The Fresh Loaf

A Community of Amateur Bakers and Artisan Bread Enthusiasts.

Sourdough

madisonbaker26's picture
madisonbaker26

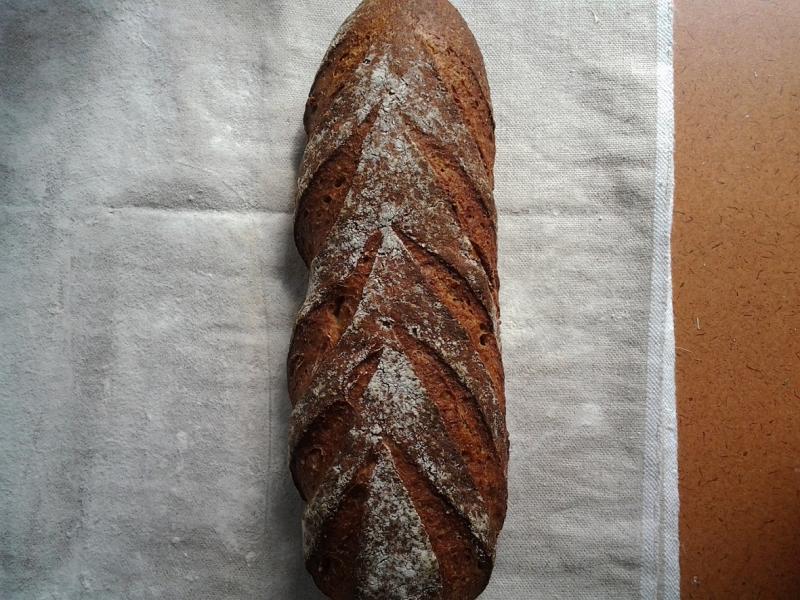
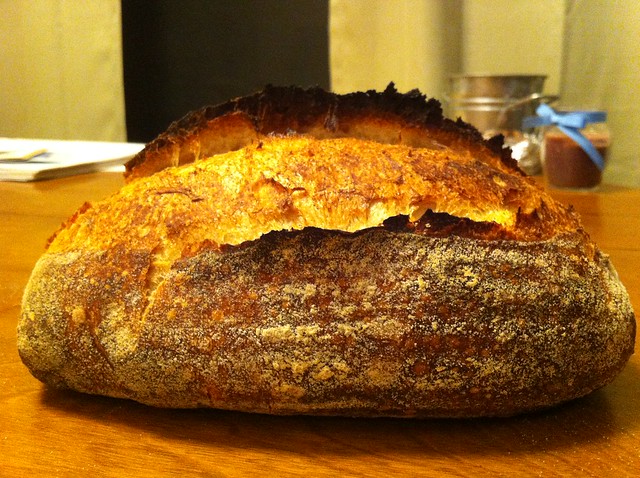
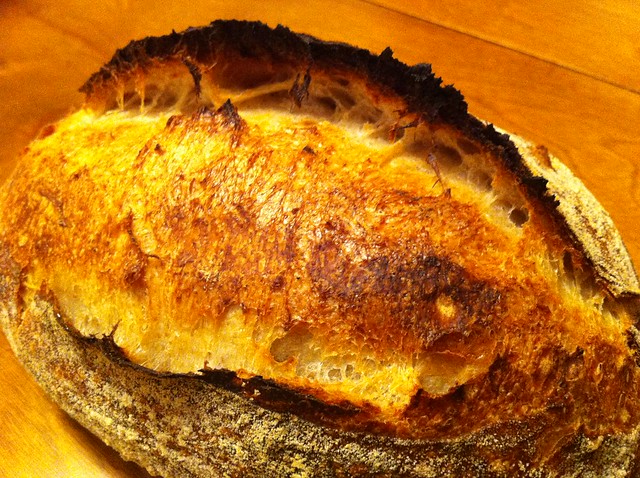
After putting my bread baking on hiatus, I decided to return and try out the 47% rye from Wild Yeast Blog.  It's my first rye loaf, save for the major disaster I made several months back.  I ended up finding the dough relatively easy to work with, which definitely surprised me.  It's also my first time trying out a chevron cut, so I'm looking forward to practicing that more.

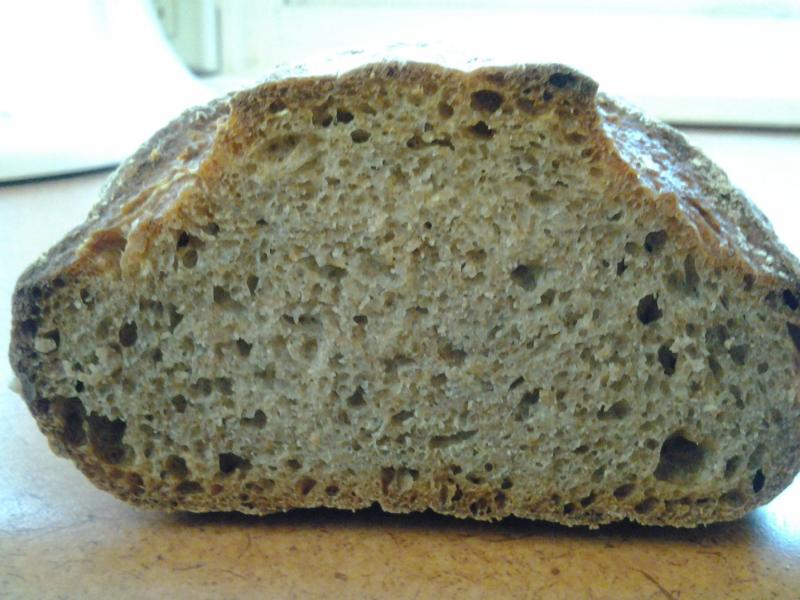
UPDATE: This bread is awesome!  It's got a pretty assertive rye flavor for only 47%, it's quite tangy and a little sweet.


 And, as promised the crumb shot:

Isand66's picture
Isand66

Chocolate flavored coffee.....what could be wrong with using some in a bread you ask?  Nothing of course, so why not use it in a soaker as well ?  That is exactly what I ended up doing.  I normally leave the grains soaking for about 30 minutes to an hour, but in this case I left it over night for around 24 hours and the soaker grains sucked up all the coffee.  When I mixed the final dough I decided to make this a very moist, high hydration dough so I didn't cut back on the additional coffee used and the end result as you will see was the most moist bread I've made to date that almost melts in your mouth.

I used some rolled oats, cracked wheat and malted rye berries for the soaker and for the final dough I used durum, dark rye, white rye, European style flours and some roasted wheat germ.  I added some barbecued potatoes and pistachio oil as well.

In order to make the soaker I used 285 grams of hot water and mixed it with the ingredients and let sit at room temperature for 24 hours.

For the starter, I refreshed my standard AP 65% hydration white starter the night before and used most of it in this bake.

Soaker

100 grams Rolled Oats

100 grams Cracked Wheat

50 grams Malted Rye Berries

285 grams Hot Mocha Coffee

Mix coffee in a bowl with other ingredients and let sit covered at room temperature for 24 hours.

Starter

71 grams Seed (Mine is 65% AP Flour Starter)

227 grams AP Flour

151 grams Water (85 - 90 degrees F.)

Mix seed with water to break up for a few seconds and then mix in flour until the starter form a smooth dough consistency.  Put it in a lightly oiled bowl and loosely cover and leave at room temperature for at least 10 hours.  The starter should double in volume.  Put the starter in the refrigerator for up to 1-2 days or use it immediately.

Main Dough

Ingredients

425 grams Starter from above (all of the starter)

100 grams Durum Semolina Flour (KAF)

100 grams White Rye Flour

100 grams Pumpernickel Flour or Dark Rye Flour

150 grams European Style Flour (KAF)  (Sub Bread Flour if you don't have this)

50 grams Roasted Wheat Germ

370 grams Mocha Coffee (90 degrees F.)

14 grams Sea Salt (or table salt)

209 grams Mashed Roasted Potatoes

10 grams Pistachio Oil (substitute any oil desired)

Procedure

I mixed  the flours together with all the coffee except for 50 grams and let them autolyes for 30 minutes.    I then added the levain, potatoes, oil and the soaker and the rest of the coffee with the salt and mixed on speed #1 for 1 minute and #2 for 4 minutes.  I then did a stretch and fold, rested the dough uncovered for 10 minutes.  I then did another stretch and fold, covered the dough and let it rest for 10 minutes.  I did one more stretch and fold and put it in a lightly oiled bowl for 2 hours.  I then put it in the fridge overnight.

The next day I let the dough sit out at room temperature for 1.5 hours.  After 1.5 hours I formed it into loaves and put them in floured bannetons and let them rise covered for 2 hours.

Score the loaves as desired and prepare your oven for baking with steam.

I then baked on my oven stone with steam at 450 degrees until both loaves were golden brown and reached an internal temperature of 200 - 210 degrees F.

I had to bake this bread for almost 50 minutes since it was so moist and the final dough came out with an excellent crust and moist crumb.

Please visit my other blog for my older posts at www.mookielovesbread.wordpress.com.

Crumb Close-up
breaducation's picture
breaducation

I love a good country bread as I think most people do. It is one of the most fun, beautiful and often times challenging styles of bread to make. However, I find myself becoming bored of the standard 10% whole wheat flour in the formula. In an attempt to changes things up I will often raise or lower the percentage of whole wheat in the dough. As little as a 10% change can have drastic effect of flavor. I've also tried putting all the whole wheat in the starter, something that adds quite a bit of sourness to final flavor.

Lately, I've  been playing around with different flours to accent the flavor. In my latest effort I have used spelt flour in place of the whole wheat. The result is quite nice! It has a subtle nutty flavor that is quite pleasing. I think in my next bake I'll try upping the spelt to 20% and see if I like it as much.

Here are the spelt results:


milkitten's picture

How to store high percentage rye bread appropriately?

July 10, 2012 - 3:33pm -- milkitten

Hi,

I'd like to know how you guys store your rye bread? What if they contain fruit, nuts or cheese?

I used to wrap in baker's linen and just put on the table at room temperature. However, the weather is so hot these day, I'm worried it might spoil...

Any suggesestion?


milkitten

milkitten's picture
milkitten

I've wanted to make this bread for a long time. Since I always finish my bread entirely, I don't even have the chance to have leftover to make altus.

Because lately I made too many loaf simultaneously, I finally got my 'old bread'.
However, I don't have rye berries and blackstrap molasses, I change the recipe a little bit. Moreover, I add some dried fruit and nuts, in case of that if the bread is gummy, I still can swallow it. I hope this won't ruin what the bread should taste like originally.
Hamelman mentions that blackstrap molasses is used to provide a slight bitter note and deeper color, for the reason, I took it upon myself to use 1T cocoa powder and a packet of Starbucks via(approximately 1/2T), and the old bread I used is Peter Reinhart's rye bread in ABED but with high percentage of first clear flour.
I was quite exciting when I made the old bread soaker. After they absorbed the water, they just look fat and cute. And the smell is depth, complex, and pleasant. When I squeezed it, because of its confortable touch, I smiled.:)

The whole process was pleasant, too. As Hamelman says, "The aroma will fill the entire room", the keep-coming aroma give me a high expectation of this black bread. The only torture is that : you have to wait at minimum for 24 hours to slice it while you're smelling the bread.
When the time I sliced it in the morning, I felt like I'm in the Christmas morning, opening up my present under the tree...I took my first bite, I felt surprised. It is truly delicious! The sour-sweet taste make it unique and totally please my palate. And the texture, the crumb is better then fruit cake for me. Though the crust is a little bit hard, but I enjoy chewing, it is flavorful. I also toasted some of crust, they've just become biscotti.~:)
I will appreciate if anyone can give me comments or suggestions! 


Isand66's picture
Isand66

I love everything and anything that has pecans in it.  While I was at a local market called Wild by Nature which is similar to Whole Foods I stumbled on some pecan butter, and a couple of new grains I have not seen before.

These were Millet and Amaranth which you can find out more information at this neat website I found: http://www.wholegrainscouncil.org/whole-grains-101/whole-grains-a-to-z/.

I made a soaker with the Millet, Amaranth and some Rolled Oats and let it sit for about 1 hour.

I wanted to get a nice tender crumb so I used som 00 Italian style low protein flour and added some White Whole Wheat, White Rye, Wheat Germ and to make it even more nutty, I added some Hazelnut flour.  Oh, and I added some chopped pecans to round off the final bread.  If you don't like pecans feel free to substitute your favorite nut.

This dough ended up very moist especially due to the added water absorbed in the soaker but ended up rising very nicely in the refrigerator and ended up with some nice oven spring as well.

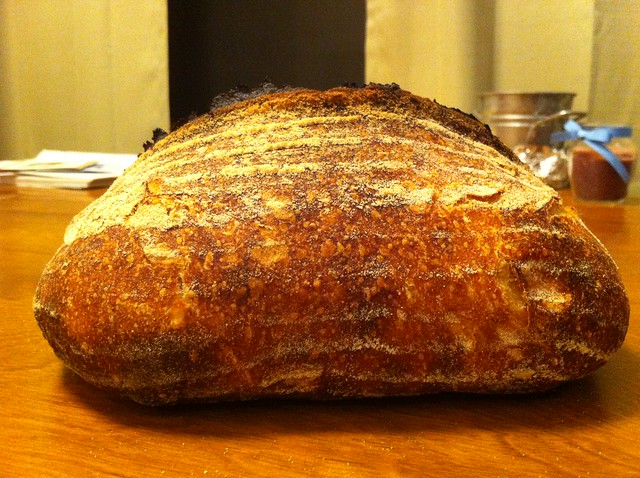
I decided to try one of my new baskets I found at Good Will so I formed the dough into 1 nice size Miche with the final bread weighing in at 3.5 lbs.  The bread ended up with a nice crunchy crust and open crumb.  The pecan flavor is not overwhelming and combined with all the other ingredients this bread has  nice mulit-grain, nutty flavor as expected.

Procedure

For the starter, I refreshed my standard AP white starter the night before and used most of it in this bake.  I have also included the ingredients to make the exact amount of starter needed from your seed starter.  Mine is kept at 65% hydration so adjust yours accordingly.

Soaker

100 grams Amaranth

100 grams Millet

50 grams Rolled Oats

276 grams Boiling Water

Mix boiling water in a bowl with other ingredients and let sit covered at room temperature for 1 hour or longer.

Starter

71 grams Seed (Mine is 65% AP Flour Starter)

227 grams AP Flour

151 grams Water (85 - 90 degrees F.)

Mix seed with water to break up for a few seconds and then mix in flour until the starter form a smooth dough consistency.  Put it in a lightly oiled bowl and loosely cover and leave at room temperature for at least 10 hours.  The starter should double in volume.  Put the starter in the refrigerator for up to 1-2 days or use it immediately.

Main Dough

Ingredients

425 grams Starter from above (all of the starter)

250 grams Soaker (all of soaker from above)

250 grams 00 Italian Style Flour (KAF)  (You can use AP Flour if you don't have 00)

100 grams White Whole Wheat Flour (KAF)

50 grams White Rye (KAF)

30 grams Wheat Germ

50 grams Hazelnut Flour

26 grams Pecan Butter

53 grams Chopped Pecans

400 grams Water (85 - 90 degrees F.)

18 grams Sea Salt (or table salt)

Procedure

Mix 350 grams of the water with the levain and break it up with your hands or a spoon.    Next add the flours and mix on low for 2 minutes.  Let the dough rest for 25 minutes and then add the soaker, levain, pecan butter, remainder of water and the salt and mix on low for 4 minutes.  Add the chopped nuts and mix on low for 1 additional minute.  Transfer the dough to your work surface.  Resist the urge to add too much bench flour (I didn't add any) and use a bench scraper to do about 5-6 stretch and folds.  Put the dough into a lightly oiled container/bowl and let it sit for 15 minutes.  Do another stretch and fold in the bowl.  Cover the bowl and let it sit for another 15-20 minutes.  Do this 2 additional times waiting about 15 minutes between S&F's.  By the last S&F the dough should start developing some gluten strength.  Let the dough sit out at room temperature for around 1.5 to 2 hours.  Do one last stretch and fold and put in your refrigerator overnight for 12-36 hours.

The next day take the dough out of the refrigerator and let it sit out at room temperature for 1.5 hours.  After 1.5 hours you can form it into loaves and put them in floured bannetons and let them rise covered for 2 hours (note: make sure to watch the dough and depending on the temperature of your kitchen and the refrigerator adjust your timing as needed).

Score the loaves as desired and prepare your oven for baking with steam.  I use a heavy-duty baking sheet on the bottom rung of my oven and I pour 1 cup of boiling water into the pan as soon as I load the loaves in the oven.  Pre-heat your oven to 500 degrees F. before placing the loaves in the oven.

Once the loaves are loaded onto your baking stone and you add your steam turn the oven down to 450 degrees and bake until both loaves are golden brown and reach an internal temperature of 200 - 210 degrees F.  For an extra crispy crust once done baking turn the oven off and crack the door and leave the loaves in the oven for another 10-15 minutes.  Once done place on a wire cooling rack and resist the temptation to cut the bread until they are sufficiently cooled.

For some of my older posts you can search TFL site or visit my other blog at www.mookielovesbread.wordpress.com.

Balloon Flowers

dabrownman's picture
dabrownman

It has been several year's since bagels were on the bake list.  We always made them sourdough but after seeing that Stan published his bagels on TFL, we had to give them a go for the 4th of July. 


We used Stan's method but instead of using clear flour we used a host of multi-grain s and some sprouts.  The grains include dark rye, WW, Durum Atta, semolina, soft white wheat and Bread flour.  The starter was a sourdough and yeast water combo starter that had some Bulgar, AP and 6 grain cereal in it.


Since the whole grains were over 50%, much of it home ground, we upped Stan's hydration to 60% from 50% and hand kneaded it after mixing the levain with the dough and salt briefly in the KA .  We built the combo levain in 3 stages - first 2 stages were 4 hours each and the last stage 2 hours before being refrigerated overnight.   The YW was used to replace the commercial yeast in Stan's recipe.

When the levain came out of the fridge the next day, we autolysed the flour with the dough for 2 hours as the starter warmed up.  We hand kneaded the dough for 10 minutes after mixing in the KA for 3 minutes.  The 25 g of sprouts were added at the very end of kneeding.  The dough was then rested for 15 minutes to relax it before forming the bagels over the knuckles and rolling the seam.

We weighed out the dough in 102-103 g portions to end up with 12  nice sized bagels that ended up at 85 to 90 g (with seeds) when baked.  Stan's recipe doesn't call for any bulk ferment prior to or after forming the bagels or after retard either.  I guess they were supposed to only rise in the fridge.  The bagels are formed right after kneading and placed on parchment, covered in plastic and placed directly in the fridge for an overnight retard.

The bagels are then removed from the fridge the next morning and simmered in malted barley water for 1 minute, (30 seconds a side -mine floated right away) then dried slightly (we used a non terry cloth towel) before dipping them in the sesame, poppy, salt or combo toppings.  They go back on the parchment and directly into a 450 F oven preheated with steam in place for 8 minutes.  Then the steam is removed, the bagels turned over and baked for another 8 minutes.

I tested the baking with 4 bagels and found that, using 2 of Sylvia's steaming pans with towels and water, the bagels needed 10 minutes of steam then flipped without steam for 10 more minutes and then flipped again for 2 more minutes - 22 minutes in all instead of 16.  We made 4 sesame, 4 poppy and 4 combo black and white sesame with kosher salt.

The bagels didn't rise as much as we wanted even though they tasted very NY authentic and had fine chew just like they should.  These would be great bagels if allowed to proof in a trash can plastic liner at room temperature - possibly after simmering in the water.  Maybe someone would know the correct thing to do.  I read later that David Snyder lets his bulk ferment for an hour before forming and retarding. 

The formula follows immediately if not sooner.

SD & YW Multi-grain Bagels with Sprouts - Stan Ginsberg Method     
      
StarterBuild 1Build 2 Build 3Total%
SD Starter1500152.78%
Bulgar10100203.70%
6 Grain Cereal10100203.70%
WW15150305.56%
Semolina0020203.70%
Durum Atta20200407.41%
AP0020203.70%
Rye15150305.56%
YW 70,Water 707070014025.93%
Total Starter1551404033562.04%
      
Levain     
Hydration77.78%    
Levain % of Total27.64%    
      
Dough Flour %   
Dark Rye203.70%   
Whole Wheat203.70%   
Semolina509.26%   
Durum Atta509.26%   
Soft White Wheat15027.78%   
Bread Flour25046.30%   
Dough Flour540100.00%   
      
Salt101.85%   
Water29554.63%   
Dough Hydration54.63%    
      
Total Flour577.5    
Total Liquid442.5    
T. Dough Hydration76.62%    
Whole Grain %52.78%    
      
Hydration w/ Adds60.62%    
Total Weight1,230    
      
Add - Ins %   
Barley Malt152.78%   
VW Gluten101.85%   

Sprouts (Rye & WW)                          

Total

25

50

4.63%

9.26%


varda's picture
varda

I haven't had a chance to comment or post lately due to difficult circumstances.   I have been reading and enjoying people's posts from time to time and regret that I haven't had a chance to comment on them.    Today I finally had time to uncover my Wood Fired Oven and bake.    I gave it a long firing since I haven't used it since a brief hot spell in March - then baked a couple of durum loaves.    It was hot, too hot and when I came out to check the loaves after 25 minutes, they were done, done, done, with a bit of char to boot.  

I have been frustrated lately with the raggediness of my score openings, and thought that it probably was a function of air flow in my gas oven.   Despite fiddling this way and that, I wasn't able to fix the problem to my satisfaction.    Today, I think I confirmed that it is oven related, as I was much happier with the result in the WFO.   

I only sprayed the loaves with water before loading and didn't put a steam pan in the oven.  

And here's the crumb:

Formula and method:

Seed hydration

67%


King Arthur All Purpose

95%


Whole Rye

5%


1st feeding


Total

percent

Seed

32


King Arthur AP

18

143


161

95%

Whole Rye

1

7


8

5%

Water

13

100


113

67%


282


Feeding factor


8.8


Final

Starter

Total

Percent


King Arthur AP

0

137

137

21%


Whole Rye

0

7

7

1%


Durum

300

0

300

47%


KA Bread Flour

200


200

31%


Water

334

96

430

67%


Salt

12


12

1.9%


Starter

240


22%


1086

169%


Starter factor

0.9


Mix all but salt - autolyse for 1 hour


Mix for around 5 minutes with salt


Bulk Ferment (BF) 1 hour 5 minutes


Stretch and Fold


BF 55 m


Stretch and Fold


BF 45 m


Cut and preshape


Rest 20 m


Shape and place in couche


Proof for 1 hour 25 minutes


Slash and spray with water


Bake in very hot WFO for 25 minutes


dabrownman's picture
dabrownman

With the 110 F days of summer upon us, all baking and most cooking is done out doors on the grill or in the mini oven moved outside.  It has been a while since we did pizza on the grill so out went the stone to preheat at 650 F.

The Semolina and Durum Atta really made this dough stand out.  My wife said it was the best pizza dough we have ever made at home.  The starter was a Yeast Water and SD combination starter that was added to the autolysed dough with the salt, rosemary. grated pecorino cheese and garlic.  The hydration was 72%.

After mixing with the KA on speed 2 for 8 minutes the dough was rested for 15 minutes and then 5 S & F's were done on an oiled surface and rested for 10 minutes in a plastic covered bowl in between.  The last S&F was done on a floured surface and then the dough was rested for 1 1/2 hours on the counter before being refrigerated for 4 hours.

2 1/2 hours before bake and pizza time, the dough was removed from the fridge and divided into one piece 400 grams (for 2 pizzas) and one 800 gram piece for the bread.  The bread was pre-shaped into a batard and then final shaped 10 minutes later an places into a rice floured cloth lined basket to proof. 

When ready to bake the bread was up ended onto parchment and the top of the broiler pan that came with it  It was then baked in the mini oven at 500 F with Sylvia's steaming method for it for 4 minutes and then the oven was turned down to 450 F for another 8 minutes.  At the 12 minute mark the steam was removed the bread rotated 180 degrees and then baked at 400 F convection this time.  Every 5 minutes the bread was rotated until done and the internal temperature was 205 F  - about 32 minutes total. 

It thought the pizza was terrific and I ate a whole one by myself - no problem and I never do that.  The crust was the difference. We had grilled some; eggplant and Mexican grey squash, some poblano / red peppers and yellow onions.  Other toppings included; sliced green martini olives, reconstituted shitake mushrooms, green onions,  pepperoni, basil  and home made hot Italian sausage.   Cheeses included mozzarella, Pecorino Romano and pepper jack.  The sauce was homemade and spicy just the way we like it.

The pizza dough was par baked for 3 minutes and then removed from the grill for a coating of Mojo de Ajo and the toppings befopre being placed back on the stone for 3 more minutes.  The crust came out thin and very, very crisp. 

The pizza was so good it overshadowed the bread which oddly tasted just like the pizza dough -  which was fantastic :-)  I see some nice sandwiches in the future and some fine tasting garlic bread that, when toasted, will be perfect for bruschetta.   Some lunch with this Italian bread salami, guacamole, chips, pico, carrot, celery, cherries, cantaloupe, corn, radish, pickle and tomato.  The formula follows the cheesecake photo that jumped in there again.

Semolina Bread & Pizza Dough    
     
SD & YW C ombo StarterBuild 1Build 2Total%
SD Starter150153.00%
AP904513527.00%
Yeast Water 50, Water9009018.00%
Total Starter1954524048.00%
     
Starter    
Hydration66.67%   
Levain % of Total27.00%   
     
Dough Flour %  
Dark Rye102.00%  
Whole Wheat153.00%  
Semolina10020.00%  
Durum Atta7515.00%  
Soft White Wheat10020.00%  
AP20040.00%  
Dough Flour500100.00%  
     
Salt102.00%  
Water37074.00%  
Dough Hydration74.00%   
     
Total Flour642.5   
Water467.5   
T. Dough Hydration72.76%   
Whole Grain %48.25%   
     
Hydration w/ Adds71.53%   
Total Weight1,185   
     
Add - Ins %  
VW Gluten51.00%  
Total51.00%  
     
1 Clove of Garlic, 1 tsp Dried Rosemary,    

1 T Mojo de Ajo, 1 T Sundried Tomato

1/2 C grated Pecorin Cheese


dabrownman's picture
dabrownman

We really like kjknits SD English muffins and have made them several times.  This time we decided to make them circles instead of irregular shapes cut with a dough scraper and we wanted to get some YW working in there too.

Still don't have a cutter so we used a plastic lid from a peanut butter jar.  It worked OK if a little small.  The recipe should make 12 large English muffins but we got 24.  The spring on these things is amazing so we rolled them about 3/16" thick to get about a 1" final height.

These were just delicious as usual they were small enough to eat like candy.  Toasted with butter and jam.... they made a for a fine, if short, breakfast.

Now how did that cheesecake get in there again?  Looks like it has an Oreo cookie crust.

Pages

Subscribe to RSS - Sourdough