The Fresh Loaf

A Community of Amateur Bakers and Artisan Bread Enthusiasts.

Sourdough

Isand66's picture
Isand66

My wife fried up some fresh plantains as a nice accompaniment to dinner the other night.  Since she made too many I figured I would try adding some to my next bread.  In retrospect I think it would have been better to boil some plantains instead of using fried ones but overall the bread turned out pretty good.  I can say that the plantains are certainly not overpowering and add a nice flavor and texture to the final bread.

I used my standard stock AP starter and added some Durum, Oat, First Clear, Spelt and White Whole Wheat flours to the mix along with some olive oil.  The overall hydration of this dough is 68%.

Starter

71 grams Seed (Mine is 65% AP Flour Starter)

227 grams AP Flour

151 grams Water (85 - 90 degrees F.)

Mix seed with water to break up for a few seconds and then mix in flour until the starter forms a smooth dough consistency.  Put it in a lightly oiled bowl and loosely cover and leave at room temperature for at least 10 hours.  The starter should double in volume.  Put the starter in the refrigerator for up to 1-2 days or use it immediately.

Main Dough

Ingredients

425 grams Starter from above

180 grams Bread Flour (KAF)

100 grams Durum Flour (make sure not to use Fancy Semolina as it is too gritty)

100 grams Oat Flour (KAF)

150 grams First Clear (This is used in Rye breads but I like the crumb this helps make in other breads as well)

75 grams Spelt Flour (Bob's Red Mill)

50 grams White Whole Wheat (KAF)

195 grams Plantains (Fried, or boiled and mashed)

395 grams Water (85 - 90 degrees F.)

16 grams Sea Salt (or table salt)

10 grams Olive Oil

Procedure

Mix the flours  with all the water except for 50 grams for 1 minute.  Let the dough rest covered for 15 minutes to 1 hour which will allow the flour to absorb the water.    Next add the salt, starter, oil and mashed plantains.  Mix on low for 1 minute and then add the remainder of your water unless you feel the dough is already too hydrated.  Mix on low-speed or by hand for 4 minutes.  Remove the dough from your mixing bowl to your work surface.  The dough will be very sticky so you may want to use a bench scraper to help you do 4-5 stretch and folds.  Leave the dough uncovered for 10 minutes on your work surface or put it in a slightly oiled bows.  After 10 minutes either on your work surface or in your bowl do another stretch and fold, cover the dough and let it rest for 10 minutes.  Repeat this S & F procedure one more time and let it rest another 10 minutes.  Do one last S & F  and put the dough in a lightly oiled bowl for 2 hours.  If you don't feel the dough has developed enough feel free to do some additional stretch and folds while the dough is in the bowl and then put it in the fridge overnight.

The next day when I returned from work I removed the dough from the refrigerator and  I let the dough sit out at room temperature for 1.5 hours.  I then formed it into loaves and put them in floured bannetons and let them rise covered for 2 hours.

Score the loaves as desired and prepare your oven for baking with steam.

I then baked on my oven stone with steam at 450 degrees until both loaves were golden brown and reached an internal temperature of 205 - 210 degrees F.  I left them in the oven for 15 minutes with the heat turned off and the door open a crack to get the crust a little harder.

This bread has been submitted to Yeast Spotting here at http://www.wildyeastblog.com/

davidg618's picture
davidg618

or Too Many Changes Addle the Brain

Recently, I made some sourdough levained baguettes, Sourdough in Baguette's clothing and was delighted to find their flavor included a distinct acidic tang (sourness) that I especially like, but my wife usually doesn't. However, with this bake, I caught her returning more than once for another slice of the cut loaf. When I confronted her, she allowed the flavor was "interesting"--and took another bite.

 The baguette dough was similar to the dough I bake weekly in batards: our daily bread. The differences are:

                         Original Formula                                          Baguette Formula

Flour ratio:     45%AP/45%Bread/10%Whole Rye          66%AP/24%Bread/10%Whole Rye

Preferment:    28% (100% Hyd., all Bread Flour)            49% (100% Hyd., all Bread Flour)

Additionally, I routinely build levain from refrigerated seed starter in three progressive steps, feeding 2:1:1 at eight hour intervals. For the baguettes I allowed the third feeding to ferment for 12 hours.

Salt and Hydration was the same for both: 2% and 68% percent respectively, and, except for the loaves' final shape, all the dough handling, fermentation times, fermentation temperatures, and baking temperatures were the same. Batards are generally proofed at 82°F, baguettes at 76°F (RT) because they won't fit into my proofing box.

Over the last two days I built levain, made dough and shaped three batards. The intention was to duplicate the dough I used to make the sourdough baguettes, and experience the same flavor.

However, I have a very strong Imp of the Perverse in my flawed character. I couldn't resist making more changes. Specifically, I built the levain in three progressive stages reducing the hydration of each build by one-third the difference between the seed starter hydration (100%) and the final dough hydration (68%). I let the final build, at 68% Hyd., ferment for 12 hours. Seduced by the sourdough lore that stiffer levain favors bacterial acid production, I reasoned "Hey, it can't hurt!".

Furthermore, I returned to the original flour ratio 45%AP/45%Bread/10% Whole Rye. And, to exacerbate my sins, I put three teaspoons of diastatic malt powder in the final dough. I wanted a darker crust.

I cannot detect any flavor difference in the finished loaves compared to our weekly sourdough bake. The distinct tang has vanished. Of course, with all the changes I've nary a clue why.

But I did get a darker crust.

David G

jarkkolaine's picture
jarkkolaine

After making my first yeast water bread, I discarded most of the yeast water, leaving about two table spoons, added a big handful of raisins and a table spoon of honey, and then filled the jar about two thirds with water. I’m not sure if this is how it’s usually done, but it worked very well: In a couple of days, the mixture had developed a very fruity and inviting smell with lots of bubbles.

I wanted to drink the liquid but resisted and started a new bread dough instead.

Following the lead of Ian and others, this time it was time to mix in some of my sourdough starter to play with the taste a bit. I was hoping to make a boule quite similar to the one I had made the first time (and usually love to make), but because of some mistakes in calculating the proportions of water and flour (I forgot to account for the water in the starter!), ended up with Ciabatta—which was actually good, as we were just about to leave on a two day trip to Tallinn, and Ciabatta makes delicious picnic sandwiches…

Anyhow, here’s the recipe. 

First build of YW starter: (evening)

  • 60 g Yeast water
  • 60 g White flour

Second build of YW starter: (about 8-10 hours after previous step, I forgot to time everything properly…)

  • All of the starter from previous step
  • 200 g Yeast water
  • 200 g White flour

Final dough: (About 4 hours later, in the afternoon)

  • 400 g YW starter (which at this point looked a lot like a regular poolish starter)
  • 100 g Sourdough starter (100% hydration, refreshed the night before)
  • 750 g Fine, rather white spelt flour
  • 700 g Water
  • 20 g Salt

The dough was quite wet, so I gave it an autolyse (it was only about 15 minutes, as I was itching to get my hands in the dough) and worked it for 20 minutes on the table.

After that, the dough rested for 4 stretch and folds at 30 minute intervals. Then I cut pieces of the dough and let them rest on a heavily floured couche for about an hour or so as the oven heated up. I baked the breads on a baking stone for 35 minutes.

...And here’s what came out from the oven:

I am very happy with the resulting flavor:  I can’t say I taste any of the fruit anymore, but it’s a little sweet, not really sour at all. And the boys liked it (filled with some salami, cheese, boiled eggs and cucumber):

Let’s see what happens next time, as the yeast is now feasting on some fresh fruit… (And looks and smells more and more like a drink! I might have to start making cider or something, soon ;))

Isand66's picture
Isand66

I had a new brand of store bought guacamole in the refrigerator just calling for me to use it in a bread.  I made bread before with fresh avocados and I've been meaning to try it again with a higher percentage of avocados this time.

The pre-made guacamole had some tomatoes, peppers, cilantro and onions which ended up adding a nice kick to this bread.

I also added some left over mashed potatoes as well as greek yogurt and I used Durum flour as well.  The idea was to create a moist, soft bread with a sour undertone and I think I achieved this.

The crumb was nice and moist and open with a buttery yellow/green texture.  The addition of the guacamole and yogurt made this a very wet dough even though by the strict definition of hydration it really wasn't it.  This would have made great Ciabbata bread but I decided to stick with traditional Boules.  The second one I made stuck to the cloth liner since I guess I didn't add enough rice flour so it ended up a little flatter than the first loaf.

If you decide to make this and are intimidated by wet dough feel free to increase the flour percentage or cut back on the water.

Starter

71 grams Seed (Mine is 65% AP Flour Starter)

227 grams AP Flour

151 grams Water (85 - 90 degrees F.)

Mix seed with water to break up for a few seconds and then mix in flour until the starter form a smooth dough consistency.  Put it in a lightly oiled bowl and loosely cover and leave at room temperature for at least 10 hours.  The starter should double in volume.  Put the starter in the refrigerator for up to 1-2 days or use it immediately.

Main Dough

Ingredients

385 grams Starter from above (you may have a little left over from above)

315 grams European Style Flour (KAF...you can substitute bread or AP flour or a combination of the two)

251 grams Durum Flour (make sure not to use Fancy Semolina as it is too gritty)

122 grams Mashed Potatoes

308 grams Guacamole

73 grams Greek Style Plain Yogurt

335 grams Water (85 - 90 degrees F.)

16 grams Sea Salt (or table salt)

Procedure

Mix the starter with all the water except for 50 grams just to break it up.  Next mix in the flours for 1 minute on low in your mixer or by hand and let them autolyes for 15 minutes up to an hour.    Next add the salt, guacamole and yogurt.  Mix on low for 1 minute and then add the remainder of your water unless you feel the dough is already too hydrated.  Mix on low-speed or by hand for 4 minutes.  Remove the dough from your mixing bowl to your work surface.  The dough will be very sticky so you may want to use a bench scraper to help you do 4-5 stretch and folds.  Leave the dough uncovered for 10 minutes on your work surface or put it in a slightly oiled bows.  After 10 minutes either on your work surface or in your bowl do another stretch and fold, cover the dough and let it rest for 10 minutes.  Repeat this S & F procedure one more time and let it rest another 10 minutes.  Do one last S & F  and put the dough in a lightly oiled bowl for 2 hours.  If you don't feel the dough has developed enough feel free to do some additional stretch and folds while the dough is in the bowl and then put it in the fridge overnight.

The next day when I returned from work I removed the dough from the refrigerator and  I let the dough sit out at room temperature for 1.5 hours.  I then formed it into loaves and put them in floured bannetons and let them rise covered for 2 hours.

Score the loaves as desired and prepare your oven for baking with steam.

I then baked on my oven stone with steam at 450 degrees until both loaves were golden brown and reached an internal temperature of 205 - 210 degrees F.  I left them in the oven for 15 minutes with the heat turned off and the door open a crack to get the crust a little harder.

The end result was a nice golden-yellow crumb with a hint of green.  The crust was nice and crispy and the bread was moist and flavorful.

This bread has been submitted to Yeast Spotting here at http://www.wildyeastblog.com/

Cosmo Waiting for the Bread to Bake
MarieH's picture
MarieH

I have been working on developing a sourdough sandwich bread. I have taken my inspiration from recipes here on TFL and from King Arthur Flour. I finally settled on a formula that I am really happy with. The bread is soft with a tender crumb but the best part is the flavor. I used a starter to provide a very slight tang to the bread flour and added white whole wheat flour, golden flax meal, whole rye flour, and hi-maize cornmeal. I learned from Jeffrey Hamelman’s formulas that a small amount of an ingredient can have a big impact. If you try this recipe, I hope you like it as much as I do.  ~Marie

Super Sourdough Sandwich Bread

Yield: 2 loaves

11 ounces 100% sourdough starter, fed or unfed (see note)

11 1/2 ounces water

1 ounce vegetable oil

1 ounce sugar

2 1/2 teaspoons salt

1 ounce golden flax meal

3 ounces potato flour

11 1/2 ounces bread flour

4 ounces white whole wheat flour

1 ounce corn meal (I used hi-maize)

2 ounces whole rye (pumpernickel) flour

4 teaspoons instant yeast

Note on the starter: the starter is more for flavor than lift. I usually build the 11 ounces a few days ahead and refrigerate it until I am ready to bake.

Combine all of the ingredients in the bowl of an electric stand mixer and with the dough hook, mix on speed 1 for one minute to create a shaggy dough.

Cover and let rest for 45 minutes.

Knead on speed 2 for 5 minutes.

The dough will start out shaggy, then become stickier as you knead. Don’t adjust with flour or water until you have kneaded for 5 minutes. Scrape the bowl. The dough will stick to the sides of the bowl. It is the right consistency if you can scrape it off the sides of the bowl and it feels firm enough to hold its shape.

Knead for 3 more minutes. Scrape the bowl to create a rough dough ball. Cover the dough, and allow it to rise at 78 degrees for 1 hour (you will need a longer rise at lower temps) until doubled in bulk.

Lightly grease two 8 1/2" x 4 1/2" bread pans. Turn the dough out onto a floured board. The dough is sticky and you will need to flour your hands and the board to prevent sticking and tearing. Gently deflate the risen dough, divide in to two equal pieces, and shape into loafs. Place dough in the pans, cover lightly, and allow it to rise until the dough crests 1 1/2” over the rim of the pans, 1 1/2 to 2 hours.

Towards the end of the rising time, preheat the oven to 350°F. Bake the bread for 30 to 35 minutes, tenting with foil after 20 minutes. When done, the bread will register 190°F on an instant-read thermometer and will be golden brown.

Remove the bread from the oven, remove from pans, and cool completely on a rack.

 After 5 minutes kneading:

After full kneading and scraped down:

Finished Loaves:

Isand66's picture
Isand66

My wife bought a bottle of Chocolate Stout about a month ago with the intentions of making some kind of chocolate cake.  This would have been a very good use for this stout, but since she never had a chance to put it to good use I decided it was time to give it a try in a bread.  I recently purchased another new flour which I have since found out is a very old flour called Amaranth.  I decided to combine this with some sprouted wheat flour, KAF European style flour along with a Yeast Water starter and my stock AP starter.  I used some Italian style 00 flour in the Yeast Water build which I built up in 2 stages.  If I made this again I would probably increase the hydration since it is only around 68% and I think the crumb would have been more open with a higher hydration.

Yeast Water Starter Build 1

100 grams Italian Style 00 Flour (KAF)

100 grams Yeast Water Starter

Mix the flour and Yeast Water in a bowl until thoroughly combined.  Cover the bowl and let it sit at room temperature for around 4 hours.  The starter should almost double when ready to proceed to build 2.

Build 2

Add ingredients below to starter from above and mix until incorporated.  Cover with plastic wrap and let sit at room temperature for 4 hours.

100 grams Italian Style 00 Flour

35 grams Yeast Water

Main Dough Ingredients

107 grams Refreshed AP Starter (65% hydration)

318 grams Italian  Yeast Water Starter (all of starter from above)

200 grams Sprouted Whole Wheat Flour or Whole Wheat Flour

150 grams Amaranth Flour

405 grams European Style Flour (KAF) or Bread Flour

161 grams Mashed Potatoes (I like to mash them with the skins on and used red potatoes)

503 grams Chocolate Stout at room temperature

16 grams Raspberry Champagne Vinegar

16 grams Salt (Sea Salt or Table Salt)

Procedure

Mix the starters with the stout but save 50 grams for later (no... don't drink it!) and stir to break it up.  Next mix in the flours into the starter mixture and mix for 2 minutes with your mixer or by hand.    Let the dough autolyse for 20-30 minutes to an hour in your bowl covered with a cloth or plastic wrap.  Next add in the salt, balance of Stout and vinegar and mix on speed #2 for 4 minutes or by hand.  The dough should have come together in a ball and be tacky but not too sticky.

Next take the dough out of the bowl and place it on your work surface.  Do a stretch and fold and rest the dough uncovered for 10 minutes.  After the rest do another stretch and fold and cover the dough and let it rest for 10 minutes.  Do one more stretch and fold and put the dough into a lightly oiled bowl and let it sit at room temperature covered for 2 hours.  After 2 hours you can put the dough into the refrigerator for 24 hours or up to 2 days before baking.  Feel free to do some additional S & F's if you feel it is necessary.

The next day (or when ready to bake) let the dough sit out at room temperature for 1.5 - 2  hours.  Next, form the dough into your desired shape and put them in floured bannetons, bowls or on a baking sheet and let them rise covered for 2 hours or until they pass the poke test.  Score the loaves as desired and prepare your oven for baking with steam.

Set your oven for 500 degrees F. at least 30 minutes before ready to bake.  When ready to bake place the loaves into your on  your oven stone with steam and lower the temperature immediately to 450 degrees.  It should take around 20 - 30 minutes to bake  until both loaves are golden brown and reached an internal temperature of 200 - 210 degrees F.

Let the loaves cool down for at least an hour or so before eating as desired.


Balloon Flower

davidg618's picture
davidg618

Yesterday I made Orange Marmalade with Single Malt Scotch. It's bursting with flavors: rabid orange with a slightly bitter tang, and subtle smokey undertones of peat smoked whiskey. No ordinary baguette's wheatiness could stand up to this flavor.

Concurrently, I was making sourdough levain for my refrigerated seed starter's refreshment; I simply made 300g extra.

I made 1050g of 68% hydrated sourdough, with 66/24/10 ratio of All-purpose/Bread/Whole Rye flours. The levain was fed only with Bread flour, and I also let the levain ferment for 12 hours to develop its sourness a bit more. This is a slight variant of my usual sourdough 45/45/10 flour ratio; only 250g of levain is used in 1500g of final dough, and the levain ferments for only 8 hours. The dough was retarded for 15 hours @ 55°F. I shaped three 350g loaves into baguettes.

This combination of tweaks yielded yielded a bread with a baguette-like crumb, softer than my usual chewier sourdough, and a distincitve acidic tang that stands side-by-side with the bursts of orange rind, the scotch-smokiness, and the marmalade's bitter low note.

Whether, or not, these loaves are deserving of being called "baguettes of a different color" or are pretenders merely dressed up like baguettes, they certainly are keepers.

David G


Xenophon's picture
Xenophon

A couple of days ago I decided to try my hand at Jeffrey Hamelman’s Vollkornbrot with flaxseeds.  I did this with some trepidation because

a)     I’m a western expat living in New Delhi, India and THE key ingredient (rye flour) is not available here, meaning that I have to bring it in from Europe on each trip.  This one recipe  would blow about 1/7 th of my precious supply.

b)    The recipe as per Hamelman requires the  use of a sourdough starter, used to create a long fermenting sourdough and two soakers (flaxseeds and rye chops) .  To these are added the last fraction of the rye meal and the salt + some water and yeast so it’s not exactly a straight dough setup with minimal rise time.

The original recipe can be found in ‘Bread’ by Jeffrey Hamelman, I’m not going to reproduce it here for the obvious copyright reasons.

Modifications vs the recipe:

a)     I didn’t have rye chops and there’s no way for me to acquire those here.  So I used pinhead oats (also called steel cut oats) instead.  This worked without a hitch.

b)    One of the big challenges of baking breads here is dough temperature control.  We’re past the peak of summer but still, the temperature in my kitchen is about 35 centgrade.  This is an obvious problem when using ‘long’ rise times/preferments etc.  What it boils down to is that I shortened the sourdough rise time from the recommended 14-16 hours at around 21 centigrade to 9 hours at 33-35.


The dough (detailed instructions see the recipe in the book):

For the sourdough I used a sourdough starter that had been initiated 3 months ago, it started out as a rye sourdough starter but has been refreshed countless times with normal bread flour so it’s totally white now.  This is added to 100% rye flour and water.  Hydratation is 100% at this point.

While this is covered and put away to start its long rise, a flaxseed and –in my case- a pinhead oats soaker were prepared.  I added all the recipe’s salt to the oats soaker in order to inhibit enzyme activity (long rise at high ambient temperature).

After 5 hours I could definitely see activity in the sourdough, based on the look/consistency and the taste I decided it was ripe after 9 hours of fermentation.  Tasting/feeling/looking are imho the only sure ways to determine ripeness.  Let it ferment too long and the taste becomes harsh/vinegary.

Everything was brought together with some extra rye flour and mixed at slow speed for 10 minutes.  Bulk fermentation took 15 minutes.

After bulk fermentation I had a very slack, sticky dough that proved almost unmanageable and had a very dense texture.  This was dumped in a large cake tin (no pullman form available) that had been oiled and covered in rye flour.  I used a spoon to flatten the top somewhat.

Baking:

First 15 minutes in a hot oven (245 centigrade)  with steam, followed by 1 hour 15 minutes at 195, dry.   Hamelman remarks that a full bake is imperative and I concur, given the high hydratation and the density.

Unpanning and cooling:

15 minutes before the end of the bake time, the loaf is taken out of the baking tin (very easily, no stick at all) and baked off the remaining 15 minutes to remove some extra moisture and firm things up.

After baking I was stuck with what literally seemed to be a very dense brick.  This then has to cool/rest between 24 and 48 hours so the internal moisture has time to redistribute.  It took an almost superhuman effort but I managed to wait 30 hours.  Don’t give in to temptation, I think the bread really requires this long rest before slicing.

Some pictures: 


Rye sourdough with flaxseeds and pinhead oats after unpanning and cooling for 30 hours at room temperature.


As you can see, the crumb is very, very dense and looks underbaked.  However, it looked and tasted exactly like the German whole grain Vollkornbread that’s for sale in (North) Germany.  It can be sliced very thin (4 mm is not a problem at all) with a serrated bread knife and the taste is slightly sweet, nutty with a delicate sourdough tang.  If you really want an extremely pronounced sourdough taste I guess you’d have to let the sourdough ferment a couple of hours more.  The bread goes very well with cured meats, jam, (dark) chocolate spread and cheeses that have a pronounced taste.


Big warning: Only try this and the other Vollkornbrot mentioned by Hamelman if you really like very dense German breads like Pumpernickel (the German version, has nothing in common with what's sold as such in the US).  Do not try to make rolls or smaller loaves as the crust is very hard indeed and -in the case of rolls- these would be inedible because this bread can only be enjoyed if you slice it really thin.

dabrownman's picture
dabrownman

After pinching off 100g of this combo; Yeast Water and Joe Ortiz’s Cumin, WW Sourdough starter for the donuts and English muffins this past Sunday, we used the remaining 230g of combo starter to make some semolina, durum atta and white whole wheat based herbed bialy’s that had a filling of home made chorizo, caramelized onions, 4 cheeses; brie, aged cheddar, pepper jack and pecorino cheese. The herbs were basil and cilantro.

What a beauty with the cilantro sprinkled on top.

The previous YW bialy’s we made here:

http://www.thefreshloaf.com/node/27712/yeast-water-rye-ww-garlic-chive-onion-cheese-and-chorizo-bialy%E2%80%99s

where we used YW only for the levain, used much lower % of whole grains and only used a small amount of pepper jack cheese with the only herb being a garlic chive in the dough. The best thing about the old bake was the unbelievable open crumb. Everything else about the new bake turned out better than the old one.

Chorizo and onion mix before caramelizing.

This bake built on the previous one without autolyse, but we gussied it up and baked it with Sylvia’s steam this time while making it a totally hand made dough. Because of the steam and50 Flower temperature, the bake took longer than the previous one that was 10 minute long. This one took 5 min of steam and then 10 more minutes to finish.
These bialys were just delicious with a slight SD tang that we hope will develop over the next 24 hours. We continue to be impressed with the JoeOrtizSDstarter and when mixed with the YW created a nice, light, open crumb and a crust that was thin and chewy. The filling was built up from the bottom starting with fresh basil a cube of double creme and a cube of Alpine Lace Swiss, then a tablespoon or so of the chorizo and caramelized onion mix, with 4 cubes of cheese on top (2 cubes of pepper jack, 1 cube of pecorino and a cube of aged, super sharp cheddar.

Before proofing.

The Method

was straight forward. The combo YW SD was built up over (2) 3 hour builds and (1) 2 hour build and then it was refrigerated for 72 hours. But there was no need to refrigerate it other than to fit my scedule

The chorizo and onions were sautéed until caramelized and refrigerated until needed.
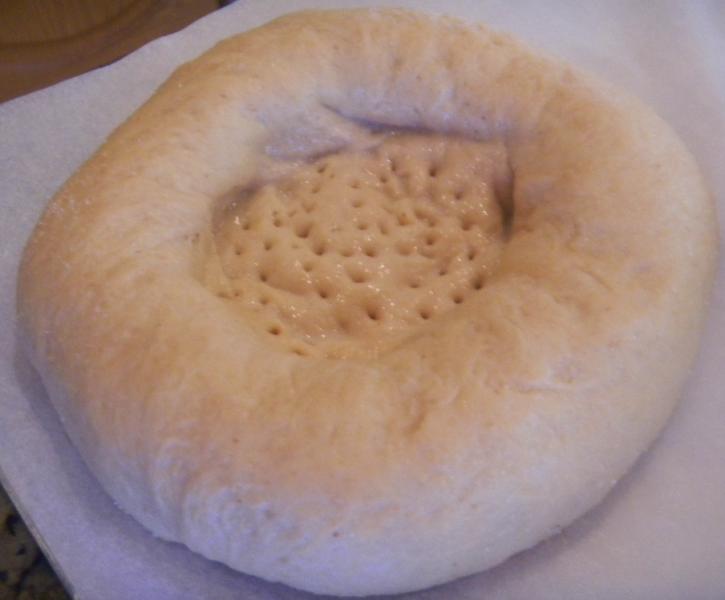
Spooned and docked after proofing.

After warming up, the levain was mixed with the dough water to break it up and the salt, flour, dried potato flakes, barley malt, molasses and butter were added to the mix. After combining by hand, the dough was emptied out to a slightly floured surface and kneaded by hand for 5 minutes. It was fully developed and the dough rebounded immediately when two fingers were poked into the dough. The dough was rested for 20 minutes and then 2 sets of 4 S & F’s each were done on 15 minute intervals. The dough was then allowed to ferment for 1 ½ hours until it had nearly doubled.

Sylvia's Steam in the microwave heating up.

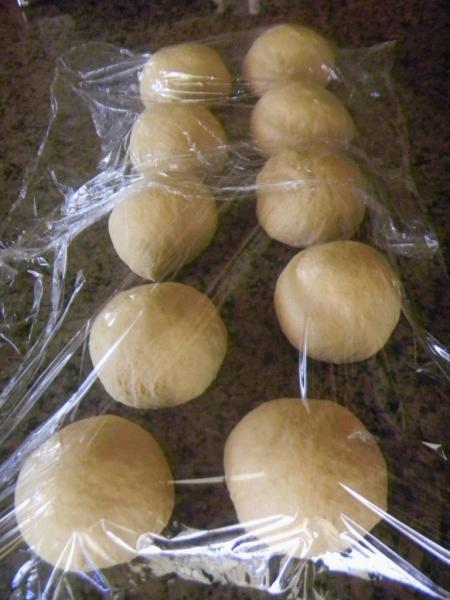
The dough was divided into (10) roughly 100g pieces and hand formed into tight balls. These balls were rested for 10 minutes and then formed into little pizza shapes by picking them up and hanging them in the vertical while pressing out the centers.

Mis en place for filling the unspooned and undocked bialys

These were placed on semolina sprinkled parchment paper on un-rimmed baking sheets. The centers were then pressed out again before covering with plastic wrap to proof for another hour. At the 30 minute proofing mark the oven was preheated to 500 F regular bake and Sylvia’s Steam was prepared in the microwave and placed in the bottom of the oven.
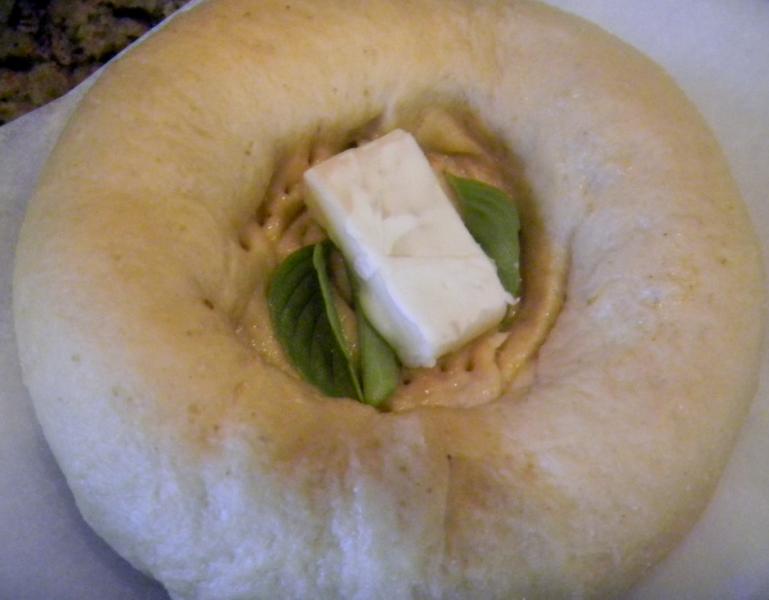
Basil and brie first then Alpine Lace went in too on this level but not shown for som reason..

After proofing, the centers of the bialys were then pressed out flat again with a wet spoon and the centers docked with a fork to keep them from puffing in the oven. Some basil leaves were placed in the bottom with a cube of brie and a cube of Alpine Lace Swiss, a tablespoon of chorizo was added and flattened out to fill the well and 2 cubes of pepper jack and 1 cube of each of aged cheddar and pecorino were placed on top.

Chorizo, and 3 more cheeses, pecorino in the middle, flanked by cheddar and pepperjack.

The bialys were placed onto the middle oven rack with the stone one very top rack and steam below. At 2 minutes the temperature was turned down to 450 F regular bake. At 5 minutes the steam was removed and the temperature turned down to 425 F convection this time as the bialys were rotated 180 degrees on the oven rack. At the 10 minute mark the bialys were rotated 180 degree again and at 15 minutes they were done and moved to cooling racks. The fresh chopped cilantro was then sprinkled on top
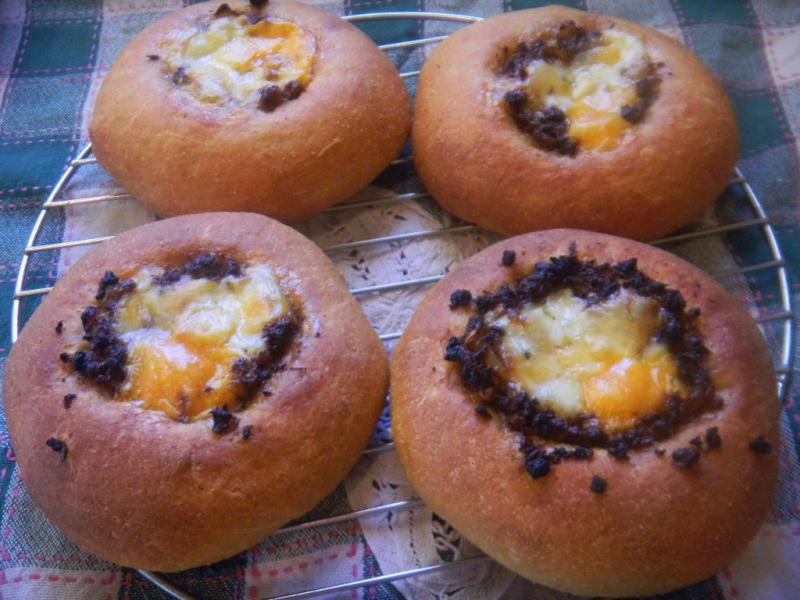
Before the cilantro went on.

The formula follows the pix’s.

Cut vertical with my daughter apprentice holding before scarfing.  She liked them!

Cut horizontal.  Not as open as the first YW only ones but these tasted so much better.  Will make them again.

SD & YW Semolina, Durrum Atta, WWW Bialy's w/ Caramelized Onion, Chorizo and 4 cheeses     
      
Mixed StarterBuild 1Build 2Build 3Total%
SD Starter2000203.48%
Yeast Water3500357.61%
S. White Wheat21170388.26%
Durum Atta16017337.17%
WWW01717347.39%
Water035357015.22%
Total Starter92696923050.00%
      
Starter     
Hydration100.00%    
Levain % of Total22.14%    
      
Dough Flour %   
Durum Atta10021.74%   
Bread Flour20043.48%   
White WW5010.87%   
Potato Flakes102.17%   
Semolina10021.74%   
Dough Flour460100.00%   
Salt91.96%   
Water26056.52%   
Dough Hydration56.52%    
      
Total Flour575    
Water - 340, YW -35375    
T. Dough Hydration65.22%    
Whole Grain %46.09%    
      
Hydration w/ Adds70.09%    
Total Weight1,039    
      
Add - Ins %   
Barley Malt204.35%   
Molasses204.35%   
Butter408.70%   
Total Add Ins8017.39%   


Apprentice takes a nice 105 F bake herself in the backyard oven.  Dumb Doxie !!!


dabrownman's picture
dabrownman

The last time we made English Muffins the kjknits way we took her SD version and added yeast water.  gmakaing made some for her grand daughter and also fried some as donuts!  What a great idea.  Her grand daughter really liked them and they disappeared fast.

Look at that color and the nice DO we got at the Estate Sale down the street.

When I told gmabaking I was doing another EM batch today and was going to fry some as donuts, I asked if she had glazed the donuts or put powdered sugar on them.   She said that they were gone too fast but thought that an apricot glaze would be nice.  Well, that sounded pretty good to me and a nice outlet for our home made apricot, nectarine and ginger jam.

The 100 g of combo YW and SD starter was pinched off a larger amount I was building for some WW Semolina bread.  It used  that nice Joe Ortiz cumin, WW SD starter and the now richly purple Apple, Minneola YW that has gone beautifully colored due to the addtion of fresh cherries inspired by Ian at isand66.  It matches my place mats which should be a requirement for any serious home baker - or possibly dumb luck :-) 

The starter was built with duram atta, whole soft white wheat and white whole wheat.  The muffin dough had 2 C of AP and 1/4 C of Duram Atta.  So these EM's were to be a healthy whole wheaty, semolina variety.  The rest of the recipe can be found at kjknits blog at http://www.thefreshloaf.com/node/3241/sourdough-english-muffins/  We love this EM recipe and it has turned out to be easily modified and versatile too.  Always very tasty no matter nhow my apprentice butcher's it.

The starter, flour and milk (I added 2 T more than the Cup of milk due to the extra 1/4 C durum atta in the dough flour) are allowed to sit out overnight for 8 hours.  In the morning the rest of the ingredients go in.  Then knead for 3-4  minutes and  roll them out 3/8" thick for cutting.  After cutting, place them on parchment paper dusted in semolina top and bottom and rest for 45 minutes covered in plastic.  The EM's are then dry fried in a 12" cast iron skillet.

We made 6 flat donut shapes by hand by using the bagel forming method of ball with afinger poked through it and then using two fingers opening the hole in a cirular motion.  Then we squished (another fine baking term) them flat.  Why we squished them flat I have no idea and it doesn't make much sense now, since they were going to puff up in the hot nearly smoking Crisco anyway.

These EM are explosive with the YW and baking soda working with that vigorous Ortiz SD starter.  We made the EM's larger diameter this time (same as Thomas) and increased the thickness a little to 5/16" thick.  Will make them 3/8" thick next time because, even though these babies really spring,  they still were only a little over an 1" high after cooling .  We made 11 EM's and 6 donuts instead of the 24 mini EM's made the last time.

The EM's came out as usual but were more tasty with the WW and semolina flours.  Not quite as open as the all AP flour ones, but still pretty good like Wofferman's in KC where I worked as a sack boy nearly 50 years ago.  Best job I ever had too.  The donuts were a hoot to make and fry up.  Fried them 1 at a time to save on the oil since we don't fry much around here except Crab Rangoon's,  Egg and Spring Rolls and a few other appetizers.  Will make some dry fried or baked bagel ones next time too.

The donuts fried up nice and brown and the spring on them was very good.  The crumb was very open, light and moist.  The crust was chewy just like a fried English muffin would be so, these donuts aren't like the cake or glazed donuts you are used to but they are tasty none the less.

We mixed some of our apricot, nectarine and ginger jam with some powdered suger and a T of milk to make the glaze for the donuts.   We dipped them twice to get an extra thick coat.  Butter and this tasty jam were have too's for the warm EM's.  Just delicious.  I personally had 3 of each for breakfast and can attest to their addictiveness!

Thanks to gmabaking for her great donut and glaze ideas for these fine EM's

.

Pages

Subscribe to RSS - Sourdough