The Fresh Loaf

A Community of Amateur Bakers and Artisan Bread Enthusiasts.

Sourdough

jhegg's picture

Pineapple juice starter.

August 14, 2012 - 6:21pm -- jhegg

OK...I made a batch of starter using the pineapple juice technique. On day four, I stopped the pineapple juice and started daily feeds with KA AP flour. I am about two weeks into this starter and I can still smell the pineapple juice (or something similar to it). Anybody have any suggestions on how to get rid of that smell?

Jim

dabrownman's picture
dabrownman

We, counting my fine apprentice,  have wanted for some time to make an olive bread that was loosely based on Nancy Silverman’s fine loaf that she did with Julia Child on Baking With The Masters.  But, since the girls at home despise olives except for olive oil, this want has gone unfulfilled for what seems like forever.


But, today the evil veil of olive hatred was lifted just enough, to allow an olive loaf to breathe a breath of yeasty CO2 without being killed outright by evil doers before the scald, add ins and olives could be incorporated.


We wanted a bread that had 20% whole grains and some rosemary that pairs so well with olives.  We also wanted some cracked bulgar berries that were scalded.  No sprouts this time - using them to make white diastatic malt instead.  The bread would possibly have been better with sprouts and seeds or nuts – maybe next time.


A mixture of 95% kalamata and 5% green martini olives were used.  The salt was kept down a bit since the olive brought plenty of their own.  The total hydration was around 70% which is a little low for us but the scald and olives brought some extra liquid that was un accounted for in the formula.  The dough felt like it was around 72% hydration but it is harder to tell with all the olives.


The diamond scoring pattern was helped along by refrigerating the large 3.7 pound batard for 3 hours after it had final proofed to 95% or so.  We wanted a huge loaf since no one could  know when we would be allowed to make another one - with olives in it.

There was no way this was going to fit in the mini oven.  With it only being 106 F today, a full 10 degrees less than last few days, we felt it was a real cold spell that we should take advantage of - so Betsy was fired up to 500 F with steamers and stone in place.  The batard baked up deeply brown and very crispy in the Big GE oven using (2) of Sylvia’s steam pans with towels.

The crust was thick and the extra drying with the oven door ajar kept the crust crispy even after it cooled.  The crumb was light, moist, a little glossy and fairly open with all the bran, whole grains and add ins.   Best of all this bread tastes wonderful.  It was just what we were looking for - with the exception of the sprouts, 50 g more olives and some pistachio nuts that we will add next time to gild the lily and turn this into just the kind of bread my apprentice drools over.  It is super just as it is though.

Method

The YW and multi-grain SD starters were built separately over (2) 3 hour builds and then combined.  The water, flour and salt were autolysed for 2 hours,.  All the rest of the ingredients were then added except the bulgar scald and chopped olives.

The dough was kneaded for 4 minutes and then placed into an oiled bowl to rest.  (4) sets of S & F’s, 15 minutes apart, were done on and oiled counter with the scald and olives incorporated in the 3rd set.  They were well incorporated by the 4th set.  The dough was allowed to ferment and develop on the counter for 90 minutes. 

It was then pre-shaped into a large batard, rested for 10 minutes, final shaped and placed into a rice floured and cloth lined basket, placed in a tall kitchen plastic trash bag to proof.  It was immediately refrigerated for 14 hours. 

The dough increased in volume 57.3 % in the fridge overnight.  It was allowed to come to room temperature and proof an additional 2 hours total getting to the 92.6% proof mark before refrigerating again for 3 hours.  This extra retardation would not normally be required but the intracacies of life come first.  Not really but it sounds so right and good.

The oven was preheated to 500 F with steam for 45 minutes before the dough was removed from the fridge, un-molded from the basket onto parchment and a peel, slashed and placed on the stone for baking.  The oven was immediately turned down to 450 F and steamed for 15 minutes.   The steam was removed and the temperature turned down to 425 F convection this time.  The batard was rotated 180 degrees every 5 minutes for another 30 minutes until it tested 205 F in the center.

The oven was turned off and the bread was allowed to crisp on the stone with the oven door ajar for 12 minutes before being removed to a cooling rack.  The batard rose to 209 F while crisping on the stone.

The formula follows the pix's

Combo Starter Olive Bread with Rosemary and Bulgar Scald    
     
Mixed StarterBuild 1Build 2Total%
SD Starter250252.86%
Durum atta250253.28%
Steel cut oats010101.31%
6 grain cereal010101.64%
Ground  Flax Seed0550.66%
Bran0550.66%
AP400405.25%
Oat bran0550.66%
Yeast Water400405.25%
Water2535607.87%
Total Starter1557022529.53%
     
Starter    
Hydration100.00%   
Levain % of Total Weight13.42%   
     
Dough Flour %  
Diastatic Malt30.39%  
Durum Atta253.28%  
6 Grain Cereal445.77%  
White WW354.59%  
Bread Flour30039.37%  
AP35546.59%  
Dough Flour762100.00%  
     
Salt131.71%  
Water49765.22%  
Dough Hydration65.22%   
     
Total Flour874.5   
Water609.5   
T. Dough Hydration69.70%   
Whole Grain %19.95%   
     
Hydration w/ Adds69.70%   
Total Weight1,676   
     
Add - Ins %  
Kalamata Olives10213.39%  
Dried Rosemary20.26%  
Total10413.65%  
     
Scald %  
Cracked Bulgar303.94%  
     
If we would have put in Sprouts %  
WW151.97%  
Rye151.97%  
Spelt151.97%  
Total Sprouts455.91%  
Felila's picture

Crust formed on top of dough - HELP!

August 10, 2012 - 5:49pm -- Felila
Forums: 

I had to leave some sourdough in the breadrising bucket in the refrigerator for nearly four days -- the limit, according to Reinhart's book. I just now pulled it out to shape it and found that, even though I had oiled the top, it had dried out. leaving a hard crust on top of the dough. 

I tried removing the crust; that didn't go well. The dough just stretched. So I've shaped the dough into batardes and nudged the hard pieces of crust into the center of the batardes. 

dabrownman's picture
dabrownman

We had some yeast water and SD Desem starter left over from our 'Bun Experiment' yesterday where we compared YW with SD in buns.  We were going to use them up with a combo starter to make the same buns but we have too many buns after yesterday.

From left: poppy and not your usual; nigella and basil seeds.

What we did not have was bagels so we used them up on some 15% WW bagels.  Our last bagel bake was a much higher percent whole grain SD bagel with sprouts.  They were delicious.  This bagel recipe was still based on Stan Ginsberg’s recipe he published on TFL and is more traditional in grains with the whole wheat being in the combo yeast water and SD Desem starters only.

These bagels are by far and away the best ones we have ever produced.  If you want NY Jewish Bakery Bagels - these are the ones you want to bake - thanks Stan.  The crust was nicely browned and blistered.  They came out of the oven crisp and went to chewy as it cooled.  The crumb was open and moist yet had just the right bite a bagel should have.  The taste was very good with a slight SD tang.  They were delicious, just cooled, un-toasted with cream cheese.  No toasting necessary at all.

Method

We built the YW and SD Desem starters separately over (2) 3 hour and (1) 2 hour  build and then refrigerated them both for 48 hours.  Home ground whole wheat berries were used for both starters and accounted for all the WW in the final dough.

The water was mixed with the 2 starters to liquefy them.  The rest of the ingredients were added and mixed by hand to incorporate.  The dough was kneaded for 10 minutes by hand and then allowed to rest, ferment and develop for 2 hours covered with plastic wrap on the counter.  The dough doubled over that time.

The dough was them divided into (10) 128 g, folded into balls and then into 12” tapered, from middle to end, ropes.  The ropes were rested for 10 minutes and then formed into bagels by the ‘over the knuckles’ method where the ends were rolled on the counter to seal them together. 

The bagels were placed onto a parchment covered and semolina sprinkled cookie sheet, covered in plastic wrap and refrigerated for 20 hours.

After removing the bagels from the fridge, they were immediately simmered for 30 seconds a side in 1 gallon of water with 1 T of barley malt syrup and 1 tsp of baking soda.  The wet bagel bottoms were placed on a kitchen towel for 5 seconds after coming out of the water and then placed on parchment paper sprinkled with semolina which was on the top cover of the mini ovens broiler.

The mini oven was preheated to 500 F with the rack on the bottom.  A 1 cup Pyrex measuring cup with a rolled up dish rag, half full of water, was micro waved until the water boiled.  Sylvia’s steaming method was then placed in the middle of the parchment paper between (4) bagels at the corners.

The bagels were steamed for 8 minutes with the heat being turned down to 450  after 2 minutes at 500 F.  At the 8 minute mark the steam was removed, the bagels turned upside down, the rack rotated 180 degrees and placed in the upper position.  The Mini Oven was turned down to 425 F convection at this time.   After 4 minutes the bagels were turned right side up again, the rack was rotated 180 degrees and placed back in the lower position for an additional 4 minutes

At 16 minutes total baking time the bagels were deemed done.  They were nicely browned top and bottom and sounded like a drum when tapped on the bottom.  They were moved to wire cooling racks until cooled.

Dabrownman's 15% Whole Wheat  Bagels     
      
Desem StarterBuild 1Build 2 Build 3Total%
SD Desem Starter1400142.06%
WW152020558.09%
Water15208436.32%
Total Starter44402811216.47%
      
YW StarterBuild 1Build 2 Build 3Total%
Yeast Water25160412.06%
WW25206518.09%
Total Starter503669213.53%
      
Starter     
Hydration80.65%    
Levain % of Total15.94%    
      
Dough Flour %   
Bread Flour34050.00%   
AP34050.00%   
Dough Flour680100.00%   
      
Salt121.76%   
Water36253.24%   
Dough Hydration53.24%    
      
Total Flour788    
Total Water453    
T. Dough Hydration57.49%    
Whole Grain %14.34%    
      
Hydration w/ Adds58.86%    
Total Weight1,280128 g each for (10) bagels
      
Add - Ins %   
Barley Malt202.94%   
Diastatic White Malt20.29%   
Total223.24%   


jarkkolaine's picture
jarkkolaine

This week, I have been reading Sandor Katz's wonderful book, The Art of Fermentation. For most part, the book is not about bread, but as bread is mostly about fermentation, the book is helping me a lot in understanding what happens in the dough   and when growing yeasts.

Last night as I was reading the book again, I had a revelation: you can drink yeast water. And in fact, a lot of people are doing it already--they just have a different name for the drink!

Or what do you say? This recipe for fruit mead from The Art of Fermentation looks just like the one I used to start my yeast water (except that I used some black tea in it at first):

 Mead is honey wine. It can be flavored in infinite variations, and many of the fruits and other botanical flavorings you can add to it also serve as sources of yeasts and yeast nutritients.

[...]

My typical proportion, measuring by volume, is 1 part honey to 4 parts water. For a lighter mead (or if I'm adding a large amount of sweet fruit), I'll dilute each part honey with 5 to 6 parts water.

[...]

Thoroughly dissolve honey in water by vigorous stirring or shaking. Be persistent if necessary. Leave the vessel capped, or cover it to keep flies away; any covering, from a cloth to a tight-fitting lid, is okay. 

[...]

Stir or shake, vigorously and frequently, several times a day for a sustained couple of moments.

[...]

After a few days of frequent stirring, you will start finding the honey water with bubbles on the surface and an effervescent release when you stir. [...] Keep shaking and stirring a few more days and the bubbles will build into a formidable force.


...and so on. The instructions continue to explain how you can then further process the mead to get more alcohol and a more refined taste by aging the drink. 

From all of this,  I'm ready to equate yeast water = fresh mead.

Another revelation from this section of the book (to me) was that the purpose of the shaking is to get oxygen into the mix so that yeast cells can multiply.  

S. cerevisiae and many other yeasts, much like the cells of our bodies, are capable of both anaerobic fermentation and oxidative respiration. In the oxidative mode, yeasts grow and reprodue much more efficiently but do not produce alcohol. Vigorous stirring stimulates yeast proliferation by providing aeration.


I still don’t have all the answers, especially for the difference in bacteria between sourdough and yeast water, but this is getting interesting--and soon, I’m going to start a new batch of yeast water, this time with the idea of drinking most of it and baking only with the remains…

--- 

And then to my most recent bake, with sourdough and yeast water.

For a long time already, I have been baking most of the bread we eat at home, so when this summer we bought a toaster and my wife and kids started buying toast bread from the store, I knew I had to do something about this. Buying toast bread (of all things) was diluting all my credibility as a real bread home baker! ;)

I have been experimenting with different bread recipes for a while now, but wasn't satisfied until I finally found txfarmer’s recipes again. Although I had seen and admired them before, I had never gotten around to trying them before now. And I had never worked the dough for 40 minutes before either. Doing this, as suggested by the recipe, made all the difference!

The bread is soft, delicious and has a fine, sweet and a little sour taste that I enjoy. 

My older son says he likes it but still prefers the storebought with no taste at all… So, maybe next I’ll try to do this without any sourdough. Let’s see! 

I’m not going to rewrite the whole recipe here as you can get it from txfarmer's blog. But I made a few changes, which may or may not be interesting. So, here we go.

 The yeast water had been sitting in the fridge for about a week and gotten a lot of color from the fruit (peaches and grapes):
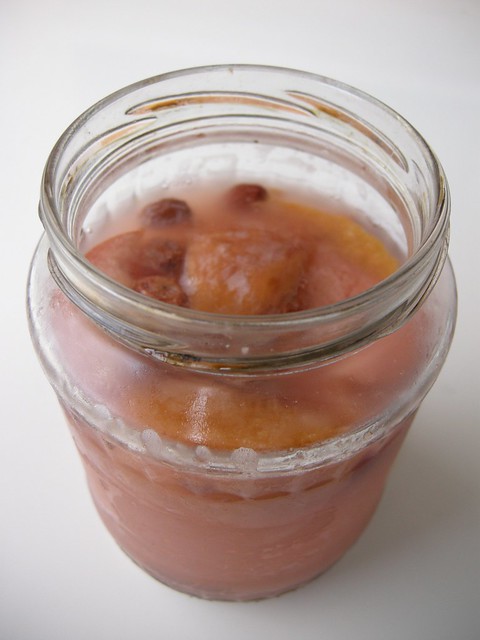
 

I used 100 grams of sourdough starter in one build (at 100 % hydration) and 200 grams of yeast water in two builds (100 % hydration) and reduced the amount of milk accordingly. Also, the original recipe used milk in the starter as well. I used water as yeast water comes with its own water… 

Final dough:

  • 100 g sourdough starter, refreshed about 8-10 hours before mixing the dough
  • 200 g yeast water starter (built in two steps during the same 8-10 hours)
  • 450 g bread flour
  • 60 g sugar
  • 50 g butter
  • 120 g egg whites
  • 6 g salt
  • 160 g milk 

I’m very happy with the results and will definitely be making some variation of this bread again. Next, with some darker grains, maybe a bit of rye or at least wholegrain wheat.

Wild-Yeast's picture

High Phosphorous / Protein Wheat

August 7, 2012 - 12:57am -- Wild-Yeast

I'm looking for a little help on a project I have been working on regarding high phosphorous content wheat. I noticed that high protein wheat also has a high phosphorous content - approximately equal to dark rye.

The hunch is that the phosphorous content plays into the heterofermentative pathway - supplying an excess of phosphates for acetic and lactic acid production. 

On the road to Tang...,

Wild-Yeast

Debra Wink's Lactic Acid Entry

Pages

Subscribe to RSS - Sourdough