The Fresh Loaf

A Community of Amateur Bakers and Artisan Bread Enthusiasts.

Most bookmarked

Lazy Loafer's picture
Lazy Loafer

Quick & easy hot dog bun pan

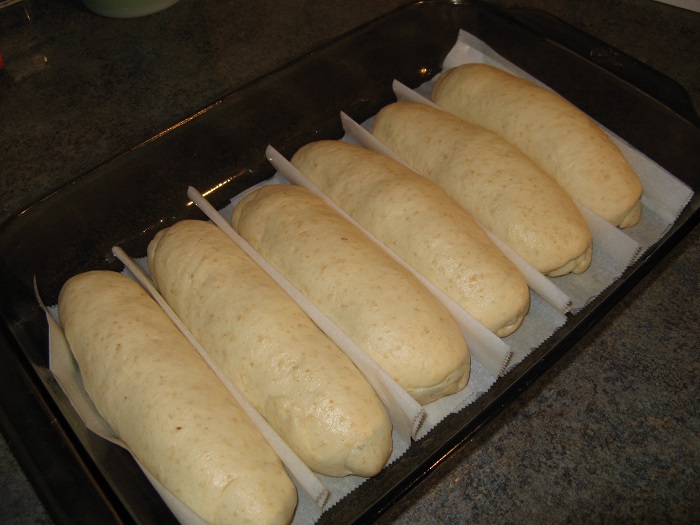
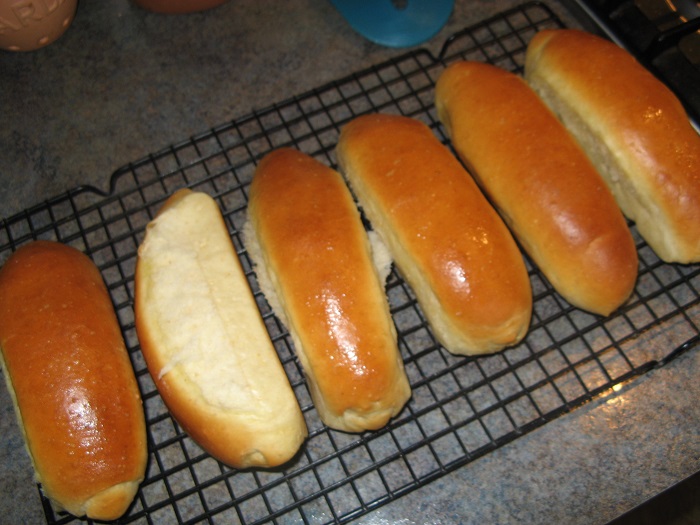
I had an urge for some hot dog buns yesterday, and don't happen to have a hot dog bun pan (just another thing I don't have room for in my kitchen). So I pleated up some parchment paper and put it in a rectangular glass cake pan. I sprayed it with pan spray so there was no problem removing the buns later. It worked a treat! Oh, and the recipe was King Arthur Flour (Golden Pull-Apart Butter Buns) with fresh stone-ground soft white whole wheat flour subbed in for some of the bread flour.

alfanso's picture
alfanso

More consistency, but let's talk about steam

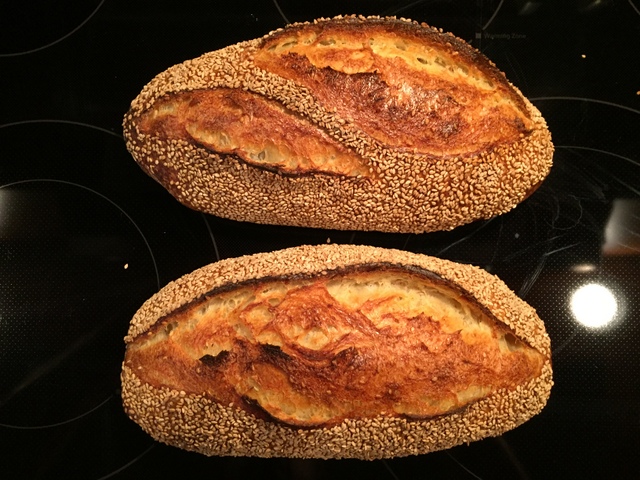
I've posted these before, the Hamelman sesame semolina batards alfanso-style - meaning subbing out the very liquidy bread flour levain for my very liquidy rye flour levain.  Delivering 15% rye flour (all through the levain) to boost the flavor in this bread.  The composition of flours is; semola rimacinata 60%, bread flour 25%, and rye flour 15% @67% overall hydration.

I believe that I have the consistency part down pretty well.  So instead, let's talk about steam, shall we alfanso?  Okie Doakie, let's roll...  Recently there has been some interaction on the part of a few participants including myself and Doc.Dough, with a series of private messages between myself and the good doctor. Including this top notch video and blog entry courtesy of Doc.Dough - lots of steaming discussion included in the comments.  

As with others on TFL, I employ a double dose of steaming components which have me insert one loaf pan with a Sylvia's Steaming Towel into the lower rack of the oven ~15 minutes prior to the bake.  Once the dough is loaded I add 2 cups of near boiling water to a lava rock filled casserole pan.  This creates dabrownman's so named mega-steam effect.  Historically I've been leaving the steaming going for somewhere in the neighborhood of 11-13 minutes.  And I'm sufficiently happy with the outcome.

Now along comes Doc.Dough with his micrometers, calipers and what-not trying to upset my baking pushcart.  Purveying the notion with engineered knowledge that the effect of steam is negated after somewhere around the 5 minute mark.  Anything beyond that is equivalent to window dressing.  

What is an alfanso to make of all this fact based information, when all along I've been getting the job done by nothing more than "educated" guesswork, experimentation and personal experience?  Well, if I were me, I'd be curious enough to see where the oven spring has taken my dough at that 5 minute mark.  Because as with all of us, I hope to get better and more understanding of baking over the long haul.

For these past few bakes, instead of setting my timer to the trusty 11-13 minute mark I've been setting it to the 5 minute mark so that I can peer through the oven door window and take a gander at what's what.  And ya know something?  For the most part I'm becoming a believer!  The baguettes do open up (almost) all the way at that mark.  However, I find that the batards still have not maxed out yet, and they take a few minutes more.

And so I've turned a corner here and pretty much gotten on board.  I still like keeping the steam going for close to my requisite time, but I can now see the doc's point of view.  I don't see any downside to leaving the steam going, although my experimentation has been limited to maybe 3 or 4 bakes.  So I'l continue to slog on and see how this goes with some other types of dough.  Always something new to be learned in this doughy business.  Thanks, Doc.

And now a very few words on the consistency thing:

Nov., 2016:

 and this morning:

IgorL's picture
IgorL

Finally a sourdough I can share!

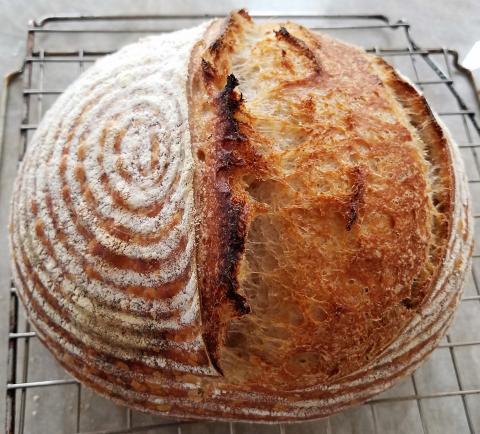
So, my scale finally arrived, and I got a banneton for proofing as well. I've been experimenting a bit, and I think I finally got it. Since all the folks here were so helpful, I figured I could contribute by sharing my results. Would really love to hear your comments too!  You can see the final product in the photo above.

The recipe:

In the morning, take starter from the fridge and feed it 1:1:1, i.e. equal amounts of starter, water, and flour.  Cover and let it sit in a warm place for 6-8 hrs.

Ingredients:
Levain (100% hydration) - 50g starter, 50g warm water, 50g  KA WW four, mixed in the morning and put in warm place.
Water - 300g
Flour - 450g KA BF 
Salt - 10g

Baker's math:
Flour - 100%
Water - 71.5%
Salt - 1.9%

Mix everything, except salt, until all flour is absorbed. Cover and let stand for 60 min, then add salt and mix for 4-5 min. I use stand mixer, but you can use anything you like.

Place the dough in a lightly oiled bowl, cover, let rest for 30 min. Take it out on a lightly-floured surface and stretch and fold from 4 sides, then put it back in the bowl. Repeat rest and stretch and fold 3 times (4 times total, cover during rest). BF for 2 hrs. On lightly-floured surface pre-shape, let rest 10-15 min, then final shape. 

Flour the banneton, and the surface of the dough (lightly), place the dough into the banneton and cold proof overnight (10-12 hrs). Next morning, take the dough out of the fridge and let warm up on the counter for 1.5-2 hrs. (EDIT: I later found this step to be completely unnecessary; you can bake straight from the fridge, and is scores this way easier too!). Meanwhile, preheat oven to 500F, then drop the temp to 475F. I baked at first under a "dome".  I have this old cast-aluminum pot, which I preheat in the oven and then invert and cover the dough with it to create hot and steamy environment, similar to a Dutch oven or Cloche. It looks like this:


I am baking right on a cookie sheet, lightly covered with corn meal to prevent dough sticking. Take the dough out of the banneton, dust off any excess flour, and score the bread.  I scored at a shallow angle, trying to create an "ear".  I think I succeeded.


Bake under the dome for 20 min at 475F, then drop temp to 460F and bake uncovered for 20 min more, rotating once in the middle.  I waited for about 2 hrs before slicing the loaf, and I must admit that was torture! :-)  (EDIT: It's actually better to wait much longer, 3-4 hrs). The crumb looks fine, although I would prefer it a bit more airy.  The taste was wonderful, and the crust was the crunchiest I ever achieved!

Hope this helps someone too!


Isand66's picture
Isand66

Durum Kamut Potato Cream Cheese Bread

If you have never made a bread with cream cheese yet, I urge you to give it a try.  The cream cheese really turns out a moist and creamy crumb.

The addition to the smashed potatoes with the durum and Kamut flours resulted in a moist, flavorful bread with a moderately open crumb.  This one is perfect for grilled bread, panninis, and simply with some olive oil or butter.

dsc_0111

Formula

durum-kamut-potato-cream-cheese-bread

durum-kamut-potato-cream-cheese-bread-weights

Download the BreadStorm File Here.

dsc_0115

Levain Directions

Mix all the Levain ingredients together for about 1 minute and cover with plastic wrap.  Let it sit at room temperature for around 8-12 hours or until the starter is nice and bubbly.

Either use in the main dough immediately or refrigerate for up to 1 day before using.

 Main Dough Procedure

Mix the flours, cracked wheat and the water together in your mixer or by hand until it just starts to come together, maybe about 1 minute.  Let it rest in your work bowl covered for 60 minutes up to several hours.  Next add the salt, starter (cut into about 7-8 pieces), olive oil, potatoes, and cream cheese and mix on low for 4 minutes.  Remove the dough from your bowl and place it in a lightly oiled bowl or work surface and do several stretch and folds.  Let it rest covered for 10-15 minutes and then do another stretch and fold.  Let it rest another 10-15 minutes and do one additional stretch and fold.  After a total of 2 hours place your covered bowl in the refrigerator and let it rest for 12 to 24 hours.  (If you have a proofer you can set it to 80 degrees and follow above steps but you should be finished in 1 hour to 1.5 hours).

When you are ready to bake remove the bowl from the refrigerator and let it set out at room temperature still covered for 1.5 to 2 hours.  Remove the dough and shape as desired.   Place your dough into your proofing basket(s) and cover with a moist tea towel or plastic wrap sprayed with cooking spray.  I used some smoked bamboo sesame seeds and garlic sesame seeds on the bottom of the basked.  The dough will take 1.5 to 2 hours depending on your room temperature.  Let the dough dictate when it is read to bake not the clock.

Around 45 minutes before ready to bake, pre-heat your oven to 550 degrees F. and prepare it for steam.  I have a heavy-duty baking pan on the bottom rack of my oven with 1 baking stone on above the pan and one on the top shelf.  I pour 1 cup of boiling water in the pan right after I place the dough in the oven.

Right before you are ready to put them in the oven, score as desired and then add 1 cup of boiling water to your steam pan or follow your own steam procedure.

After 1 minute lower the temperature to 450 degrees.  Bake for 25-35 minutes until the crust is nice and brown and the internal temperature of the bread is 210 degrees.

Take the bread out of the oven when done and let it cool on a bakers rack before for at least 2 hours before eating.

dsc_0123

dsc_0126

joc1954's picture
joc1954

Hokkaido pumpkin bread with cinnamon, sage YW and SD combo

Every autumn we have abundance of pumpkins in our garden. Most of them are Hokkaido pumpkins which have an orange skin and more yellowish meat. I usually use Hokkaido pumpkins for preparing pumpkin soup or pumpkin gnocchi with brown butter and sage leaves (one of the recent recipes is published here with a nice video), but this year I decided to make Hokkaido pumpkin bread with SD and sage yeast water combo.

Hokkaido pumpkin from our garden.

I almost never do completely white bread so also for this bread I decided to use 15% of wholegrain spelt flour and 15% wholegrain rye flour. The flour was freshly milled few hours before mixing the dough.

Procedure is quite straightforward:  First prepare SD levain and sage (if you have) YW levain and let them ferment for about 8 hours. The levain should be bubbly and active. If you don’t have sage YW or any YW just skip preparation. The final bread will be great without that as well. In this case put 5-10 fresh sage leaves in the butter used for preparing pumpkin puree. My sage yeast water was not very active so the majority of raising power was gained by SD levain. YW levain actually added just the sage taste and probably just a little bit raising power.

Preparing pumpkin puree.

Then prepare Hokkaido pumpkin puree.  You can use canned one (any pumpkin puree if you don’t have Hokkaido puree at your hand), I prepared fresh one from Hokkaido pumpkin from my garden. I rarely use preprocessed ingredients if I can use fresh one either from my garden or bought fresh on the farmer’s market. Wash it, remove all seeds and slice the pumpkin to 1/3” (8mm) thick pieces. Deliberately I didn’t peel the pumpkin as the skin gives so much color to the puree.   I used about 40g of butter and sautéed until they became soft. Instead of using sage yeast water you can put sage leaves after butter has melted while preparing pumpkin puree and remove them when the pumpkin slices become soft and start browning. Season that with salt or increase the amount of salt in the dough recipe. At the end use hand blender to prepare puree. I added 50 g of water to make blending easier (see the recipe ingredients specification).  I started with about 450 grams of sliced pumpkin and a lot of water evaporated so the estimated quantity of puree was about 250 to 300 grams.

Adding pumpkin seeds and puree to dough. In my first attempt the seeds were not cut.

The initial dough hydration is pretty low because the puree brings a lot of additional moisture. Estimated final hydration is between 73-78% - depends on the quantity of added puree. I was using AP flour, but you can use also stronger bread flour. AP flour makes the crumb really soft. There is lot of place to play with the taste of this bread - it depends on the quantity of added pumpkin puree, sage and cinnamon. In my next bake of the same bread during this weekend I added a little bit more cinnamon but found later on that it was just a little bit too much. So be cautious with the cinnamon (unless you would like that cinnamon taste would be the prevailing one).

Dough at the end of bulk fermentation

Dough preparation:

1.) Mix levain (SD and YW if you prepared it), water and flour with hand to get a shaggy mass and let it rest from 20-60 minutes (autolyse). Desired dough temperature is 27 to 29 dC (80 to 84 dF)
2.) Add salt and mix thoroughly with hand.  
3.) Do stretch & fold every 30 minutes. Add toasted pumpkin seeds and pumpkin puree one hour into bulk fermentation (at second stretch & fold).
4.) After 2.5 to 3 hours of bulk fermentation (watch the dough, not the clock) divide the dough, preshape it and let it rest for 15-30 minutes on the bench.
5.) Do final shaping and let it rise for about 1.5 - 2 hours or retard immediately and bake it direct from refrigerator after 6-12 hours. Use finger poke test to estimate when the dough is ready to be baked.
6.) Bake in Dutch oven – for 10 minutes at 240 dC (460 dF) and then reduce to 220 dC (435 dF). Open the lid after 30 minutes and bake for another 10-20 minutes.   Alternatively bake with steam for 15 minutes, after that continue with convection bake.
7.) Cool on a rack for at least 1 hour before slicing.

Another two loaves - one with curved scoring and on another one I was just playing with scoring.


The crumb is yellow, very soft and tastes heavenly.


The crumb was pretty much opened due to YW combo and relatively high hydration due to added pumpkin puree.

After adding the puree the dough becomes very silky due to used butter. Be careful when adding cinnamon and sage leaves as both have quite strong taste so you can quickly add too much. My goal was that cinnamon and sage add just enough taste to enrich the pumpkin taste in bring it to a completely new level. Of course it is up to you how much of cinnamon and sage taste you want in this bread.  

My wife and neighbors evaluated this bread as the best bread I have ever made. It is very soft bread with pronounced yellow crumb, not sweet but with warm note of cinnamon and sage spice. Topped with some butter brings you straight to heaven.  

Happy baking, Joze

alfanso's picture
alfanso

Semolina Capriccioso, alfanso style, updated Apr 2

The copycat is back, that would be me.  David Snyder's recent post on his work in progress, Semolina Capriccioso, had my brain already plotting a visit to this bread, especially as he described the taste.  I've already professed my adoration for his Sourdough Italian Baguette bread a few times on TFL.  So the wheels encased inside my cranium were turning and I just had to scratch that itch.  Y'all know what I mean!

I was interested in making a trip down to North Miami Beach (hint - don't go there expecting a beach, the name is a misnomer) to the only really real Italian market that I know of in these parts - Lorenzo's.  And here is what I saw.  Ian and other pizza aficionados - I'm talking to you!  5kg bags of 00 pizza flour for US$15.


But that wasn't what I went for.  No, I came home with this:

Lorenzo's has shelves of semolina and semolina rimacinata.  Those plastic containers are full of semolina rimacinata too, but at US$1 per pound.  I didn't see them until I was just about at the checkout counter.  Boy what a haul!  (not to mention the goat butter too)

So off to the task I went.  I used my 50% hydration rye starter for the 50% hydration durum biga in the late morning, and by evening saw no signs of life.   So I started a second biga using my ever-ready 75% hydration levain, fed it down to 50% and built the biga for an overnight ferment.  By early morning it had doubled, as David suggested it should, and so I used that and discarded the rye starter version.  Here are the two bigas at daybreak Easter Sunday:


I reformulated the original formula weight for 50% more than David's and came up with about 1565g for a mix.  Wanting to try my hand at my French Folds at this 80% hydration dough and to not rely on my mixer, I was successful, but added another 100 FFs because the dough was so slack and David wrote that his mixer was whirring for ~12 minutes.  Still, the dough was completely workable by hand, no mixer was employed and it was billowy with some tension .  And this is what the dough looked like after the 400th FF:


I didn't want to interrupt the development of the gluten during the mixing phase, so I added the toasted sesame seeds during the first of the five Letter Folds.  And this is what it looked like just as it was to be retarded.

I figured on 2 600g batards and one ~340g baguette.  The dough was indeed a bit slack and the rolling of the baguette certainly attested to that.  But although the batards were equally slack, they were much easier to form and did not present any problems at all.

At bake time I apparently made the 2 middle scores on the baguette too close together again and the oven spring just blew right past them.  Still need more work on perfecting the double score on batards as these were a little bit too offset in parity.  I think that the shorter scores on this type of dough as a baguette are more iffy than on the batards because the dough is so wet and the seeds also help weigh down the shorter scored flap during oven spring.

The baguette baked for 27 minutes, the batards for 30 minutes plus a 6 minute oven venting, oven off.

Changes from David's O.P.:

  • Used bread flour instead of AP flour.
  • Mixed by hand - 400 French Folds (they go fast!  Faster than the time that the dough was in David's mixer.)
  • Incorporated the sesame seeds on the first Letter Fold.  More than I imagined once I saw them spread out across the dough.
  • Kitchen at ~80dF, therefore 5 Letter Folds at 25 minute intervals.
  • Retarded for approx. 10 hours prior to divide and shaping   As I've stated before, the number of hours between retard and shaping is virtually irrelevant.
  • After divide, and shaping they went on a couche and back into the retarder for an overnight nap.
  • The batards were robust enough to stand up to rolling them on a wet paper towel and then in a plate full of sesame seeds.

Baked straight out of the refrigerator, no warmup.  Here the steam had just been released. 

The taste is lovely!

April 2 update:  I re-formulated to exchange the 50% hydration semolina biga with my own 75% standard levain.  I also adjusted the final dough amount of flour and water to abide by the 60% durum flour in the mix and also to maintain the 80% hydration level.  As I didn't perceive any benefit to the sesame seeds inside the braed, so I also eliminated that as well.  

For a first run, I kept the total dough weight down to 2x500g batards.  More experimentation with larger batards will soon be underway.  And then I can write up a little more about it.  Just one picture from this run should demonstrate that the results are about the same, and the bread is just as delicious.


alan

zachyahoo's picture
zachyahoo

Two Stage Levain Build

I'm trying to develop a formula for building a two stage levain. This main purpose of this is to cut down on the amount of seed starter required. Dabrownman has a great post on his 3 stage levain builds.

For my schedule though, this won't work. Instead, the idea is to do the first stage at night, second stage the next morning, and have it be ready in the afternoon (it may well be a fairly young levain, but this is fine by me)

The concept is to have both of the builds be at a 1:2:2 elaboration ratio. I'll be starting with a 66.6% hydration refrigerated starter and end up with 100% hydration levain. By the end of the first stage, the hydration will be "corrected" to be 100%.

So, if you want to build 300g of levain,

Start with 12g seed + 22.8g flour +25.2g water

(60 total) + 120g flour +120 water = 300


What do you think? Sound viable?


Formula:

L= desired levain amount

The seed amount (S) = L/25

1st flour amount = S*2-(L/250)

1st water amount = S*2+(L/250)

2nd flour and water amounts = simply the total of the 1st stage * 2

***I realize that measuring to the tenth of a gram isn't realistic nor necessary. More of a math exercise!***

alfanso's picture
alfanso

Getting a feel for the double score

As of late I've been moving towards a double score on my batards rather than what has become my standard single score.  I am pleased with the results I've seen so far.  The trick, and it is a learned trick, is to keep both blooms as consistent with each other as possible rather than having one big bubble of a bloom and one not so much.  I'm getting there.  And another trick to now put into my bag.  More practice will have to happen to lock it in.

Hamelman Pain au Levain with mixed starters

alan

sheep1's picture
sheep1

Oven spring in Fresh milled Whole Grain sourdough...

I didn't know where to post this one.

I've been baking with freshly milled wheat berries and a well established and active looking whole wheat sourdough started.  I mostly have been baking lean loaves, just milled wheat (100%), water, salt at around 80% hydration.  I do a 45 minute autolyse, 3 hours with 3 stretch and folds, a bench rest of about 20 minutes, then a final shaping.  I've done anything from a 4 to 6 hour rise in a basket or pan to an overnight in the fridge rise.

The grains I'm using are a mixture of various winter hard red wheat and about 1/3 of a white wheat added.

The dough seems to rise well at room temp.  When I put the dough into a basket or pan, it is maybe a little less than 1/2 full.  Over the rise period, it puffs up to about 3/4 of the container.  looking great. 

Then I put the loaves in the oven, either in an Emile ceramic cloche or a Pullman bread pan, and...

get very little oven spring.

Any suggestions?  I've tried extracting some of the bran out and even adding up to 25% unbleached bread flour.

bread1965's picture
bread1965

Wet, sticky and floppy..

I'm curious as to how wet and sticky whole wheat dough should be..

I'm making two whole wheat tartine loaves right now.

Levain 20; water 80; whole wheat flour 70; all purpose flour 30 and salt 2 - i used bread flour instead of AP.

After a three hour bulk fermentation with folds every half hour (kept at 80 degrees in my oven using the oven light as a heat source), I left the dough on the counter for an hour as I had to run out, came back and shaped them, left them for half an hour, shaped them again as they were floppy a bit and didn't hold their taught shape well, and after that second shaping put them in baskets. They were abit more taught, but not great.

They were very sticky to handle and very 'floppy'.. it just doesn't feel right. I'm waiting for them to proof and will bake them at some point after 2 - but no longer than 4 - hours in the baskets. 

Thoughts? I know it's a higher hydration than the regular country loaf where water is 72.5. But with the country loaf I could create a really nice taught boule. No such luck today. And as it's my day of being a dummy, I ended up placing the loaves in the baskets wrong side up, so I had to flip them out, re-flour the baskets and put them in again, So I'm not too hopeful as to how they'll come out. But I know dough is pretty forgiving, so lets see. 

Any experience with tartine whole wheat? Thanks for any insights.. bake happy! 


Pages