The Fresh Loaf

A Community of Amateur Bakers and Artisan Bread Enthusiasts.

Most bookmarked

Floydm's picture
Floydm

Pain Sur Poolish

Today's batch of Pain Sur Poolish turned out pretty good. Not as good as last time, I don't think. We left the house during primary fermentation, so I threw it into the fridge for a couple of hours. I'm not sure I let the dough warm back up enough afterward. Also, the dough was definitely drier than last time. The wetness of the dough last time was part of what I think contributed to it being so good. So, more work to be done before I've got this one down.

So, I don't forget, the recipe I used was roughly the Village Baker recipe:

3/4 teaspoon instant yeast
1/2 cup water
the poolish that had sat out overnight (1 cup water, 1 cup flour, 1/4 teaspoon yeast)
2 cups flour (1 bread, 1 all-purpose)
1 1/2 teaspoons salt

Combine, let ferment 2 hours, punch down, let rise another 45, shape into logs, let rest 15 minutes, stretch, let rise another 1 to 1 1/2 hours, bake.

DutchSourdough's picture
DutchSourdough

Question on bulk fermenting with cold room temperatures

Hi all!

So winter is coming to Europe and with the energy costs my house nowadays is typically 18C/65F.This means my bulk ferment slows down drastically and I need to reconfigure the proofing time. 

I've seen a lot of posts and blogs decribing optimal proofing temp to be around 75F. Also, I've seen posts describing that bulk ferment only slows down with lower room temp. 


My question is as follows: Will I get the same results with the same recipe, just by increasing the bulk fermentation time? Or do the bacteria and wild yeast act different in such a way that my sourdough breads will always come out different?


p.s. I dont have enoug space for proofing boxes but have been fiddling around with proofing in oven with creative solutions


rondayvous's picture
rondayvous

What is sourdough, and why bother?

In the strictest sense, sourdough is the result of naturally fermented flour from grain (usually either wheat or rye) that achieves a symbiotic relationship between lactic acid bacteria and yeast that is used for the purpose of leavening bread.

The advantage of this “natural” process is the acidification of the dough which adds flavor, reduces phytic acid, and slows amylase enzymes effects on starch (especially in rye breads). It is difficult, if not impossible,to make an edible high percentage rye bread without acidifying the dough.

Modern bakers yeast eliminates the relationship between the yeast and bacteria and allows bread to be leavened with only yeast, resulting in less digestible, less wholesome bread.

Below are some of the many ways fermentation and acidification of dough can be achieved to make naturally fermented easily digestible bread.

I intend to update and append this list as better, and additional links are brought to my attention. The purpose of this list is to have a single source of as many fermented options for making bread as possible available in one place.

Some Terms Defined A great primer by Mini Oven

Basic Sourdough Starter A tutorial for starting a traditional sourdough by gaaarp

Pineapple solution to basic starter by Debra Wink

Sauerkraut no stir sauerkraut quick-start a semi-traditional sourdough by Mini Oven

NMNF (No Muss No Fuss Starter) An alternative to a traditional sourdough by dabrownman

CLAS Concentrated lactic acid sourdough instructions and links by Yippee

CLAS in a thermos How to make CLAS without a proofing box by joe_n

FLAS flourless lactic acid sourdough compilation by GaryBishop of info from Mariana

Flavored LAB My personal favorite quick fermenting sour for rye breads

Don't be a Hostage How to avoid discards!

dmsnyder's picture
dmsnyder

Hansjoakim's Favorite 70% Rye: Revisiting an old friend

Hansjoakim was a regular contributor to thefreshloaf for a long time, He was a physics graduate student at the time, as I recall, and an amazingly adventurous and talented chef and baker. In September, 2009 he posted what he called his "favorite 70% rye." I asked him for the formula and baked it myself a week later. It was easy to see why it was a favorite. It was an easy dough to handle for a 70% rye, and it was delicious to eat.

Over the intervening years, I have made this bread a few times. Every time I make it, I wonder why I have let so much time pass since the last bake. This week, I baked it again, and it is as wonderful as ever. I baked it yesterday. Let it rest wrapped in baker's linen overnight and had some with butter and smoked salmon for breakfast. Seriously yummy stuff!

Looking at my write-up from 2009, I found it could stand re-formatting  and editing. So, here it is ...


Total Dough

Wt (g)

Baker’s %

Medium rye flour

441.5

70

AP flour

187

30

Water

472.5

75

Salt

11

1.8

Total

1112

176.8

55% of flour is pre-fermented.


Rye sour final build

Wt (g)

Baker’s %

Medium rye flour

218

100

Water

218

100

Ripe rye sour

11

5

Total

447

205

Mix the rye sour final build the day before you plan to bake. Mix all the ingredients in a medium bowl and cover tightly. Ferment for 14-16 hours at room temperature. For example, if you plan on making the bread in the morning, you can mix the rye sour the night before.


Final dough

Wt (g)

Medium rye flour

218

AP flour

187

Water

249

Salt

11

Rye sour (all of above)

447

Total

1112


Procedure

  1. Dissolve the rye sour in the water in a large bowl or the bowl of a stand mixer.
  2. In a medium bowl, whisk together the flours and the salt.
  3. Add the flours and salt to the large bowl and mix thoroughly.  If mixing in a stand mixer, mix with the paddle at Speed 1 for 3 minutes. Switch to the dough hook, and mix at Speed 2 for 3-5 minutes. You may need to scrape down the bowl once or twice during mixing. The dough should form a loose ball but remain a thick paste with little dough strength.
  4. Transfer the dough to an oiled bowl and cover it tightly. Ferment for 1 hour at 78-80ºF. It won't expand much if at all.
  5. Transfer the dough to a floured board and pre-shape into a round. Cover and let rest for 5-10 minutes.
  6. Shape into a round and place in a floured banneton/brotform. Note: If you want to dock the loaf (make lots of holes in the top to release steam), put it in the basket seam side up. If you want the folds to open chaotically, place it in the basket seam side down.
  7. Cover the loaf with a towel or place the banneton/brotform in a food-safe plastic bag and seal it.
  8. Proof for about 2 hours. (Mine usually proofs in about 1 hour, 45 minutes). The loaf will expand by 50% or so.
  9. One hour before baking, pre-heat the oven to 480ºF with a baking stone and steaming apparatus of choice in place.
  10. Dust the bottom of the loaf with corn meal or semolina. Transfer it to a peel. Steam the oven and transfer the loaf to the baking stone. Turn the oven down to 460ºF.
  11. Bake at 460ºF with steam for 15 minutes. Then, remove the steaming apparatus and turn the oven down to 440ºF.
  12. Bake at 440ºF for 20 minutes, then turn the oven down to 400ºF. Bake for another 15-20 minutes. Note: If the crust is getting too dark, you can turn the oven down further for the last 5-10 minutes.
  13. The loaf is fully baked when the crust is firm, the bottom of the loaf sounds hollow when thumped and the internal temperature of the loaf is at least 205ºF.
  14. When the loaf is fully baked, remove it to a cooling rack. Let it cool completely (2-3 hours), then wrap it well in baker’s linen or a tea towel, and let it rest for 18-24 hours before slicing.

Happy baking!

David

HeiHei29er's picture
HeiHei29er

Community Bake - Gluten Free Bread

I was excited when Abe asked for interest in a Gluten Free Community Bake.  I haven't done much GF baking lately, but I will be again once my daughter comes home from college for the summer.  It definitely has its own challenges and skill sets, but there are some very tasty gluten free breads to be made if you go into it with the understanding that you probably won't have big voluminous loaves.  These loaves are much more like high rye breads in size and crumb.

So with the spirit of the other Community Bakes put together by Dan, Allan, and Abe, I'm starting this thread in hopes that others will post some of their bakes or maybe try a gluten free bake for the first time. 

To get things started and give folks an idea on the diversity out there with gluten free baking, I have three bakes listed.  By all means, try one of these or feel free to post your own recipe.  The only rule...  It must use all gluten free flours/grains.

I assume for some folks, the apprehension with gluten free baking comes from the flours/ingredients needed.  It's tough to go out and buy bags of flour to try a single loaf.  So with that in mind, the first two bakes I have listed can be done with items most of you probably already have or can easily get the exact quantity needed with a trip to the bulk food store. (Click on the hyperlink to take you to the blog/forum post for each bread).

Every Day Pantry Item Loaf - I made this one today and it was simple but fun.  Getting the batter consistency right can take a little practice, but overall, an easy loaf to make.  Use these ingredients or see what you have lying around in your pantry!  For batter breads, it's better to err on the low side with hydration and slowly add water to get the right consistency.

Buckwheat Bread  - Abe steered me to this technique when I first joined TFL.  I tried it and the flavor of buckwheat really grew on me!  After making this loaf, buckwheat is one of my favorite grains to use in all types of bread.  This loaf of bread is excellent when toasted.  I especially like it with raspberry jam.

The third example loaf uses gluten free flours and may require a purchase or two.  

Gluten Free Pumpernickel - While I haven't tried this loaf, it does sound delicious and I love the look of it!  There is some really good information in the post about the flours used and what they bring to a bread.

I look forward to seeing your bakes in the comments!

JonJ's picture
JonJ

Dave Miller's method for semi dehydrated starter storage

Just wanted to write to say how well Dave Miller's method of starter maintenance with a semi-dehydrated stage is working for me. Learnt about the method from a forum post here that referred to this web page.

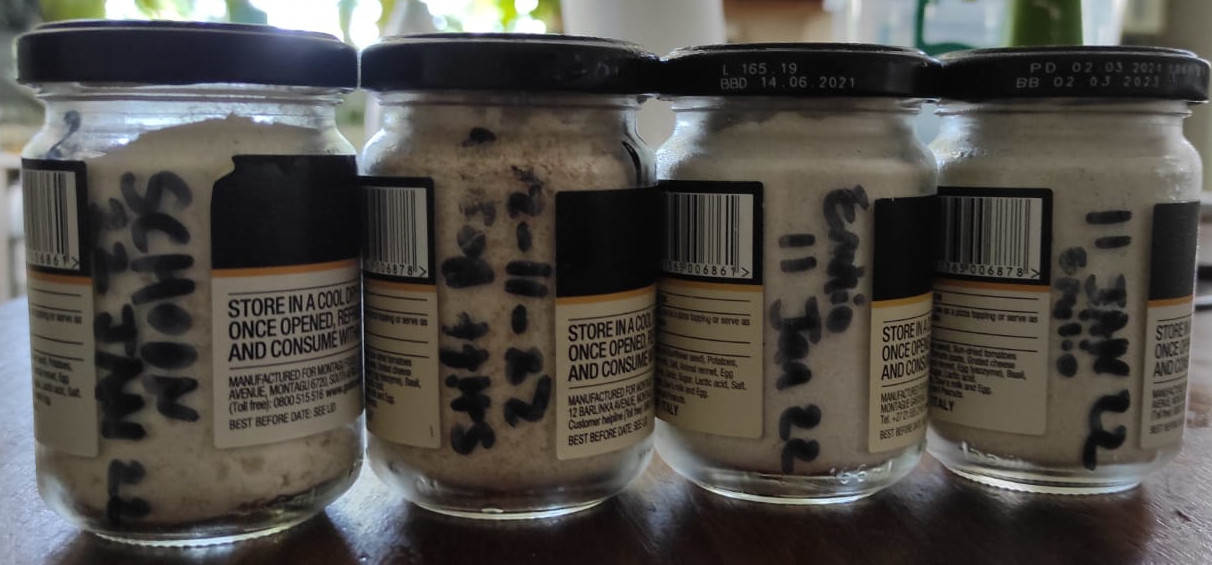
Basically I just take a small amount of starter (typically 12-13g) and rub it between my fingers in the flour that I feed the starter with (60-65g for me) until there are harder crumbs within the flour. Then the crumbs are kept buried in the flour in a water tight container in the fridge. I collect pesto bottles and small honey or mustard jars for the fridge storage.

So far it has worked out very well for me. I need to revive the starter a day earlier than if I was feeding every day, there is that minor inconvenience, but now it has enabled me to keep three different starters (Desem, my regular rye starter and now a more sour starter; and it helps with keeping them distinct as they're not being fed at the same time). Another inconvenience is that I sieve out the hardened chunks and hydrate those first for an hour or two before adding in the flour they were buried in.

The revived starter comes back with good strength and vigour, think the article mentioned that Dave Miller does it this way as a reliability thing.

Have successfully revived a 4 month old jar from the fridge, but no reason why it couldn't be much longer than that so long as the containers used are waterproof and I guess kept refrigerated.

Ilya Flyamer's picture
Ilya Flyamer

Long fermentation benefits

It is often claimed that long fermentation makes bread better. I wonder what aspects of long fermentation are actually important?

  1. Acidity. With both sourdough, and in lower degree (but maybe even more importantly in that case) with CY, longer fermentation would lead to accumulation of acidity in the dough, and to an extent that is certainly a benefit.
  2. Gluten development, and later partial breakdown? Development just through time is certainly a factor for the baker, but not so much for the final product: it'll change the crumb structure compared to development up-front, but whether it's a benefit is a question of taste. Partial gluten breakdown might be considered a benefit, if it is to be believed that it's easier to digest in that state.
  3. Any other benefits of long fermentation? For example, does just letting the flour sit in contact with water for a long time, even without any yeast/LABs/etc bring any benefits flavour-wise, forgetting about gluten for a minute? Would enzymes in the flour generate more flavour, except sugar that would feed the yeast?

Why I am thinking about this, is CLAS is supposed to bring excellent quality, but much faster, by bringing acidity and other fermentation flavours. This way one can make a bread with a relatively large amount of yeast and quickly, and still get a lot of flavour. But I am wondering if this process would miss out on some other benefits of long fermentation?

Ilya Flyamer's picture
Ilya Flyamer

Scalded 100% whole rye bread with raisins (CLAS!)

As I mentioned in comments over the last few days a couple of times, I was making a CLAS starter. In case some people missed Yippee's posts about it, CLAS stands for "concentrated lactic acid sourdough", and it's just like a regular starter - except it doesn't have yeast, only LABs. I made it using whole rye flour, diastatic malt powder, a little vinegar, water by inubating at ~40°C, where LABs are happy, but yeast are suppressed. Vinegar creates a low pH to prevent growth of unwanted bacteria. Access to oxygen is also restricted with the same purpose. While CLAS has been around for a while, the easy application of this type of sourdough has been extensively covered and popularized by Rus Brot, and he even has a web page about it in English: http://brotgost.blogspot.com/p/clas.html

The advantage is separation of souring and lifting powers (lift is provided by commercial yeast, and  souring, critical in particular to rye bread, is provided by CLAS). In addition, while I didn't use it this time, overnight refreshment of CLAS and simultaneous scalding really simplifies scheduling for scalded dough, which otherwise takes basically the whole day.

My CLAS didn't smell quite right after building (I only had diastatic barley malt, not diastatic rye malt, could be because of that): it had very prominent fruity notes which it shouldn't have. So I refreshed it once, and then the fruity aromas were gone and it was ready to use. I followed this recipe for all whole grain rye bread with a scald and including raisins: https://www.youtube.com/watch?v=GpAfPmKkn_Q&list=PLrSg5cYpPtU96v2LWR9rETxWDEHe3iIcj&index=36

Since I was testing my new CLAS, I decided to halve the recipe just in case something goes wrong. I also forgot to add caraway seeds :( Here is the formula: https://fgbc.dk/1o2h Normally it would include 2g caraway seeds in the scald (this is for my half-sized recipe). I also used mostly new flour that I haven't used before (Polish whole rye), and I think it was much more thirsty than what I am used to, and what Rus used, and I slightly underhydrated it in the end: when shaping the dough was stiffer than I expected and what I see in the video, and the final bread seems a little less soft than Rus shows. Half of the recipe made a little neat loaf, I shaped it quite long and thin.

The flavour is really-really nice. I don't know if it's the new flour or the CLAS, but I think the flavour of the bread itself is a little fuller and more complex than I previously experienced (different recipe too, of course), and addition of raisins makes it an almost dessert bread. Delicious. The bottom crust is deeply caramelized from baking on the steel (but not burnt), which actually adds nice flavour and texture contrast.


gavinc's picture
gavinc

Hamburger Brioche Buns

I made these a while ago and thought to post them to my blog during our 4th COVID lockdown (bored). I learned how to make these during Chef Jacob Burton’s online culinary boot camp.  I learned the bun sizes for large, regular and slider buns.

155 g each for large (4.5 inch) buns - about 114 mm

100 g each for regular size (4 inch) buns - about 100 mm

55 g each for slider size (3 inch) buns - about 76 mm

A well-formed bun was baked using foil ring molds held together with a couple of staples.

The brioche bun recipe is bread flour 100%, whole milk 60%, salt, 1.6%, yeast 3.6% (IDY 1.2%),eggs 20%, sugar 3%, warm water 4%.

My favourite is the regular size and suits 4 ounce/113-gram hamburger patties formed to a 3.75"/9.5 cm diameter.

Here's a link to the recipe: Hamburger Brioche Bun - Regular Size (4" Diameter) | Stella Culinary


HeiHei29er's picture
HeiHei29er

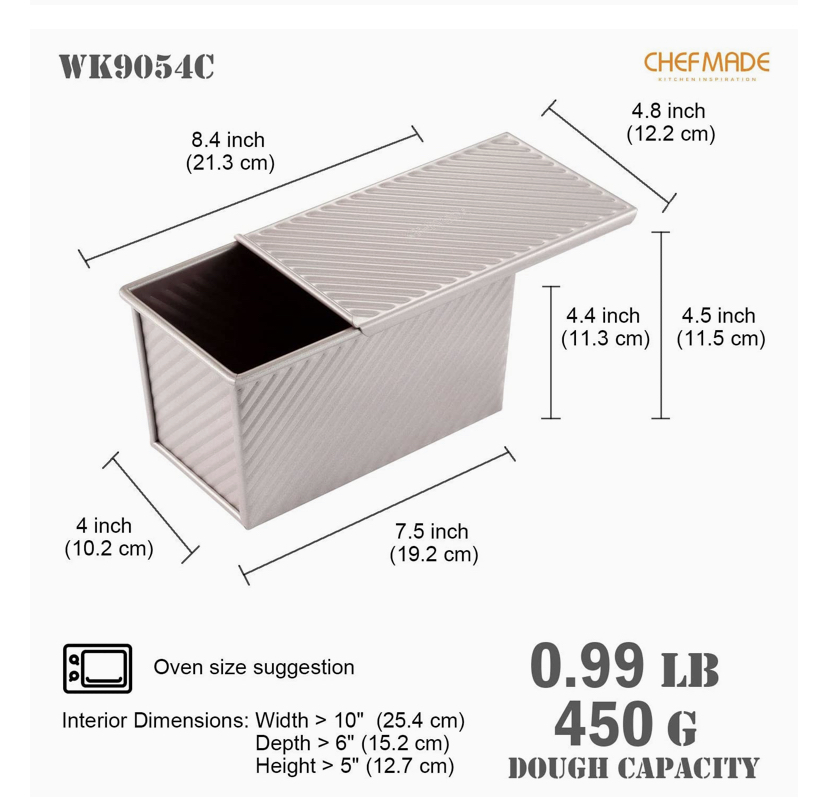
Pullman Pan size vs Dough Weight

Looking for help on getting the right size Pullman Pan.  This one is rated for 450g dough weight, but based on the dimensions, I’m thinking that’s 450g flour.

Am I looking at that correctly?

Pages