The Fresh Loaf

A Community of Amateur Bakers and Artisan Bread Enthusiasts.

Most bookmarked

MaisPalestine's picture
MaisPalestine

Baguette..technical

Hello fellow bakers,

I thought i was alone, after reading many of the comments (of getting confused by too much info from online recipes) I realized I was not. My challenge has been "the baguette", and after going through most of the recipes some questions are still lingering and I'm reaching out for your help. I managed to get the shape, crumb, crust right (as i desire it). But I am working on the taste and my challenge is to have longer fermentations with least possible amount of yeast (instant is what I have, and for all the fresh sourdough starter fans, I can say I failed miserably at doing a fresh levant)...so im working purely using the poolish method.  If anyone out there can help with the following questions I would appreciate it.

1) If I want a longer fermentation time for my main dough mix (bulk fermentation stage), then what percentage poolish would you advise me to use. (I use a % from total flour amount). Right now I have been working with 34%...but is it better to opt for 50% of poolish to get a longer bulk fermentation time, also emitting yeast from dough mix (taking into account the next question).

2) Some Recipes use instant yeast for poolish and main dough mix and others only in poolish. I use 0.03% of poolish flour for a 16 hour pre ferment. If I want a longer fermentation as in question(1) and am looking to use the least amount of instant yeast as possible - i prefer my yeast to come naturally from the poolish), then do i need yeast in my main dough mix? if i emit the yeast from the main dough mix, will my bread still rise equally during bulk fermentation/ baking . To get max rise/bloom what percentage should of flour should I use for my poolish flour. 

3) Some recipes call for warm water in the final dough mix (32℃/90℉)...if i want to decrease bulk fermentation time, I am deducting that i use room temp water instead, unless the warm water has a different reason for being there.

4) Some recipes call for 3 stretch and folds (S&F) other for 6. What do i go with if (not sure if mixing with mixer vs. by hand effects this number). the S&F are done to strengthen gluten, so what is my bench mark. 

5) Is there a minimum yeast% I can work with/is recommended (from baker's percentage) for overall baguette recipe.

5) Any recommendation for a ONE great book to own on bread making, if i want to have it as my bible/reference. Thats more versatile (ie incorporates a wide array of bread techniques)


Thank you in advance. (:

Keen covid baker. 

alfanso's picture
alfanso

Companion Blog for Rye Community Bake

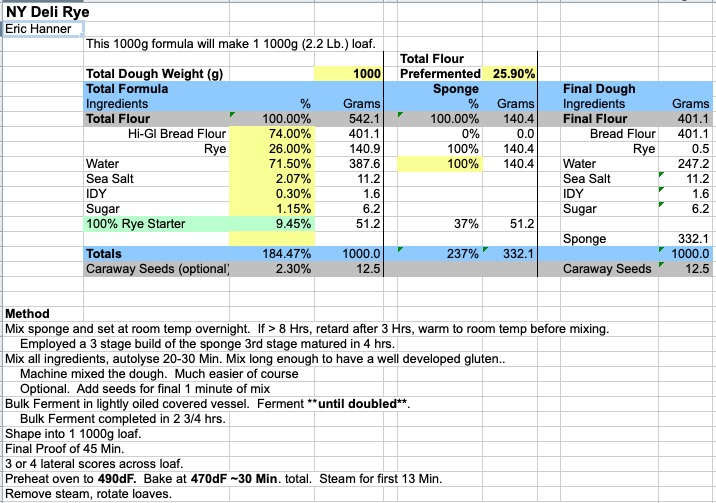
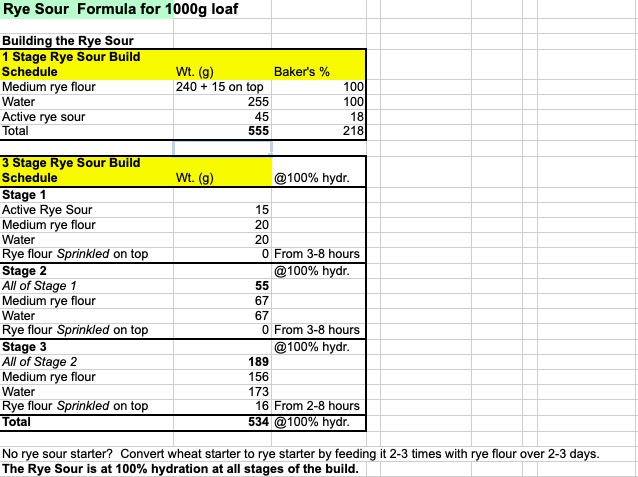
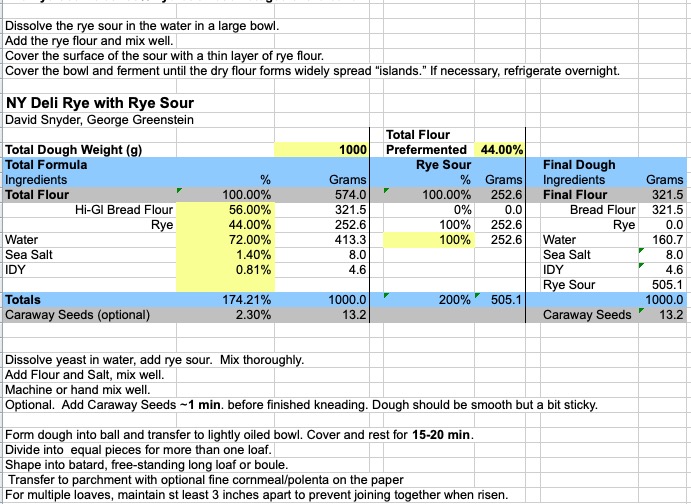
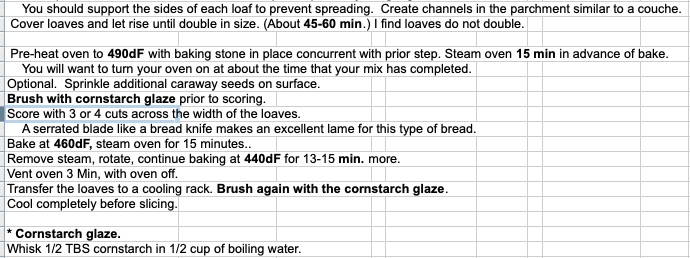
Here you will find the three formulae for the three NY Jewish Bakery/Deli Rye Breads from the Community Bake for rye breads. Refer to the CB for details.

Aviso! For the first two breads do not proof the loaves directly on a couche.  They will stick mercilessly, the clean-up will be significant and may ruin your couche.  I have no experience using a dutch oven type of vessel with these, so I cannot advise what you should or shouldn't do.

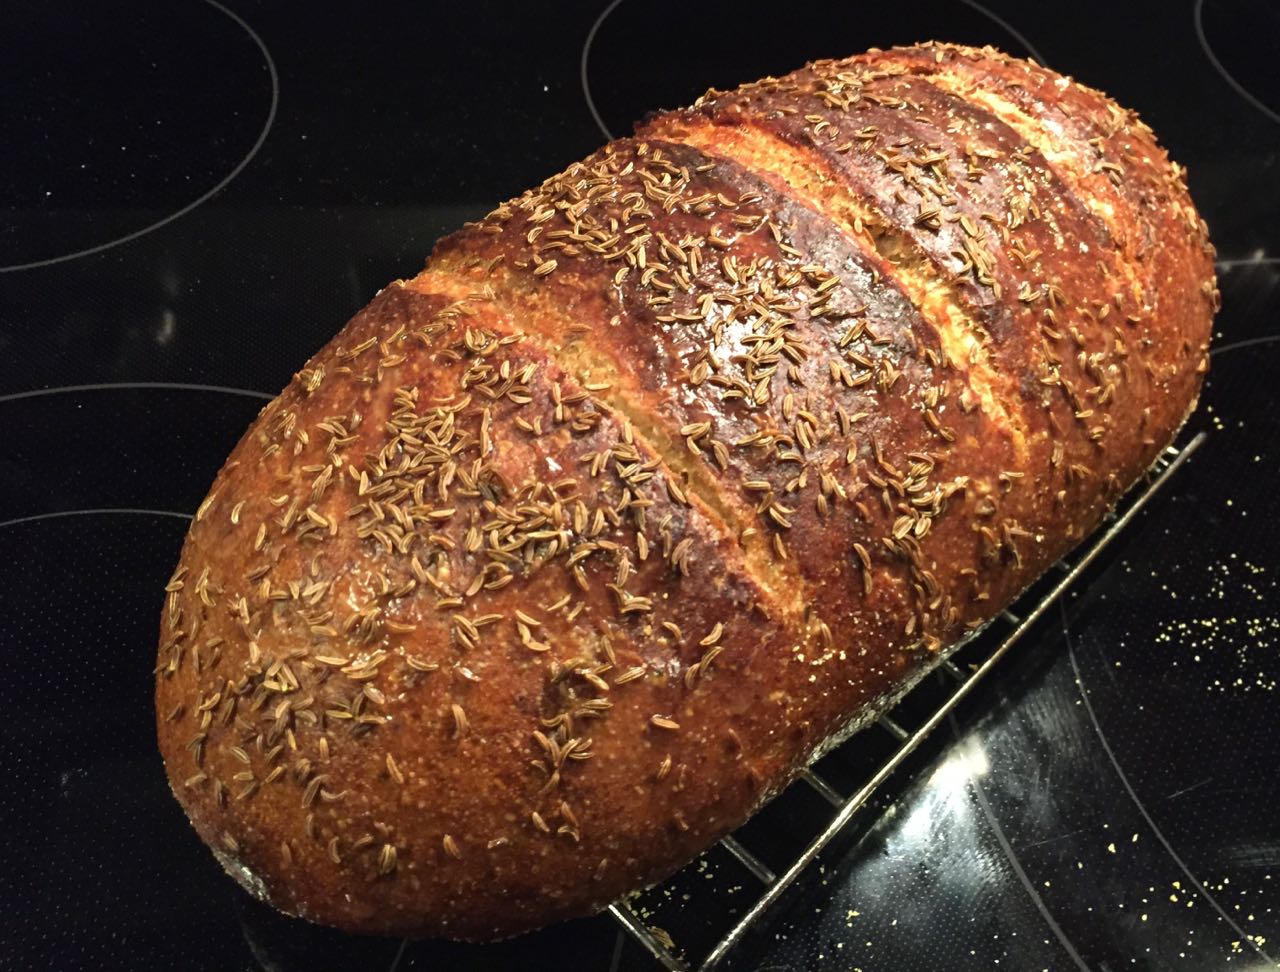
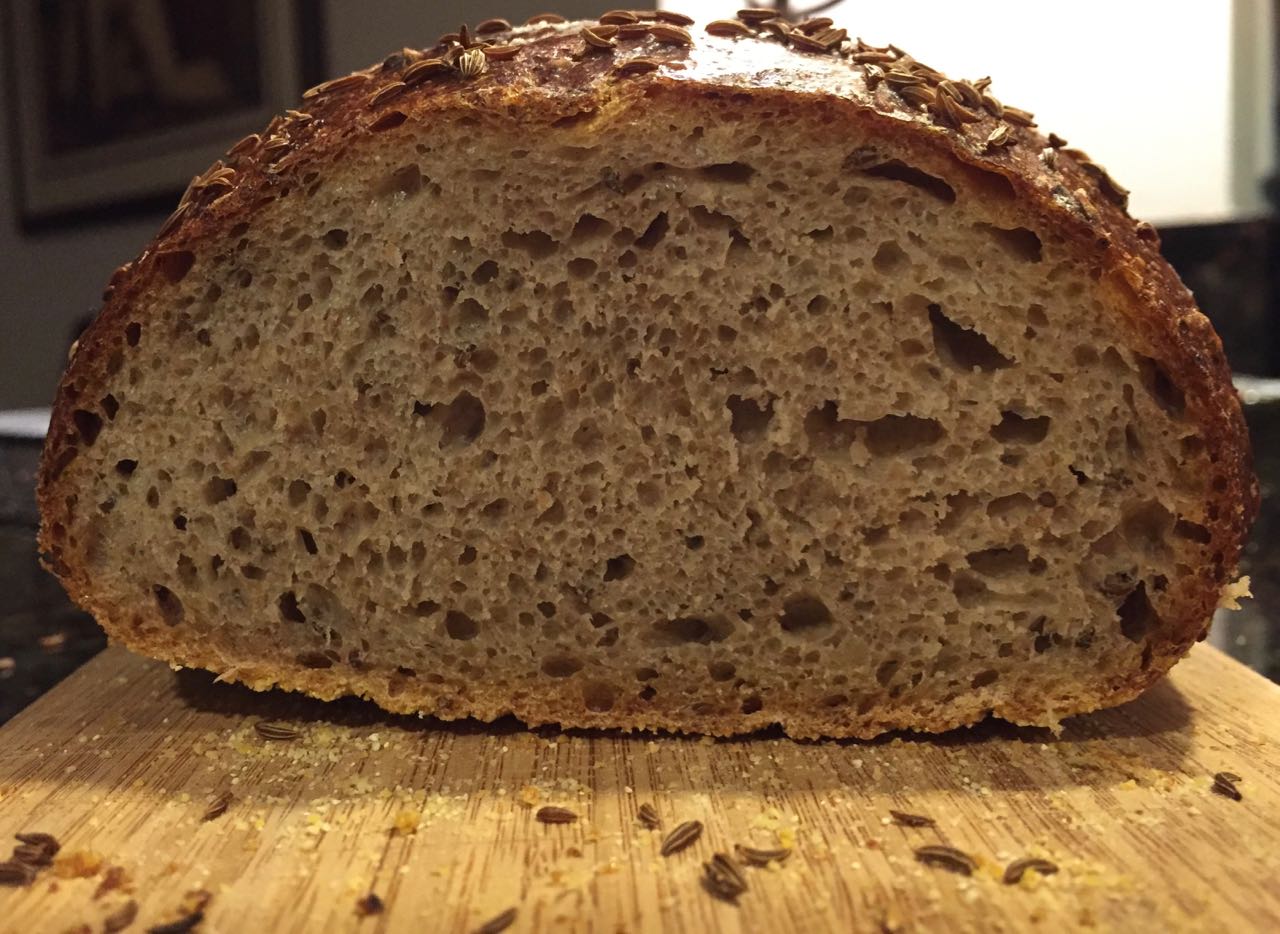
Eric Hanner's Rye Sponge Rye Bread


+++++++++++++++++++++++++++++++++++++++++++++++++++++++++++++++++++++++++++++

David's detailed Rye Sour walkthrough

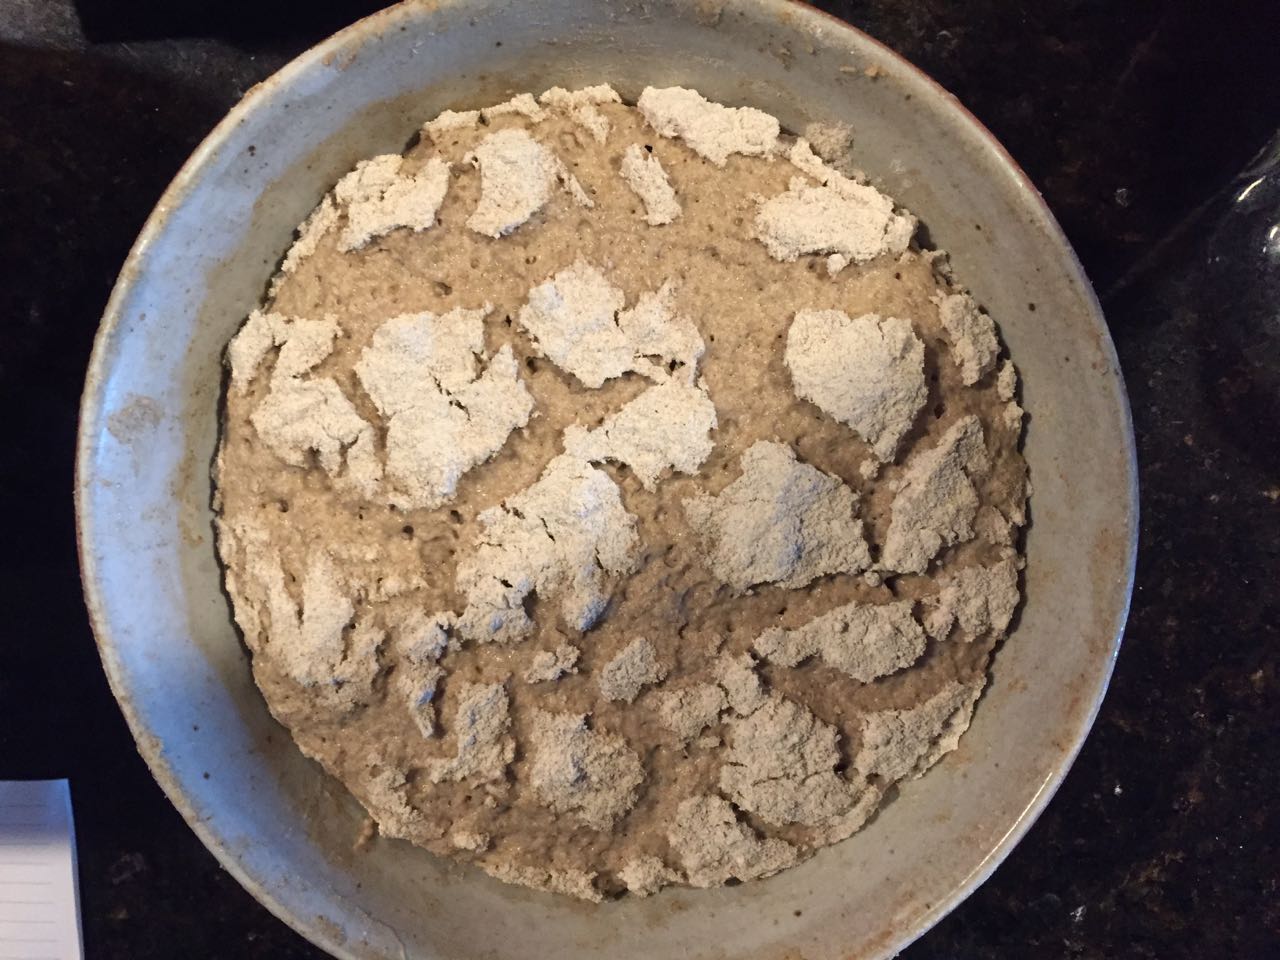
This is what the completed 3rd stage of the rye sour should look like

David Snyder's Rye Sour Rye Bread (12/05, updated from original post)

(12/07 formula updated to reflect David's updated Rye Sour 3 stage Build)

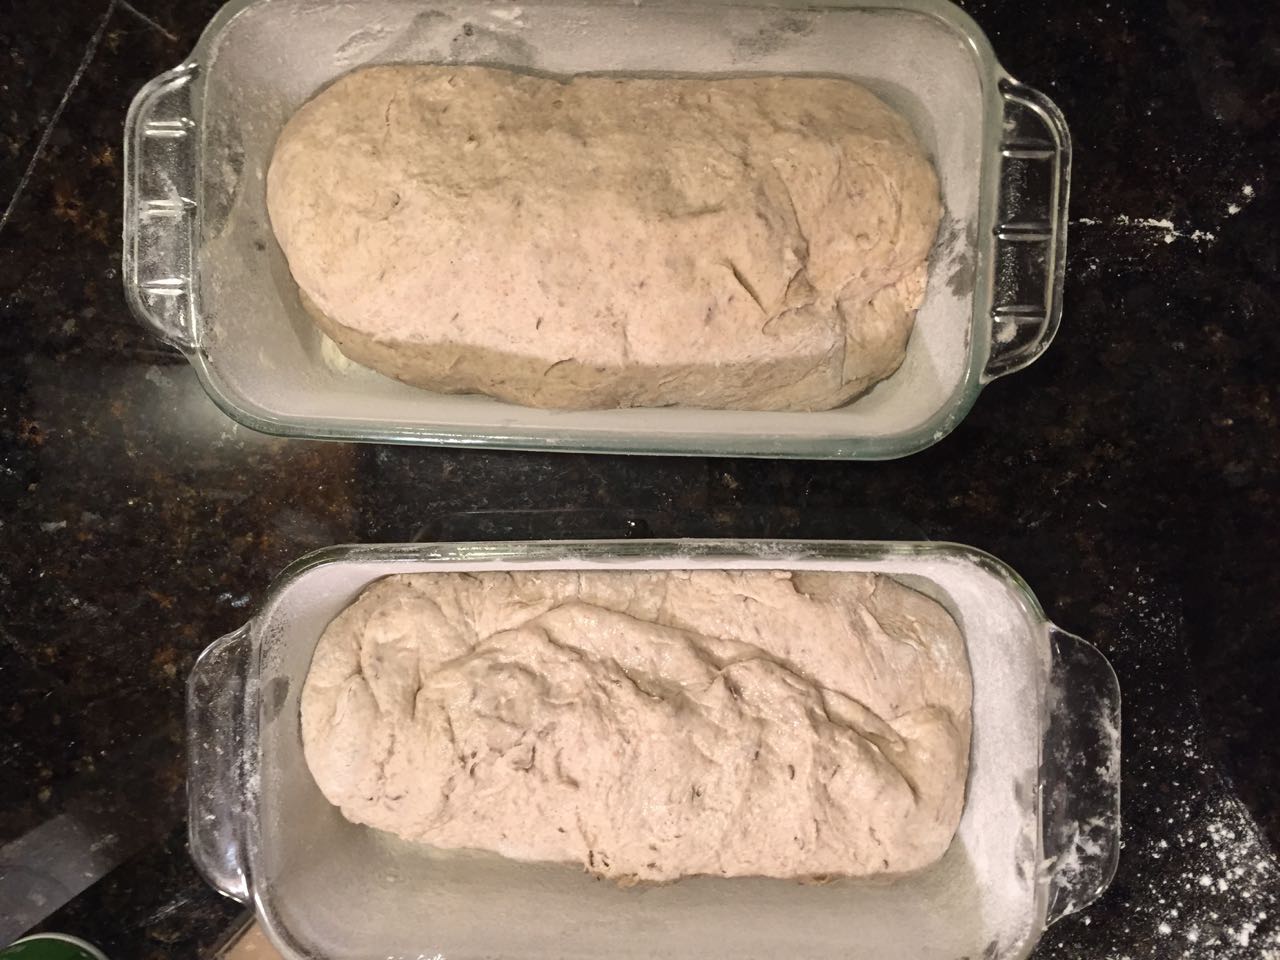
You can use a loaf pan for proofing.  The pans are sprayed with a light coating of oil and then floured, seam side up.


I prefer the following method...Blocking the sides of the loaf to avoid the dough spreading out laterally.  This will maintain a consistent shape and provide some loft.  Used on both the Hanner as well as this dough.

The key to getting a good score was to use my serrated bread knife (which I didn't use on the above breads).  These first two doughs are hell-bent on having your scoring blade get stuck and drag.  The bread knife with a swift motion will teach that dough a lesson!


+++++++++++++++++++++++++++++++++++++++++++++++++++++++++++++++++++++++++++++

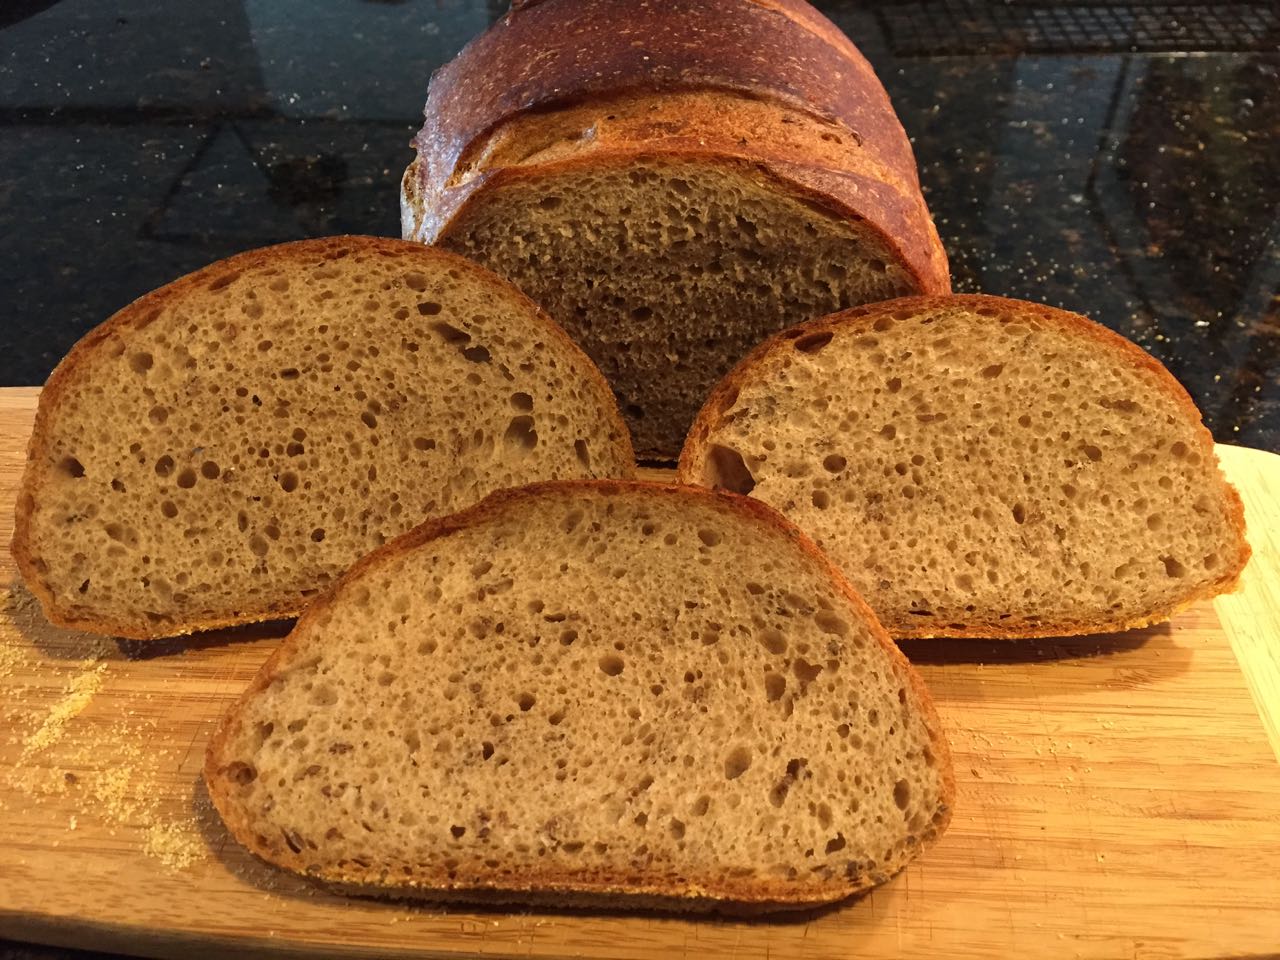
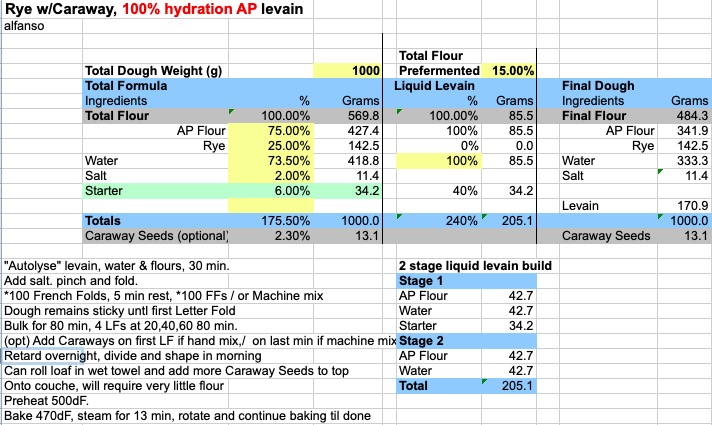
Alfanso's AP Levain Rye Bread

This dough, although basically the same percentages of rye and hydration, will provide a completely different experience.  As can be seen, it is easily formed into baguette shape.


And now...it's your turn!


DanAyo's picture
DanAyo

Community Bake - Ciabatta!!!

Our latest Community Bake (CB) featured Baguettes and was a hit. Those that actively participated learned to bake baguettes of Artisan Quality. It seems the natural progression from there would be Ciabatta, the Italians answer to the French Baguette. 

Here is an excerpt from Wikipedia -
"Ciabatta was first produced in 1982 by Arnaldo Cavallari, who called the bread ciabatta polesana after Polesine, the area he lived in. The recipe was subsequently licensed by Cavallari's company, Molini Adriesi, to bakers in 11 countries by 1999. Cavallari and other bakers in Italy were concerned by the popularity of sandwiches made from baguettes imported from France, which were endangering their businesses, and so set about trying to create an Italian alternative with which to make sandwiches. The recipe for ciabatta came about after several weeks trying variations of traditional bread recipes and consists of a soft, wet dough made with high gluten flour."

IAll bakers of every skill level are invited to participate. Novice bakers are especially welcomed and plenty of assistance will be available for the asking. The Community Bakes are non-competitive events that are designed around the idea of sharing kitchens with like minded bakers around the world, "cyber style". To participate, simply photograph and document your Ciabatta bakes. You are free to use any formula and process you wish. Commercial Yeast, sourdough, or a combination of both are completely acceptable. Once the participants gets active, many bakers will post their formulas and methods. There will be many variations to choose from.

Here is a list of our past CBs. They remain active and are monitored by numerous users that are ready, willing, and able to help if assistance is needed. A quick browse of past CBs will provide an accurate picture of what these events are all about.

******************************************************************************************

SOMETHING NEW - Since many of the CBs grow quite large, it can become difficult to follow the progress of each individual baker. Things get very spread out. In an attempt to alleviate congestion and consolidate individual baker’s bread post, the following is suggested.

  • Post all bakes in the CB
  • Copy and paste each bake into a dedicated BLOG post
  • Paste all bakes into a single BLOG
  • You may copy and paste the link to your BLOG post in the individual bake post as a reference for those that want to view your progess and evolution.

All participating bakers that consolidate their bakes the a BLO.g post will be linked in the original post for all to see.


Links to baker’s BLOGs that have posted a compiled list of bakes for this CB

******************************************************************************************

If you haven't eaten Ciabatta, you are in for a major surprise. The flavor, texture, and ultra thin crust make any sandwich special. Please join us and post your good, bad, and ugly bakes. Many old timers are probably tired of reading this (It is a personal mantra of mine), BUT... "we learn more from our mistakes than we do from our successes".

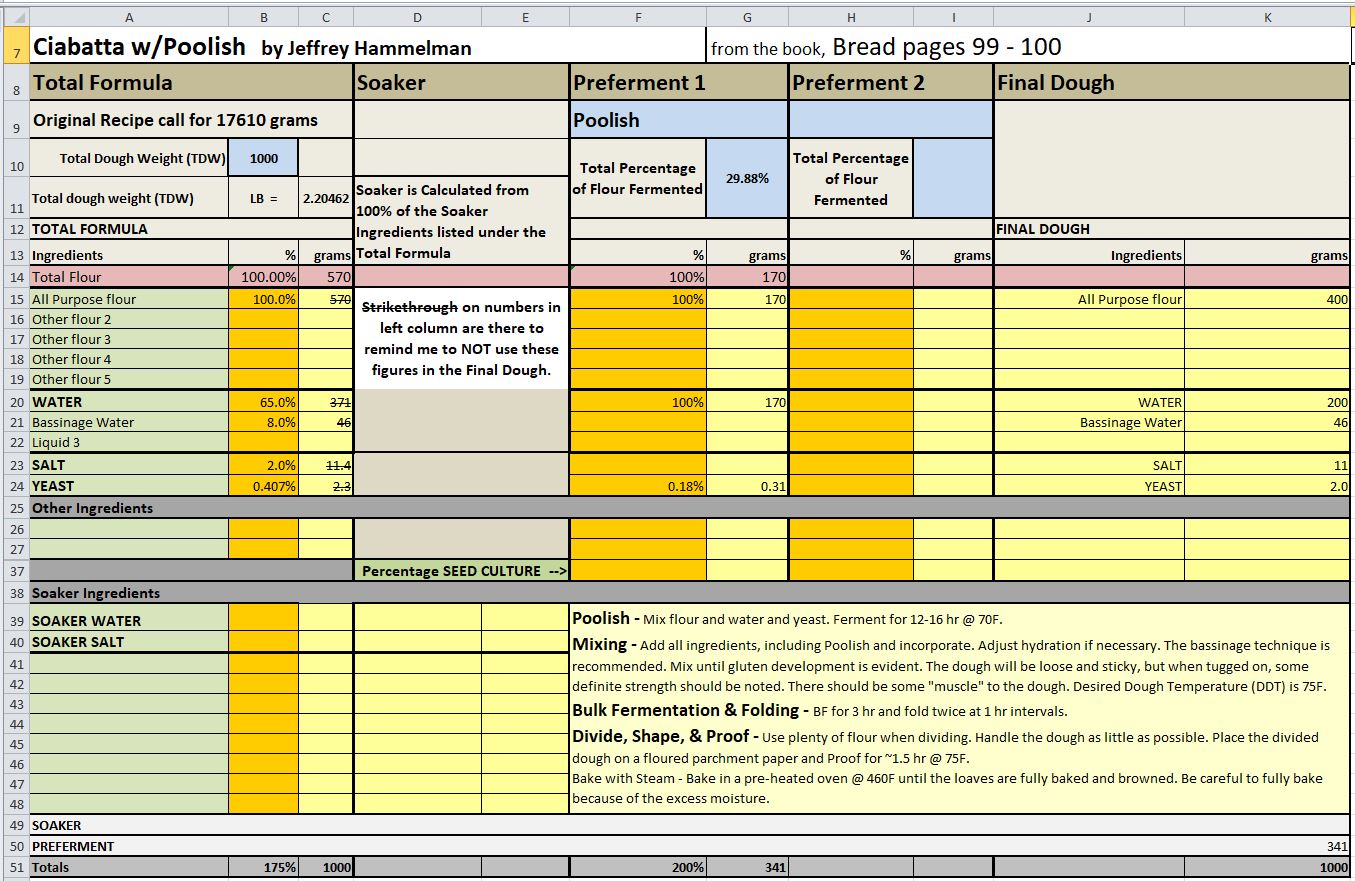
The following formula and process comes from Jeffrey Hamelman's book, " Bread - a baker's book of techniques and recipes". It is also available in Kindle version on Amazon.

NOTE - since the Total Dough Weight in the spreadsheet below was scaled to 1000 grams you can easily change the dough weight by multiplying each ingredient.

For example you decide to bake a 500 gram loaf.
Simply multiply the flour(570) by .5 to get 285. Water 371x.5=185.5 (round to 186).

Let's say you want 1500 grams of Total Dough Weight.
Flour - 570x1.5=855 and Water - 556.5

Does this with each and every ingredient to resize the formula to fit your needs.

*********************************************************

Below is a formula from Michael Wilson.

In Italy Ciabatta is mostly a CY leavened bread and the standard formula as per Giorilli is as follows:

Biga with 80% of the flour:400g bread flour180g water
1.3g Instant Dry Yeast OR 4g fresh cake yeast Rise at 61-64F (16-18C) for 16-18 hrs Final dough:All of the biga
100g flour
220g water5g diastatic malt
10g salt
  • Mix using the bassinage method until silky smooth.
  • Rise in bulk until double, cut pieces, shape dust with plenty of flour and let leaven until ready.

********************************************************************************************

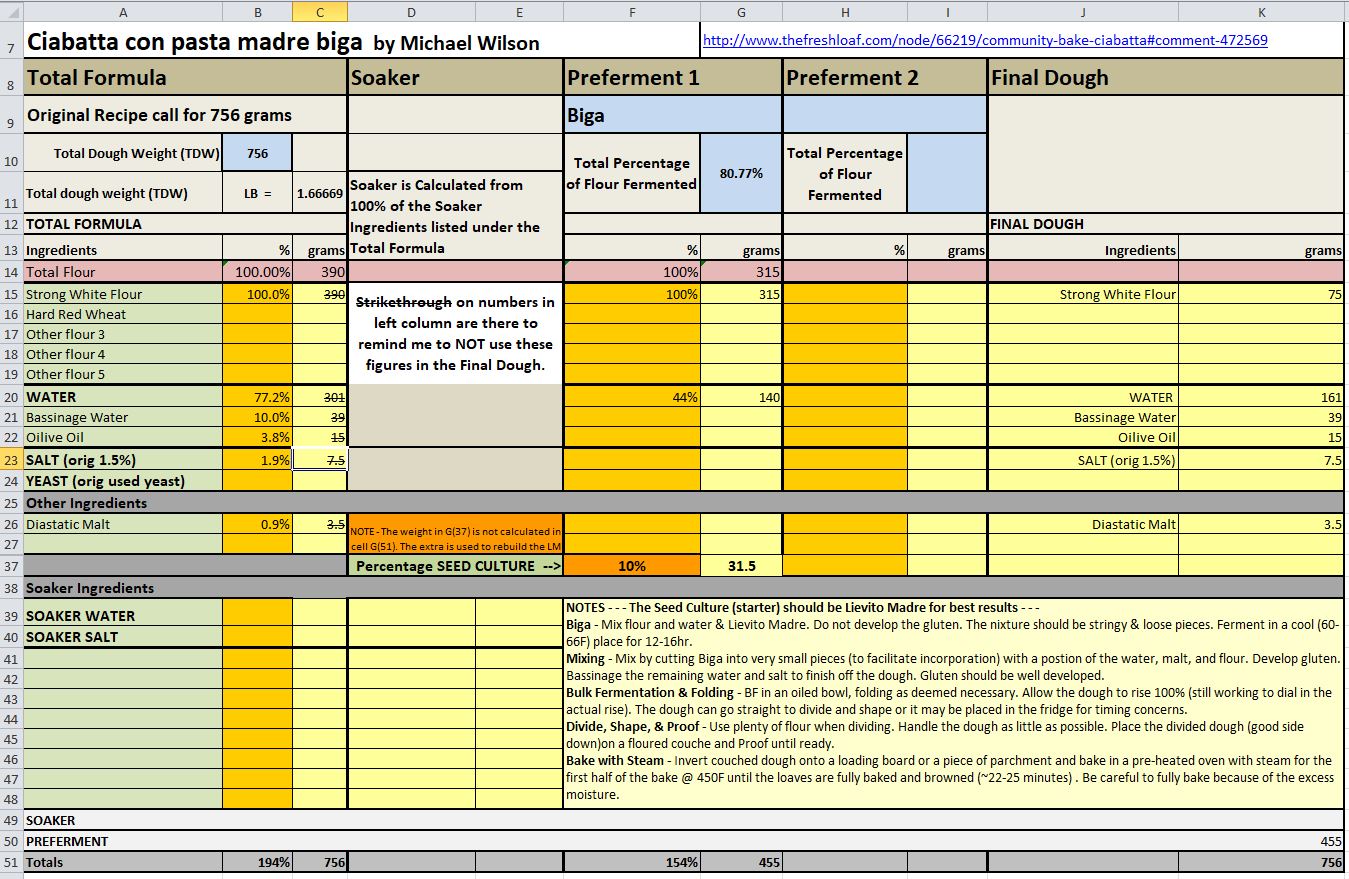
Ciabatta con pasta madre biga *** SEE THIS LINK ***
(SD biga) submitted by Michael Wilson

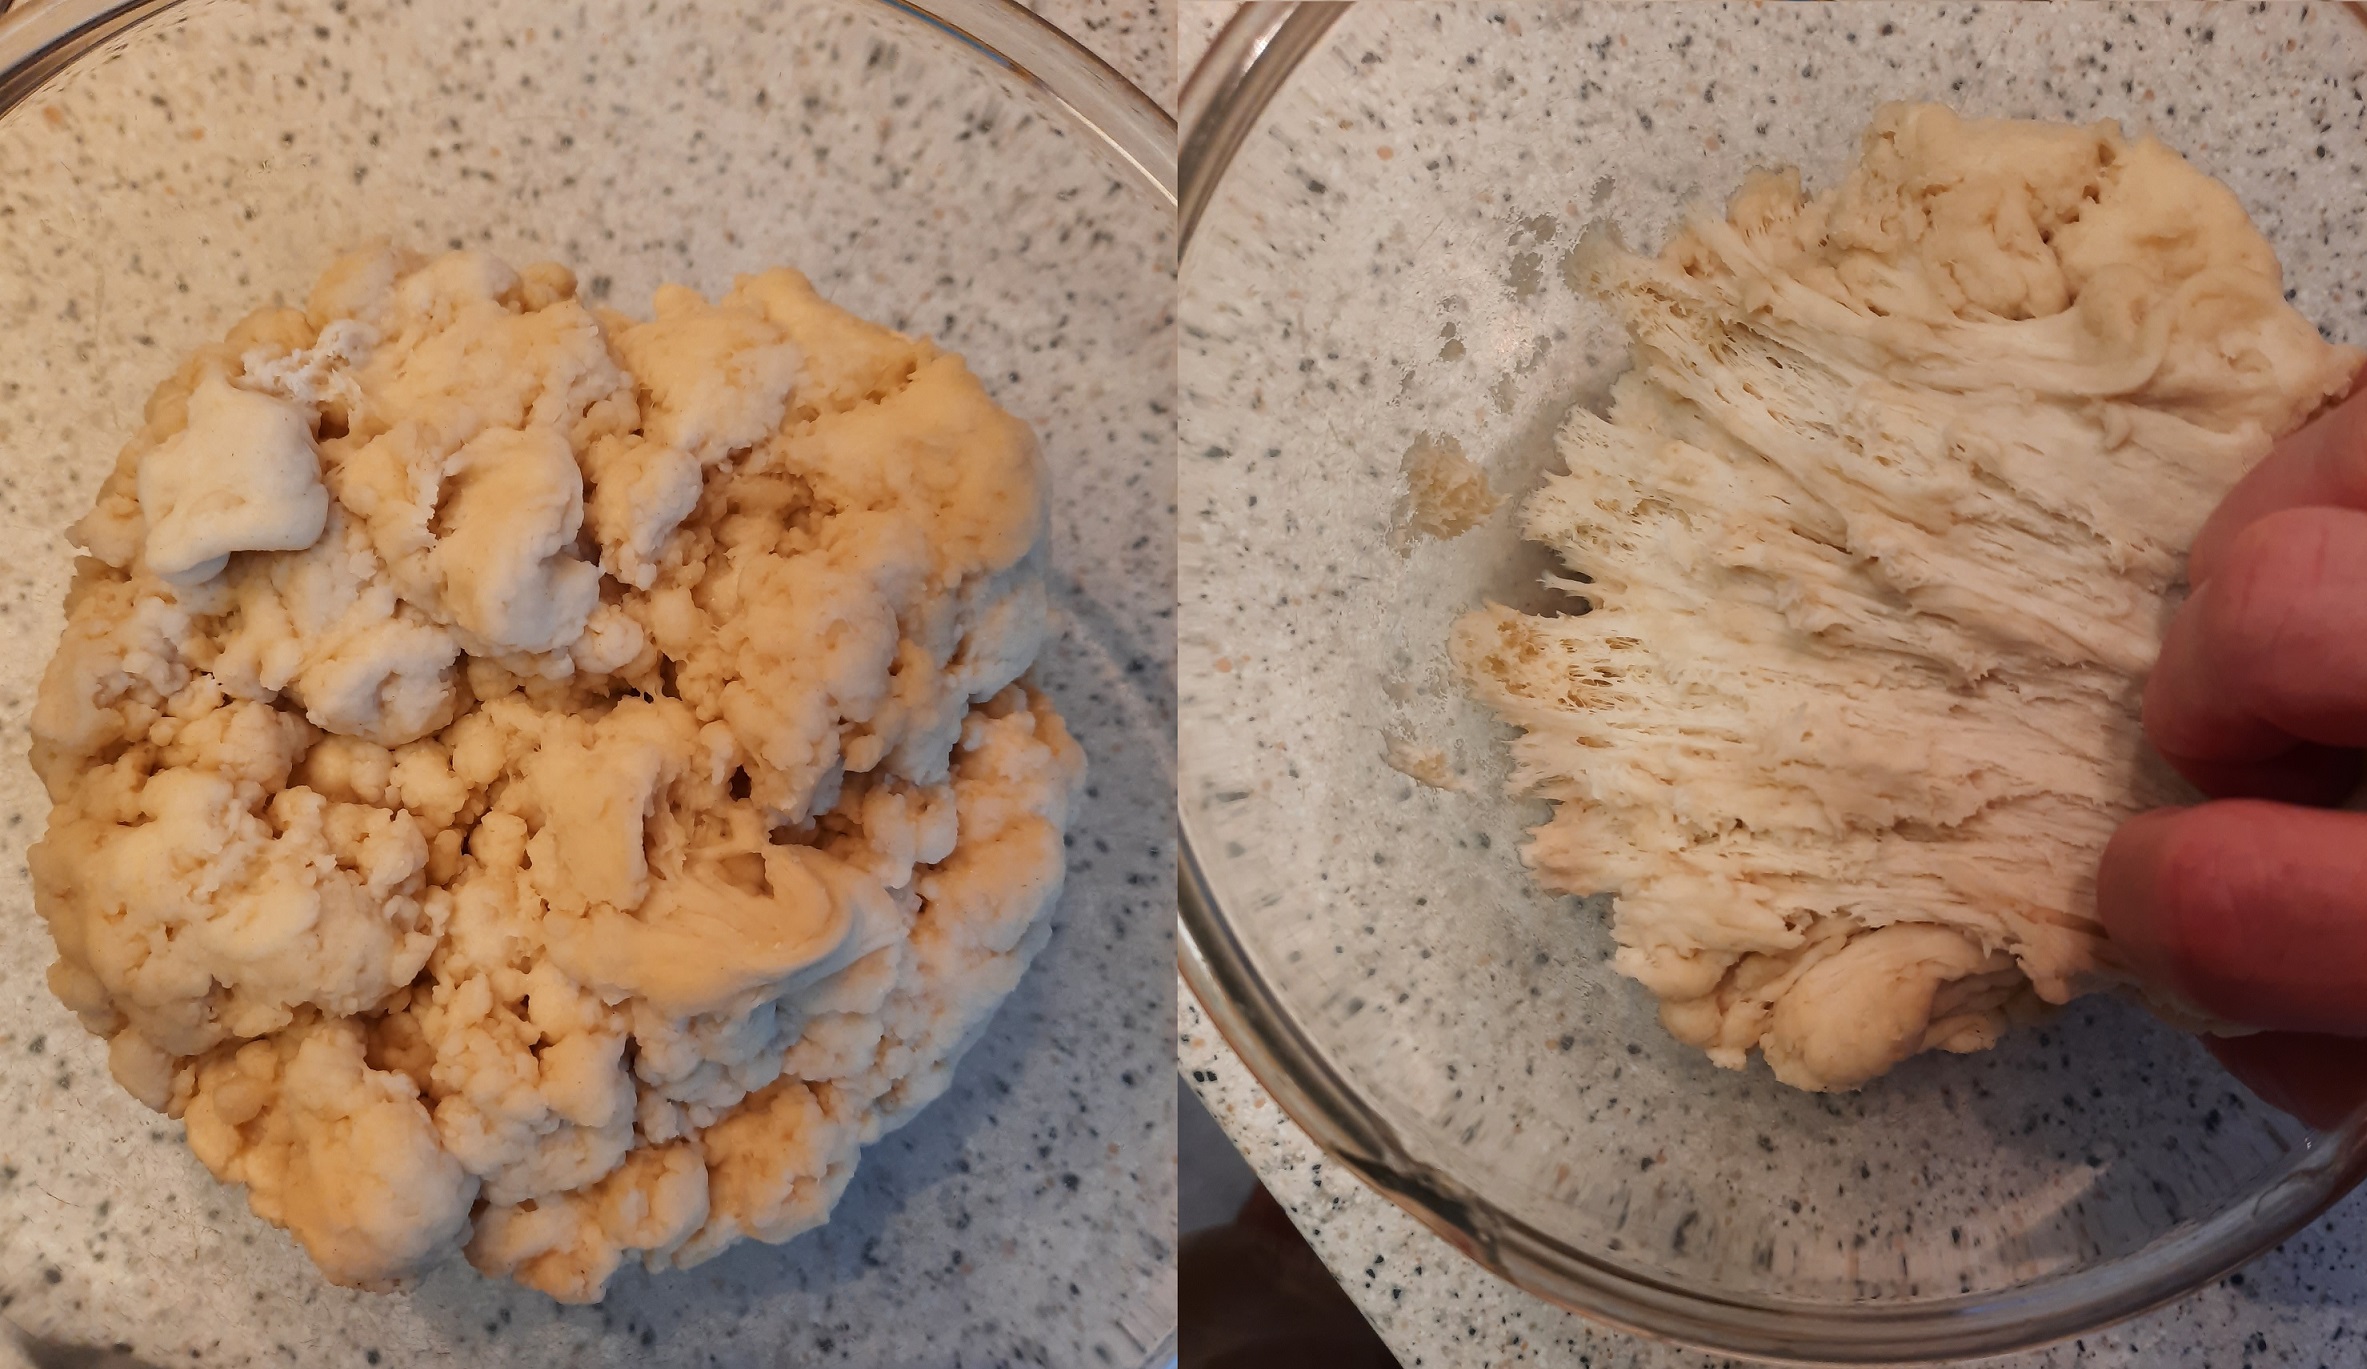
Biga: 16.5hrs @ ~18°C

300g flour
125g water
30g LM (50% hydration), refreshed twice
Main dough:

75g flour
3.5g diastatic malt
7.5g salt
200g water
15g olive oil 

84.8% total hydration
81% PFF
********************************************************************************************


 While that is basically the standard approach, I am conscious that these authentic formulas don't necessarily translate all that well using American flours. With that in mind perhaps Craig Ponsford's formula is most appropriate. I'll see if I can track it down..********************************************************

******* PLEASE READ *******
Some of the Community Bakes get very large with many post. If a user replies to ANY post in the CB they will (by default) receive email notifications for all new replies. If you post a reply and later you find that the notifications to that Topic are more than you would like you can either (1) opt out or (2) recieve replies to your post only. See image below.

Danny

mwilson's picture
mwilson

100% Durum wheat loaf, lievitazione naturale

In recent times I have been baking exclusively with durum wheat and the results have got progressively better with each bake. I wanted to explore the typical traditional process whereby an old-dough technique is employed although in real terms I applied the method in my own way.

Continuous old-dough process:

Old-dough (sourdough) (60% hydration and 2% salt).
refreshed 1:1 (old-dough:flour) + enough water to make a firm dough.

Make bread using refreshed old dough at 20%, reserve a piece.

In all cases the reserved old-dough and its refreshed version were stored in water to help speed up fermentation and reduce acid development, this being a common approach with lievito madre storage.


The following durum loaf was made at 80% hydration. A two-hour autolyse at 60% hydration was employed and the final mix was worked to full development. 


Old dough in water:


The loaf made following this one, despite all quantities being the same was much softer, something I was aiming for as the process continued. However, adding the last of the water broke the dough - in split, like curdling, thankfully I managed to work it back together with slap and folds. The lesson being that over-hydration with durum wheat is perhaps more of an issue when the gluten is highly resistant.

Thoughts:
Semola rimacinata can be difficult to work with because its gluten is overly tenacious (high P/L values) which means it requires much energy input to work it into a plastic and elastic dough. Using a starter that is on the reductive spectrum really helps to improve the properties whereas acidity makes the situation worse. Durum wheat works best where acid content is very low and the salt in the process positively helps to bring about that condition, improving dough properties.

Update:
-------------------------------

Spreadsheet:
Numerical representation of the method.

DanAyo's picture
DanAyo

Tip - Commercial Yeast, testing, expiration, & storage

Commercial Yeast

  1. Storage
  2. How long does it last
  3. Testing for viability 
  4. Bulk Purchasing is economical 
  5. Temperatures for Commercial Yeast

1. Storage
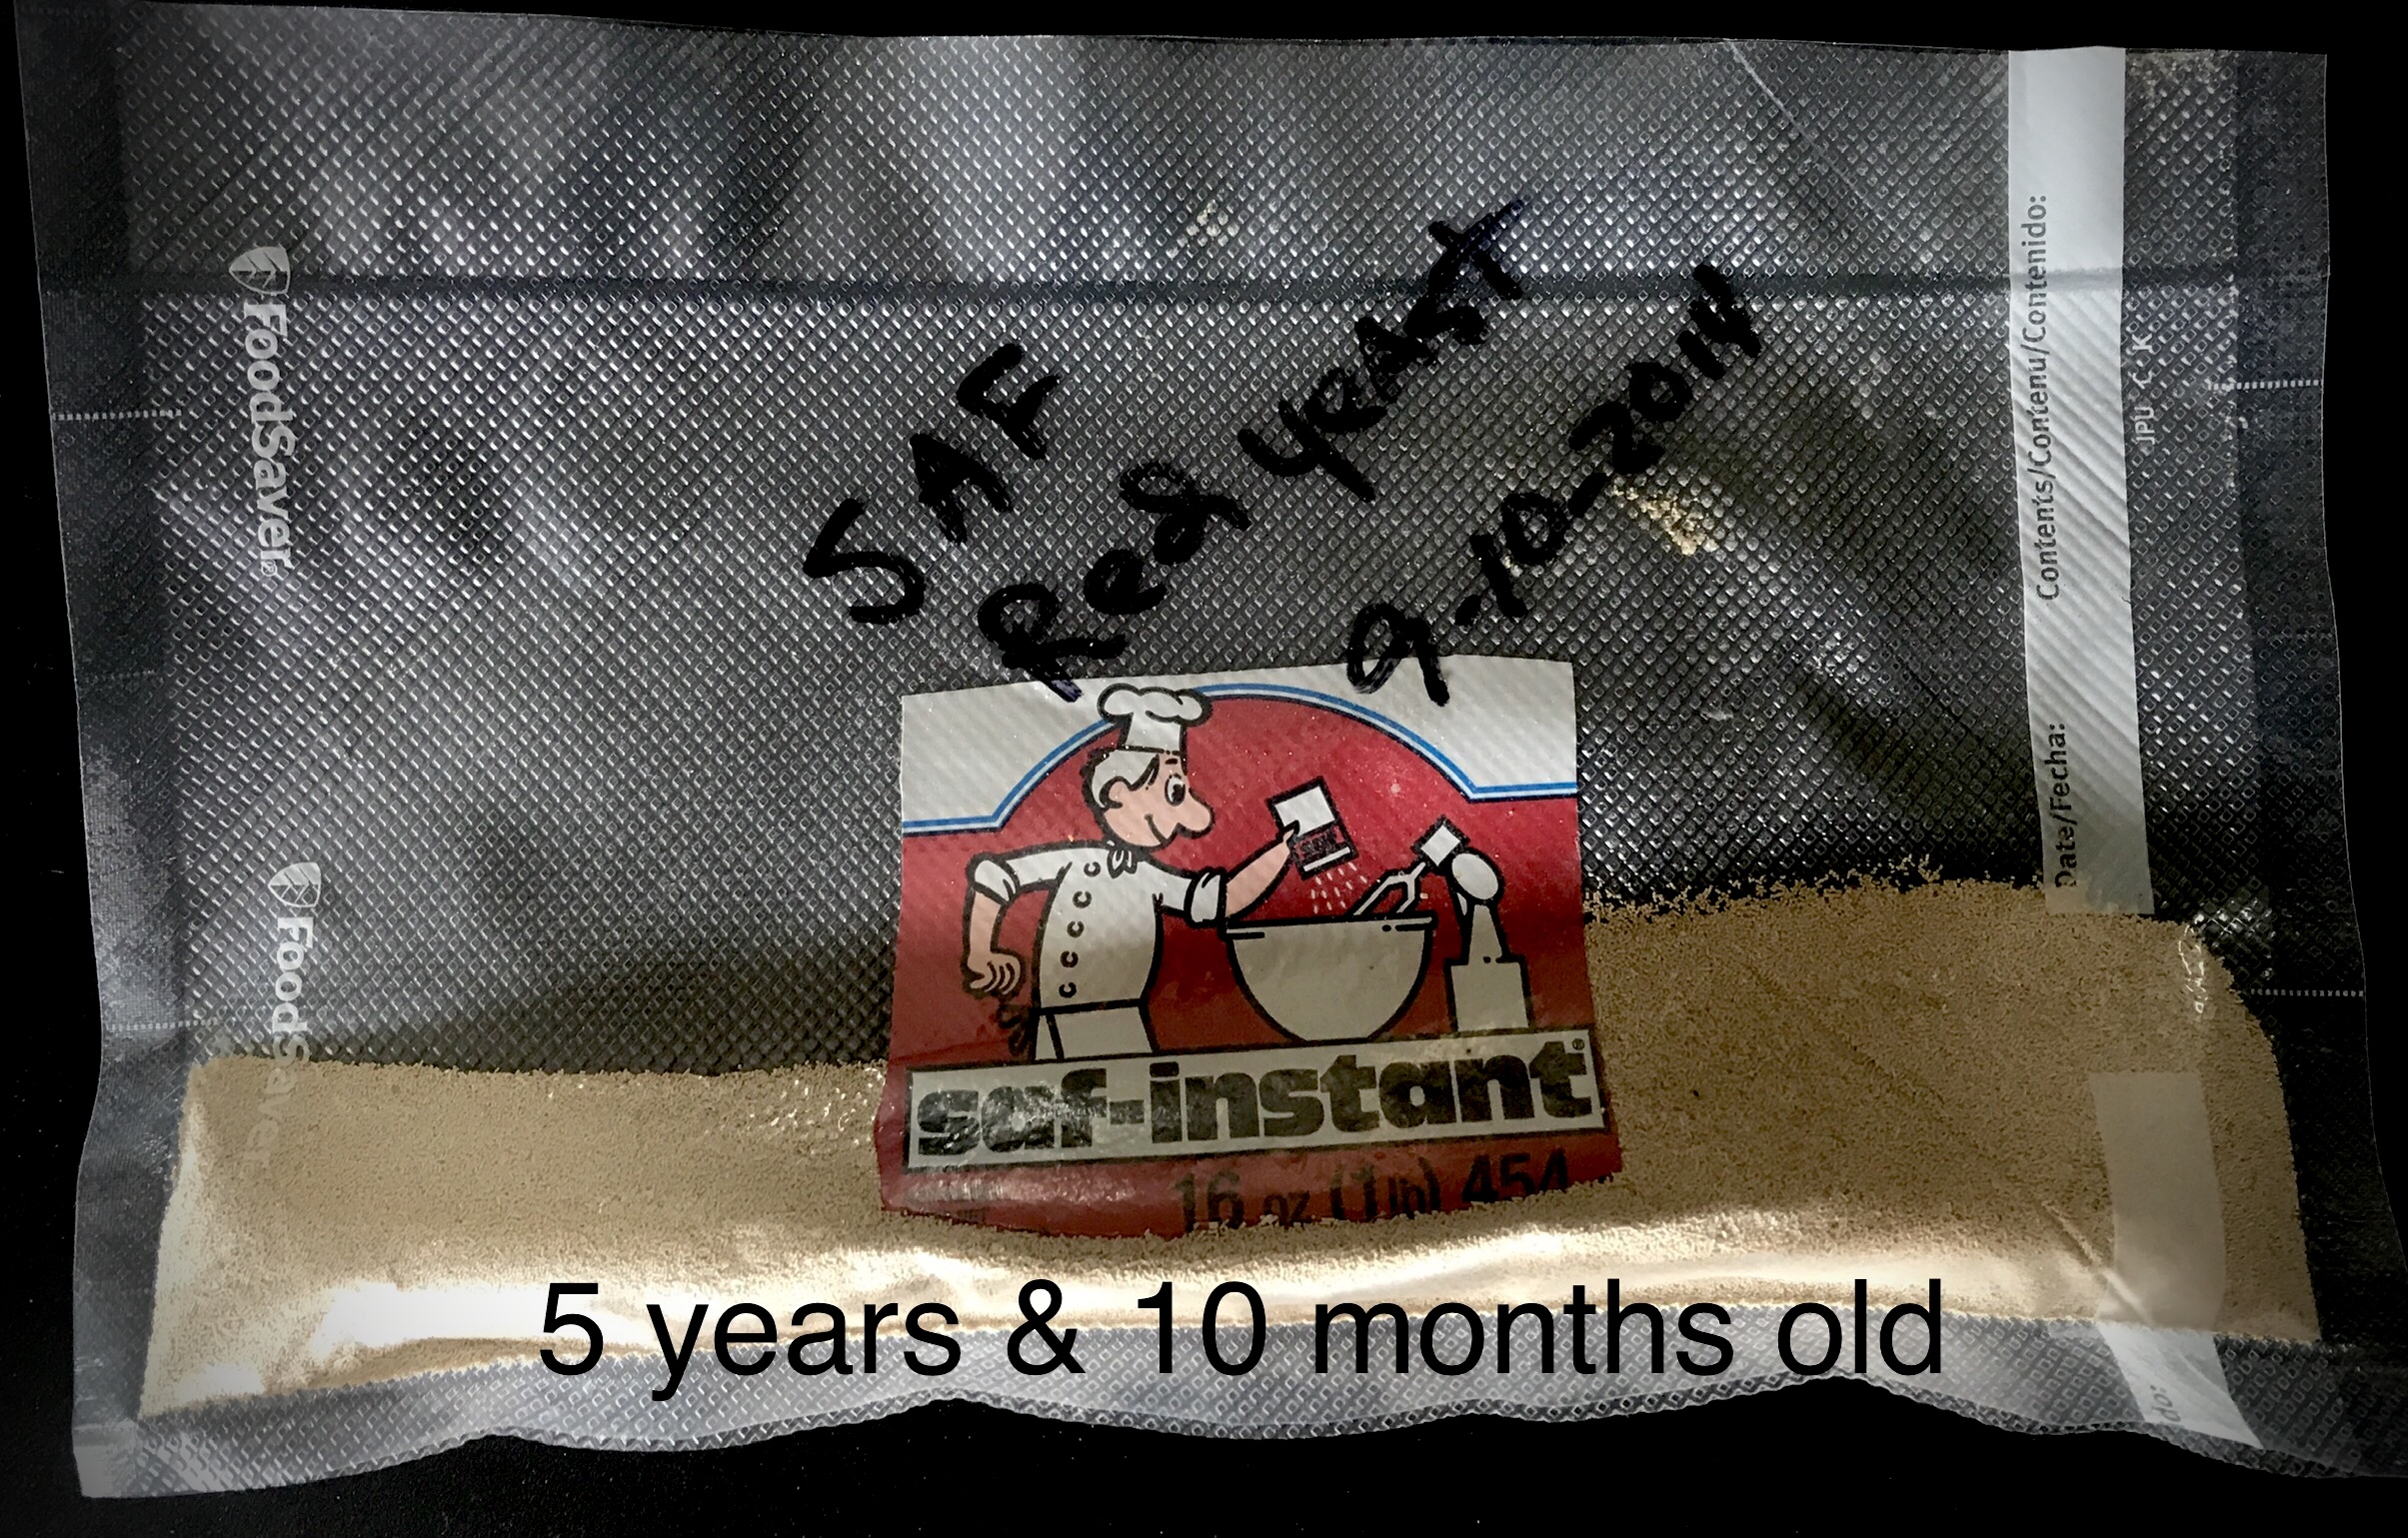
The image above shows bulk SAF Red Yeast that is stored in the freezer in a vacuum sealed bag. A small amount is removed from the original supply and is stored in the freezer in a ZipLok bag for easy access. The yeast has lost some strength, but it is 2 months shy of 6 years old.

2.  How long does it last
Stored properly, yeast is good for many years past the expiration date. Testing your expired yeast is a good idea. Checkout the “Update” at the bottom of this post.

3.  Testing for viability 
According to the Red Star Yeast (Lasaffre) website -

Yeast Freshness Test

 Follow these steps if you are unsure of the freshness of your yeast (or just want to give it a ‘good start’).

To ‘proof’ or test dry yeast, use the steps here:  (if proofing fresh cake yeast scroll down.)

  • Using a one-cup liquid measuring cup, dissolve 1 teaspoon of granulated sugar in 1/2 cup warm tap water at 110°F-115°F.
    • Using a thermometer is the most accurate way to determine the correct liquid temperature. Any thermometer will work as long as it measures temperatures between 75°F and 130°F. 
    • If you don’t have a thermometer, the tap water should be warm but NOT hot to the touch.
  • Stir in one 1/4 oz. packet (7g) or 2 1/4 tsp of dry yeast until there are no more dry yeast granules on top. Yeast should be at room temperature before using.
  • In three to four minutes, the yeast will have absorbed enough liquid to activate and start to rise.
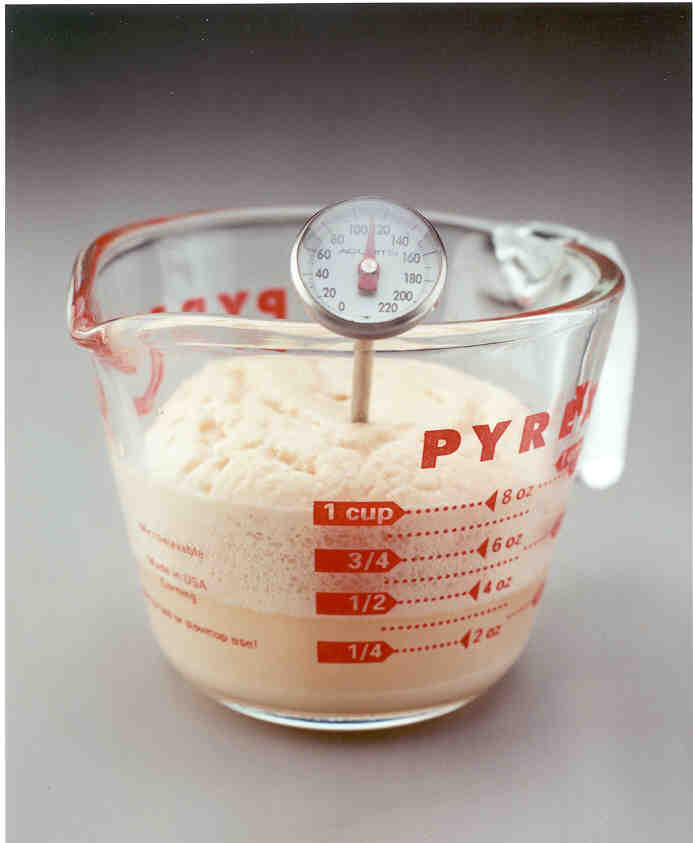
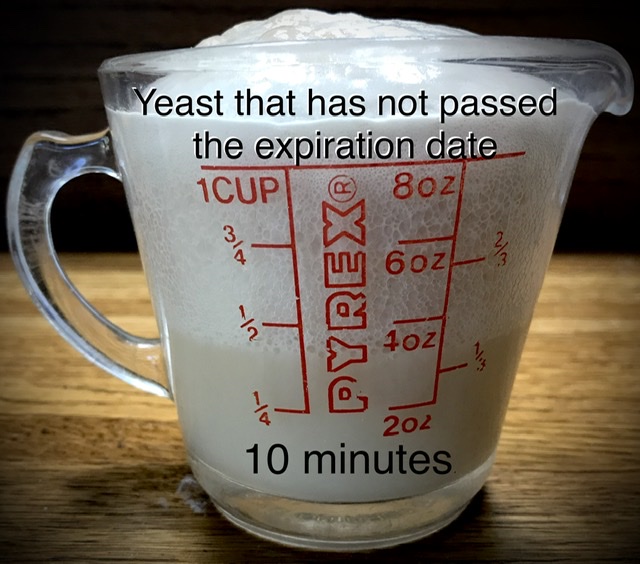
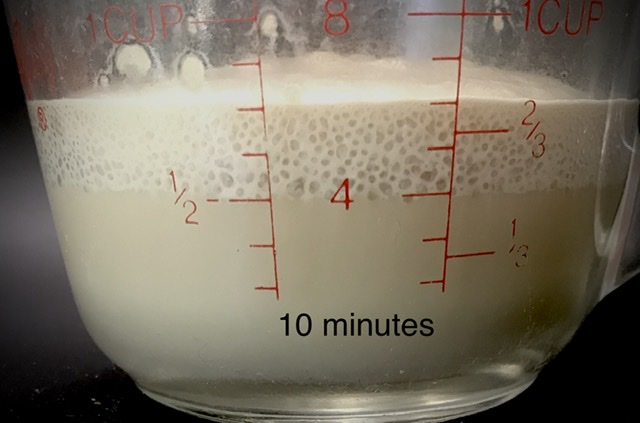
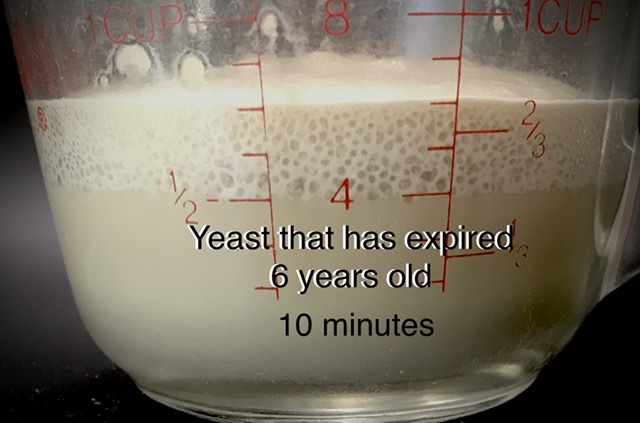
  • After ten minutes, the foamy yeast mixture should have risen to the 1-cup mark and have a rounded top. It should look like the picture below.

Yeast Freshness Test

  • If this is true, your yeast is very active and should be used in your recipe immediately.
  • Remember to deduct 1/2 cup liquid from the recipe to adjust for the water used in this test.
  • If the yeast did not rise to the 1-cup mark, your yeast has little or no activity. Discard this yeast.

4.  Bulk purchasing (1 pound) is economical
Compare THIS PRICE to the small packs available at the local grocery.

By-the-way - many artisan bakers choose SAF Red. It is an Instant Dry Yeast and requires no proofing. It can also be mixed dry into the flour, which is convenient.

After almost 6 years it appears a new bag is in order. The old yeast is still raising the dough quite nice, but upon testing it fell a little short. And besides it’s so inexpensive.

5.  Temperatures for Commercial Yeast
The article on  Bob’s Red Mill site is thorough and very informative. 

*** begin Bob’s Red Mill ***

Rough Temperature Recommendations

The guide below will give you a rough idea of ideal water temperatures for proving your yeast.

  •      Water at -4°F means your yeast will be unable to ferment.
  •      Water at 68° to 104°F means that your yeast’s ability to grow will be hindered, and its growth rate will be reduced.
  •      Water at 68° to 81°F are probably the most favorable range for the yeast to grow and multiply in.
  •      Water at 79°F are considered the optimum temperature for achieving yeast multiplication.
  •      Water at 81° to 100°F is the optimum temperature range for the fermentation process.
  •      Water at 95°F is the fermentation temperature that yields the best result.
  •      Water at 140°F or higher is the kill zone for yeast. At temps like this or higher, you will have no viable live yeast left.

Of course, these tentative estimations can be higher or lower depending on the type of yeast you are using, and whether it is active dry yeast, live yeast, or rapid rise yeast. The bottom line is that yeast thrives in warm water, sleep in cold water, and die in hot water. So, like Goldilocks and the Three Bears, it’s important to get the temperatures “just right” for your yeast to thrive and your bread to obtain the best rise and flavors possible.

*** end Bob’s Red Mill ***

Update - the new yeast arrived and a test was run.
Even though your expired yeast is raising your dough, it may be less effective than a fresher batch. If you pay attention to fermentation timing, you may be ending your bulk ferment prematurely.
   

For those that are calorie conscious and want to use No Calorie Baking Sweeteners, THIS LINK should be informative.

Danny
 

DanAyo's picture
DanAyo

Levain Calculation

Certain repeated questions turn up from time to time that are valuable, but the replies required are lengthy. This post was written with the thought that it can be linked for future replies to the question of Levain and how it is calculated.

There are 2 main methods used to calculate the percentages of Levain used in a formula.

  1. Total levain weight divided by the flour weight of the final dough

  2. Levain flour divided by TOTAL flour used in the recipe 

The various methods of calculating Levain can be confusing. Realize that many highly respected bakers use either of these methods. 

Method #1 -  Total levain weight (including the water and flour) divided by the flour weight of the final dough

This is best explained as the Levain being considered an ingredient according to Bakers Percentages, the same way salt would be calculated in a formula. It is important to realize that the weights of both the water and flour in the Levain are not part of the Total Water and Toal Flour in the formula.

Example -
Flour = 1000g (100% Bakers Percentage)
Water = 700g (70%)
Salt = 20g (2%)
Levain = 240g (24%) - Since the hydration of the Levain is not specified we commonly assume 100% hydration
Total Dough Weight = 1960g
Hydration = (Total Water = 700+120=820 ) + (Total Flour = 1000+120=1120) 820/1120=73.2% Hydration

Method #2 -  Levain flour divided by TOTAL flour (including the flour in the Levain) used in the formula
This method is called the Percentage of Pre-Fermented Flour (PFF). It is this method that has been adopted as the standard by the Bread Bakers Guild of America (BBGA). Most bakers on The Fresh Loaf use this one.

Example -
Total Flour = 1000g (100%)
Total Water = 700g (70%)
Salt = 20g (2%)
PPF (Pre-Ferment) = 12% Levain Hydration = 100% - With this method the hydration of the Levain is always specified. In this example there is 120g water and 120g flour in the levain.
Total Dough Weight = 1720g
Hydration = (Total Water 700g) + (Total Flour 1000g) 700/1000= 70% Hydration
NOTE - the dough minus the Levain contains 580g Water and 880g Flour.

Since this post was published as a reference for future questions, please let me know if you find errors or have additional pertinent information.


FueledByCoffee's picture
FueledByCoffee

My Ideal Focaccia

I've been working my way towards making what I envision as my ideal focaccia in the past couple weeks.  Due to time constraints on previous batches I sacrificed quality to fit my schedule.  The results were okay, worth eating but not worth writing about.  In my latest batch I applied what I had learned from previous batches and simultaneously found myself with less time constraints as I'm sure many are at the present due to COVID-19.  I'm happy to share my process and results and encourage you to give it a shot.  This recipe is entirely mixed by hand so the only real tools needed are a scale, a scraper, and common ingredients.

note:  I used a liquid levain (100/100) in this but for folks who don't have this a poolish could also work (200 grams water/200 grams flour/.2 grams Instant Dry Yeast)

Mix 800 grams of unbleached all purpose flour and 600 grams of water in a large mixing bowl by hand until ingredients are evenly hydrated.  Cover this and allow it to rest for 1 hour (autolyse).  I used fairly warm water (nearly 100 degrees) because it's winter and my flour and home are at a fairly low ambient temperature, but that is something you will need to determine based on your environment.

Take your ripe liquid levain and scale 400 grams on top of the Autolyse that you started.  At this point I also added 7 grams of Instant Dry Yeast (This amount could vary pretty drastically depending on your environment).  Pinch the levain and yeast into the dough at first and then start turning and folding the dough onto itself as the culture begins to form a homogeneous dough with the autolyse.  After the dough has become even, add 19 grams of salt and 40 grams of water.  Work the water and salt into the dough and then use the rubaud method to continue to develop some strength in the dough.  After a few minutes add 70 grams of olive oil, adding slowly and incorporating is more gentle on the dough and probably easier as well.  Once the oil is incorporated and everything is homogenous you can cover the dough and let it rest for 20 minutes.

At this stage I did a series of 2 "laminations."  If anyone wants I can elaborate on it but I think it's a fairly documented technique.  The second lamination was another 20 minutes after the first.  After the second lamination I allowed the dough to proof for 30 minute before doing the final fold (which was just a normal in bowl fold).  After that I allowed the dough to proof for 2 hours.  Throughout the series of laminations and folds you should have felt a shaggy dough turn a supple and quickly growing mass of dough.  The dough was probably about 2.5x it's original size by the time it is divided.  

Oil your work surface with olive oil liberally and turn out your dough.  At this stage I need to leave you to your own devices a little bit.  I have a few 14 inch round pan that work really well for focaccia but you will need to take stock of your own pan situation and divide accordingly, This batch makes 2 14 inch rounds (approximately 950 grams of dough per pan (each pan is approximately 154 square inches where as a standard half sheet pan is 192 square inches (so the math isn't exact but if you did a 1.5x batch you ought to fill out two half sheet trays nicely))).  So if you made it down that rabbit hole then you're probably still sitting with your dough on your bench wondering when I'll get on with it.  Cut your dough with a bench knife into the appropriately sized pieces for your pans.  Oil your hands do the dough won't stick to you and gently lift and flip the dough into your pre-oiled pans.  Gently press the dough towards the edge of the pan but don't force it.  Allow the dough to rest 30 minutes and then dimple and spread the dough to finish filling out the pan.  At this stage you could wait another 30-45 minutes and top and bake your focaccia or you could go for extra credit fermentation and retard the trays of focaccia overnight.  If you retard overnight pull out your trays of focaccia an hour or so before baking.

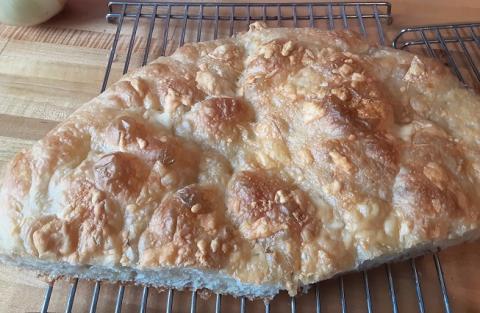
Dimple, Top, and Bake at 450 for about 25 minutes until the bottom and top are golden brown.  I put a three cheese shave blend of asiago, romano and parmesan but the topping are limitless.


Final Dough Formula:

800 grams Flour

640 grams Water

19 grams Salt

7 grams Yeast

400 grams liquid Levain

70 grams olive oil + oil for pans and work surface


Simplicity of ingredients and the right techniques.


Turbosaurus's picture
Turbosaurus

Is there a book on bread chemistry/science? Peer reviewed articles?

i am looking for a book on bread making that does not contain ANY recipes.

 A book that just talks about the chemistry and biology of bread making.  There are a couple pages in FCI's Fundamentals that really whet my appetite for knowledge, but it’s no where near enough.  With a bakers ratio and a knowledge of the chemistry I should be able to make anything better than a “recipe” that dictates each step.  

I'm Sure there is little consumer demand for such a dense thome. This book probably doesn’t exist, but the data has to exist.  What was your best eye opening scientific moment? 

I'm so frustrated with debating nonsense,1-3% hydration ratio recipe differentials when I have a moisture meter and my flour varies by more than that depending on the weather!  Or you proofed too long/ not long enough when yeast grows 4x as fast at 5% dissolved oxygen as 15% under the same temp and pH.  Four times as fast!  To say nothing of gluten or bran content.  These are all known variables - there’s no reason I should have to stare at bread dough once an hour for 3 days or assume grandma Rosie's recipe should come out good, when her water was so hard it was liquid rock and she kept her house sweltering.... I’d have to wear a tank top to Christmas dinner in upstate NY.

I would love a book, but since it probably doesn’t exist.. any data set you have, I would appreciate greatly.  


idaveindy's picture
idaveindy

Free or discounted Kindle bread books.

There are still some active sales mentioned below, but otherwise this thread/post is "closed" and the next post is at: www.thefreshloaf.com/node/66005/free-or-discounted-kindle-bread-books-2

The current / latest post is: https://www.thefreshloaf.com/node/70286/free-or-discounted-kindle-bread-ebooks-4

--

I intend these posts and comments to give Fresh Loafers heads-up when bread-baking Kindle ebooks go on sale at Amazon for either heavily discounted prices or free.  They sell for $.99 to $3.99. 

I'll start off with three books that are always (at least have been for a while) free. Two are public domain.

 As new books go on sale  I will (or you can) add them to the comments.  I mostly get these notifications from a service at bookbub.com.  The sales usually last from 3 days to a couple months, so act quickly.  The "tag" with "frog" in it, is so the webmaster can make a few pennies in commission, like his sidebar links.

All the major bread authors have sales, Robertson, Reinhart, Forkish, etc. 

For a longer list of what I've already picked up, and how much I paid, and a very very short review, see my post at: http://www.thefreshloaf.com/node/61370/my-breadpizza-library-kindle-and-hard-copy

For lists of ebooks by author, see: www.thefreshloaf.com/node/61698/my-favorite-bread-pizza-authors

---

Free: The New Dr. Price Cookbook, Kindle Edition, by New York Royal Baking Powder Company.

https://www.amazon.com/New-Dr-Price-Cookbook-ebook/dp/B00849LL7A?tag=froglallabout-20

Public domain. The bread and rolls in this book are all leavened with baking powder. No yeast, no sourdough. Dated. Almost all volumetric measurements. Inexact oven temps, such as "medium oven" or "hot oven."  

---

Free: Woman's Institute Library of Cookery Volume 1: Essentials of Cookery; Cereals; Bread; Hot Breads, Kindle Edition, by Woman's Institute of Domestic Arts and Sciences.

https://www.amazon.com/Womans-Institute-Library-Cookery-Essentials-ebook/dp/B00847SA6C?tag=froglallabout-20

Also dated, but interesting. Hey, it's free.

---

Free: How to Bake: The Art and Science of Baking, Kindle Edition, by Dennis Weaver.

https://www.amazon.com/How-Bake-Art-Science-Baking-ebook/dp/B0086W53ZQ?tag=froglallabout-20

Modern. A very comprehensive baking book with yeasted dough and baking powder. A little bit on sourdough.  Explains the uses of oil, egg, milk in baking.  He kind of uses it as an advertisement for his company, but still informative.  Great for beginners.   

 --

To see Amazon's current free and $.99 ebook "bread cookbooks", use this link:

https://www.amazon.com/s?k=bread+cookbook&i=digital-text&s=price-asc-rank&tag=froglallabout-20

--

This thread is continued at: http://www.thefreshloaf.com/node/66005/free-or-discounted-kindle-bread-books-2

DanAyo's picture
DanAyo

External Steam Generator


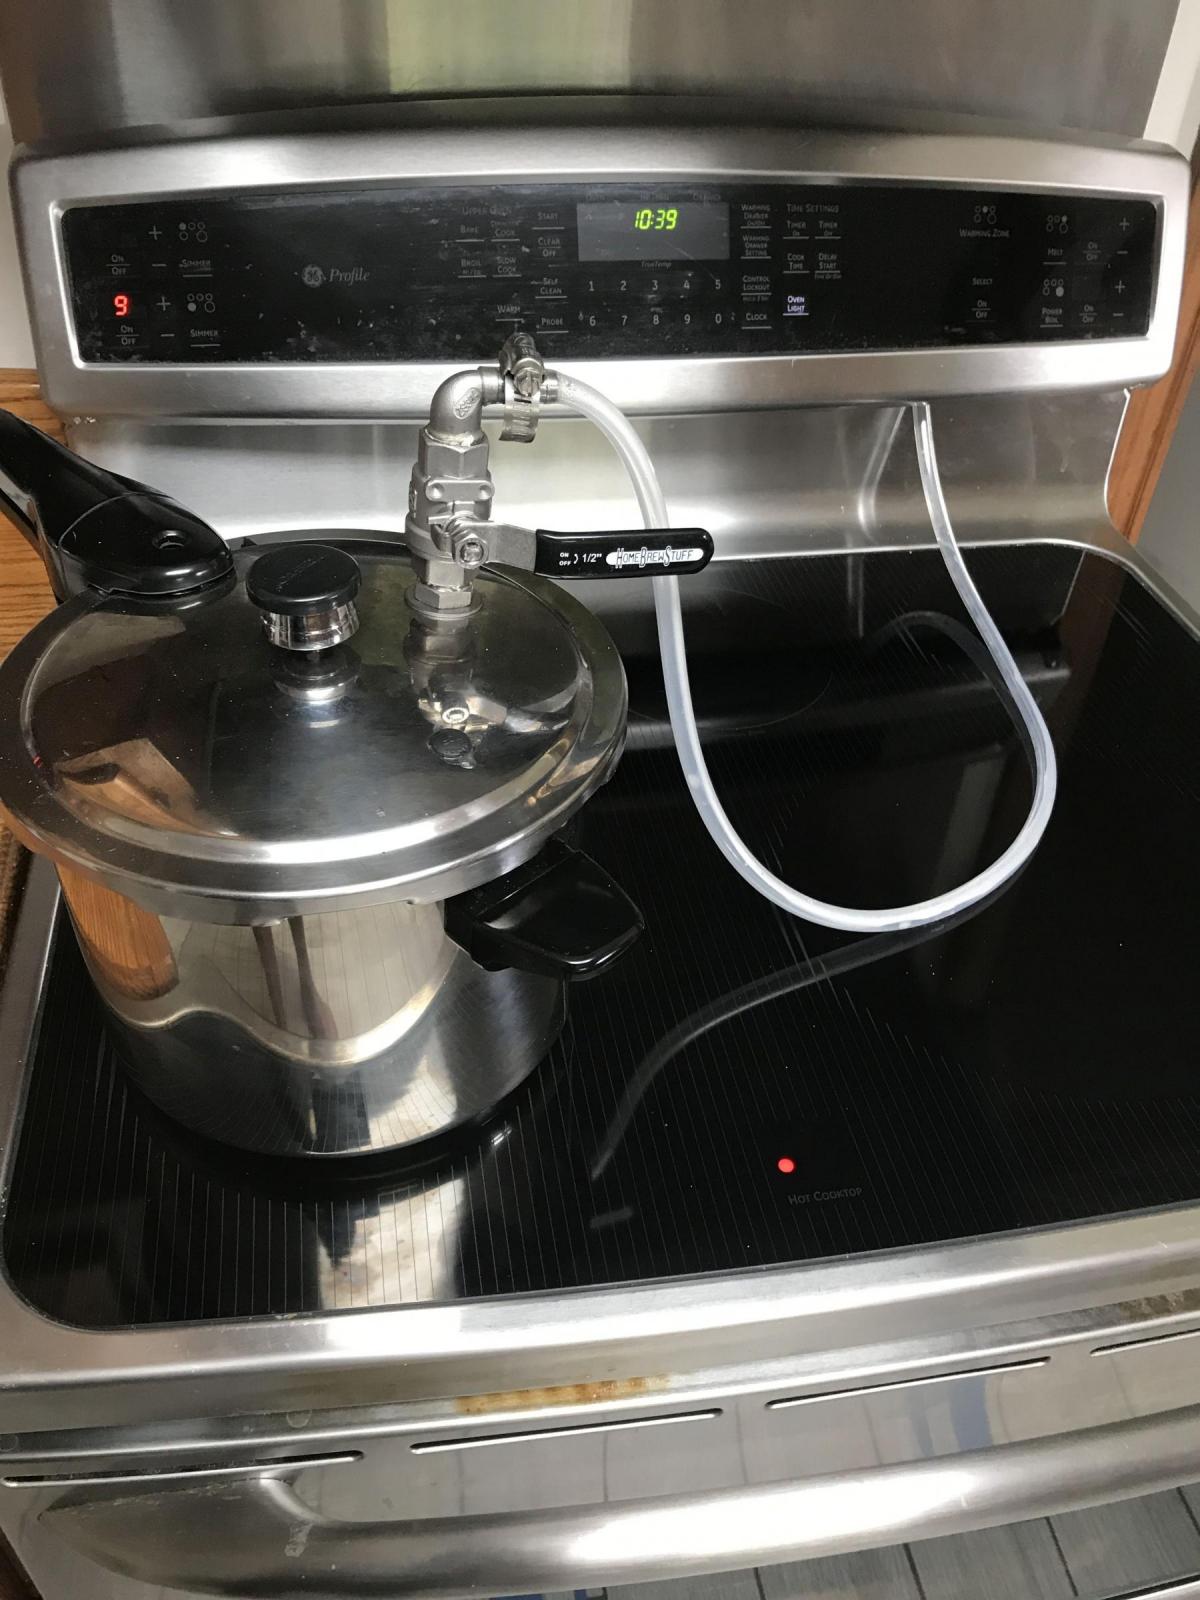
The following is what I did to fabricate an External Steam Generator for my home oven. Steam under pressure is a potential safety hazard. I am not endorsing, nor do I recommend this appliance for others. If another chooses to build a unit like this or similar to this, they do so at their own risk. If in doubt contact a professional. I don't want to see others burned, and I especially don't want to get myself burned. (If you know what I mean :D)

Use THIS LINK for best viewing or click the video below.

Here is a list of materials used for my project.

I used a 1/2" ball valve, but it was larger than necessary. Were I to do this again, I'd probably opt for a 1/4" needle valve instead. The needle valve would allow more precise control over the flow rate.

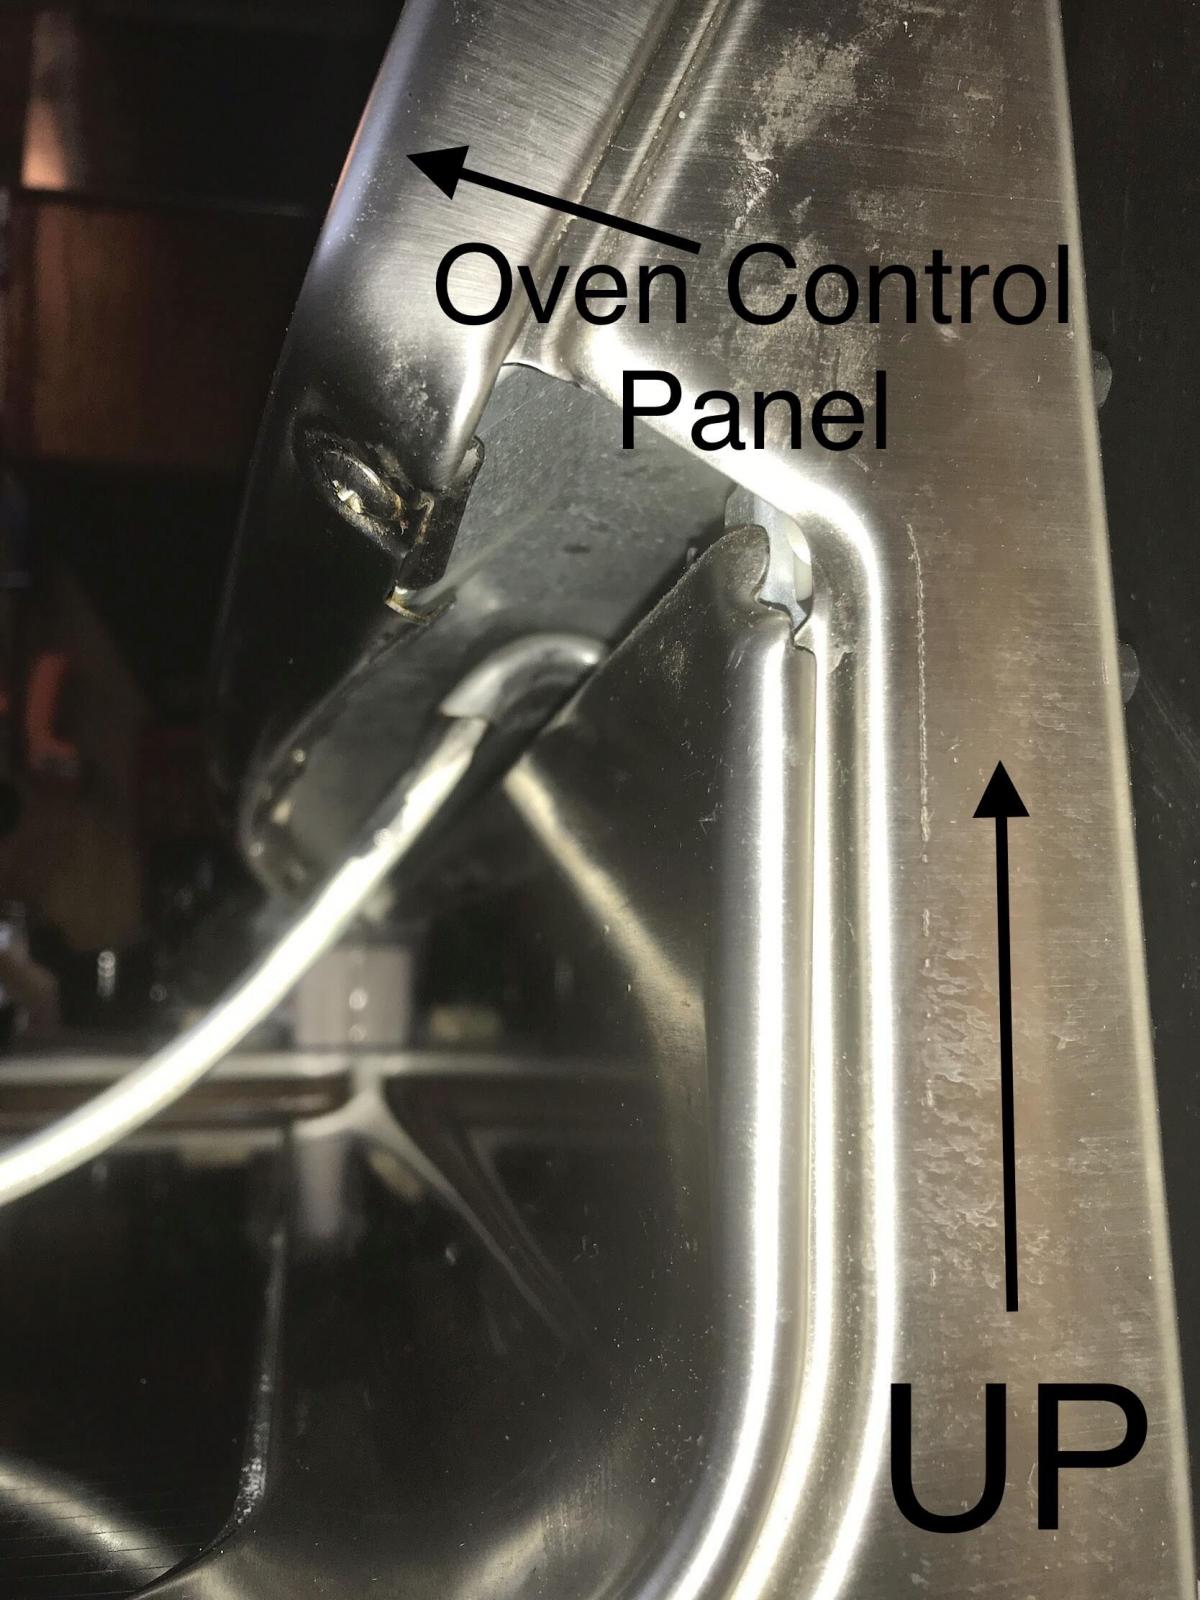
The steam is injected into the oven via the oven's exhast pipe. On my oven it was located underneath the front of the control panel. See image below.

By the way - I was inspired by Lance, aka Albacore. We’ve been pursuing high volume steam for some time. Here is his article. Lance tells me he got the original idea here.

I repeat. This is what I did to set my system up. This is not an endorsement or recommendation for others to do the same. Should anyone decide to build a Steam Generator, please make sure you know what you are doing. If in doubt, contact a professional. I would hate to see others get burnt, and I especially don't want to get burnt myself.

Updated 7-5-20 -
It seems that high pressure steam is not as efficient as low pressure. When the Pressure Cooker is injecting high pressure steam it appears that much of it is pushed through the oven and leaks out into the kitchen. Since the high pressure option is only used to inject steam for a short time (90sec) it is believed that the steam vents through the oven and it’s affects are not fully utilized. Also large volumes of steam will likely reduce the oven’s heating. By adjusting the heat under the Pressure Cooker and opening up the gate valve, steam pressure can be adjusted at will. The audible sound of the flowing steam as it passes through the silicone tubing is a good indicator of relative pressure. As of early testing it seems good to allow the steam to flow for many minutes during the initial part of the bake. The concern of over steaming is mitigated by the fact that my home electric oven is not tightly sealed and consequently leaks. For the first low pressure test it was allowed to flow for 8 minutes, with good baking results.

Here is a 5 second video showing low pressure steam slowly escaping the home oven,

For best viewing use THIS LINK


Danny
Pages