The Fresh Loaf

A Community of Amateur Bakers and Artisan Bread Enthusiasts.

Most bookmarked

nbicomputers's picture
nbicomputers

finaly made it

norms roll 2

Just got back from the suppler.

picked up everything but the shortening dam i forgot it ill get it in a week or so i do have enough on hand to het stared for the holidays

just so it was not a lost day i made these

norms roll

roll crumb

 i made a video showing the way to shape  but it did not come out well i will edit it and post it i guess to you tube and link to it latter.

when you see the vid note thst the thumb does not move or come out of the roll untill the last fold. about 1/3 to 1/2 of the dough is folded over the thumb. you will also see that each bloomed in the oven and is  not atached to the other folds. by the look you can tell the roll is hand shapped and not cut or stamped. rye flour helps this with out it the roll will look like the shape is cut into the dough rather than formed.

ehanner's picture
ehanner

40% Rye by Hamelman

Hamelman's 40% Rye with Caraway

I'm starting a string of rye breads using Jeff Hamelman's Bread. I just recently purchased this book and I can say "Bread" has had a huge impact on my baking. I strongly recommend this book for anyone who is a contributor here. Forget the comments that it is written for the commercial baker and ignores the home baker. Hamelman is clear in his writing and shares detailed information to help understand the handling techniques needed to produce beautiful bread. This is a great resource on so many levels you will never be sorry for adding it to your library.

Here is the recipe I used pretty much straight from the book. The details provided in the side bars give you more depth of understanding but this will get you close.

40% Rye Bread with Caraway
From Jeff Hamelman's-Bread

Rye Sour

  • 360 g Medium Rye Flour
  • 360 g Water
  • 20 g Sourdough Starter

Final Dough

  • 545 g King Arthur All Purpose Flour
  • 260 g Water
  • 740 g (all of the above) Rye Sour
  • 1 Tsp. Instant Yeast
  • 15 g Salt
  • 15 g Caraway Seeds

The evening before the bake, prepare the rye sour by mixing together the rye flour, water and mature sourdough starter until homogeneous. Cover with a light dusting of Rye which will show you the progress of the sour. As it cracks open you will know fermentation is causing it to grow. Let stand overnight for 12-16 hours at 75-80°F.

The next day, combine the all purpose flour, water, instant yeast and rye sour, adding additional water if necessary to obtain a dough of medium consistency. Turn the dough out of the mixing bowl onto your work surface and begin hand kneading the somewhat sticky dough until it just starts to come together. Add the salt and continue hand mixing until the dough reaches medium development, about 10-15 minutes. Add the caraway seeds and hand mix just until evenly distributed within the dough. Place the dough in a lightly oiled container, cover, and let ferment at 78-80°F for 1 hour. Divide the dough into 1 1/2 lb. pieces, lightly round and let rest under a plastic sheet for 10 minutes. Shape the pieces into batards, place the batards seam side down on a couche or in a banneton and let proof for an additional hour.

After an hour, turn the batards onto a peel or parchment, score and bake in a pre heated oven at 450F for the first 15 minutes of baking. After 15 minutes, turn the oven down to 420F and bake for an additional 20 minutes. A robust bake is more flavorful. Under baked is gummy. I shoot for 205F internal temp.

This bread needs to be completely cool before slicing. Enjoy!

ehanner's picture
ehanner

PR's Italian with Biga

Italian
Italian

This is my favorite Italian bread formula so far. I have been making this for the last two years ago when ever I need a gift for a lunch or my in-laws who love it. When I started making this mix with the biga, I began to understand how much the 12-14 hour pre ferment time helps the depth of flavor.

The recipe is straight out of th BBA under yeasted breads with a Biga. I adjusted the amounts so I end up with 2 - 1-1/2 Lb loaves after baking. Mr. Reinhart's formula is for 2 - 1 Lb loaves in the book but we like the billowy sandwich size that I can bake on the stone or sheet pan. Two of these is all I can get in my oven. Yesterday I made a 7.4 Lb batch that was double the size of todays and produced 4 similar loaves. Todays mix was done by hand, no mixer needed.

I started at 9PM last evening by mixing the Biga. I have learned from reading BBA that I need to consider a few things before I start. First, do I have 14 hours before I can mix the final dough? Second, what is the ambient temperature where the Biga will ferment? Knowing those two things will tell me how much yeast to use to get the best flavor. In this case, it is a warm day, the air isn't on and I think the 14 hours will stay at around 74-76 F. I decide to use 1 teaspoon of IDY yeast in  478 grams of flour and 340 grams water at room temp. I mix and make sure the biga is well blended before covering with a plastic bag.

This morning at 11AM I mixed all the dry ingredients, biga and milk and oil in a large bowl with a plastic scraper. Once it was barely combined I covered and let it set for 30 minutes to let the liquid absorb. The dough was sticky and slack and I kneaded and folded for a few minutes and let it ferment for an additional 2 hours. During the ferment time I usually fold twice and gently reform as in Marks latest video. That's a great technique to use that helps the dough become a ball without kneading.

Anyway, It doubles in 1-1/2 to 2 hours at which time I divide and shape into a log, place in a banneton for 30-40 minutes. I turn the oven on for this bake when the dough is divided, pre heated to 450F. When the dough is poofy and looks ready, not over 45 minutes, I turn it out on a wood loading peel covered in cornmeal. Spray with water, top with sesame seeds (pat them lightly so they stick), slash and into the oven. Steam as usual and lower the heat to 400F for 25 minutes. I was starting at 500 and lowering to 440 or so as PR suggested but I like the color better at the lower temp. It takes a few minutes longer but for me it looks like Italian.

Here is the recipe sized for 2.5 Lbs of dough. There are many detailed instructions that you can find in the book but if you want to try it this will work. This is one of my favorite yeasted breads.

Sorry about the text formatting. Hope this looks OK.--Enjoy! 


Italian Bread-P. Reinhart

Makes 2.5 Pounds of dough   

Biga                             3-1/2 C            18 Oz               510g

318 g flour-226 g water 1/2 teaspoon Instant yeast.


Dough

AP Flour                       2-1/2 C           11.25 Oz      319g               

Salt                              1-2/3 t              .41            12g                 

Sugar                           1 T                   .5 Oz          14g                 

Instant Yeast               1 t                    .11Oz          3g                   

Diastatic Malt             1 t                      .17             5g                   

Olive Oil                      1 T                   .5 Oz         14g                 

Warm Milk                  ¾ C plus 2T      7-8 Oz        227g               

Cornmeal for dusting                          TOTAL       1138g  (2.5 Lb)

Method:        

Mix dry ingredients together in bowl. Add biga in small pieces, olive oil and ¾ Cup warm milk, mix. Adjust water/flour as needed and rest 15 min.

Knead until starting to develop. Dough temp should be 77-81 F.  Transfer to oiled bowl, cover and ferment 2 hours or double. Fold every 45 minutes during ferment. Watch for double in volume.

Divide in 2. Shape into logs. Gentle handling. Light dusting of flour and rest 5 minutes. Finish shaping. Lightly spray oil and cover, proof for 1 hour or 1.5 increase in volume.

Preheat to 450 F. Score, Steam and lower oven temp to 400 after 2 steams. (400 and longer for crustier). 25 minutes for loaves, 15 minutes for rolls.


Janedo's picture
Janedo

Kayser's baguettes "Monge"

Baguettes "Monge"

Sandwhich "Monge"

These are the "famous" french baguettes from the Kayser bakery rue Monge in Paris.

I upped the hydration level, but didn't really calculate. The recipe here is the original and I don't know how it would work with american flour, so if anyone wants to try, keep an eye on the dough.

I also would leave them to rise a bit longer next time, but we were in a rush to go on a picnic (the fated one where I broke my pinky!) I thought the crumb should be a bit more open. They are really good, though. Obviously not sour because the sourdough doesn't have the time to react, but it sure gives great oven spring.

Baguettes "Monge"

500 g farine T65 (or maybe just white bread flour?)

100g liquide starter at it's peak

5g fresh yeast (or about 3/4 tsp fast acting package yeast I think)

10 g salt

270 ml water at 20°C

Mix the fresh yeast with water and leave 20 min to ferment.

Then make a regular dough using your method. Put the dough in a bowl and cover with a damp cloth. Let it rest 20 min.

Take the dough out and divide it into three pieces. Form three equal size balls and leave them on the counter to rise, covered with a damp cloth, 40 min.

Form three baguettes with pointed ends, place them in a baguette banneton or on a baking sheet covered with parchment paper.

Cover with a damp cloth and let rise 1 1/2 hrs.

Preheat oven to 220°C. Sprinkle flour on the baguettes and do the incisions. Do the water thing (coup de buée) and place your baguettes in the oven.

Leave them to back around 20-25 minutes.

bshuval's picture
bshuval

Sullivan Street potato pizza

I've been doing quite a bit of baking this weekend. In addition to the Grape Harvest Focaccia I've blogged about yesterday, today I made the potato pizza from Maggie Glezer's "Artisan Baking". The recipe calls for a very wet dough -- more water than flour, actually. You knead the dough using the paddle on your stand mixer for 20 whole minutes. In the process it miraculously transforms from this:

Kneading the dough

To this:

It really is a quite unbelievable transformation. However did anyone figure it out? This dough, albeit wet and sticky, passes the windowpane test:

 I liberally oiled (although, in retrospect, not liberally enough, as a bit of pizza stuck to the pan) a half-sheet pan, and shaped the wet dough onto it, carefully as to not burst any bubbles. I had to let the dough rest several times in order to stretch the dough to fit the entire pan. Each time, using some more olive oil. I added the potato-onion-rosemary topping (the potatoes were thinly sliced using a mandoline, and then salted and squeezed from the liquid before mixing with the onion and rosemary). I added some more olive oil on top of the topping. 

I put the pizza into a preheated oven for 40 minutes. Shortly after the pizza began baking, the house filled with a wonderful aroma of onions and potatoes. It really got those gut juices going! Halfway through the baking I took a peek to rotate the dough, so I used that occassion to take a picture of the partially baked pizza:

40 minutes later, the pizza was ready:

 The pizza is done

I removed it from the pan (as I said above, I didn't oil the pan well enough, so it stuck in a couple of places.) The crust rose nicely; here is a side view:

This was a fun baking project!  

dolfs's picture
dolfs

Dough Calculator Spreadsheet available

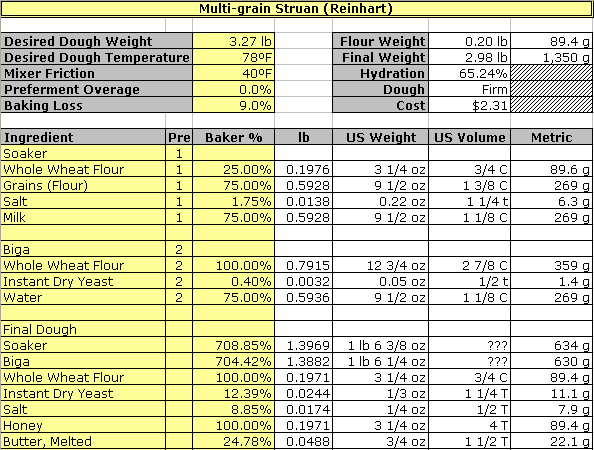
I have completed a first version of my dough calculator spreadsheet that I think is in decent enough shape to share. I have described this spreadsheet (in previous incarnations) and previous posts. This version is quite different in that it is much more automated and supports a "normal" style of using baker's percentages with preferments. I've found it invaluable in reverse engineering formulas (when no percentages are given), scaling, and overall analysis (hydration for example). Please check it out and give me feedback.

The above is just a screenshot of a tiny piece. You will find the documentation here: http://www.starreveld.com/Baking. The sidebar on the left contains a link to download the actual spreadsheet. Unfortunately, right now this spreadsheet is only supported on Windows, see the documentation. Macintosh users can use Parallels Desktop of VMWare Fusion, or Apple's Bootcamp (now part of Leopard) to run windows. In fact, the spreadsheet was developed under Windows XP running on Parallels on a 17" MacBook Pro.

Here is a (partial) list of functionality:

  • Compute weights and volumes from formula with percentages and total dough weight
  • Scale formulas to any desired dough size
  • Support unlimited number of preferments in dough
  • Compute slightly larger preferment sizes to compensate for evaporation and container loss
  • Compute final loaf weight based on estimated baking loss (evaporation)
  • Convert volumes of ingredients to weights
  • Reverse engineering. You enter ingredients and weights or volume in practically any units, and it computes the baker's percentages for you
  • Conversion between regular milk and dried milk
  • Conversion between sugar/honey/Splenda
  • General conversion between volume and weight for specific ingredient
  • Conversion between Fresh/Active Dry/Instant Dry yeast
  • Compute hydration contribution of each ingredient in formula
  • Compute adjustments to formulas when substituting different hydration level starters for others, or for yeast
  • Compute necessary water temperature for formula based on desired dough temperature, room temperature, ingredient temperature and mixer friction. Also computes amount of ice needed as substitute for water to reach the right temperature
  • Analysis of formula and overall dough for hydration, and cost

I am sure that there may be rough edges as, so far, I have been the only user. Please report back any problems in comments on this blog.

 --dolf  

See my My Bread Adventures in pictures 

ehanner's picture
ehanner

Po-Boy Victory!

What in damnation is a northern boy doing trying to make a traditional New Orleans Po-Boy? I haven't scarfed down one of those delicious handfuls in quite a while. But once bitten it's near impossible to get past the memory. After many failed attempts, I now believe that I am on the right track and have found a formula and procedure that gets pretty darn close. There is still some adjustment needed with the time and temp to get the crust at the right color when the crumb is just right but it's close now. At least to my recollection. I'll post the bread formula below.


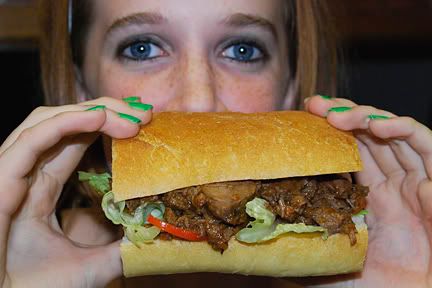
Daughter Gabrielle is ready to try her first Po-Boy!


Crusty close up shows the stratified surface that makes a mess-a good thing!


This is sooo good, I totally understand why it's a secret.


400 F for 20 minutes and 375 for another 15. Door cracked open last 5 minutes.


150 year old dutch oven and chuck roast done NO style.


Po'Boy Roast Beef with Debris. So tender it falls apart just looking at it!

Blue Ribbon French Bread recipe from Bernard Clayton's "New Complete Book of Breads".

Ingredients:
2-1/4 t dry yeast
2T Nonfat Dry Milk
1T Sugar
1T Salt
5C AP flour (I plan to try swapping 1 Cup of cake flour next time)
2C Hot Water (120-130 F)
1T Butter
1T cold water

Method
Mix together 2 Cups flour, yeast, dry milk, sugar and salt.
Pour in the hot water and butter, mix well (2 min with beater blade) then add remaining flour 1/2 cup at a time. Switch to hook near the end of flour.
Add additional flour if needed to get to a shaggy elastic but not sticky mass. I had to add an additional 1 Cup of AP flour approx.
Cover and rest for 10 minutes.
Knead on speed 2 for 10 minutes. Dough should clean sides of the bowl, adjust flour accordingly.
Turn out into a lightly oiled bowl with at least 2-1/2 times the capacity and cover. Let rise until doubled (1-1-1/4 hrs.
Punch down and turn out onto a lightly floured surface. Knead briefly to degas. Divide into 2 pieces, preshape into a loose rectangle and cover loosely, rest 10 minutes.
Press and roll into a 10X16 rectangle. Using fingers, roll up into a 10 inch jelly roll. seal the seam and ends.
Roll and stretch to longest dimension of your parchment (about16") and place on parchment lined sheet. Cover loosely with saran and proof for 45-60 minutes. The dough should double easily in 45 min.
Pe heat oven to 400F 20 minutes before bake time.
Brush dough with cold water, slash, steam oven and bake for 35 Minutes. Rotate half way through for even color. I lowered the temp after 20 mins. to control color. Clayton says to bake to a golden brown. For me that was just 35 Mins. Cool on a rack.

Clayton says this is a smooth creamy crusty bread. I would add it has a great flavor with complex after taste. I can't imagine this being much better. Honestly I didn't change a thing from Claytons suggestions and formula. It was perfect the first time. I plan to purchase the book to see what other great things he has to say.

I would appreciate any comments from those who try this.

Eric

verminiusrex's picture
verminiusrex

One Pound Loaf-Flour Weight or Dough Weight?

This is a question I've been meaning to ask.  When someone refers to a one pound loaf, is that based on the weight of the flour in the bread, or the total weight of the dough or loaf?  I'm wondering because the basic one pound loaf pan actually works with 1.5 lbs of dough, etc.  So I was wondering if there was some baking terminology involved that I was missing.


JMonkey's picture
JMonkey

Two Excel Tools for Sourdough

Two new tools:
Sourdough Spreadsheet
Sourdough Rye Spreadsheet

Lately, I've been playing around with my sourdough quite a bit. In particular, I've started keeping a very small amount of starter in the fridge -- about 30 grams or so -- and then building the starter I need from just few grams of "mother" starter over several builds or stages.

Doing the math is a pain. Especially when you're not only mucking about with builds, but also playing around with how much pre-fermented flour you want to use: 20% vs 30% makes a difference in terms of flavor and length of rise.

And then, if you get really nuts, you can start playing around with the Detmold three-stage process for making hearty rye breads, a fairly complicated arrangement that drastically changes how much flour you add and the hydration of each stage.

I got tired of searching for scratch pads and pencils to do all the math required to figure out how much flour I needed and when. So I build these two spreadsheets.

The first is for plain sourdough. Floyd was kind enough to upload it for your downloading pleasure HERE.

If you're using volumetric measurements (cups), I'm afraid this won't be much use to you. There's already a ton of variation in the weight of one cup (In The Laurel's Kitchen Bread Book, for example, a cup is roughly 5.25 ounces! 3 cups = 1 pound!), and with sourdough starter, all bets are off due to all the pretty bubbles.

Any generic weight units will do, so long as they're all the same. Grams are easiest, because they're more precise. As such, I've set the default for most cells to round off to the nearest whole number. But if you'd like to change the defaults to enable decimals so you can use ounces, I'll be glad to show you how to do it.

A few points:

  • Fill in ALL the yellow shaded areas to get a result.
  • Make sure that the "Final Starter Hydration" matches the figure that you put in for the hydration of whatever the final build is.
  • Starter innoculation refers to the percentage of pre-fermented flour that you use. 20 to 30 percent is common.
  • Multiplication factor refers to the amount by which you want to increase the amount of FLOUR in each build. You need to increase it by at least 2. At room temperature, a factor of 8 will probably take 12-14 hours to mature. A factor of 4, about 6-7.
  • There's a box that lets you set how much starter you want to have left over. I did this so I could have fresh, refreshed starter to pop in the fridge if I wanted and also becuase I always seem to lose a bit along the way as it sticks to the bowls, utensils and fingers.

    The second spreadsheet is for rye breads, and it's almost exactly the same, except that it allows you to determine the percentage of rye you want in your bread. Download it HERE.

    I'm using this spreadsheet to build my first 70% Detmolder rye with whole wheat. Hee hee! I'll post the results next week. Saturday is baking day. Can't wait!

    Hope you enjoy these tools and find them useful!

  • Pages