The Fresh Loaf

A Community of Amateur Bakers and Artisan Bread Enthusiasts.

Most bookmarked

dmsnyder's picture
dmsnyder

Tom Cat's Semolina Filone from Maggie Glezer's "Artisan Breads"

Tom Cat's Semolina Filone

Tom Cat's Semolina Filone

Tom Cat's Semolina Filone Crumb

Tom Cat's Semolina Filone Crumb

Tom Cat's Semolina Filone

Poolish
Instant yeast     Disolve 1/4 tsp in 1 cup of 110F water. Use 1/4 cup of the resulting suspension.
Water               135 gms (in addition to the above 1/4 cup)
Flour                 150 gms of King Arthur AP (or 75 gms lower-gluten AP and 75 gms Bread Flour)

Dough
Durum Flour           250 gms
AP Flour                 50 gms
Water                    205 gms
Instant Yeast         1/4 tsp
Poolish                  All of the above
Salt                      9 gms
Sesame seeds       About 2 cups

Procedure
The night before baking, mix the poolish and ferment 8 hours, covered tightly.

The day of baking, combine the flours and water, mix and autolyse, covered, for 15-60 minutes. Mix the yeast with the poolish and add to the autolysed dough for 5 minutes. The dough should clean the sides of a stand mixer, according to Glezer. (But it didn't, even with 3-4 T of added AP flour.) Sprinkle the salt on the dough and mix for another 2 minutes. The dough should be sticky but not "gloppy." (The dough was what I'd call "gloppy," even with mixing another 10 minutes at Speed 3 on my KitchenAid. I decided to proceed anyway.)

Scrape the dough into a bowl 3 times its volume, cover and ferment for 2-3 hours, folding every 20 minutes for the first hour. (The dough started coming together better after a short time and was still sticky but smooth and puffy after 2 hours in a 75F kitchen.) Preheat the oven to 400F and prepare your steaming apparatus of choice. Scrape the dough onto your bench and preform it into a boule. Let it rest for 20-30 minutes to relax the dough, then form it into a batard.

Roll the loaf in seseme seeds and place it, seam side up, in a linen or parchment couche. If using a parchment couch you will bake on, place the batard seam side down.) Cover it well and allow it to expand until quite puffy. (Glezer says this should take 30-60 minutes. My dough was very puffy, and I shaped it very gently to retain the bubbles. I let it proof for 20 minutes only before proceeding.)

Roll the batard onto parchment (If using a linen couche). Spray with water and score with one cut from end to end. (I cut holding the knife at and angle to get a nice "ear" and "grigne.")

Transfer the batard to the oven and bake with steam for 15 minutes, then continue to bake another 30 minutes or so until the bread is well-cooked. (Golden-brown color, hollow thump on the bottom and internal temperature of 205F.

Cool completely before slicing.

Comments
I have made 3 other semolina breads, but this was the first time I used fine-ground Durum Flour. The recipe is Tom Cat's Semolina Filone from Maggie Glezer's "Artisan Breads."

I used all King Arthur AP flour, as Glezer says this has the desired gluten level for this formula. I found the dough to be much wetter than I expected. I did add extra flour, as she says one might have to, but it remained a very wet dough. I was concerned it might be quite impossible to form a real batard, but, after the stretch and folds and 2 hours total fermentation, the dough behaved much better than I anticipated. It did have to be handled very gently, but I'm learning to do that.

I was also surprised how well this soft, puffy, wet dough took my cut,and the oven spring and bloom were phenomenal.

I think the result was a quite attractive loaf, and the crumb was even more open than I expected - a real "rustic"-type crumb. The texture and taste of this bread are both outstanding. The crust is crunchy with a prominant hit of toasted sesame seeds. The crumb is very soft and tender with a cool, creamy mouth feel. it has a definite semolina flavor that is most often described as "nutty." I don't know what kind of nut it's supposed to taste like, but it tastes really good.

I have been a little disappointed in the taste and texture of the other semolina breads I've made. I've not made any of them more than once. Maybe the durum flour makes the difference. Maybe it's Tom Cat's recipe. Maybe my skills in handling dough have advanced. Whatever. I'll be making this one again, for sure!

David

BrotBoy's picture
BrotBoy

Converting a recipe that uses Instant yeast to a sourdough starter recipe

Can anyone tell me... Is there a simple approach to convert  a recipe that uses commerical yeast to a sourdough starter , I have been very happy with the sourdough starter that i am using  and now want to convert more recipes to this style of bread making,

  Looking forward to some ideas

 Brotboy


bwraith's picture
bwraith

Sourdough Bagels Revisited

Many thanks to Susanfnp for posting a great sourdough bagel recipe based on Nancy Silverton's bagel recipe. She also provided a number of key tips as I made these. I posted photos of the first time I did these, and now I have some photos of my second attempt, as well as a spreadsheet with more details such as bakers percentages and preferment percentages.

Sourdough Bagel Recipe (revisited version)

Ingredients:

  • 335 grams (12 oz) 90% hydration white flour starter
  • 20 grams (0.6 oz) sugar
  • 12 grams (0.4 oz) malt syrup
  • 14 grams (0.6 oz) salt (I made salt bagels, so the salt in the dough is reduced to avoid too much salty flavor. Use 17 grams salt normally)
  • 2.8 grams (0.1 oz) instant yeast
  • 359 grams (12.5 oz) water
  • 186 grams (6.5 oz) first clear flour (I used KA First Clear Flour. Substitute a high ash or whole grain flour - maybe rye, whole wheat, Heartland Mills Golden Buffalo, or just use white flour)
  • 587 grams (20.5 oz) high gluten flour (I used KA Sir Lancelot High Gluten Flour. Substitute bread flour or other high protein white flour.) This time I corrected an error in the previous version and made the hydration lower, probably around 56%, which unexpectedly made the bagel dough stiff enough that it was a bit more difficult to shape the bagels. However, I used Susanfnp's suggestion to spray the surface of each 3 oz piece with a fine mist before shaping. This makes a world of difference.

Mix Dough - Day Before Baking

I had to mix and knead these by hand, since I have no mixer in this house. While reading the Nancy Silverton recipe, the idea seems to be to get a very stiff dough. I mixed all the dry ingredients in one bowl. I mixed the water, levain, and malt syrup in another bowl and then poured the wet mixture into the dry ingredients. Using a dough scraper I worked around the bowl a few times to get the ingredients initially mixed. I then vigorously kneaded the dough, using a traditional squeeze and fold kneading technique. This was not so easy with the stiff dough, but after about 5 minutes, the dough started to become elastic and fairly smooth, even if very stiff. After a few more minutes, the dough seemed fairly similar to what I had with the mixer in my first attempt at this recipe, documented in a previous blog entry. Since the dough is so dry, there is no need for dusting the counter with flour. In fact, you should avoid any extra flour, as the dusting can interfere with the smooth sheen of a proper bagel.

Shaping

Divide the dough into about 18 3 ounce pieces. Since the dough is so dry, it may develop a dry skin fairly quickly, so proceed smartly to the shaping stage. Don't dilly dally at this point, as the dough pieces will become too puffy quickly if they are allowed to sit at room temperature for very long. However, the pieces need to rest a short time, maybe 5 to 10 minutes, so that the gluten will be relaxed enough to shape the bagels.

I was more experienced and faster at shaping this time. The first batch of nine was placed on a jelly roll sheet, and immediately refrigerated. I discovered the next day that the first batch needed to rest on the counter for about 1/2 hour to ferment enough to come to the surface while boiling. The second batch, which had risen a while longer, was ready for boiling immediately out of the refrigerator the next morning.

If you have a fine mist spray (I have an atomizer meant for olive oil that I use for water), you can make shaping easier and avoid the dry skin, particularly on the pieces you shape last, by spraying a tiny amount of water on the pieces before you shape them.

To form the bagels, roll out an 8 inch rope shape with your palms. If the dough is too stiff or you make a mistake and want to start over, let that piece rest a few more minutes, and move to the next piece. Take the 8 inch rope and hold it between your palm and your thumb. Wrap the rope around your hand and bring the other end together with the end you are holding between your palm and thumb. You now have a "rope bracelet" wrapped around your hand. Rub the seams together on the counter to seal them, then take off the bracelet, which should look a lot like a bagel, hopefully. Stretch it out so you have a large 2.5 inch hole. It looks big, but it will shrink or even disappear as the dough rises during boiling and baking. The hole needs to be big looking compared to a normal bagel.

Place the bagels on parchment dusted with semolina flour on a sheet.

This time I used coarse corn meal, as I had no semolina available. This worked fine and seemed to make no difference to my results.

Cover with saran or foil or place the whole sheet in an extra large food storage bag (XL Ziploc is what I'm thinking here). The idea is to lock in moisture to avoid any dry skin forming yet allow room for some slight expansion as they puff up. Place the sheets in the refrigerator to retard overnight.

Boiling

Bring 5 quarts of water and 1 tablespoon of baking soda in a good sized stock pot to a boil. Place a bagel in the pot and make sure it floats to the top. If so, you can do 4-6 bagels at one time. They should only be in the water for about 20 seconds. Push them under periodically with a wooden spoon, so the tops are submerged for a few seconds. In my case, I never managed to get the bagels out before about 30 seconds were up, but they came out fine. If the test bagel won't float, lift it out with a slotted spoon, and gently place on a rack to dry and allow the bagels you have removed from the refrigerator (I did 6 of them at a time) to sit at room temperature for about 20 minutes and try again.

In fact, the batch I had shaped first the night before did sink to the bottom when I tested one. So, I left the first batch out for about 1/2 hour before it was ready. I then put them back in the refrigerator, since the baking and boiling process for the other batch was extending beyond 1/2 hour. I could tell the first batch was beginning to be ready, since I could detect a very slight puffiness in them after 1/2 hour.

The first batch floated immediately out of the refrigerator, probably because my second batch were formed and shaped after a rest of about 20 minutes while I was working on the first nine the previous night. Except for letting the first batch rise on the counter for 1/2 hour, I kept the bagels waiting to be boiled in the refrigerator to avoid any excessive rising. If you let them rise very much, they will puff excessively and become more like a bun than a bagel.

Dip in Seeds

Make plates of seed beds. I made three seed beds. One was 2 parts caraway seed, 1 part anise seed, and a pinch of salt. Another was 2 parts dill seed, 1 part fennel seed, and a pinch of salt. The last was poppy seed and a pinch of salt. I also made salt bagels, but those were done by just sprinkling a little kosher salt on some of them with my fingers.

Right after the bagels are removed from the boiling water with a slotted spoon, place them on a rack to cool for a few seconds. After they have cooled of slightly and dried enough not to ruin the seed bed with too much wetness, pick one up and place it round side down (the tops down), and gently press them into the seed bed. Pick them up and place them right side up on a sheet lined with parchment paper and dusted lightly with semolina flour or coarse corn meal.

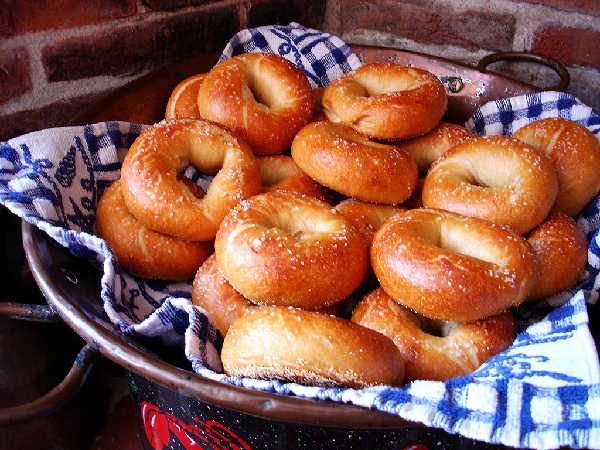
This time I made only salt bagels. It wasn't convenient to get seeds, and my kids and I both love the salt bagels anyway. I just sprinkled a very, very light layer of kosher salt on them with my fingers while they were sitting on a rack just after they were boiled. The salt sticks to the wet surface, so you don't need to do anything but just sprinkle the salt on them. Careful, you can definitely put too much salt on them, even if you use a somewhat smaller amount of salt in the dough, as I did in this case.

Baking

Preheat the oven to about 400F. No preheat may work, but I'm not sure. It seems easy, from my limited experience, for them to rise too much. The result will be an open bread-like crumb, instead of the very chewy, more dense crumb expected in a bagel. So, I didn't risk a no-preheat strategy in this case.

If you have a stone, you can transfer the parchment paper on a peel to the stone and bake directly on the stone. I baked them for about 20 minutes at 400F. You can also bake them on the sheet.
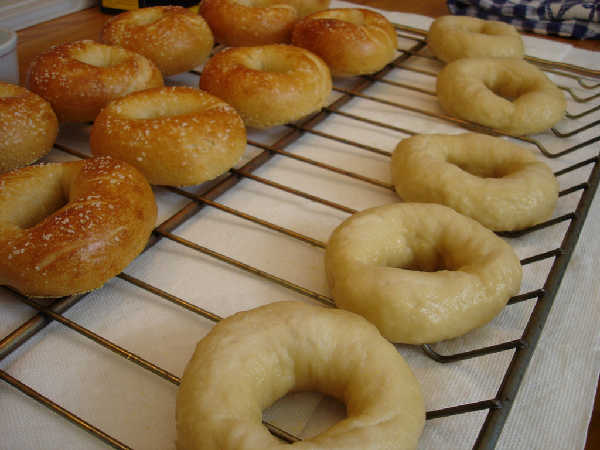
Cool

Allow the bagels to cool.

Results

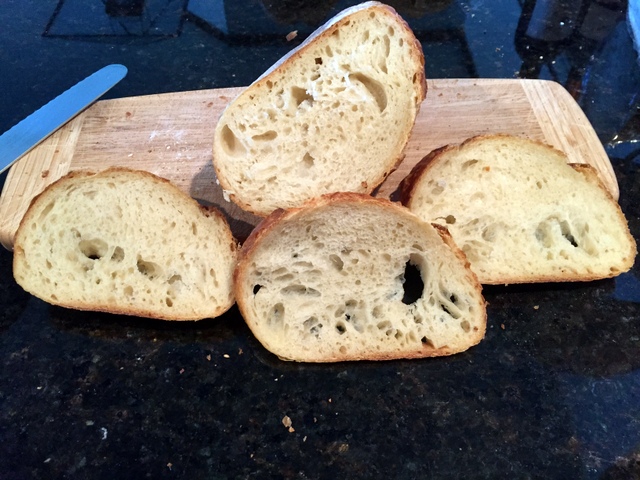
The bagels were chewy and delicious, as they were last time. However, I think the lower hydration was a definite improvement. I succeeded in getting a stiffer, drier dough this time. They had less tendency to rise excessively, even though I let them sit on the counter a little longer than last time. The resulting crumb was a little more dense and seemed just like the real thing this time. Last time, the slightly higher hydration gave me a slightly more open crumb, which seemed just a hair too soft and open like ordinary bread. This time, the crumb was dense and chewy and just right for a bagel.

zolablue's picture
zolablue

Memo's Brown Bread

I had promised to post this recipe for ehanner so here it is.  This is the “brown” bread my grandmother used to make which we all loved so much.  She passed away 25 years ago and I never thought I would taste it again. 


Being a new bread baker I was determined to find out what recipe she used and duplicate it.  Thankfully, my dear Aunt was there to help me since it was my grandmother’s own and not from a recipe ever recorded.  As my Aunt told me, Memo (mee-moe), which was our name for our grandmother, baked this bread, before my Aunt, now 84, was born, in an old iron range heated by wood logs with guess and bigosh temps, as she says it. 


So you can see that it was a challenge for me to duplicate this.  Through emails my Aunt wrote from the very old hand-written notes of my grandmother and my Aunt’s own notes, I could begin.  It took me several very disappointing attempts but soon I discovered the missing link.  It was the type of graham flour and this is where I stress unless you use the Hodgson Mill Whole Wheat Graham flour or if you know of one that is identical to that in color, texture, and flavor this bread cannot be made properly.  I tried Bob’s Red Mill and it did not even come close and several regular whole wheat flours just wouldn’t do it.  There is something exquisitely yet mildly sweet in the Hodgson Mill graham flour that reminds one of a graham cracker flavor.  And I knew the instant I looked at the HM graham flour it was right.


You can shape the loaves however you wish but I had to do it the way my grandmother did, making the two balls for each loaf.  I can see her doing it in my head, and the first time this bread came out correctly I thought I would cry I was so happy.  It transported me back in time.  And the toast from this bread is simply the best.  I hope if you try it you like it, too.


  Memo's Brown Bread 

1 envelope active dry yeast

1/4 cup warm water (110° - 115°F)

2 1/2 cups potato water*

1 Tablespoon salt

3 Tablespoons sugar

1/4 Cup shortening

3 1/2 - 4 1/2 cups all-purpose flour

1 1/2 cups Hodgson Mill graham flour** (see important note below)


Sprinkle yeast on 1/4 cup warm water.  Stir to dissolve and set aside.


Place sugar, salt, and shortening in mixing bowl and pour hot spud water over this and cool. The potato water should be about the temp of a baby’s bottle, warm to the wrist, otherwise it can kill the yeast.


By Hand:  Stir 2 1/2 cups of all-purpose flour into bowl containing salt, sugar & potato/potato water to make a thin batter. Add yeast and beat well. Then add 1 1/2 cups graham flour and mix well.  Stir in remaining all-purpose flour - 1 to 2 cups – until it can be handled on a floured board or counter. Knead in more flour until you have a smooth ball that no longer sticks to counter.


By Stand Mixer:  Stir 2 1/2 cups of all-purpose flour into bowl containing salt, sugar & potato/potato water to make a thin batter. Add yeast and beat well. Then add 1 1/2 cups graham flour and mix well.

Stir in remaining all-purpose flour - 1 to 2 cups - to make a dough that leaves the sides of the bowl.  Knead/mix until smooth and elastic, about 7 - 10 minutes.  

Place in greased bowl; turn dough over to grease top.  Cover and let rise in warm place until it doubles, about 1 1/2 hours.


Punch down.  Turn onto board and divide in half; round up each half to make a ball. Cover and let rest 10 minutes.


Shape into loaves and place in 2 greased loaf pans.  Cover with cloth or sheet of plastic wrap and let rise until dough reaches top of pan on sides and the top of loaf is well rounded above pan, about 1 1/4 hours.


Bake at 350 degrees for 45 minutes, rotating half-way through if necessary.  Cover loosely with sheet of foil the last 20 minutes, if necessary, to prevent excessive browning.  Makes 2 loaves.


Brush melted butter over top of loaves upon removing from oven.  Allow to cool.


*I peel and slice, very thinly, one small potato and boil in 4 cups of water until very well done – usually takes about 15 minutes because of the size of the slices.  Then mash the potato in the water and usually the remaining water with the potato leaves the exact amount of liquid you need for the recipe – the 2 1/2 cups.  If you need to, add a bit more water if you don’t have enough. 


**You must use Hodgson Mill, whole wheat graham flour to be authentic to Memo’s bread, or if there is another brand that is exactly as Hodgson Mill.  Hodgson Mill is the only brand of graham flour I’ve found so far that is the correct coarseness, color of grain and flavor.  Other flours can be used but the entire flavor and texture of the bread is completely changed from what Memo used to make.  This is a taupe colored wheat bread not golden as with regular whole wheat.  It is beautiful and makes the best toast!


Community members have contributed some great information about baking naturally leavened breads. SourdoLady's pieces (who, as the name implies, knows a thing or two about sourdough) Wild Yeast Sourdough Starter and her Deluxe Sourdough Bread are among the most popular articles on the topic. JMonkey posted a great lesson on getting a sourer sourdough. Gaarp has also posted a wonderful sourdough tutorial. Other folks contributed some excellent recipes for sourdough pancakes and sourdough banana bread.

When I had my first starter going, I was able to write a couple of introductory articles on sourdough: When Yeasts Attack: A First Experience with Naturally Leavened Bread and More about Sourdough. These two articles contain enough information for an amateur baker to learn how to bake with a starter.

More recent forum posts, blog entries, and articles have included information on sourdough as well (and new information gets posted all of the time), so use the site search and look for terms like "sourdough" and "starter" to find the very latest.

Sourdough Lessons

SourdoLady's picture
SourdoLady

My Favorite Basic Sourdough Loaf

I bake a lot of sourdough bread. Over the past several months I have been trying a lot of new techniques and trying to perfect the quality of my loaves. The recipe below is how I am currently making my white bread. Next year I may have a whole different approach, as I am constantly learning and trying new things.

Deluxe Sourdough Bread

1 1/4 cups proofed starter
1 cup water
3 T. dry powdered milk
1 T. lemon juice
1/4 cup instant potato flakes
3 3/4 cups bread flour
1/4 cup white whole wheat flour
2 T. sugar
3 T. butter or margarine
2 tsp. salt

Combine the first 5 ingredients. Mix in the flour just until the mixture is a shaggy mass. Cover and let rest for 30 minutes. Add sugar, butter, and salt and mix until all is incorporated. Knead dough until it is smooth and satiny.

Cover and let dough rest for 45 minutes. Divide dough into 2 equal portions. Pat each dough portion out into a large, flat circle. Gently stretch and fold the left side over the middle, then the right side over the middle (like folding a letter). Pat down with the palms of hands and repeat the folding with the remaining two unfolded ends. Shape loaves, always keeping the folded side as the bottom. I do free-form oval loaves and place them on parchment paper.

Spray the loaves with Pam and cover with plastic. Place in the refrigerator overnight. The next day, take loaves out and let them finish rising at room temperature. They should be very light. Do not rush it or your bread will be dense.

While bread is rising, preheat oven and stone to 400� F. I also place a shallow pan of hot water on the bottom rack for steam.

When bread is fully risen, slash top and slide onto hot stone. If you don't have a stone, just bake on a baking sheet. After 10 minutes, turn the oven heat down to 375� F. When loaves start to show color, water pan can be removed. Bake until loaves are a nice golden brown. Time will vary according to the shape and size of loaf.

Cool on a wire rack. You can brush crust with butter while still hot if you like a soft crust.

The small addtion of white whole wheat flour that I use in this bread gives it an interesting depth of flavor that I like. It does not change the color of the bread. I don't know if white whole wheat flour is easily available just anywhere. I am fortunate to live in an area where wheat is grown and milled so I have easy access to various flours.


Hot Cross Buns! Hot Cross Buns!
One a penny,
Two a penny,
Hot Cross Buns!
If you have no daughters,
Pray give them to your sons!
One a penny,
Two a penny,
Hot Cross Buns!

My recipe below.

Hot Cross Buns are a popular Lenten tradition which are believed to have originated in England 150 years ago, though perhaps they are originally of pagan origin. Most commonly they are eaten on Good Friday. They are not made after Easter.

This year I baked my buns with raisins because that is what I had in the house. In past years I've used currants, which are excellent.

If your raisins or currants are dried out, soak them in warm water for 10 minutes before mixing them into the dough.

Hot Cross Buns

Makes 1 dozen buns

3 cups unbleached all-purpose flour
1/8 cup sugar
1 cup warm (90-100 degrees) milk
2 tablespoons melted butter
2 teaspoons instant (bread machine) yeast
1 teaspoon salt
1/2 cup raisins, currants, or dried fruit
1/4 teaspoon ground cinnamon
1/8 teaspoon ground nutmeg
1/8 teaspoon ground ginger

Egg wash:
1 egg

Glaze:
1/2 cup powdered sugar
1 tablespoon lemon juice

In a large mixing bowl, mix together the flour, yeast, sugar, salt, and spices. Add the warm milk and butter and mix until all ingredients are combined. Add a little flour or milk until you achieve the proper consistency, which is moist enough that all of the ingredients stick together but dry enough that you can knead the dough without it sticking to your hands. I had to add a couple of tablespoons of flour to get to this consistency, but depending on the humidity in your area and how tightly packed your cups of flour are, your may need to add more or less.

Pour the dough onto a floured surface and knead for 5 to 10 minutes. Flatten the dough and pour the raisins or currants on top and press them into the dough. Work the dough until the raisins are well mixed in. Return the dough to a greased bowl, cover with plastic wrap, and allow to rise for 1 to 1 1/2 hours until the dough has doubled in size.

When it has risen, pour the dough out onto a cutting board and divide into 12 pieces. Roll the pieces into balls and place on a greased baking surface (I used a 9 x 13 Pyrex pan). Cover the pan and allow to rise until they double in size again, typically 45 minutes to 1 hour.

While the buns are rising, preheat the oven to 425 degrees. When the buns are ready to bake, scramble the egg in a bowl and brush some over the top of the buns. Then put the buns in the oven and bake at 425 for 15 minutes. Remove and allow to cool for 5 or 10 minutes.


While the buns are cooling, make the glaze by combining the lemon juice with the powdered sugar (you can also use orange juice, milk, or water if you don't have lemon juice around). Use a pastry bag, a spoon, or a knife to paint the crosses on top of the buns. Eat while still hot.

Hot Cross Buns

dmsnyder's picture
dmsnyder

Today's bake 3-15-2019: Mixed grain sourdough by a new/old method

Sourdough Bread

March, 2019

David Snyder


My recent trials of sourdough bread production methods have made some very good breads, but still not exactly what I want. I recall that, about 10 years ago, I baked some breads from a recipe developed by a home baker who was an active participant on The Fresh Loaf at the time, “Susan from San Diego.” At the time, I felt it was the bread I had baked closest to my ideal. So, I thought I would return to that bread, applying some procedures I had adopted with good results since that time.

Of note is that Susan's recipe called for two builds of firm starter before mixing the final dough. As I recall, it produced a rather sour, crusty loaf with a moderately open crumb. Back then, I mixed the dough with a stand mixer. For this bake, I mixed by hand.

I made two loaves. One, I cold retarded for 17 hours then left at room temperature while the oven pre-heated. The second loaf was cold retarded for 40 hours. I was eager to see whether the second would be much more sour, as one would expect.

Total Dough


Ingredient

Wt (g)

Bakers' %

High-protein flour

125

11

AP flour

803

69

Whole Wheat flour

138

12

Rye flour

92

8

Water

826

71

Salt

23

2

Total

2007

173


Starter 1st Build


Ingredient

Wt (g)

Bakers' %

High-protein flour

18

75

Rye flour

6

25

Water

12

50

Seed starter (liquid)

6

25

Total

42

175

  1. Dissolve starter in water.

  2. Add flours and mix thoroughly.

  3. Ferment at 76ºF for 8 hours.

  4. Proceed to 2nd build or refrigerate 1st build overnight and continue the next day.


Starter 2nd Build


Ingredient

Wt (g)

Bakers' %

High-protein flour

104

75

Rye flour

35

25

Water

69

50

Starter 1st Build

42

25

Total

250

175

  1. Dissolve starter in water.

  2. Add flours and mix thoroughly.

  3. Ferment at 76ºF for 8 hours.

Note: If not ready to make the Final Dough when this starter build is ripe, the starter can be refrigerated for up to 3 days, until you are ready to proceed.


Final Dough


Ingredient

Wt (g)

AP flour

803

Whole Wheat flour

138

Whole Rye flour

50

Water

743

Starter 2nd Build

250

Salt

23

Total

2007

Procedures

  1. In a large bowl, mix the water and the flours to a shaggy mass.

  2. Cover the bowl and let rest (autolyse) for 1-2 hours.

  3. Sprinkle the salt over the dough and add the starter in chunks.

  4. Mix the dough to incorporate the added salt and starter uniformly.

  5. Transfer to a clean, lightly-oiled bowl and cover.

  6. Ferment until expanded by 75% with stretch and folds at 30, 60 and 110 minutes. (I do the first two S&F's in the bowl and the third on a lightly floured board.)

  7. Divide the dough as desired and place in floured bannetons or on a couche. Cover.

  8. Proof at room temperature for 1-3 hours, then refrigerate for 8-40 hours (or more?).

  9. If you think the loaves need it, proof at room temperature for additional time before baking.

  10. Transfer to a peel. Score as desired.

  11. Bake: If baking in a Dutch oven, bake at 475ºF covered for 30 minutes, then uncovered at 450ºF for another 20 minutes or until done to satisfaction.

  12. Bake: If baking on the hearth, pre-heat oven at 500ºF for 1 hour with baking stone and steaming apparatus in place. Turn down oven to 460. Load loaf and steam oven. After 15 minutes, remove steam and continue baking for 30-40 minutes, until loaf is baked. (Depends on size and shape of loaf.)

  13. The bread is done when the crust is nicely colored and the loaf sounds hollow when thumped on the bottom. The internal temperature should be at least 205ºF.

  14. Transfer the bread to a cooling rack and cool thoroughly before slicing.

The crust was crunchy in the darker-baked parts and chewy in the rest. The crumb was moderately open and mildly chewy. The flavor was complex, sweet and creamy. There was the slightest hint of acetic acid tang. Interestingly, even though the whole wheat was only 12% of the total flour, the distinctive flavor of Turkey Red wheat came through.

I baked the second loaf 40 hours after retarding it, including the last hour at room temperature, while the oven preheated. It turned out ... well ... it was kind of spectacular, in my humble opinion.

The crust is crunchier. The crumb has the same chewing consistency - what I call tender/chewy - but it is substantially more open, and the flavor is substantially more sour. Interestingly enough, I think creamy, lactic acid flavors still predominate, but there is more of an acetic acid tang. Now, that is all based on a first taste when the loaf was just completely cooled. If the flavor profile evolves, I'll add a note.

As far as I can recall, I have only retarded dough for more than 24 hours once before. That was an experiment with my San Joaquin Sourdough, and the retardation was of the dough before dividing. Today's loaf is so good, that I believe I'm going to stick with this routine for a while. It sure made delicious bread.

Happy baking!

David 

Danni3ll3's picture
Danni3ll3

Baguettes Formulas

Alan, you offered to give me more detail on a variety of formulas for baguettes. I really appreciate this.

As to the 80% hydration baguettes that I made, I had no issue with the dough. I am not sure if it is the flour I have in Canada that absorbs more water or the fact I am working regularly with 78% hydration doughs, but shaping and handling is just fine for me.

Danni

alfanso's picture
alfanso

Bouabsa Batards - Against the tide

Reversing direction from my recent thang to make baguettes from boule/batard formulae.  I searched TFL and found minor but inconclusive evidence that anyone had published their results for creating batards from the Bouabsa baguette format.  So it was high time that some silly goose decided to do it.  I waddled into the tide with both webbed feet.

As I'd mentioned earlier when I made a batch of Bouabsa baguettes for the first time in a long time, this is the baguette that "put me on the board", so to speak.  The simplest of them all, by the clock the quickest way to bulk fermentation fame and fortune, and the longest retard period.  Since I got on the levain bandwagon quite a ways back now, I hardly ever bake anything that is purely a commercial yeast product.  Neither political statement nor religious conviction nor an us vs. them confrontation.  It just happens that basically everything else I decide on baking contains either no or scant amounts of IDY.   Fine by me either way.

A roll in the sesame seeds for 2 of the boys because I love the look as well as the taste of them.  These should have been handled with a bit more kid gloves than I did, and I think that perhaps the lovely open crumb structure on these suffered due to that.

I should have paid attention to my own heed from that recent bake.  With no out-of-the-retarder warm up and proof, as I bake directly from the refrigerator, I neglected to give the bulk dough an additional 30 minutes of bench rest after the 3rd letter fold.  And of course, my old war cry of "I should have let them take on a half shade more color", was forgotten.

Oh well, they are still nice.  Can't hit a home run every time.

I was a bit too aggressive on shaping the center and right batards, particularly the "nude" batard.  Notice the tear in the skin on the lower left portion of this one.  That means trouble ahead.  Indeed!

And as evidenced by the final product, the tear in the skin did in fact affect the bloom and shape of the center batard.  The bloom and shape of the left batard was also affected by aggressive shaping, although less so.  The right batard is just dandy.  

The two seeded bookends.

The crumb suffered from the aggressive shaping.  This is the innards of the nudie.  The other two had destinations beyond my own kitchen and gullet.

page1image4184 page1image4344alan page1image5088

Pages