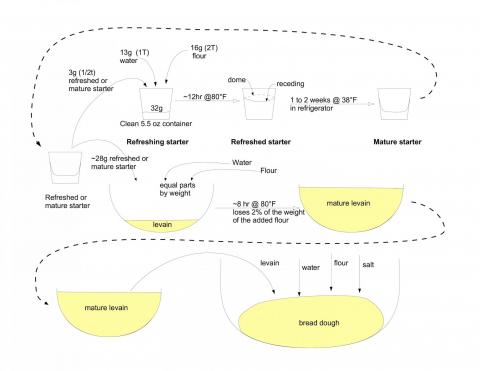
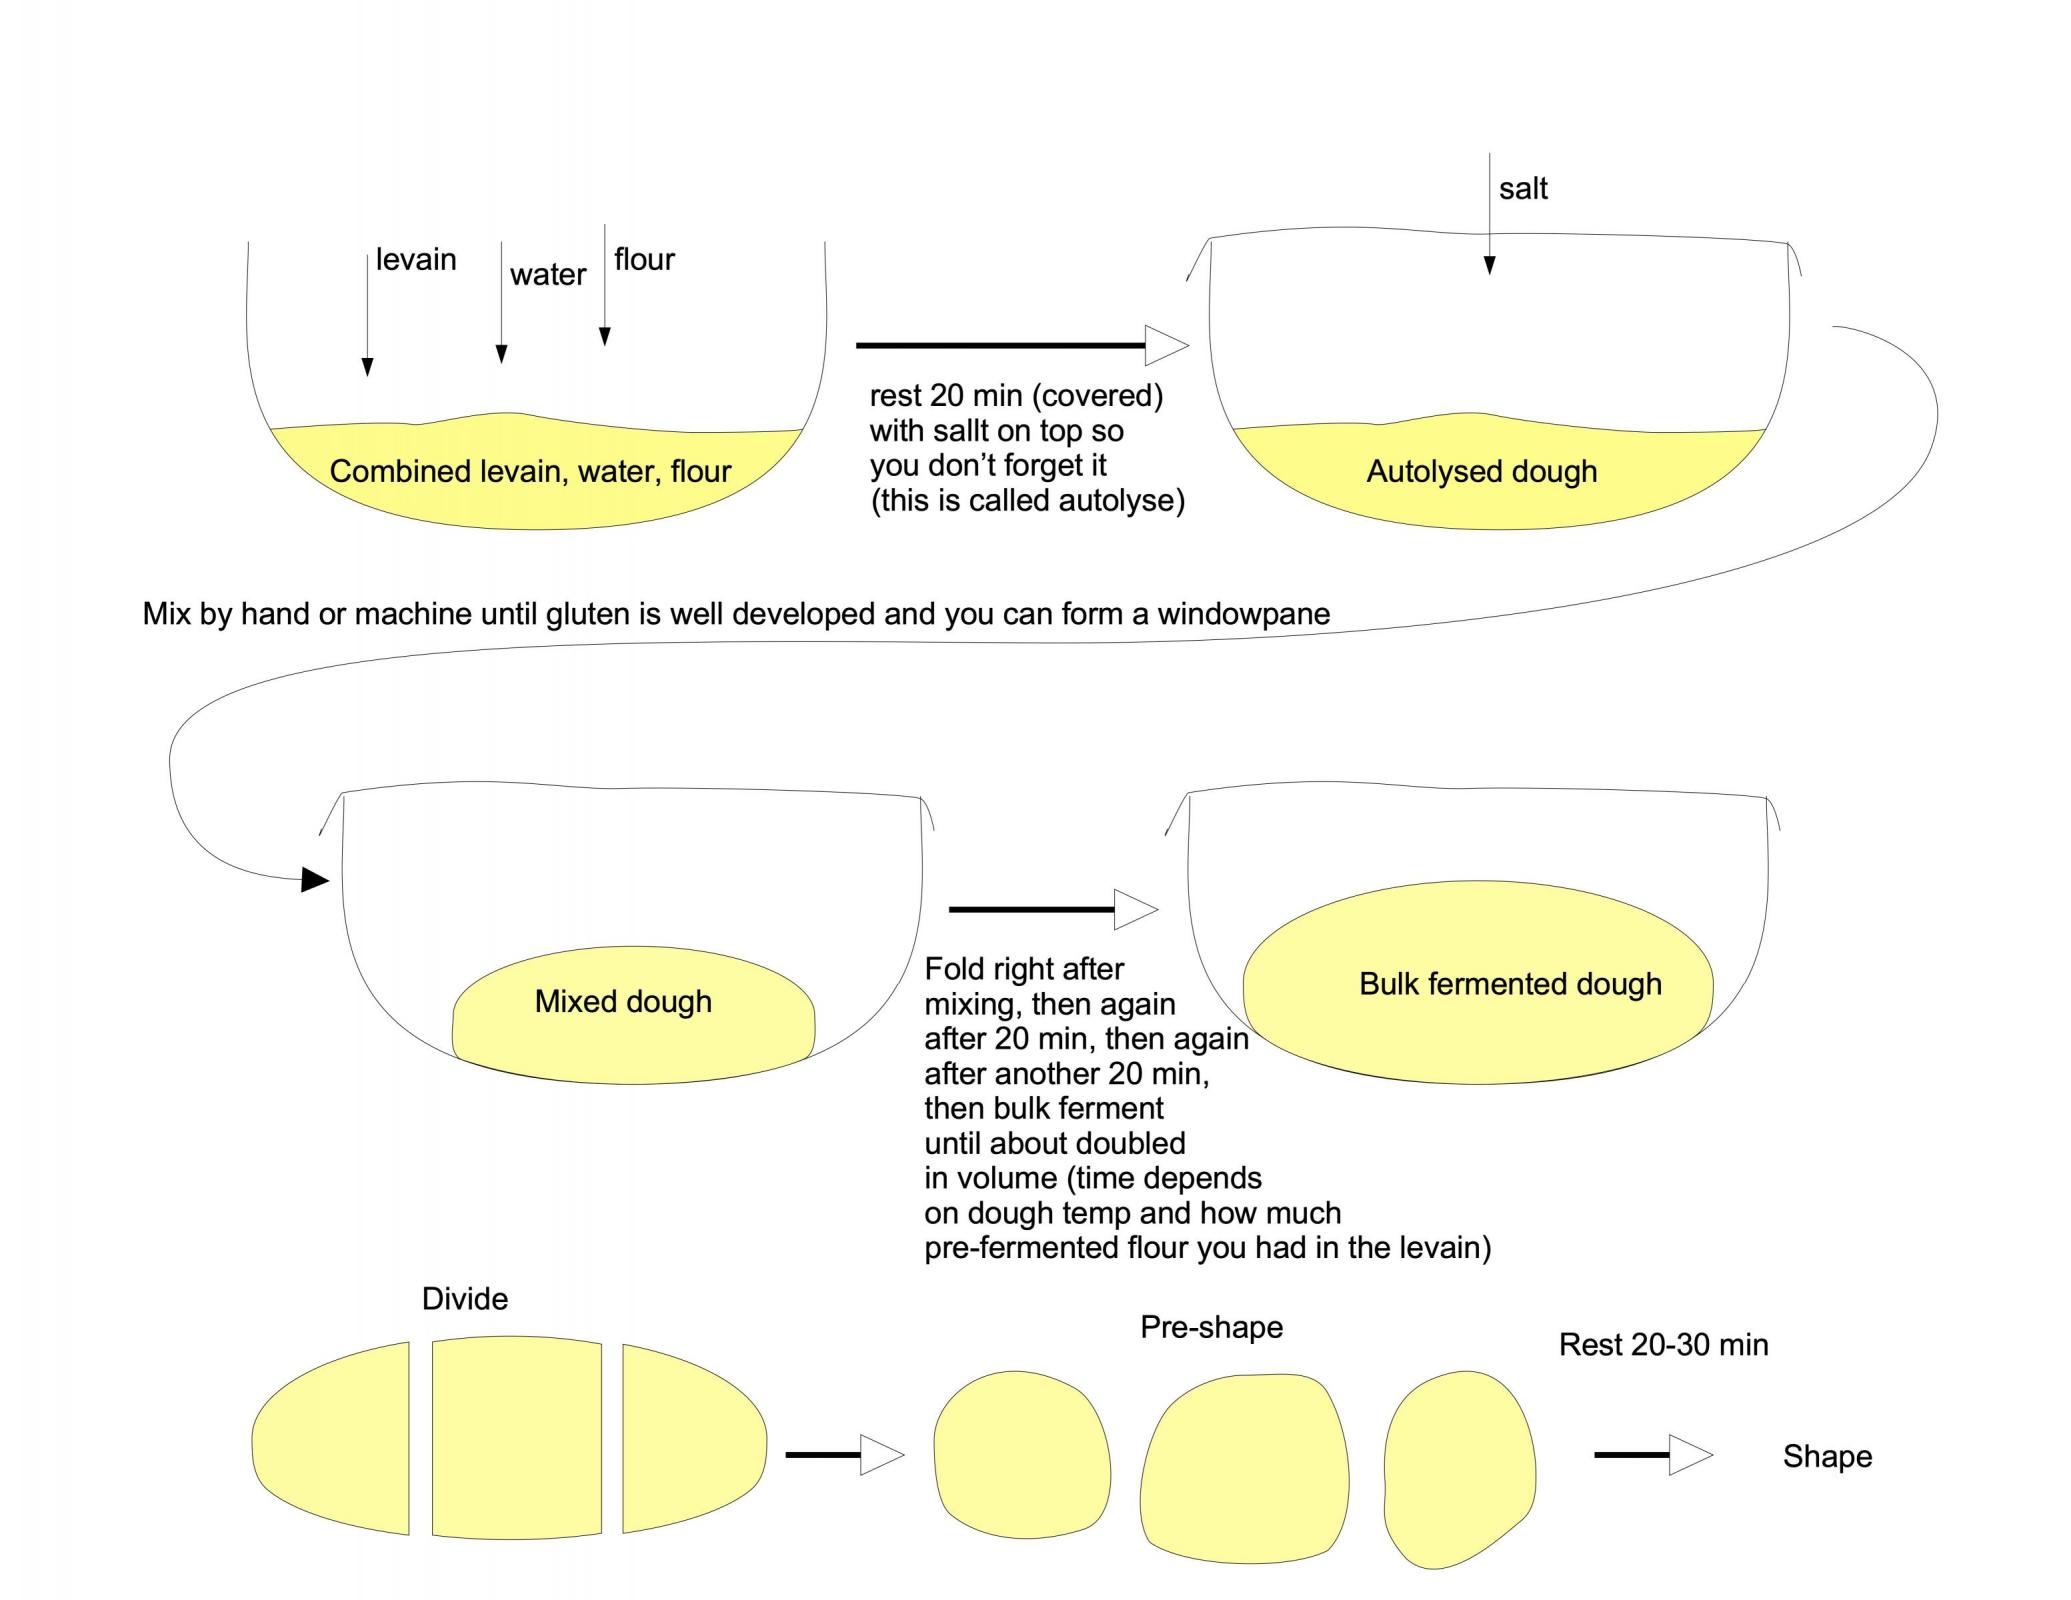
The Fresh Loaf

A Community of Amateur Bakers and Artisan Bread Enthusiasts.

Most bookmarked

Jeffrey Hamelman's picture
Jeffrey Hamelman

Starter maintenance

I was told that a FreshLoafer had asked about my method of sourdough maintenance. Now that my baking is done at home as needed, and not as daily production, my method might be pertinent to some FL bakers. 

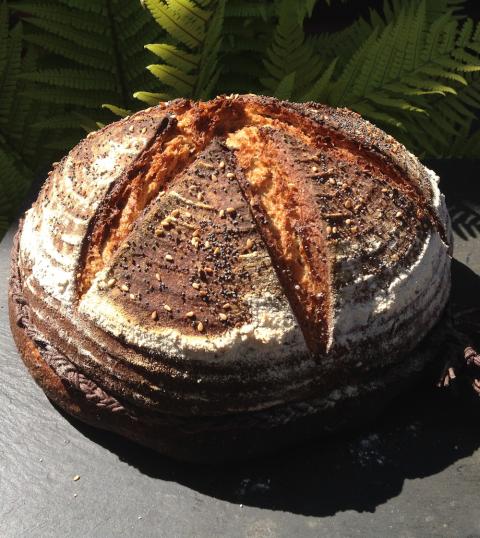
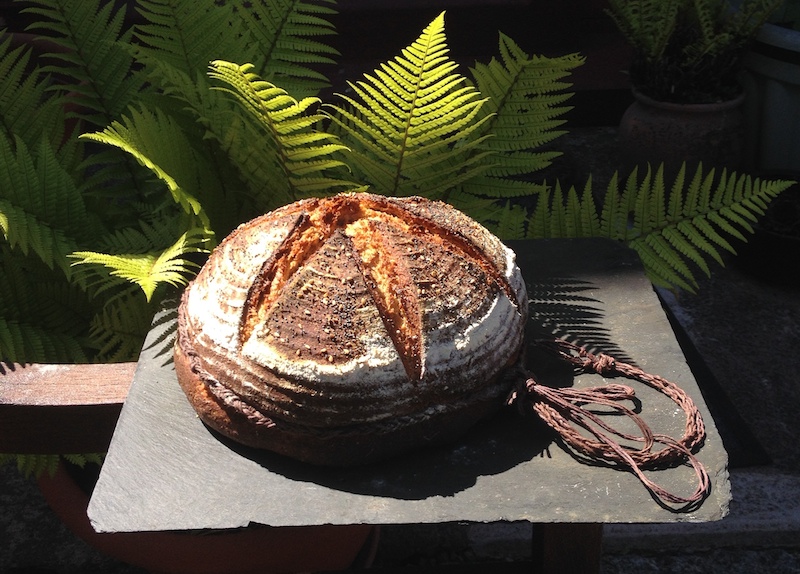
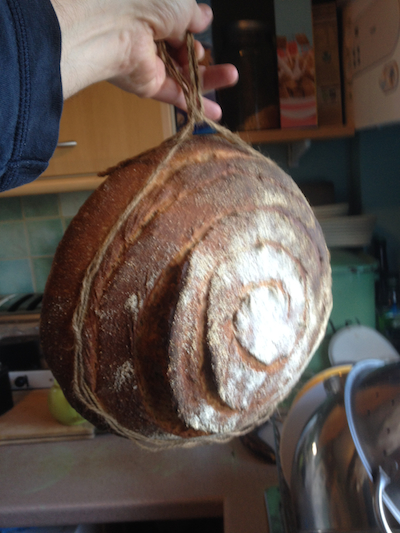
During my first baking job, I worked for a German woman in Northampton, Massachusetts. We used a rye culture for all the breads--rye, whole wheat, white. Before leaving that job, I began a rye culture of my own, on August 28, 1980. It wasn't for another 12 or 15 years that I began maintaining a liquid levain culture along with the rye. The rye culture was the backbone of the bakery I owned, and over the years it has brought me to six continents. Both cultures were fed daily, as the healthiest cultures always are. And how good it feels to know that well over a million loaves of bread have been generated by the cultures.

These days I  bake once every week or two, and I only maintain the rye culture. I feed it daily. Here's how: 10 g ripe culture, 16 g water, 20 g whole rye flour. Pretty straightforward, right? However, I do make slight adjustments as the seasons come and go. For instance, this time of year--hot and humid in Vermont--I may start with just 7 or 8 grams of ripe culture to slow it down a bit. And I make it just slightly firmer during the hot months, as a firmer culture ripens more slowly than a looser one. And for that reason, I may increase the water weight by a gram or two in the winter to encourage full ripening  (I heat with wood, so the house is pretty cool by morning). Occasionally I'll use some of the discard for waffles, pancakes, or crackers, but most days I discard it. Into the compost it goes. I certainly don't consider this to be "waste," as I'm sure all those many millions of sourdough bugs are contributing in their own way to the metabolism of the compost. I simply consider that the discard is changing its "job description."

If I am making a bread that requires a wheat culture, I simply feed some of the discard with wheat for a day or two before building the final sourdough.

The sourdough is kept on my baking table 24/7. If I am going away, I give a normal feed, then refrigerate it after two hours. The principle is that the yeasts can get a bit of a head start before a lot of acidity develops, and once refrigerated, the majority of the rye flour is still available for them to feed on. I think the longest I've kept it refrigerated in this way is about three weeks. It returns to full health almost instantly. This method also works well with firm levain cultures (making the build slightly firmer before refrigeration is a good idea). If I maintained a liquid levain culture and was leaving for awhile, I'd simply make it into a firm levain first. 

I try to remember to dry some of the rye culture every year. I take maybe 10 grams of ripe culture and patiently rub it with roughly 100 g of whole rye. I put it into a square of cheesecloth or an old (clean!) cotton sock and leave it on my desk. I've successfully re-hydrated the culture after two-plus years of dormancy. I'm currently holding some dried culture back to see how it does after five years. It's a good idea for all bakers to keep some dried culture as a back-up, just in case. I also like to dry some as it preserves the culture's "DNA."

I guess if I decided to eat just one day a week and spend the majority of my life at 38F, I'd feed my culture just once a week too and refrigerate it the other days. However, I really enjoy seven days of nutritious eating each week. Although my trusty old rye culture doesn't speak English, it surely does communicate, and the message it sends is that it prefers daily meals too. 

Doc.Dough's picture
Doc.Dough

Methods and Rationale for Sourdough Starter Maintenance and Elaboration

Since the facility for uploading fully formatted Word and PDF documents has not been implemented, the details of this post can be found here and I have loaded (above and below) a pictographic shorthand version which lacks any explanation of the rationale.  The artwork covers the whole bread-making process of which the illustration above covers starter maintenance, elaboration into a levain, and then using the levain to initiate a batch of bread dough.  The linked paper covers only the starter maintenance and elaboration aspects of this process. The remainder of the complete bread process is included in the illustrations below.

One point I want to make here is that you don't need to keep a lot of starter, even if you want to make a lot of bread. Using the quantities noted below, you are keeping about 30g of starter, from which you use 3g to seed a refresh cycle and either throw out the remainder or use it to make a levain, from which you will make a batch of bread.

Many sources would have you keep at least a cup of starter (or a pint, or a cup in a pint jar, or a pint in a quart jar) which is totally unnecessary.  If you are going to need 10Kg of levain, you can elaborate 20g into 10,500g in two steps (or 3g into 10500g in three steps), building 20g into 500g of refreshed starter by feeding it at 20:250:250 (a factor of 12.5) and letting it ferment for 6 to 12 hrs depending on the temperature and repeating the feeding to expand it by another factor of 10 (500:5000:5000) to yield 10.5 Kg of levain. So your little 5.5 oz polypropylene food service cup containing 28g of starter becomes 10.5 Kg of levain in 24 hrs.  By doing this and assuming that you feed it every day (which is one option though once a week is enough to maintain it if you don't need bread during that time) you throw out starter containing ~16g of flour every day. That is a total of  over 5.5Kg of flour in a year which is not trivial, but it does make for a pretty inexpensive hobby - or you might perfer to think of your starter as a pet which doesn't eat nearly as much as a dog.  If you maintain a pint of starter and feed it 50g of flour daily you will need 18Kg of flour over the course of a year in addition to the amount you use to make bread. And you have to figure out where to throw out 100g+ every day (which should never go down the drain since it will eventualy coat your drain line like hundreds of layers of paint and irretrieveably plug it up).

You can also read the blog post down below the one about idli that explains the The 2% weight loss method for judging levain maturity (which you can also use for your starter if you have a high accuracy scale).


DanAyo's picture
DanAyo

Maximizing Yeast in SD Starter

Michael Wilson’s use of the highly yeasted Levito Madre (Pasta Madre) have interested me for years. Unfortunately (as far as I know) all of the definitive literature is written in Italian. Because of this I have not ventured into this endeavor.

I recently got in touch with Debra and asked her for help to develop a sourdough starter which prioritizes the yeast population over the LAB. Below is her reply, which has been posted with her permission. Hopefully others will find the information useful.
<Thanks, Debra>

You're in luck. It's not that difficult to shift the balance, and it can be done rather quickly, although changes in the organism profile will likely follow more slowly. The best way is to reduce hydration to a firm dough, 50-60% or whatever gets you to something that isn't sticky after you knead the flour in. Feed it 3x a day if you can. (If you want to see it lose all sourness, feed every 4-6 hours for a day or two.) Like always, you need to work out feeding ratios that get you to the next feed without being overripe or deflated, because that's when LAB are forging ahead. You don't need high temperatures for this, room temp works best, especially now that the weather is cooling off. The warmer it is, the more frequently it will need to be fed to keep LAB from increasing too much.

With a strong ap like King Arthur, I usually go 60% on the water and feed 1:3:5, 3:3:5, 5:3:5, or even 8:3:5 depending how long it will be going between feeds --- 12, 8, 4-6 hours or less, accordingly, or depending on temperature. You know the drill. You develop your own routine as you go. Taste along the way, because that and how much rise you get will tell you everything you need to know about the balance. You'll probably get about 4x rise once it has transitioned and stabilized, provided you have the gluten structure to support that.

So the factors that favor yeast are: white flour, low hydration, more frequent feeding, and moderate-low temperature. This kind of starter makes great pain au levain, and I'll bet it would be the perfect choice for sourdough baguettes too. I don't know if high temperature is essential for the right species profile of a good panettone starter (it could be), but if you choose that route, just remember the higher the temp, the shorter the feeding intervals need to be to keep LAB in check.

Debra Wink's picture
Debra Wink

Raisin Yeast Water

This post is in honor of the current community bake featuring Jeffrey Hamelman’s Swiss Farmhouse Bread. The process begins with soaking raisins in water for 5 to 6 days to create the natural leavening for this bread. Essentially, the long raisin soak is making wine, but from rehydrated dried grapes instead of fresh. Just the first stage of wine fermentation, though. Being higher in natural sugars than most other fruits, grapes are particularly suited to winemaking. But making wine is very different from making sourdough in both the species that are initially present in the raw materials – grapes versus grains – and how their cultures develop over time.

Grape skins, like the bran covering on grains, provide a natural biofilm of microorganisms, most of which have names quite foreign in the baking world. Two of them – Kloeckera and Hanseniaspora – together account for 50-70% of the yeast, with the balance made up of a variety of other genera – Candida, Metschnikowia, Cryptococcus, Pichia, Kluyveromyces, Hansenula... In wine lingo, these flora are collectively referred to as the non-Saccharomyces yeasts. Indigenous strains of our old friend Saccharomyces cerevisiae are also present, but in very low numbers by comparison. And yet, S. cerevisiae is by far the most important.

In the beginning of a typical wild fermentation, non-Saccharomyces yeasts take off. Their initial flush is short-lived, however, and after about the first two to four days of fermentation, they start dying. They require more vitamins than S. cerevisiae, and vitamins are in limited supply; they are less tolerant of alcohol than S. cerevisiae, and S. cerevisiae is a more prolific producer of alcohol; they have a slower growth rate at typical fermentation temperatures than S. cerevisiae, and so are less competitive. In other words, Saccharomyces cerevisiae is just all-around tougher and less demanding. It is a better contender over the long haul, and so it rises valiantly to the top.


Growth Pattern During Alcoholic Fermentation by Species Naturally Present on Grapes


Note the time line. At four to five days, the Saccharomyces population reaches its maximum, while other yeasts are dropping like flies. Temperature plays an important part in indigenous wine fermentations. Fastest yeast growth and fermentation occur at 77-86ºF (25-30ºC) with a general pattern following the one shown here. Below 68ºF (20ºC), the non-Saccharomyces yeasts don't necessarily die off. Their rate of growth is faster than S. cerevisiae at the lower temperatures and their tolerance to ethanol is increased, so their populations may remain high to the end.

Now take a look at lactic acid bacteria (the orange line). They drop to their lowest numbers after about five days (less than 10/ml), which explains absence of acidity in the bread. Oenococcus oeni is a species of lactic acid bacteria unique to wine ecosystems, and depending upon pH, may be the only one involved. It is the primary agent in malolactic fermentation later in the winemaking process. But lactic acid bacteria don’t take off until about two to three weeks after alcoholic fermentation is complete, giving us a nice window of opportunity to leaven bread without their interference.

While fermented raisin juice provides natural leavening, being primarily Saccharomyces cerevisiae without lactic acid bacteria, clearly it isn’t sourdough. This is the wild counterpart to bakers’ yeast. You may be wondering, "So why bother fermenting raisins if you end up with the same species?" I think you’ll know the answer the first time you bake a loaf for yourself. Wines produced by wild, mixed fermentations have the potential for more complex and interesting aromas and flavors, even if less predictable than those induced by commercial monocultures. And so it seems just as true for breads leavened by them. The fragrance that filled my house the first time I baked this bread had a richness and intensity I had never experienced in a lean bread before, the foretelling of wonderful flavor. 


What it Looks Like in Action

Your timeline might be a little different than this, although you should see bubbling within 48-72 hours if it's working. As always, with variable live cultures, variable ingredients and variable conditions, results will vary.


Day 1

Initially, raisins sink in water and start out on the bottom. Some air bubbles may get trapped in the wrinkles.


Day 2

As they absorb water and swell, raisins expand and appear to be suspended throughout the watery raisin juice, although still underneath the surface.


Day 3

You'll know fermentation is underway when active bubbling becomes evident. The liquid will turn cloudy with yeast, and the raisins migrate upward as they become gassy.


Day 4

As fermentation progresses, the raisins become more buoyant, floating higher in the liquid (above the surface). Excess yeast cells settle in an increasing layer of sediment on the bottom.


to be continued ...

DanAyo's picture
DanAyo

Community Bake - Maurizio's Fifty-fifty Whole Wheat Sourdough - Everyone is Welcome

It's that time again, this will be our second "Community Bake". The FIRST ONE was a great success! This time we are baking Maurizio's Fifty-fifty Whole Wheat Sourdough. Guess what? As luck would have, today Maurizio celebrates the 5th anniversary of his website, The Perfect Loaf.

Since most bakers are separated by many miles and even different countries, this “community bake” may be the best way to share information and learn together along the way. The idea, for those who want to participate, is that we document our progress with pictures and post. It is suggested that each participant start a new comment to document their progress. As more information and images are available for your bake you can edit that post and append it. We’ll share our success, and just as informative, our failures. During the process we can ask questions, compare results, or offer suggestions. Both expert and novice have a place here.

We plan to start our bake today. We will be following Maurizio's well documented instructions. They can be found here. https://www.theperfectloaf.com/fifty-fifty-whole-wheat-sourdough-bread/

I hope you choose to join in. The more the merrier. Even if you don’t come aboard now you can still post your bake and results at any time in the future. All threads are constantly monitored for recent activity. Be sure, someone will be available to assist you.

Some may prefer to bake small loaves. It seems 500 grams loaves are the choice of many. Below I setup the spreadsheet for 1050 grams of total dough. This would make (2) 500 gram loaves or divide the ingredients weights in half to make a single 500 gram loaf. NOTE - the total dough weight is slightly increased to account for loss. On most of these bakes I choose to omit the Diastatic Malt and they baked well. I know many don't have this ingredient in their kitchens.

Dan
Always remember this, "we learn more from our failures than we do from success".
   
Post it all. The good, the bad, and (if you dare) the ugly. 

Flour.ish.en's picture
Flour.ish.en

A Challenging Panettone

Didn't know making panettone was a challenge until I read a recent article on the New York Times referring to this traditional Italian bread as "the Mount Everest of baking."  I tasted an exceptional piece of panettone made by Jim Lahey. Met him on his book tour in New York city when he spoke about his new book The Sullivan Street Bakery Cookbook. How difficult could it be to make the panettone armed with a detailed five-page recipe in the cookbook? This is what I've found.

Bread bakers deal with this process everyday: 1) prepare a preferment, 2) mix the dough, 3) bulk ferment 4) shape the dough, then 5) proof and 6) bake the bread. A fairly linear approach going from start to finish; done it, been there many times before. There are a few indispensable things to keep in mind. Among them, you'd need: a lively stiff starter, a stand mixer, panettone molds and long metal skewers. None too daunting. What I was not prepared was how long every stage of the process took. How many times I thought nothing good could possibly come out of this?

I'm starting to understand climbing Mount Everest requires endurance, a clear and focused mindset, a firm belief that you'll reach the destination and the discipline to ward off negative thoughts and resist messing around unnecessarily. It dawns on me that a recipe is just a set of guidelines; it's what we do with it that matters the most to the final outcome.


This Jim Lahey's recipe works, unequivocally. It's perfectly balanced. I have to keep reminding myself to stop messing around on the edges. It may take longer than 24 hours to get the preferment ready, 15 minutes at high-speed in the stand mixer to emulsify, 48 hours for the dough to quadruple during the bulk rise, 7 hours to get the dough to rise to the top of the panettone mold and 55 minutes to bake and several more hours for the inverted panettone to cool completely.

Who knows the unrelenting waiting game, especially if you haven't done it before (or you are type A like me), is the secret to a successful panettone? The panettone is weightless, cotton-candy airy, delicate, indulgent and far better than anything I've ever bought. More important, it's not about the bread. It's about a long and arduous journey, while keeping the hands and impulses (after all, I'm the master of the universe!) from interfering the dough and leaving it alone. Yes, sometimes it may take longer than you believe is sensible. That's the real challenge and a humbling experience.

Happy holidays to you all!


P.S. I have given these breads as gifts, therefore no crumb shots. I have another batch waiting.... Will post the interior pictures in a day or two.

Postscript:12/25

Finally, some crumb shots. Not too shabby. Certainly, there is room for improvement!


Artisan Pompeii Miche

RoundhayBaker's picture
RoundhayBaker

Description

As promised in AbeNW11's post on Making 2,000 Year Old Bread this is my now thoroughly tested recipe for the Pompeii loaf.

For those of you who don't know the back-story, when the Pompeii Live exhibition was staged at the British Museum in 2013, one of the items on display was a carbonised loaf of bread found in a bakery oven. On the day of the eruption in 79AD, it received a slightly longer and higher temperature bake than the baker intended. Not that he cared any longer.

Museo Archeologico Nazionale di Napolii (© Fotografica Foglia).

Apart from surviving the eruption, the loaf is notable for three things. There’s the bread stamp on it which reads ‘Property of Celer, Slave of Q. Granius Verus’. It is also wrapped in a cord . And it’s divided into eight wedges.

The museum asked chef Giorgio Locatelli to recreate the bread. And you can watch him and his kitchen staff doing just that on this video here. It’s fascinating stuff but, viewing it, my reaction was that this is was a restaurant loaf, one made using modern techniques (yeast, gluten powder etc.). Why not have a go at making a true artisinal loaf instead and have a go at baking it wrapped in a cord?

So I did.

Here it is. It’s a whopper. 

Out went the modern flour, yeast, and gluten additive. In came a sourdough preferment, ancient flours, and artisinal techniques to develop gluten. I used Kamut, rye, and spelt flour; all grains common in the Roman world. I suspect Prof. Calvert was not the first person to come up with the idea of autolysis. After all, bread-making’s been around for eight thousand years. Many, many bakers must have noticed the benefit of giving hydrated flour a rest, so an autolyse was in. The same applies to double-hydration.

I used a 100% hydration dark rye sourdough starter, but any will do (however, you do need to adjust the water quantity if you use a lower hydration starter).

Although it makes a delicious, nutty-textured bread, Khorosan is horrendously expensive, so I tried the miche with varying proportions of all the flours, including replacing the Khorosan with wholemeal/wholewheat or buckwheat. All worked very well. The recipe is adapted from the ever-reliable Weekend Bakery's Miche formula and is is therefore fairly disaster-proof. I sprinkled the loaf with anise, poppy, and sesame seeds because it’s known they were used by Roman bakers and because I like the their taste.

Here’s the obligatory crumb shot.

Summary

Yield
Servings
Prep time18 hours
Cooking time1 hour, 15 minutes
Total time19 hours, 15 minutes

Ingredients

50 g
Rye sourdough culture (100% hydration) (preferment)
180 g
Kamut Khorosan flour (preferment)
40 g
Strong Bread Flour (preferment)
180 g
water (preferment)
540 g
water (or less (depending upon sourdough hydration))
405 g
Spelt flour (wholemeal (wholewheat) spelt)
405 g
Kamut Khorosan (or wholemeal (wholewheat) flour or buckwheat flour)
24 g
salt
2 t
Anise, poppy and sesame seeds (optional)

Instructions

Adapted from the WKB Miche 

  1. PREFERMENT: Mix the ingredients for the preferment together into a stiff-ish dough and leave at room temperature (18-24℃ - 65-75F) for 12 hours or overnight.
  2. MIX. When ready, and if you have a thermometer at hand, determine the Desired Dough Temperature (I aimed for 25℃ - 77F) and adjust your water temperature to achieve it.
  3. Stir the preferment into half the water.
  4. Add the flours and stir to incorporate. 
  5. Gradually add the rest of the water and let the dough come together (you may need all of the water or even a bit more, depending on the flour you use). If you canreserve 10% of the water for later double-hydration.
  6. KNEAD: Knead for 1 minute into a shaggy mass.
  7. AUTOLYSE: Cover and let the dough rest for 30 minutes
  8. KNEAD: Add the salt and knead for 3 minutes on a stand mixer (5-6 minutes by hand).
  9. DOUBLE-HYDRATE. Continue kneading and dribble a little of the remaining water into the mixing bowl (or sprinkle on your work surface). Wait until it is absorbed before making the next addition. Do this for 2 minutes on a stand mixer (3-4 minutes by hand) 
  10. KNEAD: Continue until you achieve a good window pane (with these flours it’s never going to be great). 
  11. BULK FERMENT: Return to a greased bowl and let it rest for 50 minutes.
  12. FIRST S&F: Wet your hands and, either do one complete stretch-and-old turn in the bowl, or tip onto a floured work surface then do one stretch-and-fold. Return to bowl, cover, and leave to rest for 50 minutes more. 
  13. SECOND S&F: Repeat and leave for another 50 minutes
  14. THIRD S&F. This is optional depending upon the strength of gluten development in the dough. When I replaced the Kamut flour with either buckwheat or wholemeal it was needed. 
  15. PRE-SHAPE: On a lightly floured surface, gently de-gas the dough, tuck the edges into the centre, flip over, then, with floured hands (the dough is quite sticky), drag it into a loose boule in four quick turns, making sure not to overwork it.
  16. Cover with a damp cloth (or similar) and let it rest for 20 minutes.
  17. Prepare a large (1.5kg) banneton.
  18. SHAPE: Lightly flour your surface and hands again then shape the dough into a tighter boule, making sure not to tear its skin. It’s a big loaf, so you’ll need to use both hands and/or a bench scraper to do this. Make sure you flour your hands again if they begin to stick to the boule.
  19. Sprinkle the top of the boule with flour, gently turn it upside down, then carefully place it in the banneton.
  20. PROVE: Cover again and leave to prove for up to 90 minutes. Precise time varies with the ambient temperature. When you think the bread has risen enough, use your finger to carefully make a very small dent in the dough. If after 30-45 seconds the dent remains, the bread is ready to bake, if the indentation disappears, the dough needs a little bit more time. 
  21. Preheat your oven to 225/205(fan)ºC (440/400F).
  22. When the loaf is ready, turn the oven up to 240/220(fan)℃ (465/430F). Prepare your steam tray.
  23. Carefully turn the miche onto your baking peel. Spray it lightly with water then sprinkle on the seeds.
  24. Dust your peel with flour then turn the boule onto it. 
  25. Tie the cord around the loaf, knotting it to make a carrying loop from its tails.
  26. SCORE: Make four cuts from rim to rim across the centre to create eight segments. You need to slice down to the cord. I used a sharp bread knife to do this; my lame was not up to the task. I’ve also cut it some loaves into six wedges rather than eight. Either way is good.
  27. BAKE: Slide the miche into your oven and immediately turn the heat down to 225/205(fan)ºC (440/400F) and bake for 50-75 minutes until dark brown. 
  28. Remove the steam tray 30 minutes into the bake.
  29. When baked, transfer to a rack and leave to cool. 

Notes

Okay, why the twine? First, as you can see from the bread selfie below, it helps you carry a whopping 1.7kg miche. Handy for the Roman shopper/house slave. Then there’s the division of the loaf into wedges. They’re deep cuts but, if you tie the cord around the loaf first, the miche keeps the shape it would lose if it was sliced without the cord.

I baked my first Pompeii miche using a cord made from garden twine. It worked well but left hairs embedded in the crust. Not so good. I tracked down some 20lb hemp cord which comes lightly waxed with corn and potato starch. To make a cord thick enough for the miche, I cut three lengths, wove the strands together, repeated the process twice more, then braided the three-ply cords into one strong 9-ply cord. Problem solved.

Why the wedges? No seems sure, but the simplest explantion is that the loaves could be sold or served by the slice, just as some miches are sold in France today. I’ll have a go at my next farmers' market.


(Beatrice, Creative Commons)

And the bread stamp? Roman bakers didn’t just sell their own bread (like the unstamped Pompeii loaf above). For a fee you could have your own loaves baked in their ovens (a communal tradition that only recently died out in France but survives in Morocco - read Bill Alexander's superb 52 Loaves for more) hence the need to identify which loaf was your own.

Bread stamps have been much discussed on TFL. I’ve yet to decide how to make mine, but I will.

______________________________________________

A bit more about baking in Pompeii at the time of the eruption:

More than thirty bakeries have been excavated in Pompeii and Herculaneum. Almost two-thirds were large enough to have their own donkey or slave-powered flour mills. They also had communal ovens to which you could bring your dough (bread-stamped, of course) to be baked overnight.

(Carole Raddato, Creative Commons)

Ironically, basalt rock from old lava flows was used to make both the millstones and the floors of the wood-fired ovens.

Despite the devastation of the eruption, quite a few loaves have been found. Eighty charred loaves alone were recovered from the ovens of one baker, Modestus. Their (ultra) dry weight is 580g on average, all were divided into six or eight wedges, and each has a diameter of about 20-25cm. Luckily, about the size of a 1.5kg banneton.

And here’s a portrait of another baker, Terentius Neo, and his wife. It's a fresco from inside their house in Pompeii. He holds a scroll, showing he was literate. She holds a wax tablet, showing she was numerate too.

(Public domain)

They look like a pleasant couple, but then, of course, they're bakers. :)

PetraR's picture
PetraR

Rustic loaf

I started it at 3am in the Morning * yes I know I am silly but if you suffer from Insomnia you need to do something, right? *

Ingredients

250g mature Stiff Starter * 50% hydration *

400g Bread flour

250g Whole wheat flour

 100g Rye flour

2tbsp Caraway Seeds * we like the taste so I used quite a bit *

500g tepid Water

2Tbsp Vegetable Oil

25g coarse Salt


I mixed the stiff Starter with the Water, added all the flours and caraway seeds and mixed it until well combined.

Autolised for 50 Minutes.

Added Salt, gave it a turn in the Bowl, covered the bowl and let it sit for 30 Minutes, gave the dough the turns again, let it sit for 30 Minutes..

I did those turns 6 times , every 30 minutes for 3 hours.

Between the turns I put the bowl in a  plastic bag.

Bulk fermentation for about 6 hours and final proof in banneton for 2 1/2 hours.

Oven was preheated to 250C with the Dutch Oven in it.

I baked the bread for 40 Minutes at 250C and a further 30 Minutes at 200C without the Lid.


I just prepared my Dinner as you can see in the last picture and there is NOTHING better than a slice of good bread with a simple Tomato on which I put Pepper , Salt and some light Soy Sauce:)

Since we are a family of 6 and we all love Sourdough bread and , well, bread... I have to start the next one tonight. 

There won't be much left by lunchtime tomorrow. lol


pstros's picture
pstros

Almost Purely Rye Sourdough

This is upgraded recipe for Purely Rye Sourdough from the book Brilliant Bread by James Morton. This is pretty nice loaf packed full of great flavor and really rich in taste. It goes very well with some fruit on it as a healthy afternoon snack! Scroll down for a photos...

Recipe:
400g Wholemeal Rye Flour
300g Water
200g Sourdough Starter
100g Cooked Rye Grains
40g Honey
10g Salt

1. Mix together all ingredients into wet dough and leave to rest for 30 minutes;
2. Knead well for 20-30 minutes by hand, the best is slap and fold method, but use the method you like until gluten is well developed and dough is nicely sticky and coherent;
3. Cover the bowl and rest for 12 hours at room temperature. Dough should rise a little or nearly double in size;
4. Turn it out on to a heavily floured surface and shape it into a loaf tin shape. Move to well greased tin, spray the surface with water and cover to proof for 3-6 hours at room temperature or until double in size. Keep an eye on it and regulary spray with the water. Dough must remain nicely wet all the time during this proof;
5. Preheat the oven with baking tray inside at 240C at least 30 minutes before baking;
6. Slide the tin on the preheated baking tray and bake for about 30 minutes until the top is nicely brown in colour. Keep an eye on it and steam regulary with fresh water. It is the best to spray the top of the bread every 2-3 minute and keep it constantly wet for the first 15 minutes of baking. When the top is nicely brown, remove from the oven and bash out of the tin. Replace the bread on the baking tray and bake for another 20-30 minutes until a dark brown colour;
7. Immediately after baking place the loaf on cooling rack and properly greas it all over with sunflower or rapeseed oil. When the bread is completely cooled down to room temperature, wrap it to the baking sheet and leave to rest about 24 hours at room temperature;
8. Take the wrapped loaf, pack to the plastic bag and chuck it to the fridge overnight;
9. Slice with pretty sharp knife (but not serrated!!!) and ENJOY!
10. Store well packed in the fridge.

________________
My sourdough starter is 100% Hydration, contains 50% basic white bread flour and 50% wholemeal rye flour. Feeded on regulary basis at 12 hours intervals. I am usually using it after 5-8 hours after the last feeding.


dmsnyder's picture
dmsnyder

Sourdough Honey Whole Wheat Multigrain Bread

Sourdough honey whole wheat multi-grain ciabatta rolls and boule

May 11, 2013

After last week's San Francisco-style Sourdough with 30% whole wheat, I considered a number of modifications of the formula. The leading candidates were 1) increasing the whole wheat to 50%; 2) adding some honey or other sweetener; 3) adding a mixed grain/seed soaker. In the background but not very far back was my wife's request that I make her some soft sandwich rolls that were low profile. When she gets a rather spherical roll, she cuts a horizontal section out of the middle.

 So, starting with the my San Francisco-style Sourdough formula, I attempted to accomplish all of the above in one swell foop.

I increased the whole wheat to 50% of the total flour. That was the easy part. I had bought a mix of grains and seeds called “Harvest Blend” from KAF and decided to use that as a multi-grain soaker. I planned to add this at 18% of the total flour weight. I had no clue as to the appropriate amount of water to use for the soaker, so I used 125% of the weight of the Harvest Blend, which is what some similar multi-grain soaker's in Hamelman's Bread calls for. I added 4% honey, on a similar basis.

This all seemed quite reasonable to me. I thought this new formula ought to make a pretty tasty loaf and also good sandwich rolls, if I could figure out how to make them as flat as my wife wanted.

What's the saying? “Nothing ventured, nothing gained.” Or is it, “No guts, no glory?” Or maybe it's Pat's, “Sometimes you gets the bear, and sometimes the bear gets you.” Well, there were times when I thought I felt the hot breath of that bear on the back of my neck.

After letting the levain ferment overnight and the soaker soak, they both looked very good in the morning. So I mixed the flours and water and let them autolyse for 30 minutes. I then added the salt and levain. I decided to hold back the soaker until the dough had pretty good gluten development. As I mixed, I thought the dough was on the dry side, so I added some water - maybe 30 cc's. After mixing for 6-7 minutes, I added the soaker. Yikes! There was 20 to 30 cc's of free water hiding underneath the soaked grains and seeds. When I turned the mixer back on, my dough was severely goopy. As I continued mixing, the dough was looking like 90+% hydration rather than the 78-80% hydration I had intended. So, my plans for the dough changed.

Rather than fermenting for 2-3 hours with a couple stretch and folds, then shaping and retarding to bake the next day, which is what I had planned, I treated the dough more like a San Joaquin Sourdough. I did S&F's in the bowl every 30 minutes for 2 hours then retarded the dough. The next day, I preheated the oven and divided the dough into one 500 g piece, which I shaped into a boule and retarded to bake the following day. The rest I scaled to 4 oz and “shaped” as ciabatta rolls, which is to say, by simply folding the pieces like envelopes.


Rolls proofing

I proofed the rolls for about 50 minutes, as the oven was heating. I then baked them at 480ºF with steam for 10 minutes and then for another 5 minutes at 455ºF/Convection bake in a dry oven.

After a night in the refrigerator, the boule was warmed at room temperature for a couple hours while my wife roasted some beets and my baking stone pre-heated. I baked the boule at 460ºF with steam for 15 minutes then for another 15 minutes at 435ºF/convection in a dry oven. The loaf remained on the baking stone with the oven off and the door ajar for another 20 minutes before transferring to a cooling rack. I let the loaf cool for several hours before slicing, thinking that this very wet dough need some “curing” time like a high-hydration, high-percentage rye bread does.


For both the rolls and the boule, the crust was soft and chewy. The crumb was very moist and almost gummy, but not really. The aroma and flavor were very assertive. Whole wheat predominated with very apparent poppy seed and less apparent sunflower seed flavors. There was a definite honey flavor to me, but my wife did not find it too strong. We made toscano salami sandwiches with the rolls and had slices of the boule with sweet butter with a dinner of salmon cakes and a salad.

The boule was placed in a plastic bakery bag, and slices were eaten both toasted and un-toasted over the following 4 days. The bread stayed moist but became less sticky. The flavor became more mellow and balanced, to my taste, over time. I enjoyed it more (un-toasted with Cotswold cheese) on day 4 than when “fresh.”

I thought both the rolls and bread were pretty good and improved after the first day – definitely worth making again with some modifications. The thing is, my wife thought they were fabulous. She absolutely loved the flavor.

The next steps will be to decrease the hydration and either eliminate the honey or substitute another sweetener.

David


Pages