The Fresh Loaf

A Community of Amateur Bakers and Artisan Bread Enthusiasts.

Most bookmarked

Anonymous baker's picture
Anonymous baker (not verified)

Liquid levain vs. stiff levain

Is there a standard hydration level for a liquid levain vs. a stiff levain? I was reading Leader's Local Breads this morning and noticed that his liquid levain has about 130 % hydrated vs. his stiff which has about 50% hydration. I've also been readin Michael Suas's Advanced Bread and Pastry and notice that some of his SD formulas call for a liquid levain while others require a stiff starter.

I realize there is probably not a rigid standard, but perhaps someone has some knowledge what constitutes one vs. the other. I'm also interested in knowing if a book discusses these terms. Oddly enough, Suas' book, which is very comprehensive, doesn't define the differences.

--Pamela

Mylissa20's picture
Mylissa20

Waaaay to Sour! Help!

Ok, I am a SD newbie and on my 6th unsuccessful loaf.  This last loaf showed the most amount of promise, but I have determined that my start must be waaaay to sour.  Everything smells good during the process, but by the time the bread comes out of the oven, you can smell the overpowering sour.  Is there a way to tone down my starter without starting over? And what is a good WW SD recipe?  I am feeling frustrated and very close to calling my SD quest quits.  (I can't stand to waste all that flour on bread that is too sour to use for anything)

Djehuty's picture
Djehuty

Secret to open crumb?

Everywhere I look, I see photos of bread with this wonderful, open crumb.  For reasons thus far beyond my ken, I cannot seem to duplicate this.

I thought perhaps my shaping technique was at fault.  I've tried to obey the dicta in Peter Reinhart's books and not degas the dough while shaping, but that seems to leave me with rather weakly-shaped loaves.  I've seen videos of the pros, and not only do they take a firmer hand, I've actually seen them intentionally degas before shaping, and they wind up with a nice, open crumb.  I read that greater hydration could help, so I made a rather oozy ciabatta, and even that didn't have much in the way of random interior spaces.

As I type this entry, just to the right of the text box is a photo of whole wheat bread -- whole wheat! -- with a more open crumb than my best baguette.  I'm obviously doing something very basic very wrong.

Any suggestions?


LindyD's picture
LindyD

Mystery of page 249 solved.

I've been curious why Jeffrey Hamelman's unkneaded six-fold French bread appears at page 249 in some copies of his book, "Bread," while other copies show a recipe for beer bread.

So I went to the KFA baking circle forum and asked the question.  A nice member there e-mailed King Arthur and received the following response from Jeffrey Hamelman:

"The beer bread was in the first printing of the book, and for the second 
printing I removed it and added in the no-knead French. I'll look and 
see if I have the no-knead here and send it to you. And you can feel 
free to disseminate it if you wish. 
Thanks and best wishes, 
Jeffrey Hamelman "

My procrastination paid off since I have the second printing.  Nice to know that we can reproduce the recipe here.

Whole Wheat Cinnamon Rolls & Sticky Buns

JMonkey

I make these for breakfast every so often. They’re 100% whole wheat, but, really, you’d not know it, especially if you use buttermilk in the dough. That’s not to say that they’re exactly healthy, but however detrimental they may be to the body, these warm sticky buns are awfully good for the soul on a grey and chilly weekend morning.

Dough Formula
Whole wheat flour: 100%
Milk or buttermilk: 58%
Egg: 12.4%
Honey: 18.8%
Butter, melted: 6.2%
Salt: 2%
Instant yeast: 1.3%

Dough Ingredients

Whole wheat flour: 450 grams; 3-4 cups
Lukewarm buttermilk or milk: 275 grams; 1.25 cups
Egg: 1 large, lightly beaten
Honey: 85 grams or 1/4 cup
Butter, melted: 28 grams or 2 Tbs
Salt: 9 grams or 1.25 tsp
Instant yeast: 6 grams or 2 tsp

Filling ingredients

Brown sugar: 210 grams or 1 cup packed
Egg White: 1 large
Cinnamon: 14 grams or 2 Tbs
Salt: Just a pinch
Currants or raisins: 100 g; or 2/3 cup
Chopped pecans or walnuts: 60 grams or ½ cup

Sticky Bun Topping Ingredients
Brown sugar: 140 grams; 5 ounces; 2/3 cup packed
Cinnamon: 2 to 3 grams; 1 tsp
White flour: 3-4 grams or 1 tsp
Salt: Just a pinch
Melted butter: 56 grams; 2 ounces; 4 Tbs
Corn Syrup, honey or brown rice syrup: 39 grams; 1 3/8 ounces; 2 Tbs
Chopped pecans: 106 grams; 3.75 ounces; 1 cup

 
Cinnamon Roll Glaze

Powdered sugar: 120 grams or 1 cup
Lemon juice, milk or water: 15-30 grams or 1-2 Tbs

Mixing
If the honey's cold, I like to put the butter and honey in the same bowl and heat it for about 1 minute on medium power in the microwave. But, however you do it, first mix the milk, egg, honey and butter. Mix the flour, salt and yeast in a separate bowl, and then add to the liquids. Mix until everything is hydrated. If you wish, you can knead the traditional way now, or do as I do and use the stretch and fold method starting at 1/2 hour after mixing, and doing two more folds 20 minutes apart.

You may have to adjust the flour or add some water -- the dough should be tacky, but not sticky. In any case, if you've kneaded, the dough will be ready in 60-90 minutes and, if you've done the stretch and fold, it'll be done in about 2 hours.

Filling and Topping
Meanwhile, for the filling, mix everything together until smooth except the dried fruit.

If you’re making sticky buns, mix the topping ingredients except for the pecans. Corn syrup will give you a better consistency for the topping because it prevents the sugar from crystallizing, but I don't often have it on hand, and have had good results with both the alternate ingredients.

If you’re making cinnamon rolls, you can mix up the glaze now and cover it, or you can wait until the buns are just about to come out of the oven. Start with 1 Tbs of lemon juice, milk or water (I really like the flavor that lemon juice gives to the glaze) and stir it, adding more liquid until you get the consistency you like.

Shaping
Grease a 9x13 inch pan. If you’re making sticky buns, spread the topping on the bottom of the pan, placing the pecans on top.

Then, on a lighlty floured surface, roll out the dough into a rectangle that's roughly 12x16 inches. Spread the filling over the dough, leaving a margin of about an inch or so on the top and bottom edges. Scatter the dried fruit and the nuts over the filling.

Roll the dough into a log and then, using a serrated knife or some dental floss, divide the log in half. Next, cut the two halves in half. Finally, divide each of these sections into three so you end up with 12 buns. Place the buns in the pan.

If you want your buns now, let them rise for about an hour or so until they're just barely touching each other, and then bake. But, if you want to bake them the next morning, simply cover the pan tightly with plastic or aluminum foil, and pop them in the refrigerator or a cold room (if it’s in the 40s or 50s, I sometimes just put them outside). The next morning, you may want to let them warm up for about 1 hour before baking, but I find mine are usually ready to go into the oven right away. You’ll know they’re ready when the buns are touching each other and are about 50% bigger than they when you shaped them.

Baking
Bake at 350 degrees for about 30 minutes. When they are baked, for sticky buns, put foil or parchment paper over the top of the pan, and quickly invert it onto a cooling rack. Scrape any topping left in the pan on top of the buns.

For cinnamon buns, leave the rolls in the pan and drizzle the glaze over them with a fork or a spoon.

They should probably cool for 20-30 minutes before you dig in, but I'll leave that to your discretion.

dmsnyder's picture
dmsnyder

Gosselin's Pain à l'ancienne - rustic baguettes and ciabatta

pain à l'ancienne

Rustic baguettes and ciabatta from Gosselin's formula (as described by Peter Reinhart)

pai

Pain à l'Ancienne baguette crumb

I made these baguettes and ciabatta from the formula Reinhart says he got directly from Phillipe Gosselin. The version in "Bread Baker's Apprentice" is a modification.

This is a very high hydration dough (about 80%), and I made my dough with KAF's "French Style Flour," which is their T55 clone. This is a low-gluten flour, by American standards. The dough started out like a batter once the additional water was added. I mixed it in my Bosch Universal Plus for something like 15 minutes before it was smooth and shiney. It still flowed like a batter. For the next hour, I did Hamelman's folding in the bowl. It then doubled over the next 90 minutes. (This technique was improvised. I thought about chucking the whole project as a lost cause at several points, but I'm glad I didn't. I learned a lot.)

The loaves were divided and stretched onto semolina-dusted parchment. The baguettes were baked without further proofing. The Ciabatti were folded in the usual manner and allowed to rise for about 30 minutes before baking.

Note: No attempt was made to score these loaves.

The baguettes had the sweet taste and cool, silky mouth-feel of ciabatta. I count them a success. Whew!

David

holds99's picture
holds99

Mark Sinclair's Portuguese Sweet Bread and Rolls

First, I want to express my sincere appreciation to Floyd for making this post with images possible on the new TFL system.  It keeps getting better and better.  Thank you!

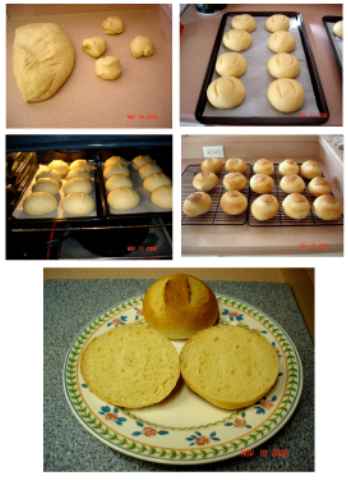
The following are photos of Mark Sinclair's Portuguese Sweet Bread and Rolls that I made recently.  I divided the dough in half and made 2 loaves of bread and a dozen or so rolls.  Both the bread and rolls are excellent and favorites at our house.  The bread is very good either plain or toasted and the rolls are wonderful as breakfast rolls or as sandwiches. 

Thank you Mark for this great recipe and for your video on roll shaping, which showed me the proper way  to shape rolls.  Hope you're knocking their socks off with your baked goods at your new bakery in Kalispell, Montana.

Howard


Section II: Bread Basics

You can jump right in and start baking without knowing much about the ingredients or how the process works, but if you'll take the time to learn a little bit about the baking process you'll find baking to be much more rewarding.  You'll also be equipped to modify recipes to fit your taste if you first understand how those modifications will change the results.

Elagins's picture
Elagins

100% Rye

As some of you know, I've fallen in love with rye flour because it's so different in chemistry and structure from wheat, and so challenging and rewarding to work with. Lately, I've been playing with different hydrations, fermentations and baking times/temps. This is my latest, a 70% hydration, 3-build sour (wild yeast only), using medium rye flour and baked at 250 for almost 3 hours. Apologies for the poor focus; I'll do better next time. (By the way, I used an electric food slicer to get those nice uniform slices):

Halloween 100% RyeHalloween 100% Rye

Susan's picture
Susan

Susan's Original Sourdough - 3/26/2007

I kept losing this recipe, so am placing it here in my blog!

My recipe and methods are most decidedly less than scientific, and are the result of about 1.5 years of fumbling and many bricks. I would welcome any suggestions.

Starter

1 T expanded starter, which was saved from the sponge

15 g filtered water (1 T)

25 g flour (2-3 T)

Mix water into starter, then mix in flour. Cover with plastic and leave at room temp until it is puffy and you see bubbles under the surface (for me, 4-6 hours, depending on room temp). Store in fridge and use as is within 3 days. For longer storage, refresh it before using (throw away all but 1 T, then add 1 T water and 2-3 T flour, etc.)

Sponge

240 g filtered water (1 cup + 1 T)

223 g flour (1.5 cups) (I'm currently using GM Harvest King here)

All starter

Mix water into starter, then add flour, stirring until well mixed; cover with plastic and let sit at room temp overnight. When ready, it will be expanded and bubbly with just a hint of a depression in the middle. (btw, I am using a 1.5L bowl, and the sponge fills up the bowl to within an inch of the top when the sponge is ready.)

Dough

60 g water (1/4 cup) This amount is variable (weather, etc.)

14 g (1 T) olive oil

All sponge, except for 1 T saved for the next starter

222 g bread flour (1.5 cups) (currently using GM Better for Bread here)

62 g (1/2 cup) white whole wheat flour (KA)

1.5 t salt

I use my Zojirushi ABM to mix and knead the dough, but have made up a custom program of 6 minutes mix/knead, 20 minutes rest, and another 6 minutes of kneading. Everything goes into the pan but the salt, which is added during the last couple of minutes.

Empty the dough into a straight-sided, lightly oil-sprayed canister to ferment for about 3 hours at room temp (lower 70's F). Stretch and fold 3 times over the first 90 minutes of this fermentation (Many thanks to MountainDog!). When the dough is fully risen, turn it onto a Silpat and cut in half with a bench knife. Gently pull each half into a rounded shape, turn over, cover with plastic and rest for 15-20 minutes.

Gently rotate each round a few times to tighten it, then invert each round into a well-floured cloth laid inside a small bowl (add some seeds in the bottom of the bowl if you like). (The bowls I use are about 7 inches in diameter at the top.) Seal the seam and tightly cover the top of the dough with plastic wrap. Put the bowls in a warm spot, upper 70's F, for 1.5-2 hours. (I use my microwave, OFF of course, and put a mug of hot water in with the bowls.)

Preheat oven to 450 F. Remove plastic wrap from one round and gently re-seal the seam if necessary. Invert onto a semolina-dusted peel, slash the top, and slide it into the oven. (My oven is a Miele, and it came with several trays, but I would think a large cookie sheet would do the trick. I stopped using a stone, as it didn't seem to make a difference in oven spring.) As soon as the round is in the oven, overturn a 4L heat-proof Pyrex bowl on top of it. The bowl has been quickly rinsed with hot water before putting it in the oven. I assume one could use a SS bowl, but you'd miss seeing the rise, and that's half the fun!

Leave the bowl on top of the bread until it just starts to brown (16-18 minutes), then very carefully remove the bowl by sliding a spatula under the edge (there will be a small release of steam here, so let it happen and stay out of its way) then I slide my other hand, well-covered with an oven mitt, under the edge of the bowl and lift it up and over the bread. Make sure you already have a safe place to set the extremely hot bowl when you take it out of the oven. I would not put it on a cold counter; a couple of hot pads are what I use. Please be careful.

Bake the bread another 6-8 minutes until it is dark brown. The darker it is (without burning, of course) the more taste it will have.

Bake the other loaf. I bake 2 little boules two or three times a week. And one loaf of each baking usually ends up with one grateful neighbor or another...

Well, now you know my sourdough odyssey. Remember that it's just mine; yours may take a different path. If you have any questions, please ask. I now weigh everything (again, thanks to the folks on this site), but have put in measurements for those who do not weigh. The flour was scooped and leveled.

Susan in San Diego (so you'll know I am at sea level!)

Boule Baked Under Bowl

Baked Boule

Pages