The Fresh Loaf

A Community of Amateur Bakers and Artisan Bread Enthusiasts.

Most bookmarked

freerk's picture
freerk

honouring my mother(s) update! here are the pics and the recipe :-)

(scroll down for update and pictures!!!)

My mother passed away long before her time, now almost 15 years ago.


She left behind a bread recipe that still goes around by her name; "Renny-bread" Even distant cousins seem to know the recipe; last summer I visited one of them here in Amsterdam, after she had been really helping me out for my wedding (she has THE most wonderful flowershop here in Amsterdam). To thank her I brought her a "Renny-bread", thinking she would see and eat it for the first time in her life...


When I showed her what I had made, she shouted out: "Ohh wonderful, a Renny-bread!"


That, of course, brought a big smile to my face; she remembered eating the bread when she was a kid, and loved it very much!


At the wedding a good friend of mine pointed out that my mother in law shares her name with my mother. She is Venezuelan and her name is Reina. Both names mean "queen", which I think is a wonderful name for a mother, OR a mother in law for that matter :-)


After all this (coincedence or fate, we will never know I guess) I played around with the idea to invent a bread in honour of these two wonderful women in my life; a bread fit for a queen!


There is one small problem with this bread though.... It's not really bread, it's more like a cake. It's a real simple recipe involving self raising flour, basterd sugar, a mixture of milk and water and some all-spice that makes it taste very X-massy.


I have decided that it should be a braided bread, even though the original "renny-bread" always came out of the oven in a shape, that, once cut into slices, resembled the outline of the province that we were all born in, here in the Netherlands. That was completely coincedental, but it always made us laugh.

My mother was good at making braided breads; she never ceased to amaze me with them, so I guess it would be the appropriate shape, all the more because I wouldn't have a clue how to bake the outline of a province into a bread...


I'm looking around for a nice sumptuous sweet bread recipe that I can use as a base, and tweak into a loaf that will, most of all, taste like the original. But it has to be special (fit for a queen!)


That's why I would like to ask my fellow members here at TFL to help me out. Is there any one out there who can point me in the right direction, or maybe has a better idea that I haven't thought of yet? I would love to hear from you!!!!


to be continued!


warm greetings from Amsterdam


Freerk

01-01-11

Happy New Year every one!

I think the Gods were with me on my second attempt to make a bread in honour of my mother and my mother-in-law:


The crownshape is definitely there :-)
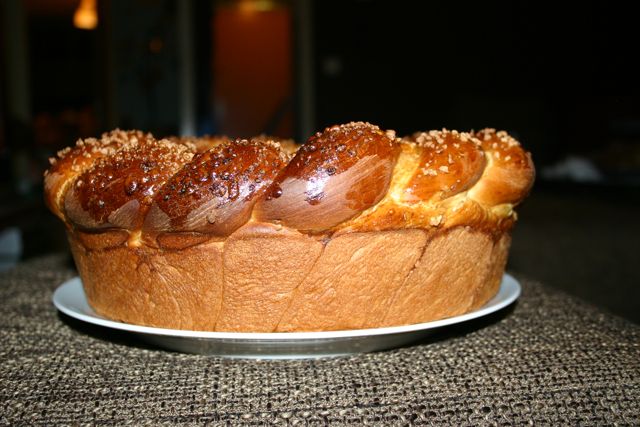
 

It is very close to what I had in mind, both visually and tastewise. Here is what I did:

PAN DE REINA

2 eggs

4 cups of bread flour

1 cup of milk

1/4 cup of unsalted butter

7 grams instant yeast

1/4 cup + 2 tbs of white caster sugar

cracked seeds from 9 cardemom pods

1 heaped tbs of coriander seeds

2 tsp cinnamon

pinch of salt

pinch of white pepper


Beat the eggs and put aside.

Heat the milk over low heat until bubbles form on the edge of the pan and the milk smells cooked.

Stir in the crushed cardemom seeds and melt the butter into the milk. Let it cool to about 40°C (104°F)

Add the milk mixture to the eggs little by little, constantly stirring. Make sure the milk has cooled enough!

Stir in the yeast into the mixture and let it rest for a few minutes.

Combine 2 1/2 cups of the bread flour, the cinnamon, the coriander seeds, the sugar, salt and white pepper in a coleander.

Pour half of the milk-egg mixture into the dry ingredients to make the dough come together. Add the other half of the mixture and mix for about 5 minutes on low speed. The dough will not "clear the bowl", it is too moist for that.

Flour your work surface with some of the remaining flour. Turn out the dough and work in as much flour to make it kneadable by hand. Don't "overflour" or overwork the dough at this point.

When the dough is smooth, put it in an oiled container, cover it well and let it rise until doubled in size (about one hour).

When the dough has doubled in size divide it in half. Divide one of the halves in two equal parts. Divide the other half in three equal parts.

Thoroughly grease a round pan with high sides. If you have a big baking ring to act as a support during proofing the dough, grease it as well, and place it in the middle of the round pan.

Take the two big pieces of dough, shape them into two strands and make a two-braid (twist) that will fit the inside of your round pan. Carefully place it in the pan, pinching the ends together. Cover to prevent crust forming.

Take the three smaller pieces of dough, three-braid it and put it on top of the two-braid.

Put the pan in a big plastic bag and let the dough proof until fully developed (about one hour). The upper braid will rise over the edge of the round pan, creating a crown effect.

45 minutes prior to baking preheat the oven to 175°C (350°F) and put a baking stone on the second highest shelf. Clear out any other baking sheets.

Give the dough a thorough egg wash and royally sprinkle with maple sugar.

Bake for about 35 minutes, turning it halfway through the bake to ensure even browning.

Let it cool on a rack before taking the bread out of the pan and remove the baking ring.


The taste and texture were perfect. What I suspected happened: the cinnamon gets a little lost in he battle of tastes, so next time I will put in a little extra, to come closer to the tate of the "original" recipe my mother used to make. The peppery crushed cardemom seeds give wonderful bursts of intense flavor, battling with the much sweeter coriander seeds. I left out the vanilla in the end because I thought there was more than enough going on, tastewise.


Thank you all so much for your wonderful and inspiring suggestions, ideas and contributions in completing this project. I can't think of a better way to start 2011 than with this wonderful tribute to the two most important women in my life. Couldn't have done it without you guys!!


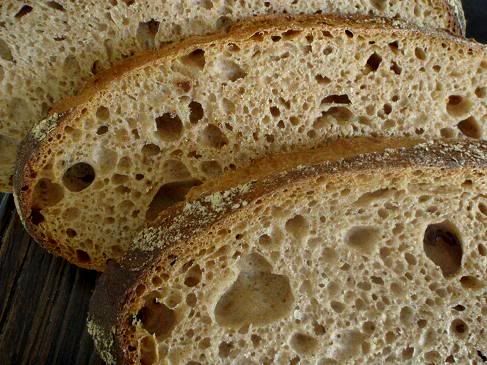
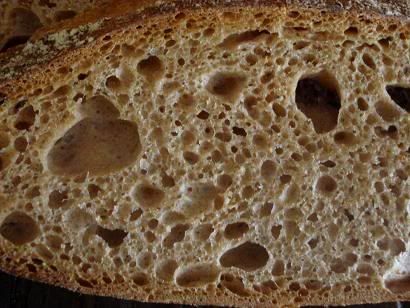
Let me know what you think of the result (picture of the crumb will be added later!)


X Freerk


GAPOMA's picture
GAPOMA

Storing sourdough starter short & long term

I’ve been baking bread nearly every week at home for more than 10 years now.  After several failed attempts to get a sourdough starter going I finally was successful about 18 months ago.  After feeding my starter nearly every day for the first 6-8 weeks and making several successful loaves, I began to worry about losing the starter to contamination (or neglect).  I wanted access to a good starter when I felt like sourdoughs but I didn’t want to feel as though I was tied to keeping the starter going daily (or even weekly) for the rest of my life.  I really wanted to be able to put it away for a while (months at a time), but go back to my starter when I felt the urge for sourdoughs in the future.  So I started looking into how to store my starter. 

I came across a post here on The Fresh Loaf (http://www.thefreshloaf.com/node/6737/help-storingfreezing-starter-please) in which Mike Avery said he kept starters of 65% hydration “in the fridge far longer than I care to admit with good results.”  In that same post, Bill (bwraith) said he too kept 65% hydration starters in the fridge, for as much as 6 months!  Mike said he didn’t like to leave the starter more than 2-3 months without feeding.

Obviously this is what I was looking for, but questions still remained.  How long can I really leave it?  Should it be refrigerated, or frozen?  Although it worked for Bill long term (6 months), would it really work for me for that long?  I decided to do an experiment.  I took my robust 100% hydration starter, made it into a 65% hydration starter, split it into eight (8) aliquots of 50g (1/4 cup) each I refrigerated 4 of the aliquots and froze the other 4 aliquots, and decided to take an aliquot of each out at various times later (1, 3, 6 and 12 months) to see how well they reconstituted my starter. 

At each time point I took the 50g of refrigerated/frozen starter, let it warm for about 30 minutes, and then added 200g of water.  After a thorough mix, I then added 200g of flour, stirred until smooth, and then watched and waited.


1 Month

Refrigerated – Smelled quite sour but had little if any liquid on top.  Doubled in 30 hours.  Looked and smelled great.

Frozen – When thawed there was no real scent and no liquid of any kind on top.  No activity seen at 24 or 36 hr.  By 48 hr there were a few small bubbles on top, and by 72 hr it had doubled.  At this point it looked bubbly and smelled like it should.


3 Months

Refrigerated – Sample smelled very sour at this point and had a gray colored layer on top of it.  There was no liquid on top.  The starter underneath was “whiter” and when stirred it made a surprisingly watery mix.  Activity noted at 12 hours and had doubled by 24 hours. Had fallen by 48 hours but was bubbly and smelled great at that point.

Frozen – When thawed the starter had a very faint sour scent and a shiny wet surface, but no accumulated liquid on top.  Some slight bubble activity at 36 hours.  At 48 hr it had quite a few large bubbles on top.  I decided to refresh it at this point by removing 50g and adding this to 100g water and 100g flour (I also kept and watched the original frozen starter).  By 72hr the original frozen starter had lots of small bubbles on top and increased in volume by about 25% and it had doubled and was just fine by 84 hr.  The refreshed frozen starter had not increased in volume at all by 72hr, had grown about 25% by 84 hr, and it had doubled by 96 hr.  Looks and smells just fine at this point.


6 Months

Refrigerated – As at 3 months the sample smelled very sour and had a gray layer on top of it.  There was no liquid on top.  The starter underneath was “whiter” and when stirred it made a watery mix.  After 24 hr this sample had increased in volume by about 60% and it doubled by 30 hr.  At this point the top was bubbly and wet and it smelled nice and sour.  No problems here!

Frozen – No smell, no change in color, kind of a sticky lump when warmed.  There was slight bubble activity at 24 hours.  At 72 hr it had a distinct sour smell but it hadn’t changed much in volume from the 24 hr sample.  So I again decided to refresh it at this point by removing 50g and adding this to 100g water and 100g flour (I also kept and watched the original frozen starter).  By 96 hr the original frozen starter had doubled and was just fine.  The refreshed frozen starter had also doubled in volume and smelled/looked just fine by 96 hr.


13.5 Months

Refrigerated – The sample was very gray colored both on top and underneath.  There was some liquid on top of it, and even when stirred it had an “off” scent.  The smell reminded me of cider vinegar.  No activity at 24 or 48 hr although it did smell a little less at 48 hr than it did at the beginning.  I decided to try the “refresh” trick at 60 hr by removing 50g and adding this to 100g water and 100g flour (I also kept and watched the original starter).  By 84 hr there was perhaps a hint of activity, but no more activity at 96 hr.  I tried a second refresh at 96 hr.  At 144 hr (6 days) there is no sign of activity in any of the 3 refrigerated samples.  At this point it still had a bit of a vinegar odor and had some gray/green hooch on top.

Frozen – Again no smell, no change in color, kind of a sticky lump when warmed.  No activity at 24 or 48 hr.  Like the refrigerated sample I decided to try the “refresh” trick at 60 hr by removing 50g and adding this to 100g water and 100g flour (I also kept and watched the original starter).  No activity at 72 hr there was perhaps a hint of activity, but no real activity at 96 hr.  I tried a second refresh at 96 hr.  By 108 hr there was a 50% increase in volume of this second refresh sample, and by 120 hr it had at least doubled in bulk.  At this point (120hr) it had lots of small bubbles on top and it smelled like a good healthy sourdough starter should.  At 132 hr I took all (~200g) of this 96hr refresh sample and added 200g of water and 200g of flour to see if it would work as a real starter.  It had more than doubled 3 hours later demonstrating that at this point it was a robust starter.


Conclusions:  It is clear from this experiment that storing starter at 65% hydration in the refrigerator is fine (and probably the method of choice) for at least 6 months but a year or more is probably asking too much.  Freezing the starter works fine, even out to a year or more.  However it takes longer to restore a vigorous starter from the frozen state.   

Early on in this experiment I came to the conclusion that keeping a sourdough starter in the refrigerator for a month or two (or even six) is absolutely no problem.  It is now my routine.  I pull it out every 2-8 weeks or so, feed it for a weekend (probably use it once or twice), and put it back in the fridge.  I also keep an aliquot at 65% frozen as a backup, and I plan to refresh this backup on an annual basis.  (I also must admit that I don't always go to the trouble of making a 65% starter for refrigeration.  If I'm planning on taking it out again in the next few weeks I usually just put my 100% starter in the fridge.)

In the end, I now feel much less stressed about ignoring my starter in the back of the refrigerator for a few months.  Thanks to Mike and Bill for their inspiration in this experiment.

- Greg


clazar123's picture
clazar123

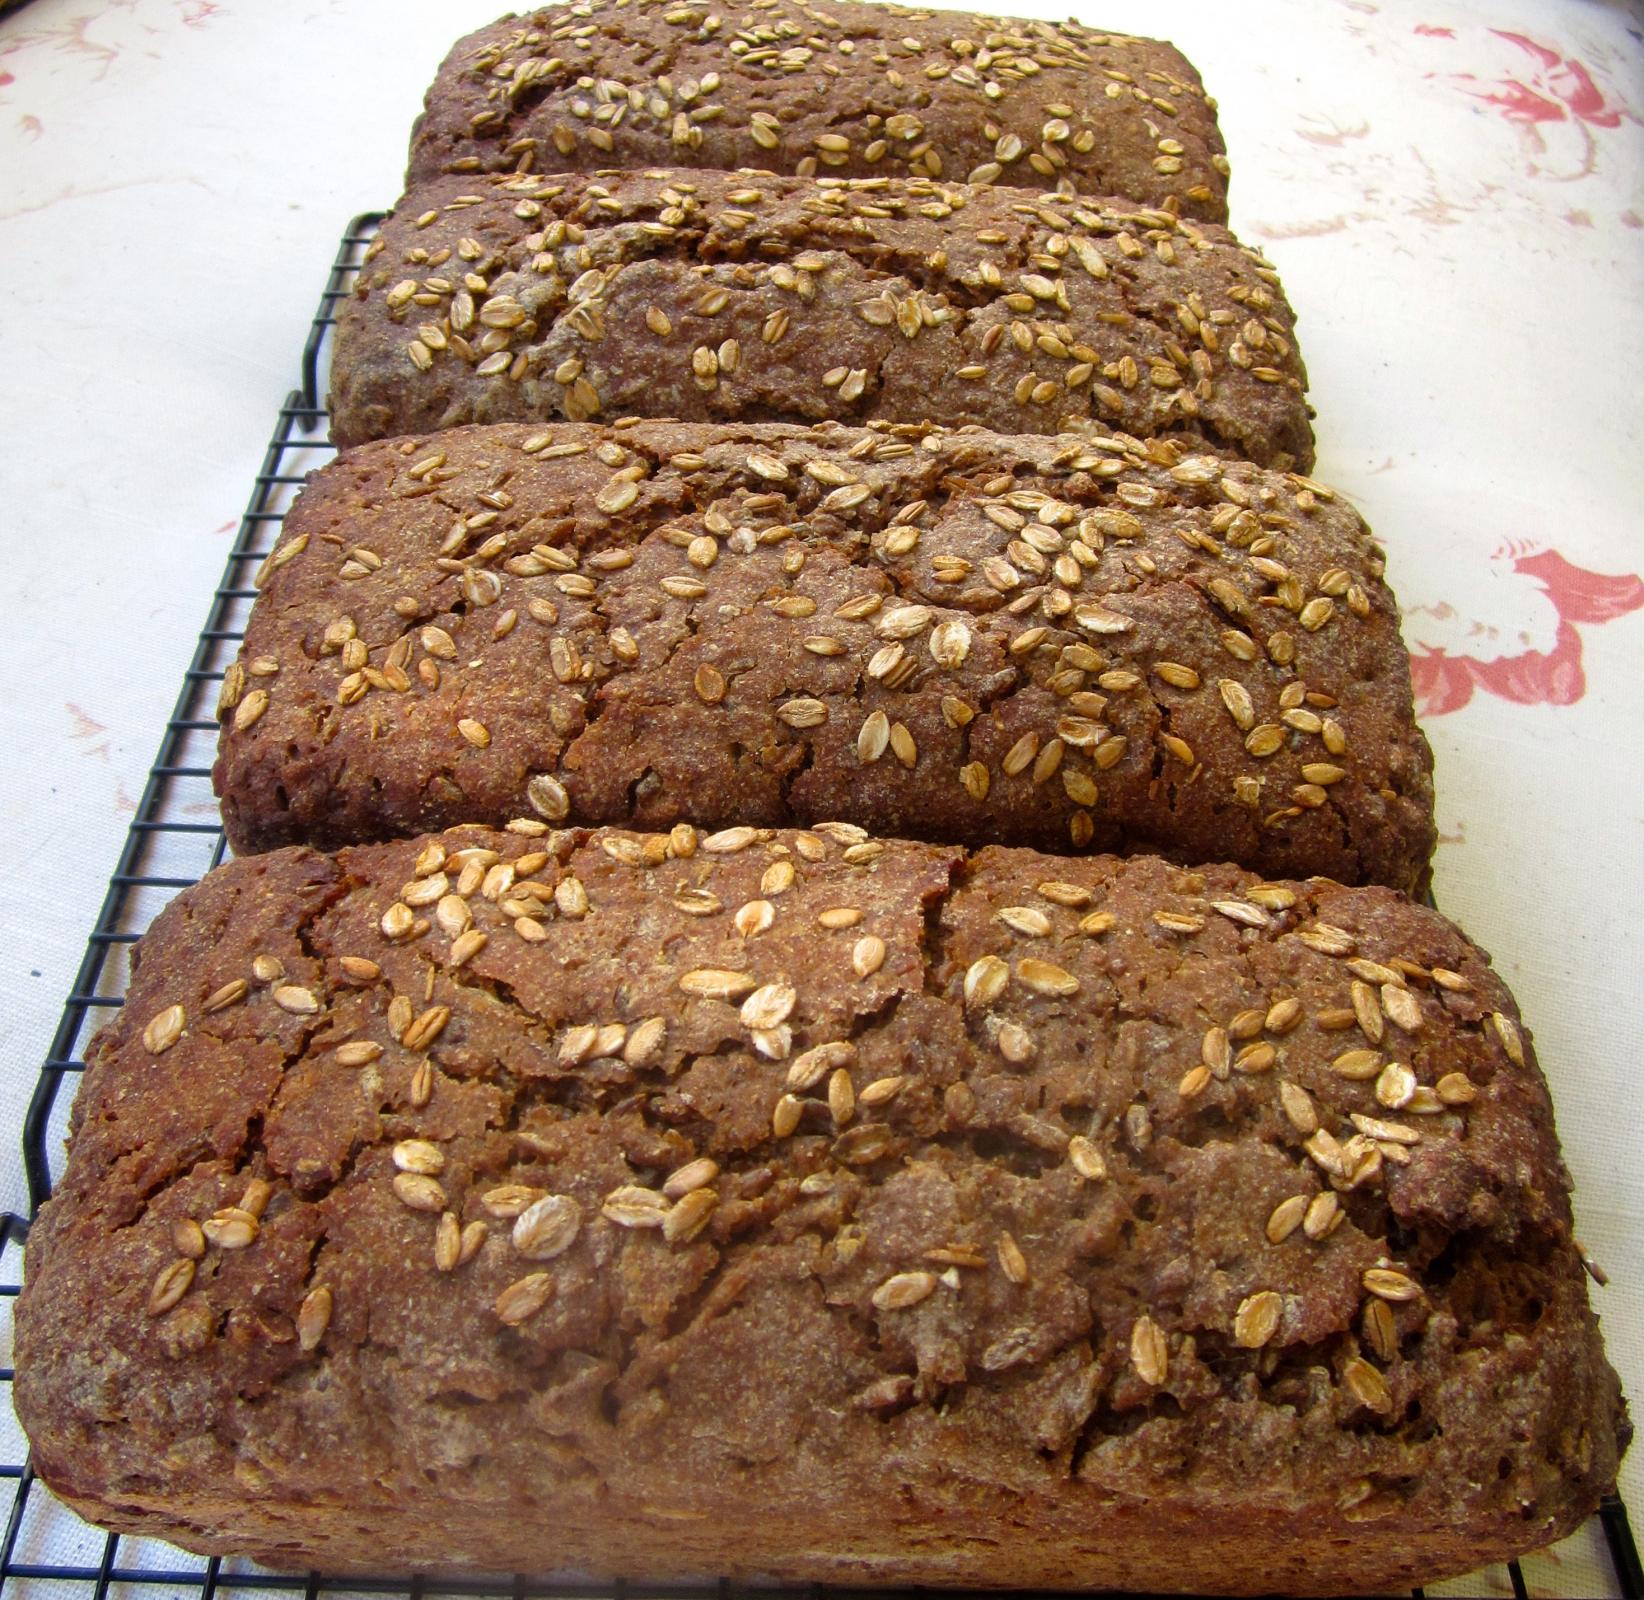
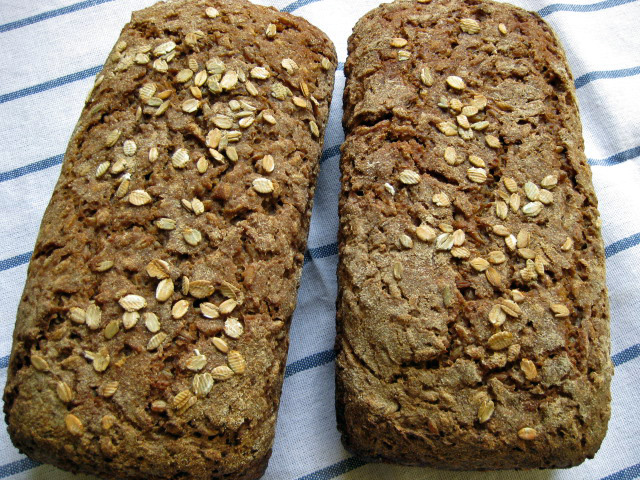
Great whole grain cereal loaf!

After After reading the post about "troubleshooting a multigrain loaf" I thought I'd try my hand at developing a recipe I'd like. It still needs a little tweaking (and I made it a hybrid sourdough) but it turned out absolutely wonderful in terms of texture and grain flavor. The one complaint I have is that I used 100% white whole wheat, which I find rather bland. I'm used to the grassy,sweet flavor of home-ground red spring wheat.I think one of the tweaks will be to use a combination of flours-either red WW, spelt or even some kamut or rye.  Hmmm.....rye would be very interesting.

Multigrain Bread

1 tbsp brown rice

1 tbsp pearled barley

1 tbsp wheat berries

1 cup mix of any rolled grains-I used rye,triticale,spelt,kamut,oats,wheat

Bring 1 1/2 c water to a boil and add the whole grains (rice,barely and wheat berries) and simmer for 15 min,covered. Then add the rolled grains,cook for 1-2 minutes and turn off, cover and cool (yields a total of 2 cups cooked whole grain)

I'm sure you could use any of the multigrain cereal blends from Bob's Red Mill or Hodgson Mill.

This really softens the rice,barley and wheat berries so they don't break your teeth in the final loaf.

In a mixing bowl:

4 1/2 c white whole wheat

1/4 c ground flax seed

1/2 c milk/kefir or buttermilk (I used kefir)

1 cup active starter (prob 100% hydration)

1 tsp instant yeast

2 tbsp oil

2 tsp salt

4 tbsp honey

1 egg

About 1/4 c AP flour to bring dough to correct consistency

I mixed in a stand mixer and because of the substantial amount of cooked grains, you have to mix a while to develop the gluten.If you don't, I suspect you will end up with a gooey,dense loaf. I actually mixed a few minutes and let it set for 30 minutes to give the whole wheat a chance to hydrate,then continued mixing about 5 minutes more to develop the gluten.Pay attention to this part.

Because of the cooked grains, this is a very sticky dough-no amount of flour will change that.I found that damp hands and a bench scraper were beneficial, as well as a couple stretch and folds.

When I was happy with the gluten development, I flattened the dough out and distributed the pumpkin seed by hand throughout the dough with some hand kneading.

3/4 c pumpkin seeds (more to cover the tops)

Rise til double-gently shape-proof-bake with steam at 450 for 10 min then 375 for about 40 minutes.

This recipe is still in development but I thought it was a really good first try at a multigrain.I pretty much just dumped,mixed and paused. I'm sure it could be improved with a longer rise,autolyse and perhaps smaller amounts of yeast. I also think either using red,spring wheat or a mix of flours would also improve the blandness of the flavor.

This actually made 2 6"x8" loaves and 5 bread thins (I use for sandwiches)

Enjoy! Glad I finally figured out the picture thing again-it is really a pretty looking and wonderful smelling loaf!


evth's picture
evth

Apple Pie: Dream Pie Crust Realized


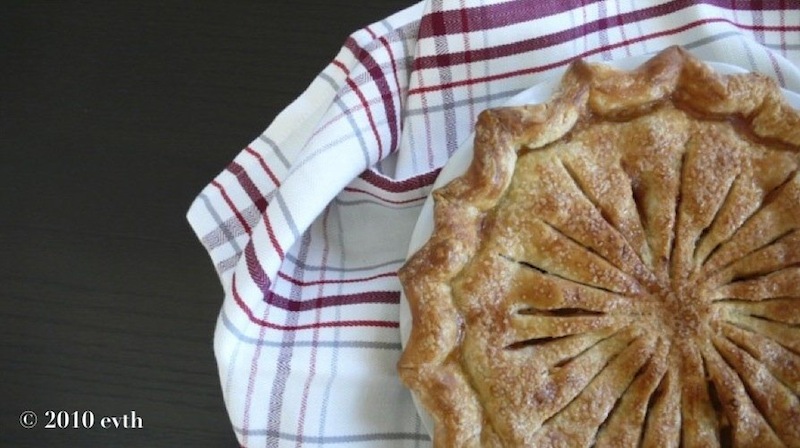
A modified version of Cafe Azul's Pastry Dough makes a terrific pie crust. This recipe will yield enough dough for two 9-inch double crusts or four single crusts. Yes, it is a lot of dough so make a few pies or freeze the extra. Use four sticks of butter as the original recipe states for an insanely rich - think puff pastry - pie crust. Or knock the butter down like I did to two and half or three sticks (this is my only change to the crust recipe). Divide the dough into four mounds and wrap them individually before putting them into the refrigerator. Let it rest for at least 1+1/2 hours. Be prepared to be amazed with how easy it is to roll out beautiful pie crust that is flaky, tender and buttery. Click below for the dough recipe:

http://www.epicurious.com/recipes/food/views/Cafe-Azuls-Pastry-Dough-107241

Now let's turn to the main part of the apple pie recipe (i.e. filling, baking times, etc.). I followed Rose Levy Beranbaum's recipe from the Joyofbaking.com except that I substituted her pate brisee (short crust pastry) for a modified version of Cafe Azul's Pastry Dough. Click below for the apple pie recipe: 

http://www.joyofbaking.com/ApplePie.html

To briefly sum it up (click on above link for the entire recipe), Rose's way is to first, let the seasoned apple slices sit in their juices. Next, drain them and keep the juice, cooking it down with butter. Finally, mix it all in with the slices and pour the filling into the pie shell. After you top it with the other half of the crust, crimp the edges. *Here's a variation I made to the recipe: brush the top crust with a lightly beaten egg (egg wash) and give it a sprinkling of raw sugar (e.g. Washed Raw, Turbinado or Demerara). Place the pie in the refrigerator for about twenty minutes before baking it in the pre-heated oven (425°F) for 45-55 minutes - baking time will depend upon your oven's temperature and any hot spots. Good tip from Rose: bake the pie using a pizza or bread stone on the bottom rack of the oven. Place a baking pan/sheet between the pie and the stone to guard against filling overflow. The stone ensures that the bottom crust is baked through – crispy and golden! *If you are using a glass or ceramic pie pan, and you are worried about it cracking or breaking after placing it on the hot stone, make sure the baking pan/sheet is at room temperature before placing it underneath the pie pan, or you can just forego chilling the pie altogether. Keep a foil ring handy in case the pie edges brown too quickly. 

As for apple varieties, I used a mixture of Fuji and Granny Smith apples. The filling was a tad runnier than I cared for (even after the pie rested) but made up for it with lots of nice concentrated apple and caramel flavors. Next time around I will use a greater assortment of apples in the pie. I will try cooking the apple slices and then cooling the mixture before adding it to the pie shell. 

Here's to a bountiful autumn harvest and more apple pies on the table!

Next post: Pain de mie

hanseata's picture
hanseata

Rheinisches Schwarzbrot - Rhineland Rye

RYE BERRIES
150 g rye berries
water, for soaking
 
SOAKER
150 g rye flour
5 g salt
113 g water
 
STARTER
40 g whole wheat mother starter
116 g whole wheat flour
83 g water, lukewarm
 
FINAL DOUGH
all cooked rye berries
all soaker and starter
37 g whole wheat flour

3 g instant yeast
11 g salt
15 g molasses

3 g honey

1 tsp. rolled rye, for topping


Rheinisches Schwarzbrot - Rhineland Rye

DAY 1 AFTERNOON

In a bowl, cover rye berries with at least 1 inch cold water and let soak for 24 hrs.


DAY 2 EVENING

Drain soaked rye berries, discard water, bring to a boil well covered with fresh water, and let simmer for 30 min. at low temperature. Drain, cover and let cool to room temperature overnight (they can be kept at room temperature for 24 hrs.)

Stir together all soaker ingredients until all flour is fully hydrated. Cover with plastic wrap and leave at room temperature for at least 12 hrs.

Combine all starter ingredients in a bowl to form a ball of dough, then knead (using stand mixer or wet hands) for 2 min. to be sure all ingredients are evenly distributed. Let rest for 5 min., then knead again for 1 min. Cover with plastic wrap and leave at room temperature overnight.


DAY 3 BAKING DAY

If mixing by hand, chop soaker and starter into 12 smaller pieces and sprinkle them with some extra flour to keep pieces from sticking back together (with a good stand mixer this step is not necessary).

If mixing by hand, combine all final dough ingredients in a bowl and knead with wet hands for 2 min. (or use a stand mixer with paddle attachment at low speed). Dough should be soft and slightly sticky.

If kneading by hand: dust work surface with flour, then roll dough in it to coat. Knead for 3-4 min., trying to incorporate only as much flour as needed. (If using a stand mixer, mix with paddle attachment at medium-low speed for 4 min.) Dough should still be slightly sticky.

Let dough rest for 5 min., then resume kneading (hands or mixer) for 1 min. The dough should be still very tacky, verging on sticky. Form dough into a ball and place in lightly oiled bowl, rolling it to coat with oil. Cover with plastic wrap and let rise at room temperature for ca. 45 min, or until it swells and just begins to show signs of growth. (Dough can be refrigerated overnight, remove at least 2 hrs. before using).

Preheat oven to 450 F. Spray loaf pan (8 1/2" by 4") with oil.

Form dough into sandwich loaf and place into pan, sprinkle with rolled rye and spray with oil. Cover pan with aluminum foil, don't let it rise anymore!

Place bread in oven (middle), reduce temperature to 425 F and bake for 35 minutes, until it holds its shape when removed from pan. Take out of the oven, remove aluminum foil, and turn half baked bread out onto a sheet pan (use plastic spatula to loosen it along the edges, if necessary).

Return it to the oven to bake for another about 30 minutes (it should register at least 200 F in the center).

Transfer bread to cooling rack, spray with water and allow to cool. For the first 24 hours keep it in a paper bag to allow it to continue drying out and developing flavor. After that, it can be wrapped in aluminum foil. (Don't keep it in the refrigerator).

Updated with some changes 7/9/15

bnom's picture
bnom

Divine inspiration--for me it way Larraburu Brother's SF SD. What was it for you?

Remember the scene in Close Encounters of the Third Kind when Richard Dreyfuss obsessively worked to recreate in his living room the mountain that was imprinted in his mind by the aliens? 

For me, that "mountain" is the sourdough bread that Larraburu Brother's of San Francisco made.  Larraburu had a Gold Rush era sourdough and a gorgeous crust and crumb.  Unfortunately Larraburu went out of business in the 70s. It's taken me nearly 40 years but I'm finally making dough that reminds me of Larraburu.

I was surprised that I found no reference to Larraburu breads on Fresh Loaf because if you've had it, you likely consider it the holy grail of sourdough.  Anyway, I'd love to know if anyone on this board remembers Larraburu bread.  And I'd also be interested to know if others are similarly driven to recreate a memorable loaf from the past. 


saraugie's picture
saraugie

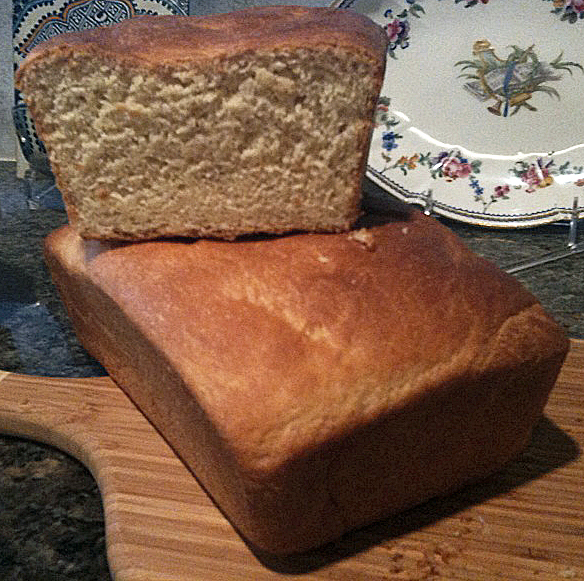
Portuguese Sweet Bread

This formula came out great, really nice taste. However, it is way different than what we buy in the store. This is more of a sandwich type bread with a dense crumb. I wonder how I can get it to be soft like the kind we buy at the bakeries here in Hawaii ? Anyone know ?

maryserv's picture
maryserv

A great white (with some WW snuck in) sandwich loaf converted to sourdough fermentations

In the ever-constant quest for a sandwich bread my picky 7 year old will eat, I search and try a lot of breads.  Yesterday I came upon Farmhouse White from A Year in Bread blog.  It sounded good to me, so I entered the info into my sourdough converter (first time using it) that I downloaded from Mike on SourdoughHome.com. I made smaller loaves and ended up with 4 so, so oh darn I made that one cinnimon swirl bread.  My starter is 100% hydration started and I put in about one cup of whole wheat flour and then 5 tsp of Vital wheat gluten since I was using Gold Medal AP Flour along with the C of WW.  I almost broke my Kitchenaid while mixing the dough and had to move to a stretch and fold form of kneading before bulk fermentation for a couple of hours.  I then shaped the loaves and covered them with a damp cloth in the fridge for a slow rise over night. 

So, I start the quest for a good, high-powered higher capacity dough mixer.  But, the bread turned out GREAT!

Most of the content is Susan's from the blog and all of the pictures are hers.  I have included hyperlinks to the 2 websites to which I refer.  Enjoy!

Susan's Farmhouse White Sandwich Bread - from A Year in Bread
Makes 3 loaves, approximately 1-1/2 pounds each

Ingredient US volume Metric Volume US weight Metric
organic all-purpose flour 4 cups - 940 ml - 1 lb, 4 ounces - 566 grams
instant yeast** 2 Tablespoons - 30 ml - 22 grams
granulated sugar 2 Tablespoons - 30 ml - 28 grams
canola oil 2 Tablespoons - 30 ml - 30 grams
warm milk (or water) 4 cups - 940 ml - 2 lbs - 908 grams
organic bread flour (approximately) 6 cups - 1,410 ml - 1 lb, 13-1/8 ounces - 825 grams
salt 1½ Tablespoons - 22 ml - 3/4 ounce - 22 grams

**To bake an even better loaf, you can reduce the amount of yeast to 1½ Tablespoons (or even 1 Tablespoon). This will make your dough rise more slowly, so you'll just need to increase the fermenting and proofing times. You can reduce the yeast in pretty much any bread recipe—a lot of bakers go by the formula 'half the yeast and double the rising time.'

MY Changes were: 

0.43 Kilos Starter      
0.56 Kilos Milk or water    
0.27 Kilos all purpose White Flour  
0.71 Kilos Bread Flour (or high protein flour)
0.02 Kilos Salt      
0.02 Kilos Sugar      
0.02 Kilos Canola Oil      
2/3 Cups Dried mild powder can be added to the recipe
May add vital gluten to AP flour to increase protein/glutein of 
flour at 1.5 tsp per C of AP flour (especially if using a wholemeal) 


Mixing and fermentation


Autolyse
Autolyse (pronounced AUTO-lees and used as both a noun and a verb) is a French word that refers to a rest period given to dough during the kneading process. When making your dough, mix together only the water, yeast, flour, and grains until it forms a shaggy mass. Knead it for several minutes, and then cover the dough and let it rest for 20 minutes. (I simply leave the dough on the floured counter and put my wooden bowl over it.) During this time, the gluten will relax and the dough will absorb more water, smoothing itself out so that it is moist and easier to shape. After the autolyse, knead the dough for several more minutes, mixing in any other ingredients such as herbs or nuts or dried fruit.

In a very large bowl, stir together the all-purpose flour, yeast, and sugar (I use a wooden spoon). Make a small well in the middle of the flour mixture and pour in the canola oil and then the milk. Mix well, then continue to stir vigorously, slowly adding 1 cup of the bread flour at a time, until you've added about 5 cups, or until you have a soft, slightly sticky dough; this should take several minutes.

Turn the dough out onto a floured surface and knead for about 6 or 7 minutes, adding more flour as necessary to keep the dough from sticking to your hands or the work surface.

Place the mixing bowl over the dough, and let it rest for 20 minutes. This rest period is called the autolyse.


Remove the bowl, flatten out the dough with your hands, and sprinkle about half of the salt over it. Begin kneading the salt into the dough. After a few turns, sprinkle on the rest of the salt and continue to knead for 5 to 7 minutes, until the salt is completely incorporated and the dough is soft and smooth.

Sprinkle flour in the dough bowl, place the dough in it, liberally dust it with flour, and cover it with a damp tea towel (not terry cloth, as it will shed lint on your dough). Or put it in a straight sided plastic container with a snap-on lid and mark the spot on the container that the dough will reach when it has doubled in volume.

Set the dough somewhere that is preferably between 70°F and 75°F until it has doubled in size, about 60 to 75 minutes. Ideally, the dough should also be between 70°F and 75°F. It's fine if your dough is cooler; it'll just take longer to rise and will end up even tastier. It's easy to check the temperature of your dough and ingredients with an inexpensive instant read thermometer.

When the dough is ready to be shaped, you should be able to push a floured finger deep into it and leave an indentation that doesn't spring back. Unless your dough is rising in a straight-sided container, it can be difficult to judge whether it has "doubled in size" which is the guideline most recipes use. I find the finger poking method to be more reliable, though lately I've been letting all my doughs rise in plastic containers.

Shaping and final rise (proof)
Turn the risen dough out onto a lightly floured work surface, flattening gently with your hands to break up any large air bubbles. Divide the dough into three equal pieces.

Shape the dough into loaves and dust the tops with flour. There are dozens of ways to do this; for the way I like to do it, check out this post on how to shape dough into sandwich loaves. Place loaves seam side down in greased loaf pans. I like my sandwich breads to be tall, so I use smaller loaf pans. I can't say enough good things about these commercial loaf pans from Chicago Metallic. They call this size a 1-pound loaf pan, and it measures 8-1/2 inches x 4-1/2 inches and is just under 3 inches tall. For the price of a few loaves of bread, they're definitely worth the investment—and with a 25-year warranty. Chicago Metallic also makes this larger 1½ pound size pan for those of you who prefer a wider, shorter loaf.

Cover the loaves with a damp tea towel and let them rise for 45 to 60 minutes. When you lightly poke the dough with a floured finger it should spring back just a little.

If you let the loaves rise too long, they may not have enough energy left to rise once they're in the oven--and they may even collapse. I was always so afraid this would happen that for years I unknowingly under-proofed my loaves of Farmhouse White.


While the bread was still delicious, you can see that the dough had so much 'oven spring' that it basically blew apart the side of the loaf. I finally started letting the loaves rise a little longer and was rewarded with the more evenly shaped and visually appealing bread that you see in the top two photos.

Bake at 375° for 35 minutes or until the loaves are golden brown and the bottoms sound hollow if tapped. Remove immediately from pans and let cool on a wire rack. Try to wait at least 40 minutes before cutting into a loaf. Store at room temperature or freeze in zipper freezer bags. Make sure loaves are completely cooled before sealing in bags.

Update: I've started baking all of my pan loaves on a heated baking stone (in order to simulate the ceramic hearth deck of my 7-foot wide commercial deck oven in the someday-bread-bakery-to-be), and the results have been wonderful. The bottoms of the loaves are nice and evenly brown, and I think that extra initial burst of heat makes the loaves end up even taller. Just like with pizzas and freeform loaves, you need to preheat your stone so that it's nice and hot when you put the bread in. Since Farmhouse White bakes at just 375°, 30 to 45 minutes is usually enough.

Susan's picture
Susan

Today's Bread

MORE SESAME SOURDOUGH

130g starter (100% hyd.), 305g water, ~1/4 cup sesame seeds, 9g salt, 1 tsp toasted sesame oil, 400g All Trumps high-gluten flour, 50g coarse whole wheat flour.

The dough was kept close to 76F throughout mixing and fermentation.

Mix starter and water.  Add seeds and oil, mix.  Add flours and salt, mix just until flour is wet, rest 1 hour, fold 3x at 30 min intervals.  Let rise until near doubled (about 2 hours).  Shape, put in triangle brotform, and deposit in fridge for overnight.  Bake at 500->460F (after a half-hour out of fridge) under cover for first 20 minutes.  Let rest in oven for 10 minutes after bake.

Shiao-Ping's picture
Shiao-Ping

100% Spelt Levain Bread

At SFBI, we did a 100% Spelt bread using dry instant yeast.  To soften the bitterness taste of spelt flour, we did a poolish as the preferment for this bread.  The result was very pleasing.  Two things about that spelt bread I found worthy of a mention from my own perspective: 

(1) The weak gluten in spelt flour is such that its mixing technique needs a bit of attention.  Its protein may be high (14.2% according to the bag of my organic spelt wholemeal flour), but a lot of it is not gluten forming protein.  However, while it is a weak flour, its gluten will happen fast (sounds counter-intuitive, doesn't it); and therefore, we need to mix faster when we are working on the spelt flour.  Towards that end, at SFBI, we used the double hydration method to try to get the gluten developed at an early stage before all recipe water is added.  (For a description of double hydration, please see my post on Chocolate Sourdough)  Also note that to mix faster does not mean that we use a vigorous mixing or kneading motion because spelt is a fragile flour. 

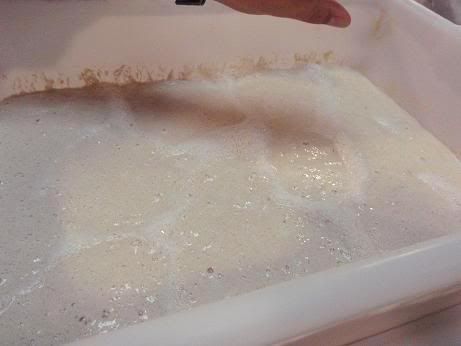
(2) The spelt poolish after it's been fermented shows a lot of foams on the surface.  The froth resulted from the weak flour unable to trap in gasses produced by the yeasts as seen below: 


                                                       Didier Rosada's thumb, Artisan III at SFBI, August 2009  

Theory aside, I have had no luck with the double hydration method using my bread machine.  So, with this 100% Spelt Sourdough, I used my old trusted hand method.  As well, I made another Pain le Levain with 20% Spelt flour that I posted yesterday to practice on my scoring and to see if I could get better grigne.  I suspected that the scoring in that earlier bake was difficult because I inadvertently incorporated too much water into the dough when I was stretching & folding my doughs with wet hands (the dough ended up much higher hydration than Hamelman's 68%).  I have found grigne almost not possible with wetter doughs. 

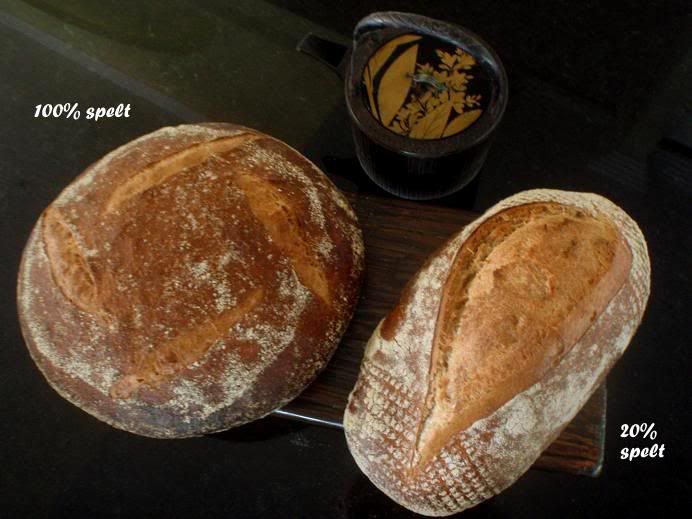
So, here are the two spelt sourdoughs:


My Formula for 100% Spelt Sourdough  

First levain build - day 1, night or early evening 

  • 3 g starter (I used my usual white starter at 75% hydration, but at this quantity, any starter you have at any hydration will do.)
  • 10 g spelt flour (I used 90% white spelt flour and 10% whole spelt flour)
  • 11 g water

Second levain build - day 2, morning

  • 24 g starter (all from the first levain build)
  • 48 g spelt flour (I used 90% white spelt flour and 10% whole spelt flour)
  • 48 g water

Final levain build - day 2, late night

  • 120 g starter (all from the second levain build)
  • 155 g spelt flour (I used 90% white spelt flour and 10% whole spelt flour)
  • 155 g water

Note: as the ratio of flour to starter is less than 1. 5 times, if your room temperature is very warm, you'll need to do this levain built as late as possible for the next day's dough mixing.

Final dough - day 3, very early morning

  • 430 g Spelt starter @ 100% hydration (all from the final levain build)
  • 224 g water
  • 387 g organic white spelt flour (90% of final dough flours)
  • 43 g organic wholemeal spelt flour (10% of final dough flours)
  • 12 g salt
  • Extra spelt flour for dusting

Total dough weight 1.1 kg and dough hydration 68%

  1. In my big mixing bowl, I first put in the starter, then poured a little of the formula water, stirred to combine, then a little more of the water, stirred to combine, then a little more of the water, and stirred, until all water was thoroughly mixed into the starter.  (I have found this way my starter works very well for me; it is as if all of the little microorganisms are woken up to do their morning aerobics.)
  2. I put in the rest of the ingredients and stirred them just until they were combined and no dry flour was visible; more work than that at this stage was not necessary.
  3. Autolyse 25 minutes
  4. First set of stretch & folds (I did 100 strokes, more than my usual, to try to build up dough strength.  I wet my hands to do the S&F's so the dough doesn't stick to my fingers.)
  5. After 30 - 40 minutes, the 2nd set of S&F's was done (I did another 100 strokes.  The dough felt silky and smooth, and quite elastic (there was good gluten development.)
  6. After another 30 - 40 minutes, I did the 3rd set of S&F's (100 strokes again).
  7. Dusted some spelt flour on the work bench.
  8. 30 minutes from the last S&F's, I pre-shaped the dough by way of a minimalist S&F's so that I could pick up the whole dough easily with one hand and dump it on the floured surface (right side was against the flour, ie, seam side was up).  Cover.
  9. Rest for 15 - 20 minutes.  In the mean time, a linen lined basket was dusted with flour.
  10. Shaped the dough first by gathering the edges of the dough to the centre, turned the dough over (so that the seam side was now down), then shaped it into a very tight ball.  Placed it in the proofing basket.  Up to this point, bulk fermentation had been about 2 and a 1/2 hours.
  11. Proof for another 2 hours (and in the mean time, I planned when the oven was to be turned on for pre-heating).
  12. Bake with steam at 230C / 450 F for 20 minutes and another 25 minutes at 220 - 210 C.


It was quite a cold morning (for a spring time) when the dough was bulk fermenting and proofing.  While I was putting on a sweater to keep myself warm, it never entered into my mind that my dough might need extra flour time because of the low temperature.  It was almost as if that I wanted to behave myself by sticking to a set formula - ie, bulk fermentation 2 and 1/2 hours and proofing 2 hours.  This is the reason why formulas don't always work because there are a lot of details that are not spelled out but which are critical.  A time-table of bulk fermentation of x number of hours and proofing of x number of hours is on the basis of a certain dough temperature and ambient temperature perimeter as well as the amount of the pre-fermented flour as a percentage of the total flours, etc.  While we may know those base temperatures and percentages very well, we may not be quick enough to adjust for our scenarios, which incidentally is never exactly the same as the last one. 

Because of the low temperature, the fermentation should have been at least 1/2 to one hour longer.  The crumb could have been more open, I believe, if the yeasts in the levain had been given a longer time to work.  The effect may be more apparent in the 20% spelt levain bread below (and I would like to come back to this point again).


Despite the above, this 100% spelt levain bread has a lovely crumb flavor.  Because of the way the levain was built up and its hydration, the acidity is very well balanced with the nutty flavour of the spelt flour.  I didn't taste the bitterness, very often associated with spelt.  The sourness is less than medium strength to me.


My formula for the 20% Spelt levain bread - please refer to my post yesterday.

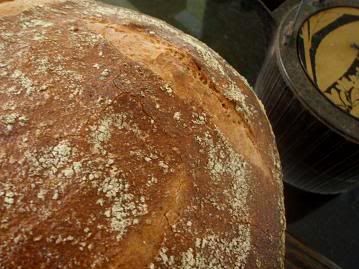
To adjust for the fact that I normally dip my hands in water before I stretch & fold the dough, I did 1% less hydration in this dough.  As well, I did 100 strokes at each set of S & F's, trying to build up more dough strength for the "grigne" that I was looking for (but was unable to get in that last bake).  These two being the only adjustments, see how different the profile and the crust of this bread look compared to those posted yesterday:   


When the dough was loaded onto the baking stone, it was about 3 - 4 cm in height; it rose to about 12 - 13 cm in its oven spring.  I think the 100 strokes of S&F's were doing the trick.


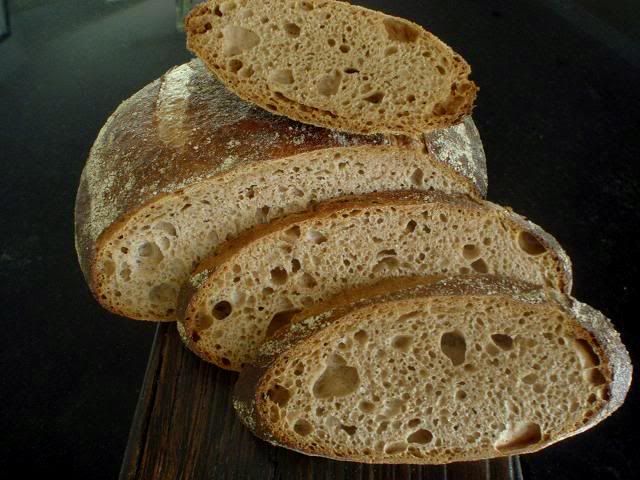
For signs of good fermentation, I look at the cell structure of the crumb, especially the area where there was no visible big holes - I think the parts where there are no holes tell more story about the fermentation than the area where there are a lot of holes.  In the crumb shots above: 

(1) where there are no holes (big or small), you see that the cell structure is quite dense; and

(2) where there are holes, they are not all there to register the presence of yeast fermentation, but they could possibly be there due to the way my hand stretch and folds the dough - it is possible that I had simply folded in too much air than I should have. 

The somewhat dense cell structure (where there are no holes) tells me that the fermentation probably did not happen at the optimum temperature, given the time in which the levain had to work.  From this I learned that, even with the same formula, each bread is a new situation to be assessed independently in terms of its action plans regarding dough strength and fermentation.   

It is a flavorful bread just the same with very mild acidity.  If I could get yesterday's cell structure with today's crust and grigne, it would be a near perfect world for me.


Shiao-Ping

Pages