The Fresh Loaf

A Community of Amateur Bakers and Artisan Bread Enthusiasts.

Most bookmarked

dmsnyder's picture
dmsnyder

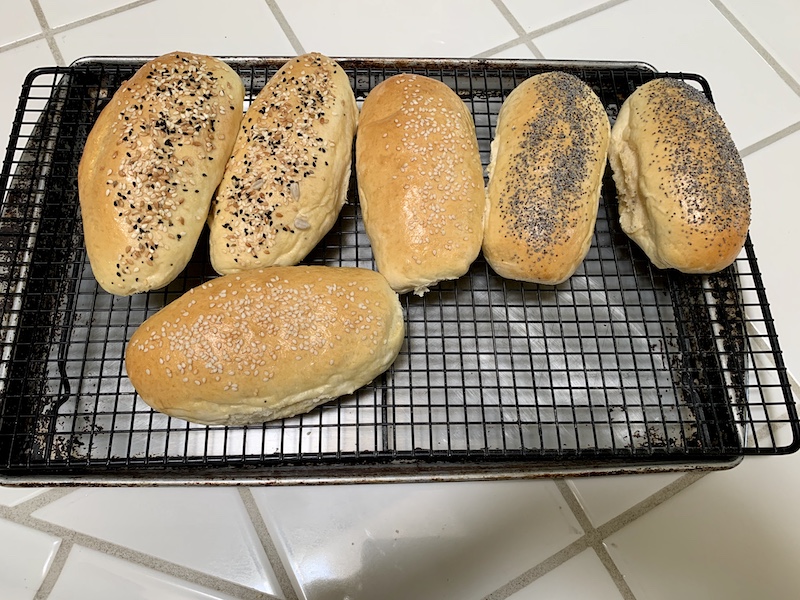
Soft rolls with a "Medium Vienna Dough"

Medium Vienna Dough for Soft Rolls

This formula is from

 “Inside the Jewish Bakery,” by Stanley Ginsberg and Norman Berg

 As Interpreted by David M. Snyder

May, 2020

 For those who don’t know, Vienna Dough is an enriched dough that can be used for breads but is most often used for rolls - onion rolls, double knot rolls, pletzel, kaiser rolls and more. Besides differences in shaping, toppings and fillings, the various rolls differ in two respects: First, the dough can be more or less enriched with eggs, oil and sweeteners. Second, the shaped rolls can be more or less fully proofed. So, for example, rolls like onion pockets and knotted rolls are made with younger doughs (less proofed) and a sweeter dough. Kaiser rolls, where you want a less sweet dough, a crisper, thinner crust and less oven spring so the decorative shaping is maintained are proofed more fully.

 It should be noted that all of these products were made without dairy and are therefore kosher with either dairy or meat meals.

 This recipe is for a “medium vienna dough” that is ideal for knotted rolls and onion rolls. I use it for sandwich rolls. It makes a dozen 3 oz rolls. 

Ingredient

Volume

Grams

Bakers Percentage

Bread flour

4 1/2 cups

620

100

Water

1 1/4 cups

280

45

Veg. oil

2 Tbs

30

5

Egg

1 large + 1 for brushing

50

8

Sugar 

3 Tbs

40

6

Dry or liquid malt

1 Tbs

20

Instant yeast

5 tsp

20

3

Salt

1 1/2 tsp

10

2

Seeds for topping the rolls


 Note: I generally use all purpose flout with 11.7% protein. If you use a high gluten flour or if you substitute whole wheat flour for some of the bread flour, you will have to increase the water slightly to achieve the expected dough consistency which should be slightly tacky but not sticky. 

 If you use dry malt, treat it as a dry ingredient. If you use malt syrup, dissolve it in the water and then add the other wet ingredients.

 Procedures

1. Place the dry ingredients except the salt in the bowl of a stand mixer. Whisk them or use the paddle attachment to mix them together.

2. Mix the wet ingredients in a medium bowl.

3. Add the wet ingredients to the mixer bowl and mix with the paddle attachment at slow speed until all the flour is moistened. Add the salt and continue mixing for another minute.

4. Switch to the dough hook and mix at Speed 2 (on a KitchenAid Stand Mixer) until a medium gluten window is achieved (about 10 minutes).

5. Transfer the dough to the board and form a ball. Place the dough in a lightly oiled large bowl that can allow doubling of the dough volume. Cover the bowl.

6. Bulk ferment the dough in a warm place until it has doubled in volume. (45-60 minutes). 

7. Transfer the dough to a lightly floured board. Divide it into 12 equal pieces of about 3 oz. each.

8. Form the pieces into balls, cover them with a towel and let them rest for 15-20 minutes.

9. Shape the pieces as desired - flat disks for hamburger buns, long rolls for sausages, ropes to make knotted rolls, etc.

10. Places the formed rolls onto baking sheets and cover them. (I use quarter sheet pans which hold 6 rolls each and put these in plastic bakery bags for proofing.)

11. Pre-heat your oven to 350ºF.

12. Mix an egg with a tsp of water to glaze the rolls. Get out any seeds you want to put on them.

13. Let the rolls proof 3/4 of the way. (If you poke a finger in one, the hole should fill in very slowly.)

14. Brush the rolls with the egg wash. Sprinkle each roll with seeds (optional).

15. Bake until lightly browned and fully baked. (12-15 minutes or a bit longer, depending on your oven).

16. Cool on a rack completely before serving. 


 These rolls freeze well. I wrap each in cling wrap and place them in a plastic bakery bag with a tie. Thaw in a 375ºF oven for about 7 minutes.

 Enjoy

 David

WatertownNewbie's picture
WatertownNewbie

Tartine Basic Country Bread

This is for all of the new bakers who want to tackle a Tartine recipe and get a sense of what to expect and look for during the various stages.

The Tartine Bread book begins with the Basic Country Bread, which is 90% all-purpose flour and 10% whole wheat flour.  With a 75% hydration, this can be a challenge for those who have not handled much dough, but the recipe is manageable, and making this bread will give you experience in recognizing the signs for when to move on from step-to-step (and when to be patient too).

The night before, I mixed 20 grams of starter with 100 grams of 50/50 all-purpose/whole wheat flour and 100 grams of water.  It is amazing that all of the lift is provided by this little amount of starter.  After all, 20 grams is less than three-quarters of an ounce, and there will be over two pounds of flour in the dough.
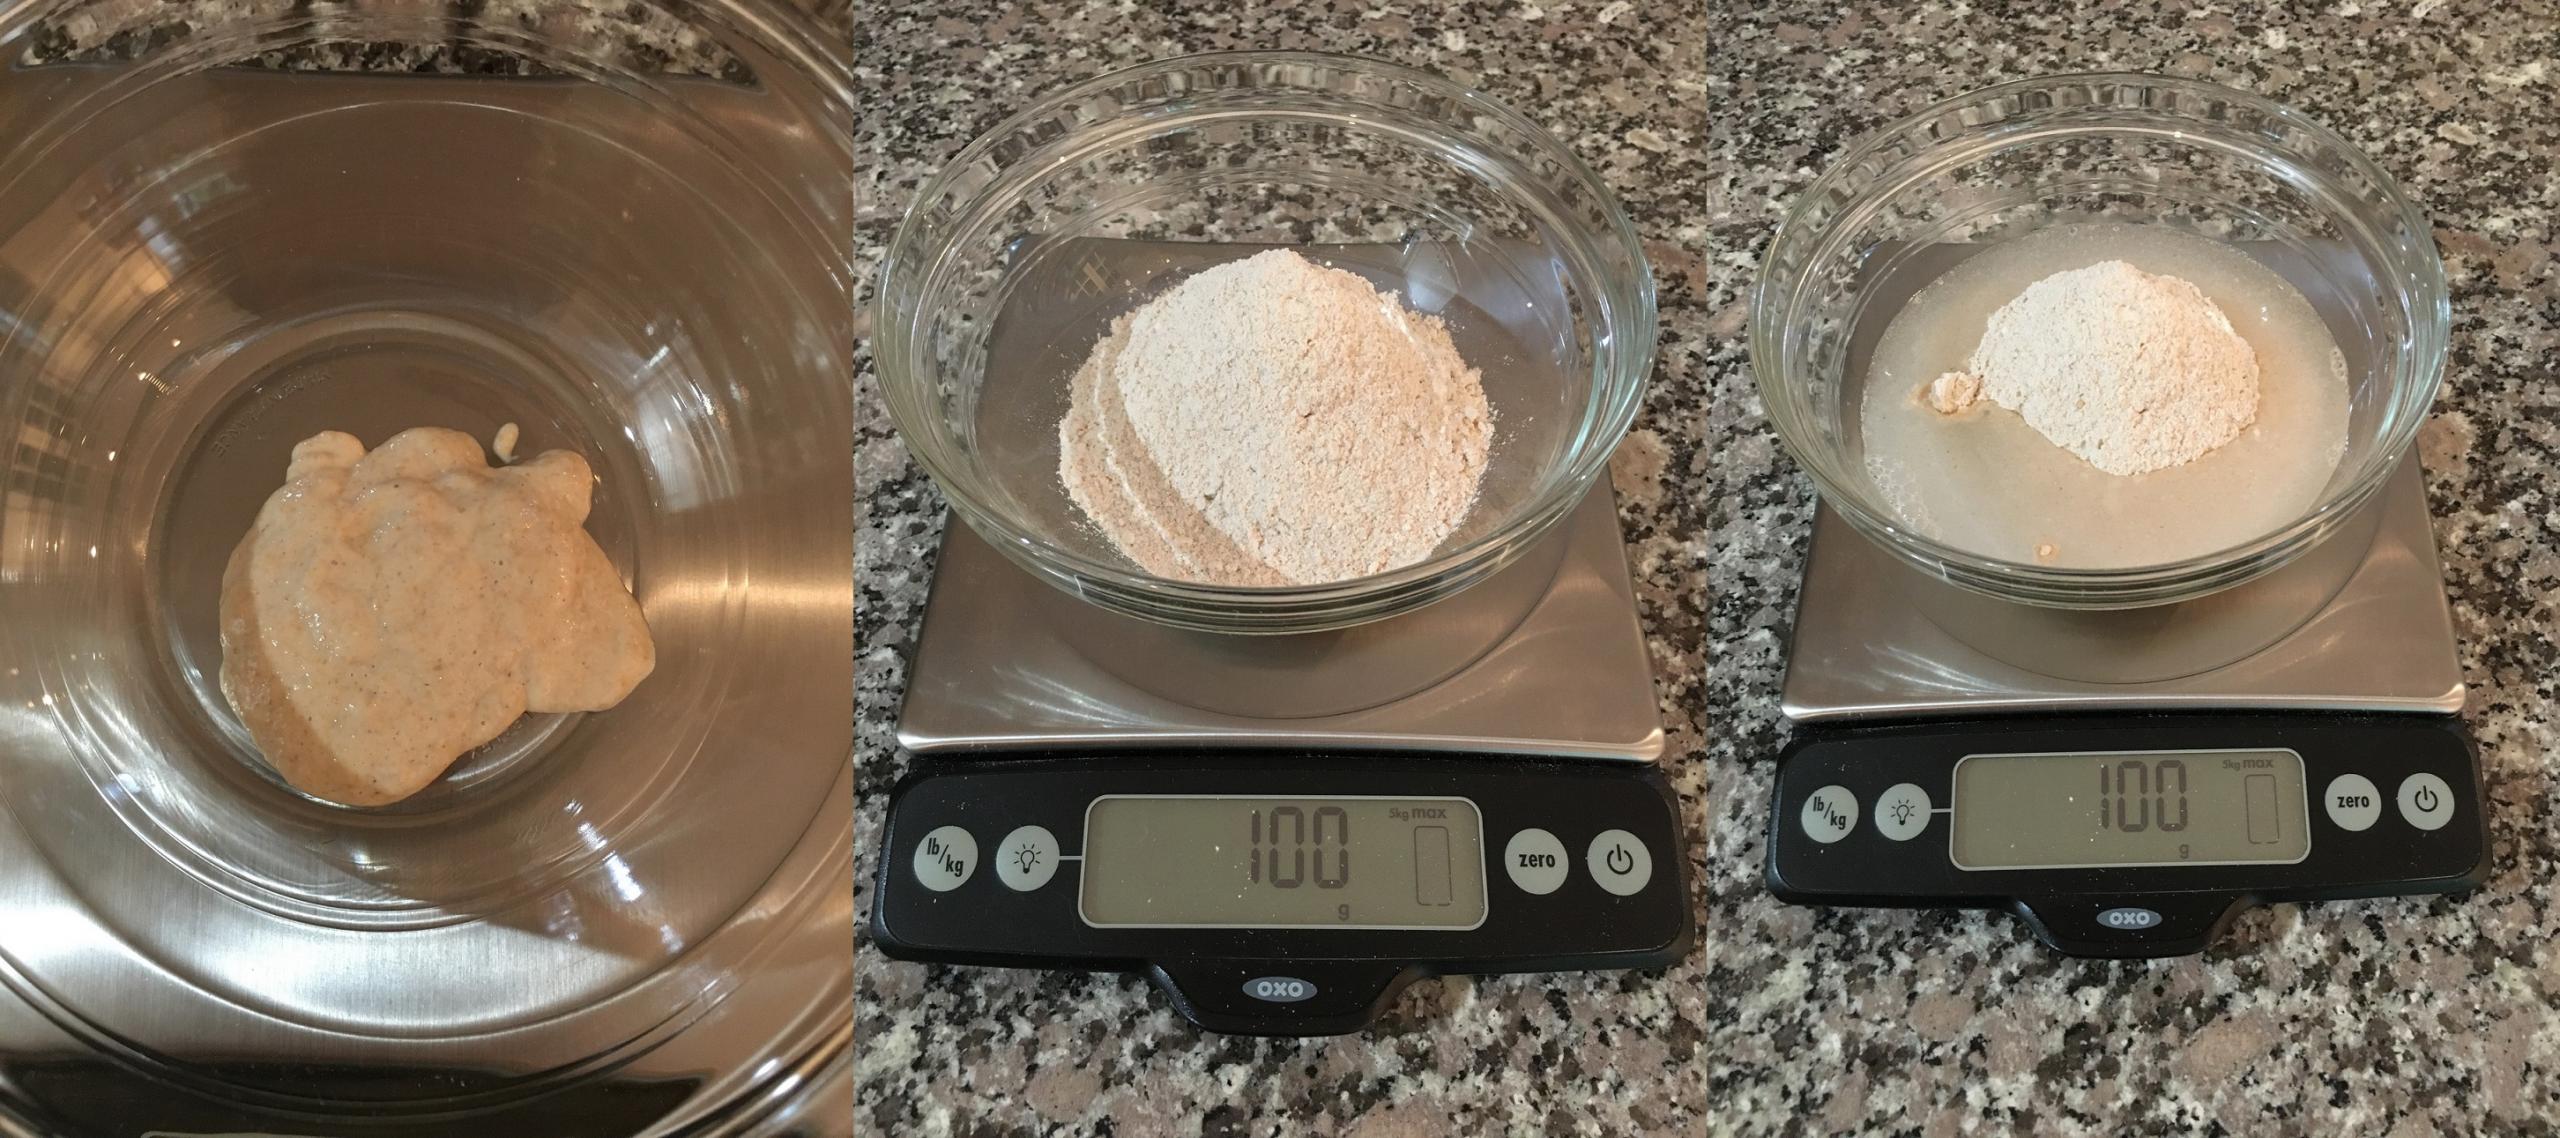
These ingredients were stirred until thoroughly mixed and then the container was covered for the overnight period.  By the next morning the leaven had expanded nicely.
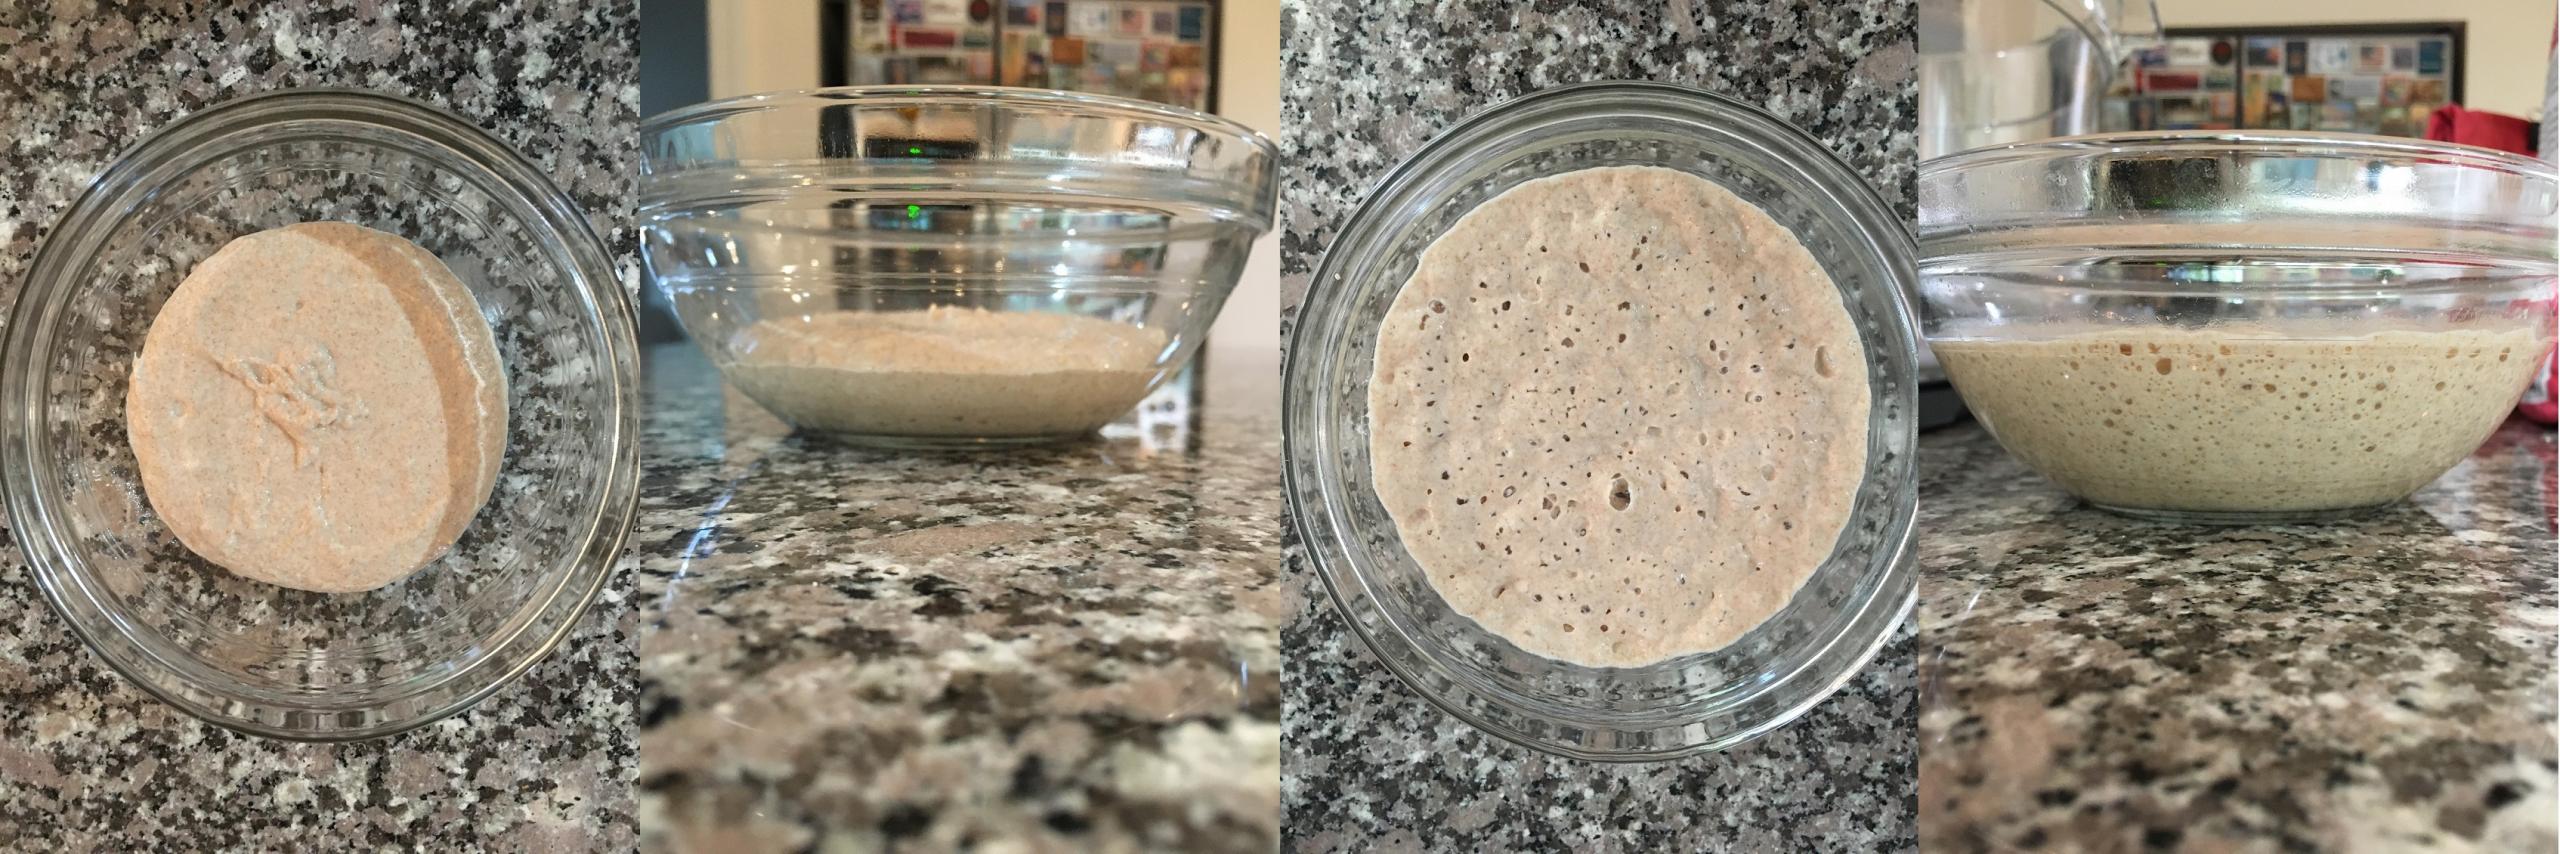
On the left are top and side views of the leaven just after being mixed, and on the right are similar views from the next morning.  Note the bubbles on the surface and side of the container.  This is a healthy, vigorous starter.

Tartine calls for mixing the water and leaven before adding the flours.  There is 700 grams of water (my kitchen was a bit chilly, so I used pretty warm water) and 200 grams of leaven.  After adding the leaven to the water (I let it drop out of the container into the water while I watched the scale and used a spatula near the end to get the amount right), I stirred the leaven into the water, which helped distribute it before any flour was added.

Next the flour went in, and the mixing was about to start.
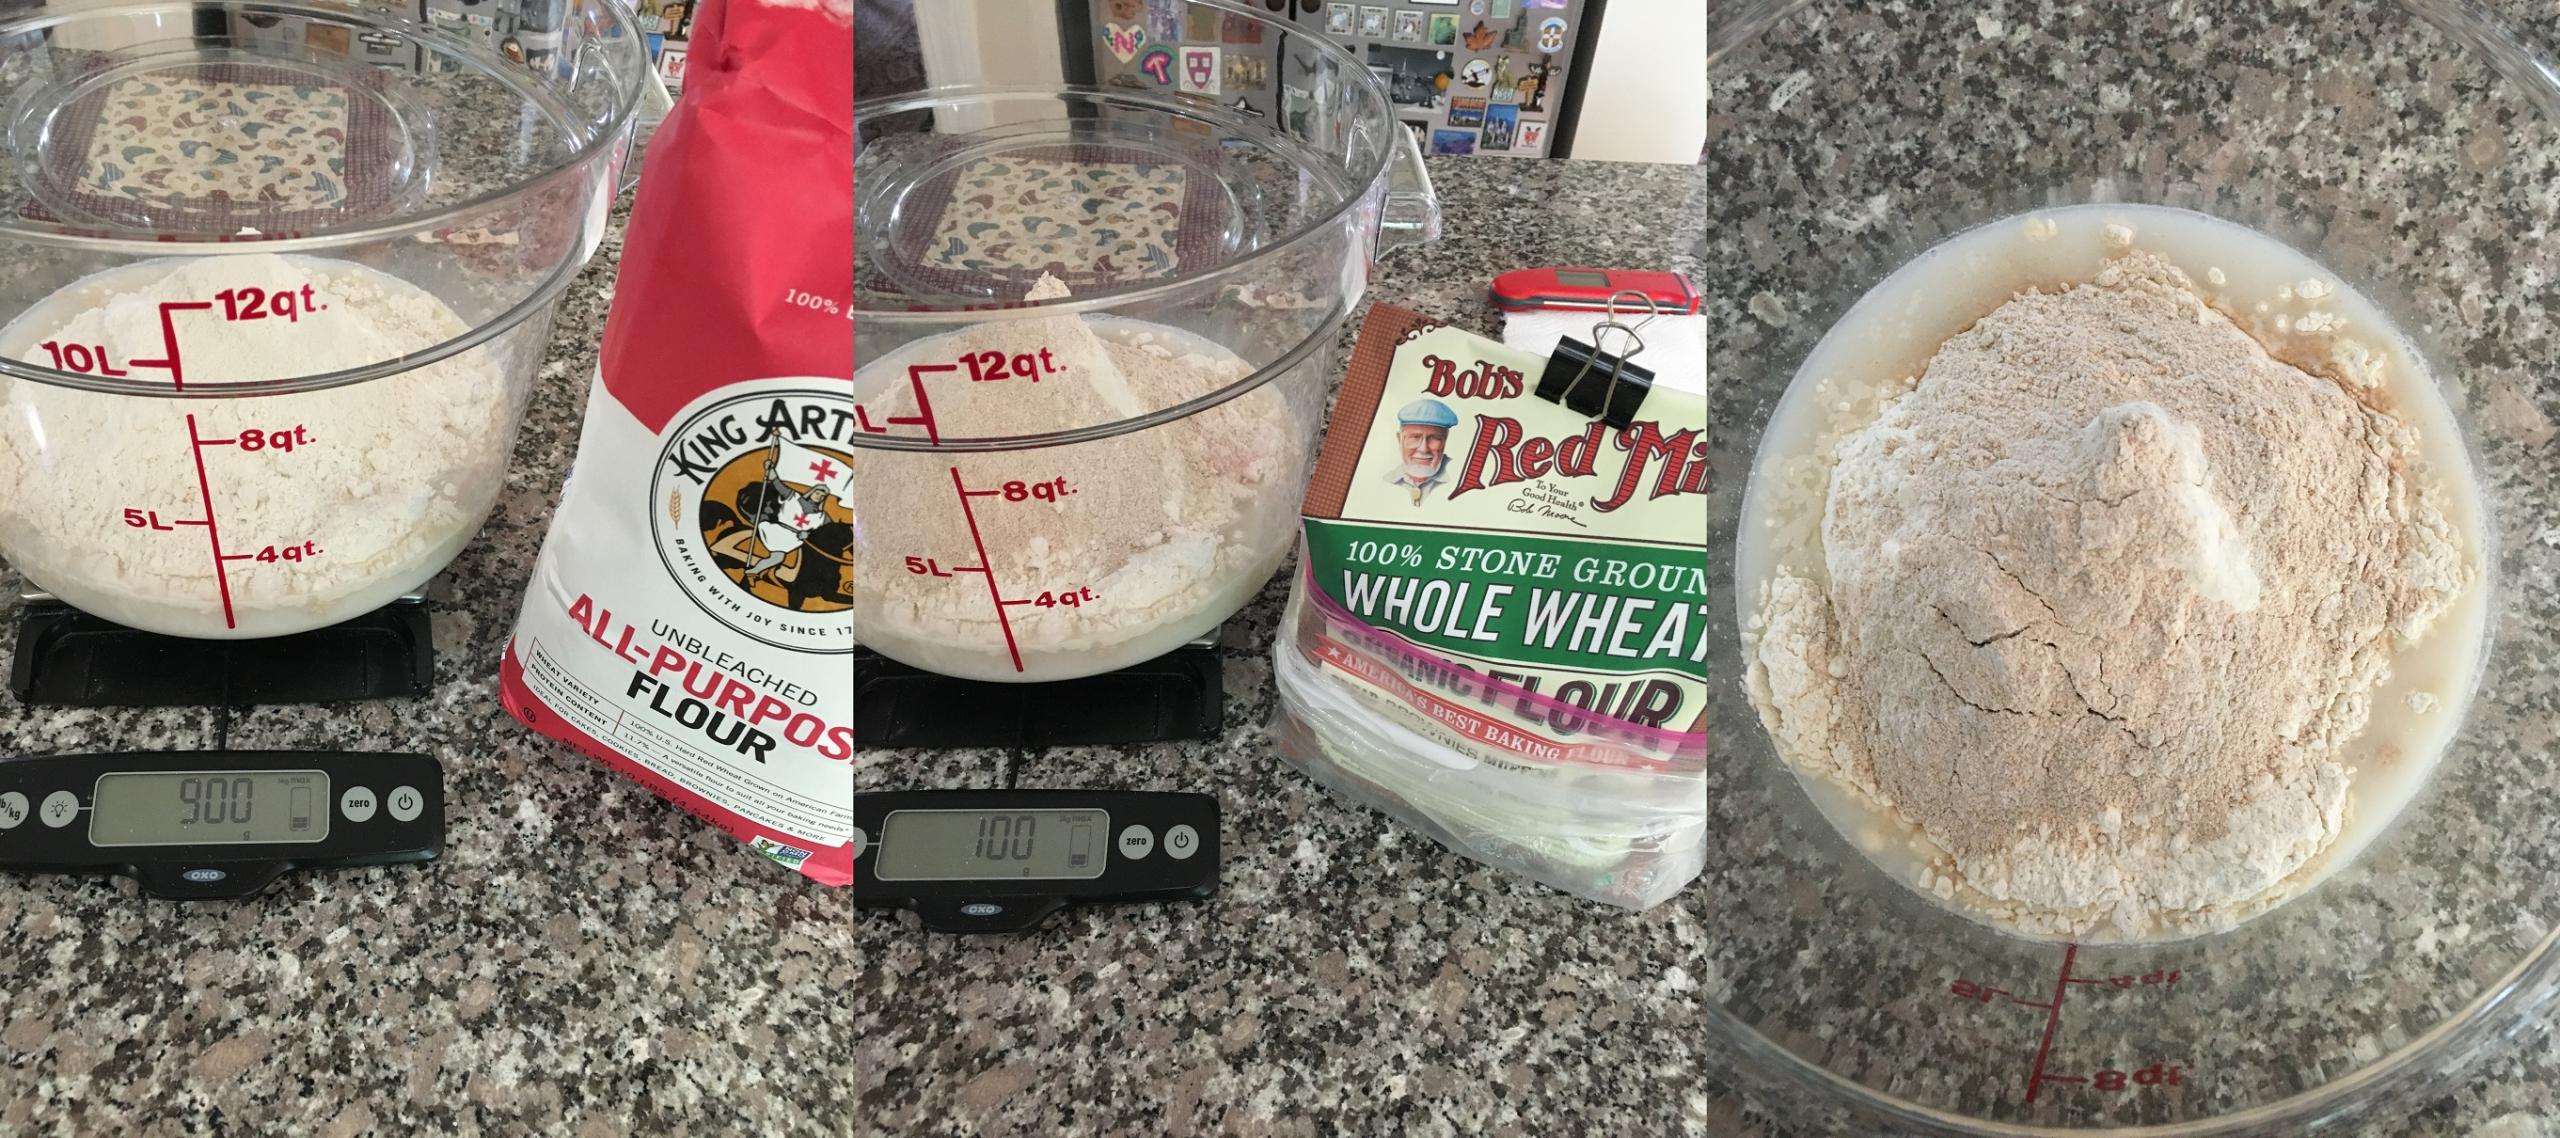
The goal now was simply to make sure that there was no dry flour.  I used a dough scraper (which I will point out in one of the photos that follow below) to help integrate the water and flours, and eventually I used my hand to move the dough around enough to get everything moist.  Then the container was covered for the autolyse session, which lasted forty minutes.
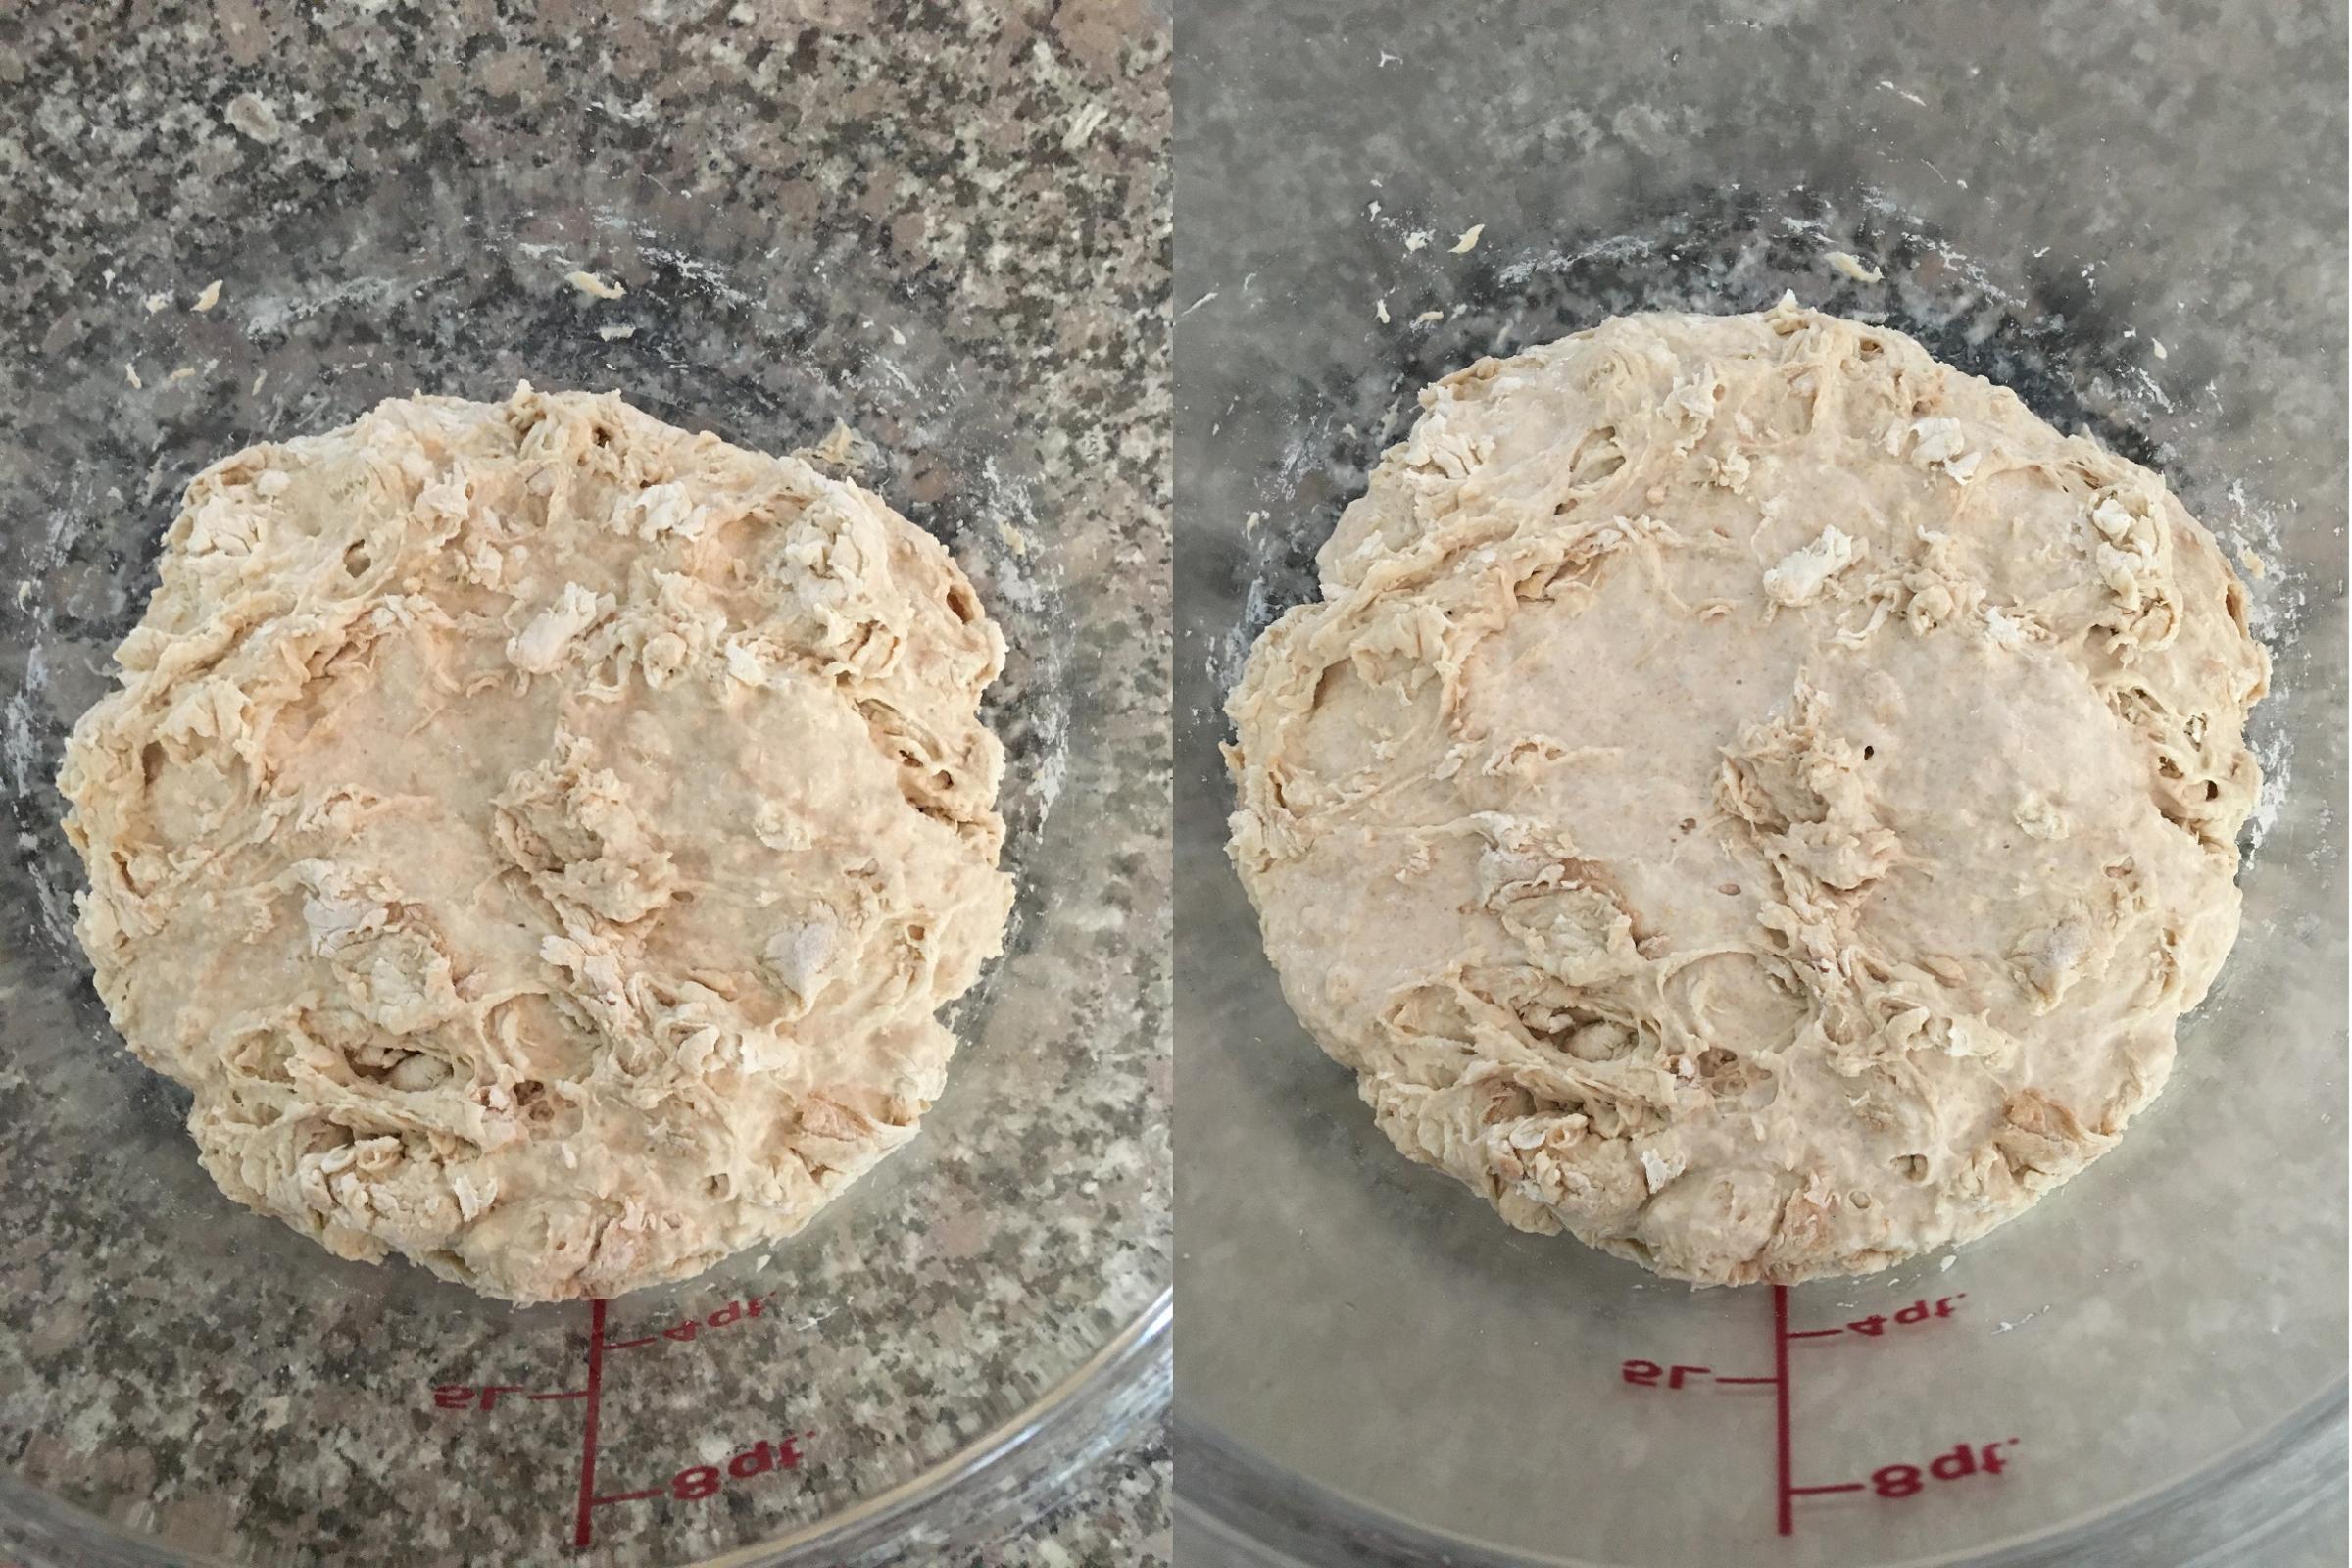
As you can see, from outward appearances not much happened during the forty minutes, but in fact there was the beginning of gluten development.  With the autolyse completed, it was time to add the salt and some water to help dissolve the salt.  First I sprinkled the salt around to distribute it, and then I sprinkled the water around.  Now the fun began.

Still working with the dough in the Cambro container, I moved it around to absorb the additional water (essentially massaging the dough and turning it to expose any dryer portions) and mix in the salt.  When the water had been absorbed (perhaps five minutes), I dumped the mass of dough onto our granite countertop.
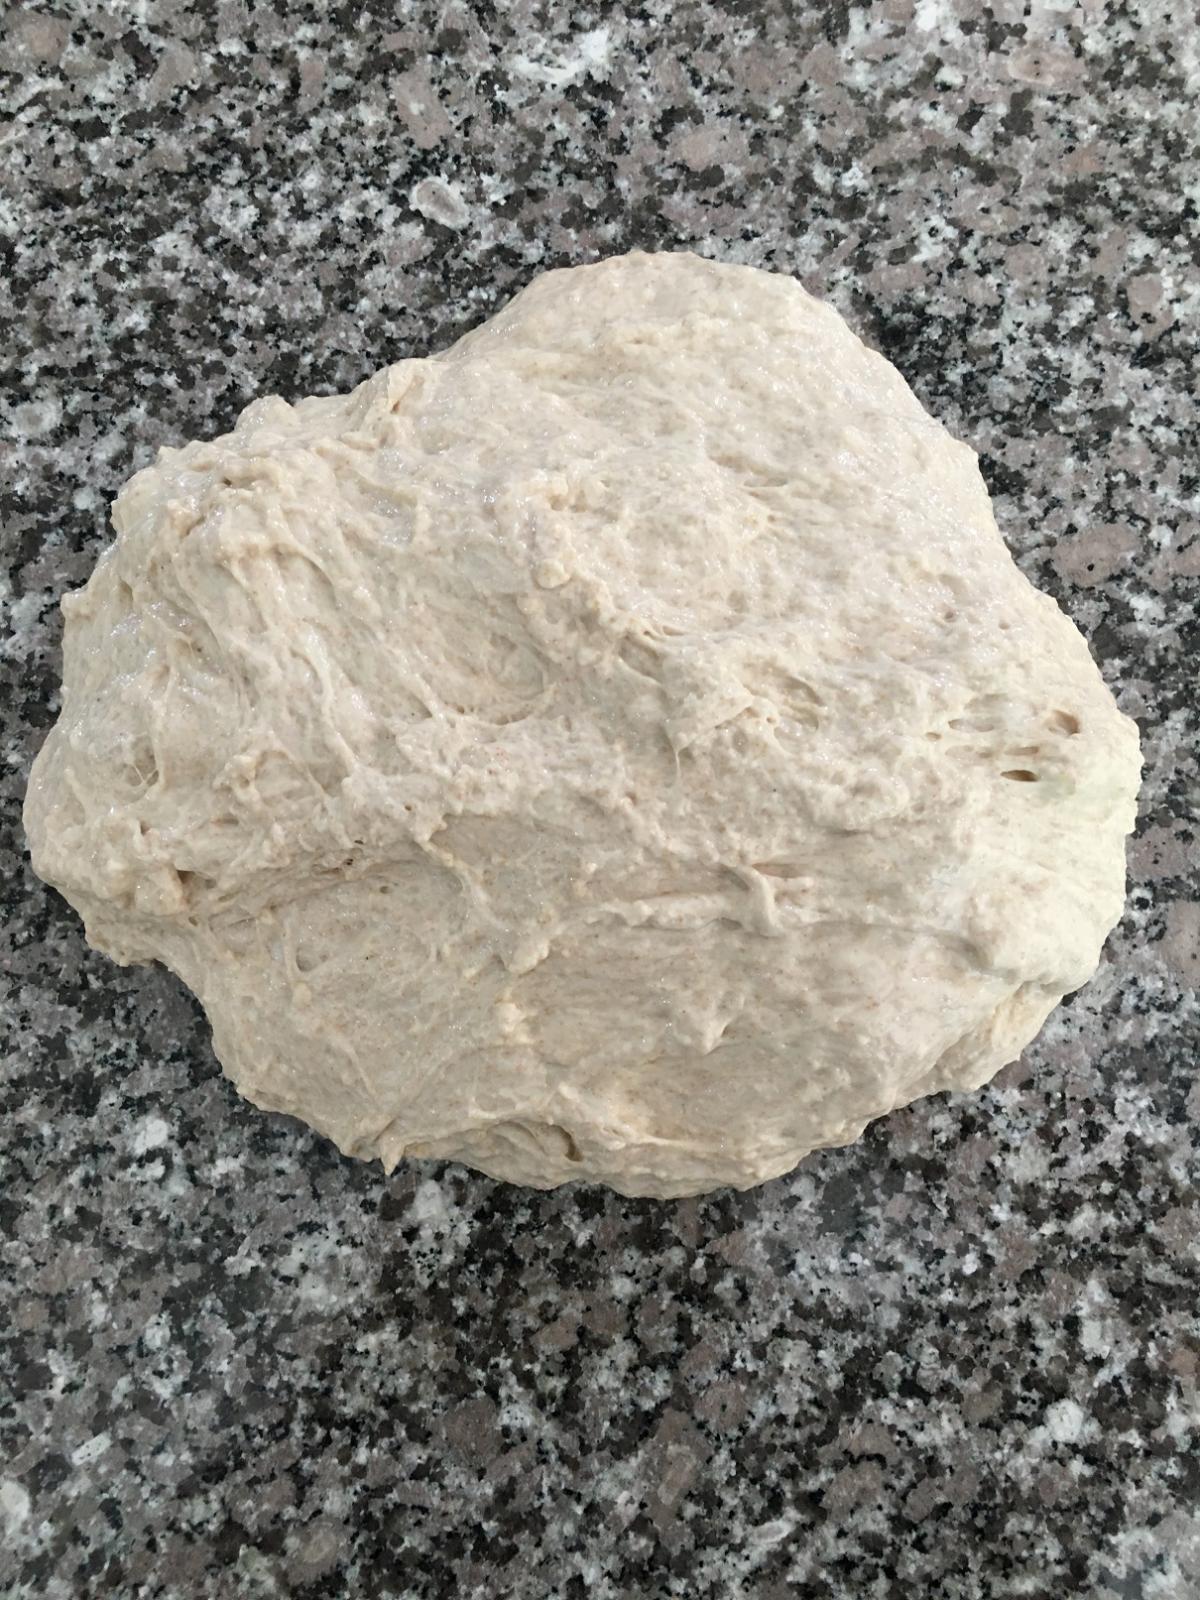
In the past I have typically continued to work the dough by hand in the Cambro tub, and that produces fine results, but this time I decided to do some slap-and-folds (aka French folds) for the initial mixing.  If you prefer to mix the dough in your container, I heartily recommend the videos of Trevor J. Wilson on his Breadwerx site, where he demonstrates a simple way to create nice doughs.  It took me awhile to include French folds in my set of techniques, so do not feel any need to venture there yet, especially if you are new to bread making.

After five hundred French folds, I had a dough mass with some great gluten development and a smooth surface.  (By contrast, I recently baked a Jeff Hamelman bread that uses bread flour and has a 65% hydration, and the dough came together fairly quickly and required many fewer French folds, but that illustrates a difference between all-purpose and bread flours and 75% v. 65% hydration.)  I always check the temperature of my dough at the end of the inital mixing because that gives me a sense of what to expect during the bulk fermentation.  (Also, note the red dough scraper -- mentioned above -- in the background.)
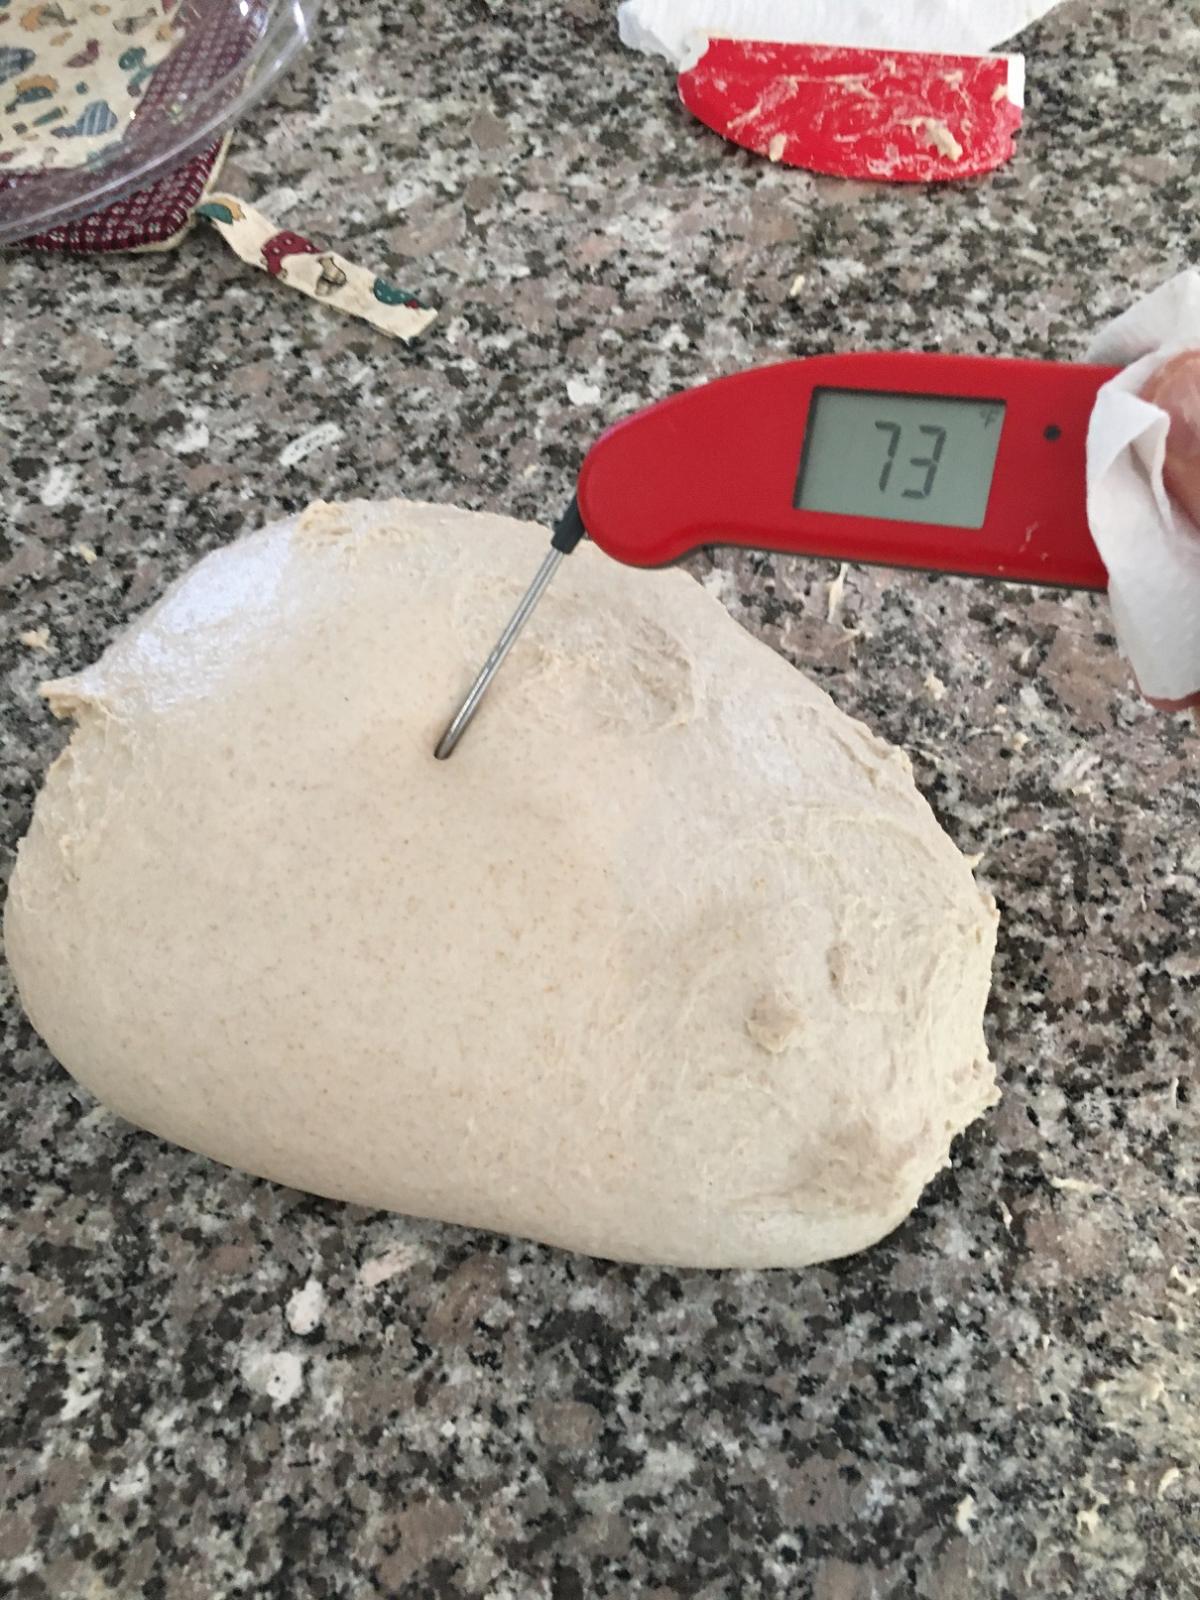
The 73F temperature told me that the dough was going to take a little longer for bulk fermentation than if the target temperature of 78-82F as described in Tartine Bread had been reached.  That was fine, because good bread takes patience, and the reward is good flavor.

The recipe calls for four stretch-and-fold sessions spaced thirty minutes apart beginning thirty minutes after the initial mixing.  Thereafter the Tartine Bread book says to monitor the dough and give a stretch-and-fold as needed until the bulk fermentation stage ends.  I did the four S&F sessions and then another an hour after the fourth.  This composite photo shows the dough just before each of those five S&F sessions and then at the end of the bulk fermentation.

My Cambro tub holds 12 quarts, so the dough sits near the bottom as it spreads to the sides, but a discernible expansion occurred, especially in the final two photos.  Another way to monitor the bulk fermentation is to note changes from the top, and the following composite photo shows the state of the dough just before each of the five S&F sessions.

Note that as the bulk fermentation progresses, the dough tends to retain the shape from its previous S&F, which is a sign of growing strength.  Similarly, as the dough does gain strength, it spreads less and also shows that strength during the S&F (when I could feel the dough gaining in resistance).  The following composite photo shows the state of the dough just after each of the five S&F sessions.

Note how it is possible to bring the dough together much better as the bulk fermentation goes along.  (Also, I should add that each S&F is done a bit more gently than the preceding one so as not to deflate or damage the dough.)  Sometimes I end up doing another S&F before the bulk fermentation stage concludes, but in this case I saw that the dough was ready to be divided.  This photo shows the dough just before being dumped onto the countertop.
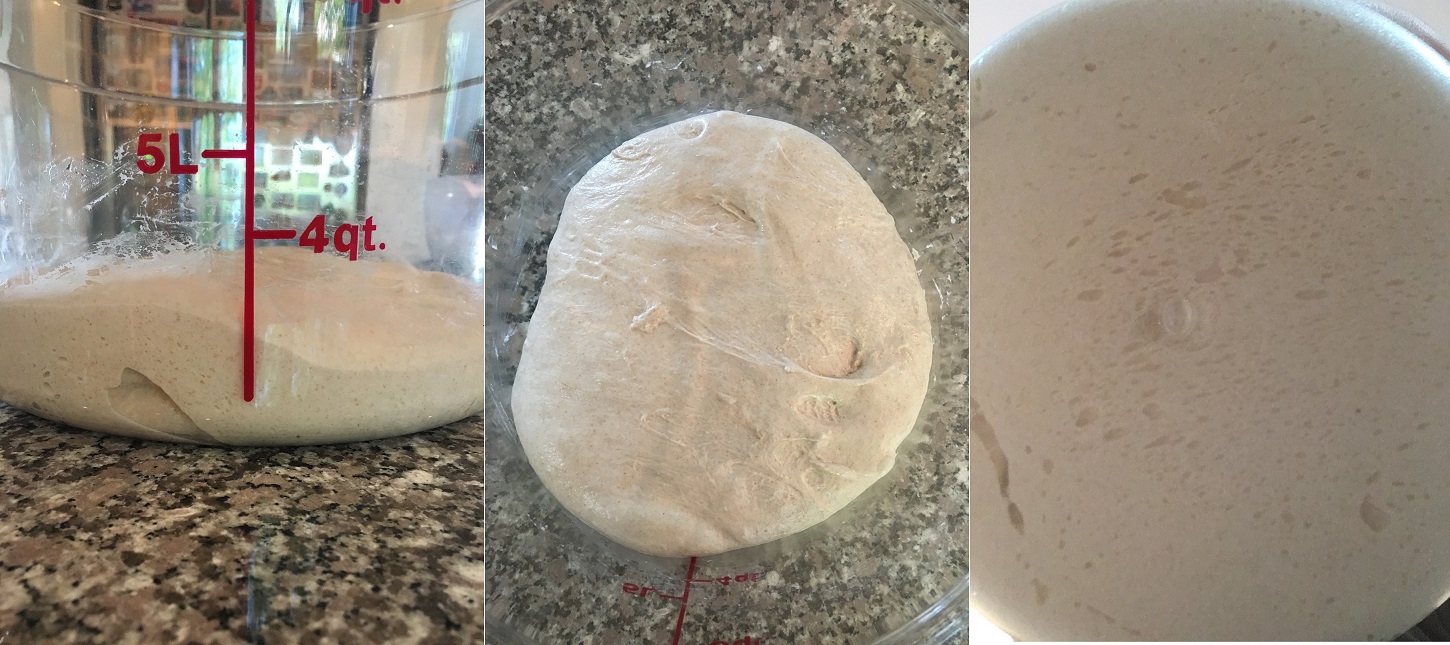
My experience with this dough in particular and doughs in general led me to note several factors, and I point these out mainly for those who are new and want some clues and signs to watch for.  The dough had billowed, which showed up in the expanded volume, but also in the feel during the final S&F.  There were numerous bubbles on the side and bottom of the container.  (I often lift the Cambro tub and look at the underside, and if there are no bubbles I know that the bulk fermentation stage needs to continue, whereas here it was ready to end.)  During the last S&F session the dough did not cling to the side as much, indicating the further development of gluten and the transformation of the dough into a unified mass.  When I lightly jiggled the container, the dough wiggled gently back-and-forth a bit.

The next step was to get the dough onto the counter, divide the dough, and do the pre-shape.  Then came the bench rest, which was thirty minutes.  This composite photo shows the dough just out of the tub and the two portions just before and just after the bench rest.
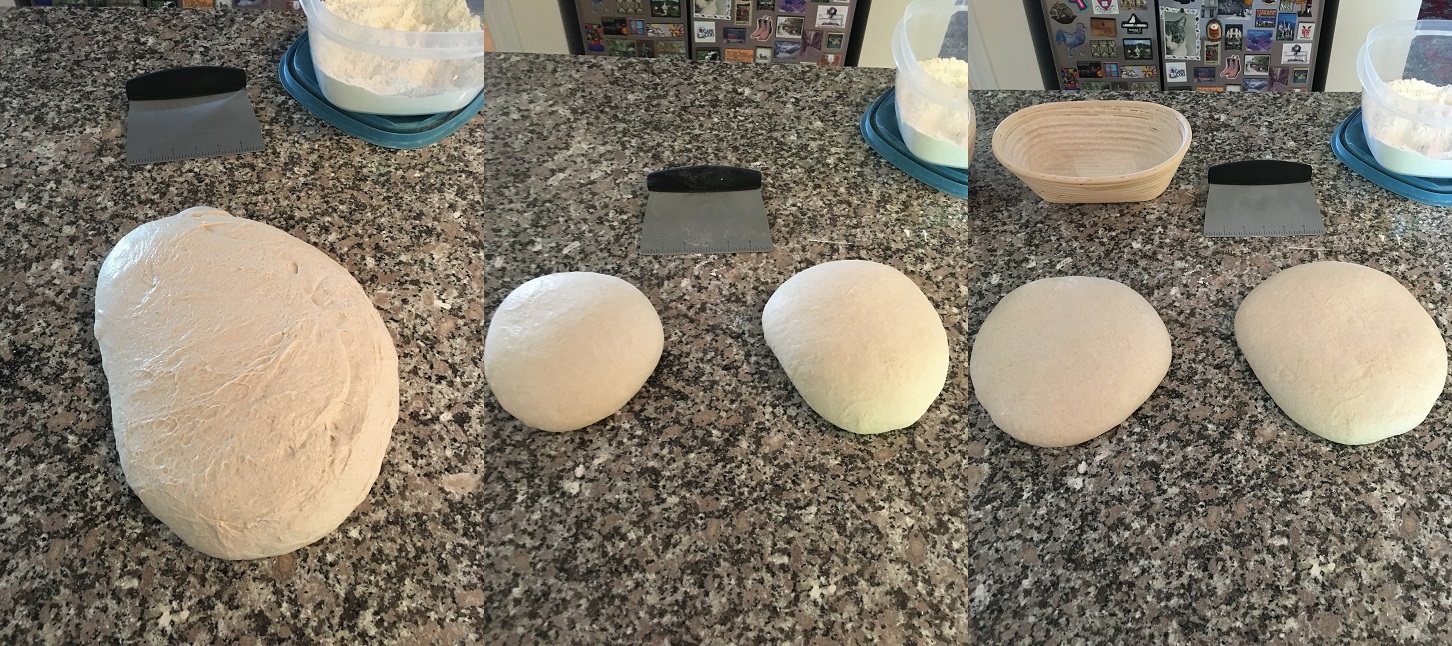
Note the bench scraper and container of flour in the background.  Once the mass of dough was on the counter, I sprinkled some flour on top and lightly spread it around with my hand across the top surface to cover any sticky areas.  Then I used the bench scraper to divide the dough into two portions.  This was not a sawing action, but rather a cut straight down and then a short slide to one side to separate the cut.  I usually do that three times to divide a mass of dough this size.  Then I slid the bench scraper under a dough portion around its perimeter to make sure it was not sticking somewhere onto the counter.  Then I flipped each portion over so that the floured side was now on the counter.  I used a stitching process to pull sides of the dough up and toward the center and then pressed down gently to adhere the part pulled up. This created some surface tension on the part that was now the underside.  After I pulled from all directions toward the center, I used the bench scraper to flip the portion back over.  Using the bench scraper along the side of the portion and my hand as a guide, I slid the portion on the dry countertop and created further surface tension.  (King Arthur as well as the San Francisco Baking Institute have excellent videos on pre-shaping and shaping dough, and I recommend watching those.)  During the bench rest I lightly draped a tea towel over the dough.  As you can see, the dough had enough strength to retain its general shape during the thirty minutes, but enough extensibility to spread a bit too.

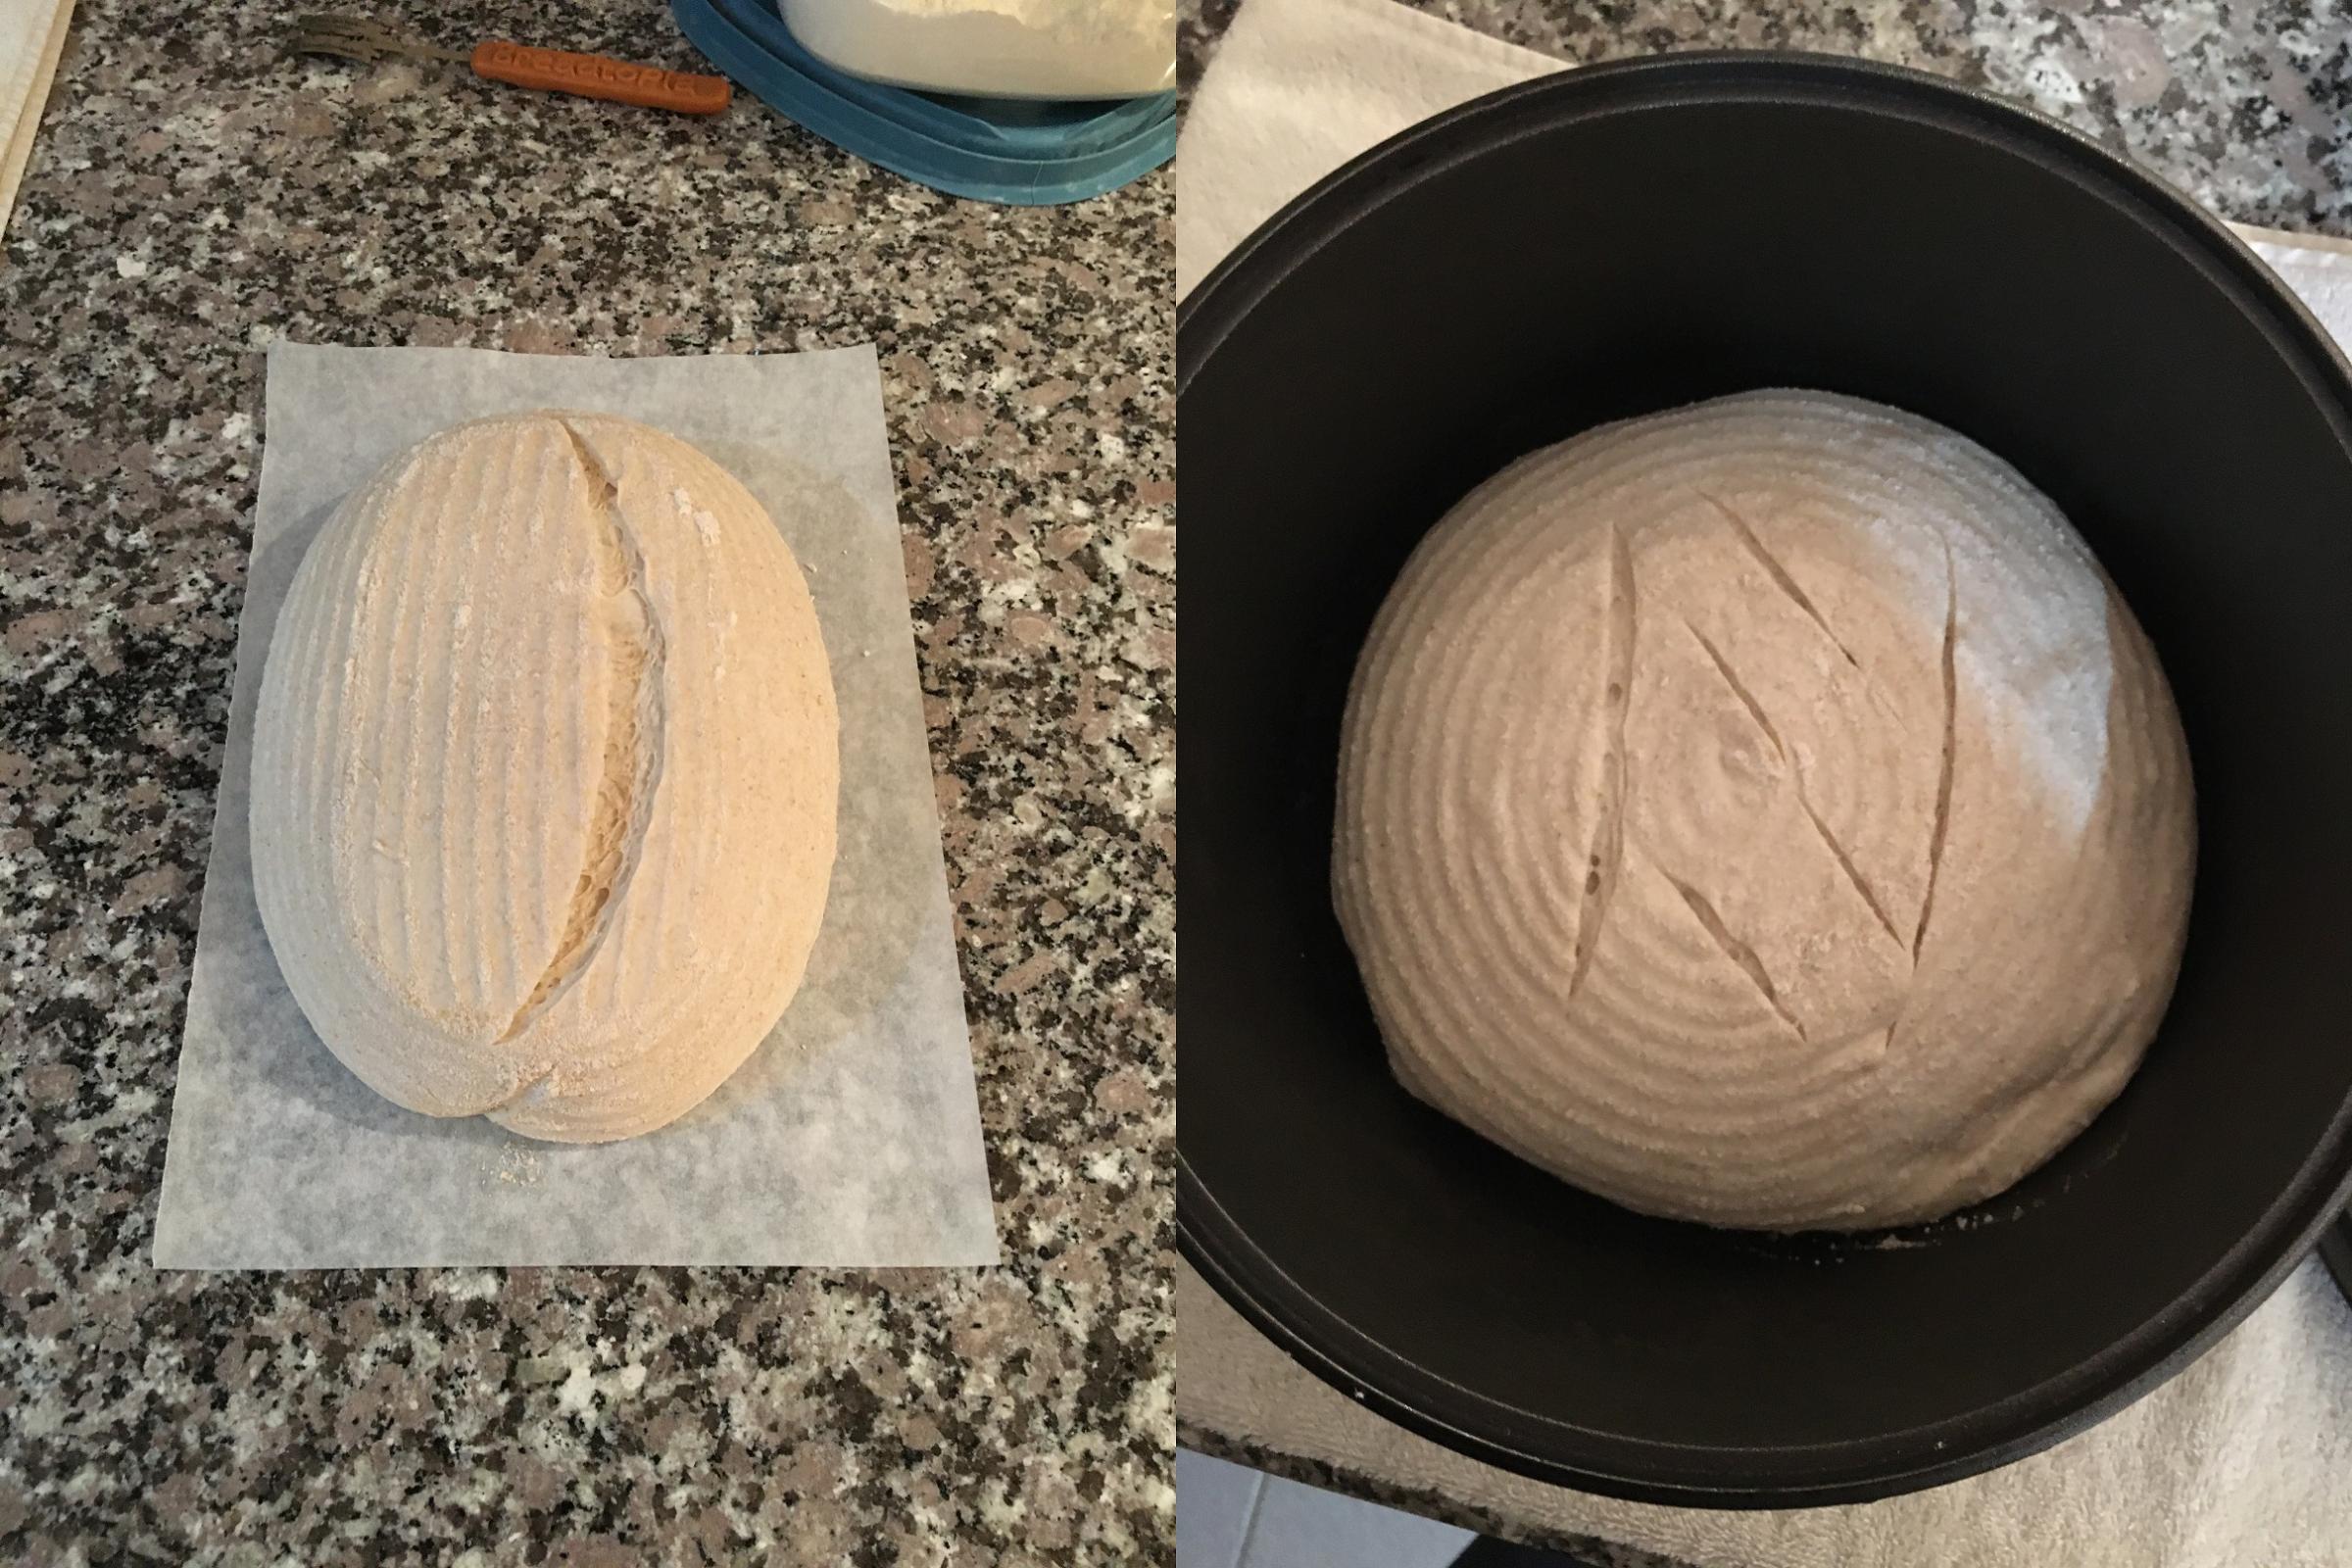
Next came the final shaping, and I opted for a boule and a batard.  My original plan had been to keep the bannetons in the refrigerator overnight, but during the final shaping I sensed that this dough had moved along, and I would be wise to monitor it.  Dough that enters the fridge does not immediately drop to 37F and instead takes awhile to reach that temperature.  During that time the fermentation continues.  This dough ended up spending a bit over six hours in the refrigerator before being put into the oven.  This composite photo shows the two loaves just before going into and just after coming out of the refrigerator.

I scored the two loaves before they went into the oven (the boule in a Dutch oven and the batard on a baking stone).
Here are the finished loaves from an angle.
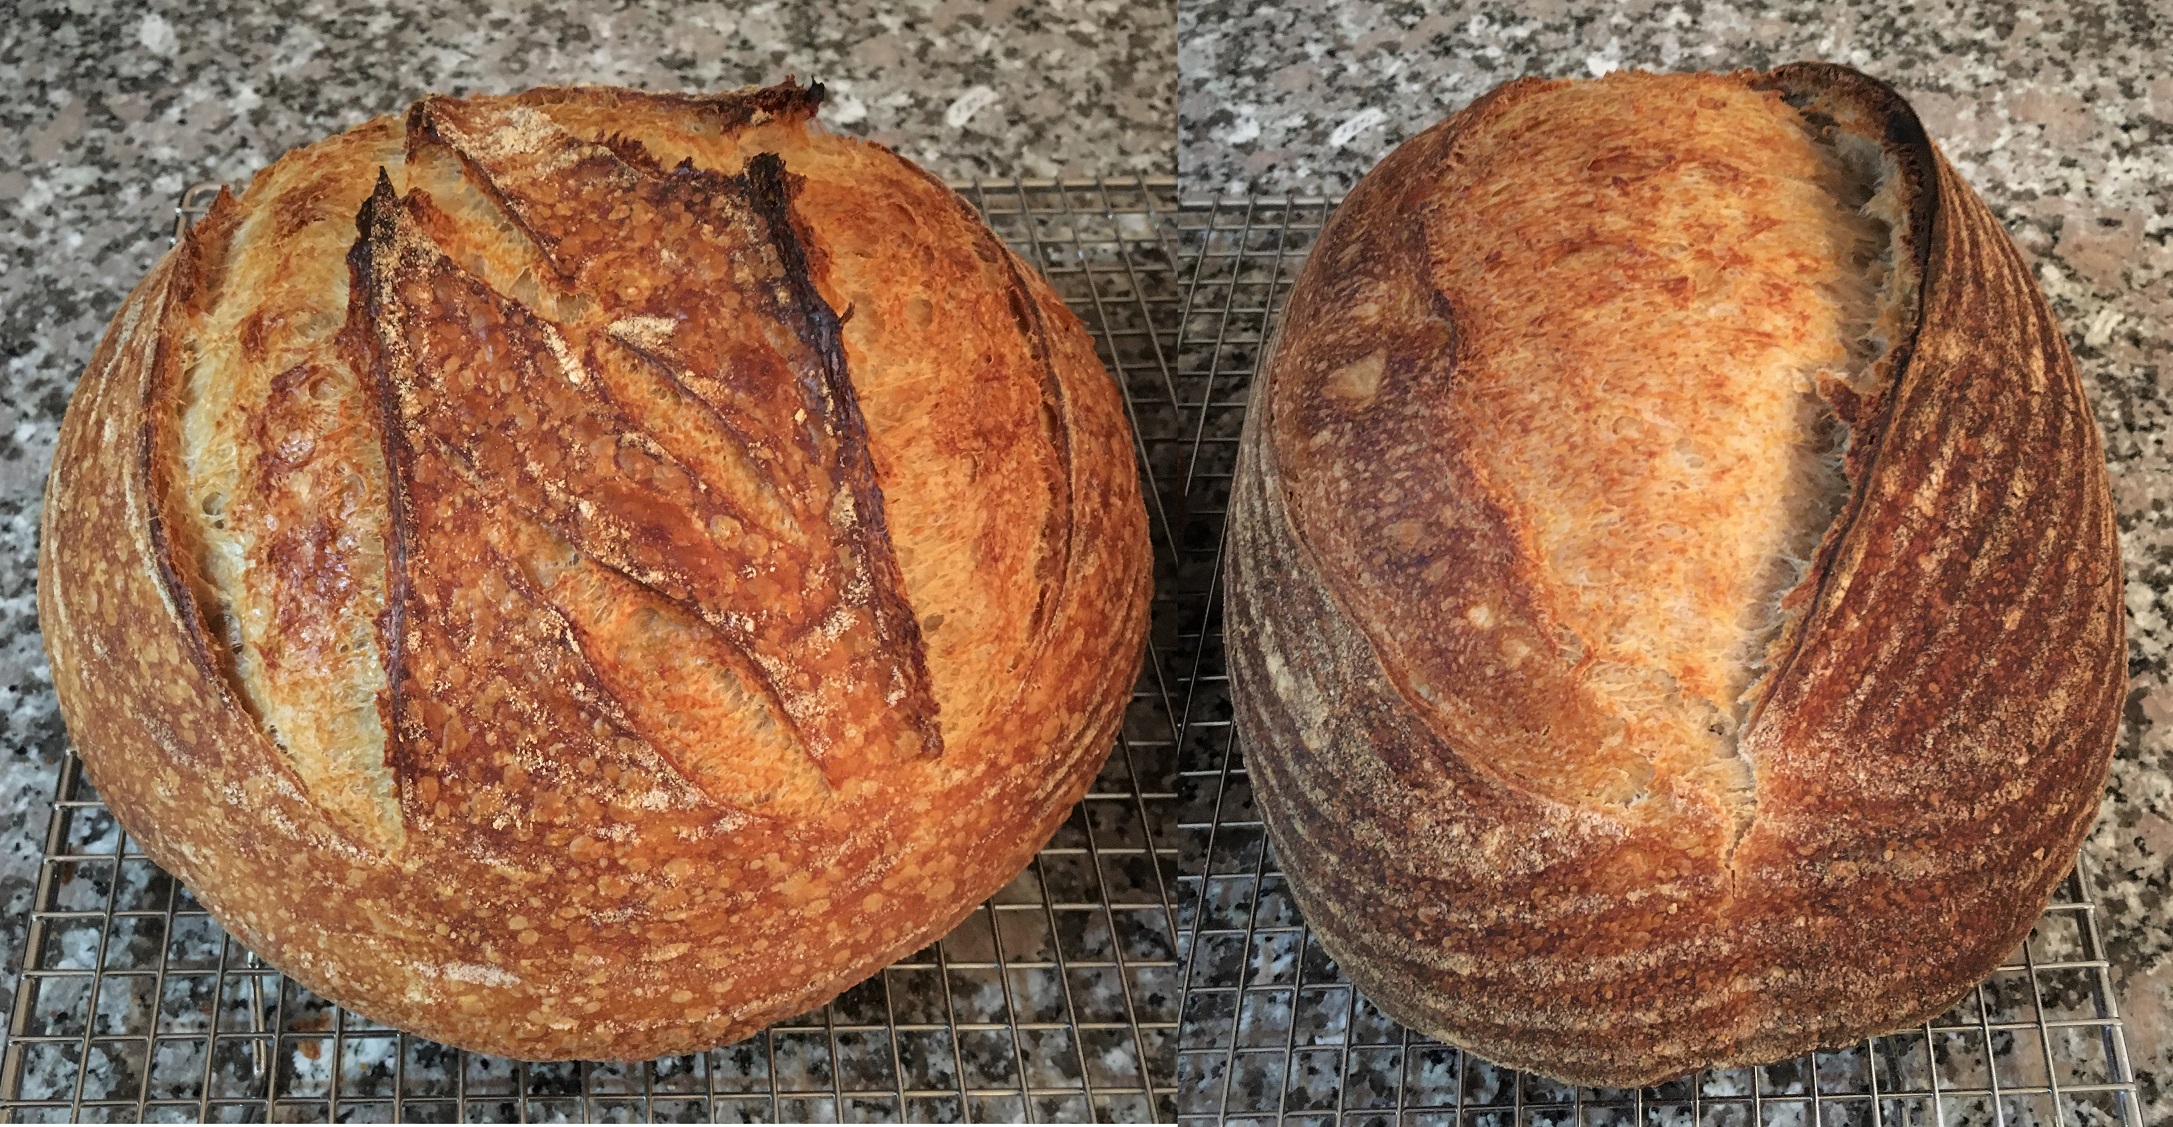
The batard baked for 42 minutes and the boule for 47 minutes at 450F.  (I typically find that the loaf on the baking stone needs less time than the one in the Dutch oven, and I check the internal temperature with my Thermapen to make sure it is at least 208F.)  The decision to pull the loaf from the oven essentially comes down to crust coloration, and I prefer a dark bake to enhance the flavor of the crust.

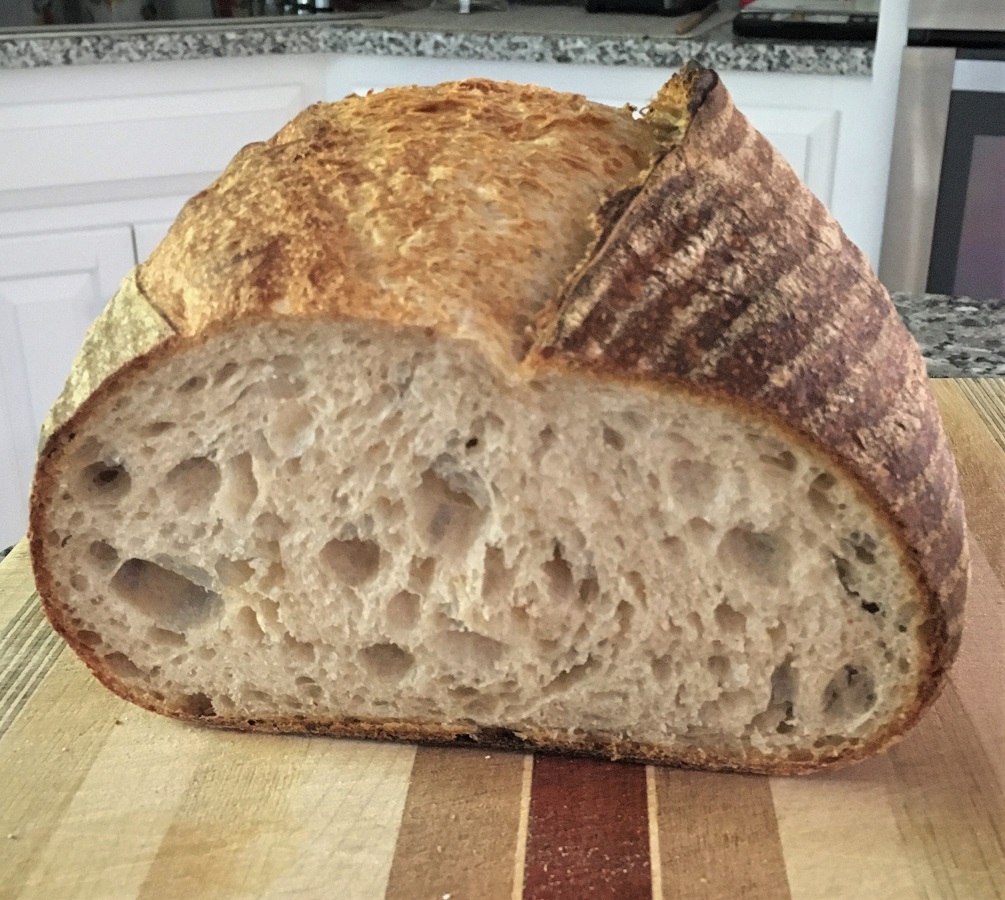
One of the loaves was a gift for a neighbor, but here is the crumb from the one we kept.
Thank you for reading this far, and I hope that you benefited from the details and photos.

DanAyo's picture
DanAyo

Tip - Sourdough Starters

Many new bakers are drawn to sourdough (SD). As each baker starts their SD journey, a starter becomes a prerequisite. This post is my attempt to assist those embarking the SD train. There are many methods used by different bakers to successfully make a starter. The information below is the culmination of what I’ve learned from numerous bakers and my own personal experience. There is no single ultimate way to make a starter. Pick a method from a baker with experience and try to stick with it and exercise patience.

This is a work in progress. I am in the process of collecting information that will be posted here. This way, instead of repeating ourselves as we attempt to help those new to SD starters we can link to this post.
We ofter hear, “It barely doubles over 6 hours”.

The height of rise and the time it takes to do so is a very good indicator of a starter’s activity. BUT, in that equation there are HUGE variables! *Temperature - Hydration - Feed*

  • Temperature has a great influence on your stater. Recommended temps are in between 75 & 82F. The same starter that takes 8 hours to double at 68F, can do so in 4 hours at 82F.
  • A 70% hydrated starter will rise much higher than a 125% starter, because one starter dough is stronger and more able to hold gas than the other. Most new starter are built at 100% hydration because it is dry enough to rise, but also wet enough for extremely active fermentation.
  • Whole grain, especially Rye act as steroids for starters! The very best flour to feed a brand new starter is 100% extraction organic whole rye flour. I contacted Bob’s Red Mill to be sure it fulfilled the requirements and they assure me it did. It can be purchased on AMAZON. Once your starter takes off you will not need to continue using this more expensive flour.

HERE is a COMPARATIVE TEST (posted dated 10-12-2021) that a TFL user ran testing 5 different flours on an existing starter.

In a nut shell, starters, like bread dough inflate because of the gas produced by fermentation and rise because the gluten is developed and strong enough to contain that gas. For example, a 125% starter may produce huge amounts of gas that ultimately escape into the atmosphere because the super wet mixture can’t contain the gas.

Most of us have a tendency to judge our starters by the reports we read from other bakers. I know for sure, I used to! BUT, when comparing other starters to ours, the race must be fair. What was their hydration, flour(s), and of utmost importance, the temperature. Without knowing the temperature of fermentation, we know very little about the starter’s capabilities, judged over time.

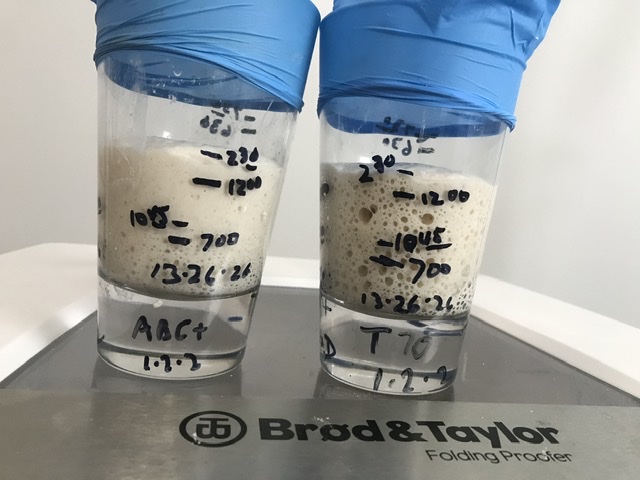
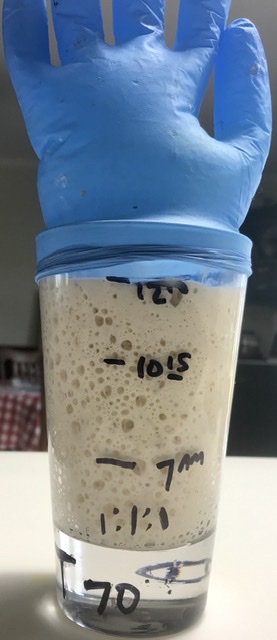
 By the way - the ability to judge the maturity of your starter is very important. It is my understanding (from Debra Wink) that the optimum time to refresh your starter (when maximum yeast is the goal) is once the starter has peaked and just begun to recede. A great way to discern that time is to use a sharpie and periodically mark the glass jar at the current rise level and note the time. (Marker ink is easily removed from glass when washing). As the starter nears maturity continue to mark the vessel with the high level and also the time. Once the starter no longer exceeds the previous mark and you notice a slight recession, it’s optimum time to refresh.

Image below is messy, but you’ll get the idea. We can see that the starters matured in 7 1/2 hr. But to fully evaluate these starters we need to know the feed, hydration, and temperature. If the temp was 68-70F they are very active.  But at 82F maturity would be expected much sooner. That applies for these starters, because I know them well.


Tip - a black felt tipped marking pen (Marks-a-Lot) is great for marking your glass jar. It easily washes off with light scrubbing. Mark the level of the starter and on the side put the time. From time to time repeat this, continuing to mark the jar. Once the level of the starter falls below the previous mark it is time to feed. Keep track of the feed ratios, time to maturity and other pertinent information. 

The latex glove provides a visual indicator of the gas produced during fermentation. Not necessary, but lots of fun...


My best advice for your best chance at quick success. The comments below are focused upon the easiest and quickest way to succeed.

  1. Mix your brand new starter by weight. 1 part water + 1 part flour. You don’t need to make a large starter. 50 grams water + 50 grams flour is good when using a small vessel. NOTE - you may elect to use Debra Wink’s Pineapple solution in the initial phase of your starter building. Although not necessary, it is a great preventative method for those that choose to do so.
  2. The very best flour you can use is 100% extraction organic whole rye flour. This flour is not necessary but it makes a huge difference. I contacted Bob’s Red Mill and they assured me that their flour was 100% extraction. It can be purchased HERE or if you want to buy in bulk, HERE. Your starter will not need this more expensive flour once it matures and takes off. Any flour will work, but there is no better flour than whole grain organic rye for new starters. The outermost portion of the organic rye berry (the bran) is loaded with microbes needed to populate your starter.
  3. The water should not contain Chlorine and especially not Chloramines. Your best best is to use bottle spring water in the beginning. 
  4. A small, narrow, clear sided glass is ideal. It can be covered with a cap or even a piece of plastic secured with a rubber band. If the vessel is too wide it will be more difficult to evaluate the rise. Glass is also nice because you can write on the vessel with black marking pens. The ink is easy washed off.
  5. Warm temperatures will have a huge affect on the time required to mature. Recommended temps are between 75 & 82F. Warmer temps will promote quicker activity at any stage of your stater’s life.
  6. Stirring the new starter from time to time often stimulates activity. After stirring scrape the sides of the vessel down so any growth can be detected on the clean glass.
  7. When refreshing (re-feeding) your starter by weight use 1 part starter + 1 part water + 1 part flour. The ratio is written 1:1:1 (starter:water:flour). You don’t need to make a large starter. 30g (grams) starter + 30g water + 30g flour is plenty enough and it will save a lot of flour that is often discarded.
  8. You will need to remove a small portion (30g) of starter to prevent the starter from growing out of hand. Otherwise 30:30:30 (= 90g) is refreshed 90:90:90, you can see where this is headed...

The following instructions written by TheFreshLoaf user, ‘Abe’. When it comes to sourdough (SD) starters Abe is considered an authority.
How To Make A Sourdough Starter

What you will need:

 ● Flour: Preferably Organic and Wholegrain with Organic Wholegrain Rye flour being the best option.

 ● Water: Tap water should be fine but on the rare occasion the treatment of tap water in some places may hinder progress in which case bottled water will be a good substitute or one can use tap water which has been boiled and cooled.

 ● One small jar.

 ● A warm place to keep the starter with 75-78°F being ideal. NOTE - Abe tells me he specifies 75-78F because it is easier for most people to obtain. Since I have a proofer, 82 is my preference. Be careful to not keep your starter in much higher temps, which can be detrimental to survival.

 ● Patience!


 METHOD

  1. Mix into a slurry 50g water + 50g flour. Clean down the sides of the jar. Place the jar in a warm spot and do not feed again for 24-48 hours until you see some activity.
  2. Onto the first feed: remove 50g starter and discard. Feed the remaining starter left in the jar with 25g water + 25g flour. Return to the warm spot.
  3. From here on in every 24 hours repeat step two but only if you see some activity. The starter might rise a lot, a little or not much at all but produces bubbles. If no signs of life at all then skip a feed or two until it picks up again and then resume step 2 at a 24 hourly schedule.
  4. Once your starter is reacting well with each and every feed (this will take about 6 days give or take) then it's time to strengthen the starter by increasing the ratios and frequency of the feeds. So the first step will be to keep the schedule and increase the feed to: 34g starter + 33g water + 33g flour. This is now close enough to a 1:1:1 feed while still keeping it 100g. See how it reacts. Should it begin to rise, peak and fall within 12 hours then switch to a feed twice a day.
  5. From here on it's just a matter of maintaining and strengthening your new starter. Once your starter is on a 12 hourly schedule, rising and peaking, with a feed of 20g starter + 40g water + 40g flour (1:2:2) it should be ready for the first trial bake.
  6. Bear in mind your starter is young and will continue to improve over the coming weeks. Maintenance is easy… once you have a successful bake, feed your starter, allow it to double and keep in the fridge. Exact ratios at this stage is not important as long as the feeds are healthy. When baking take some starter the night before to build a levain. Once your starter runs low, take it out of the fridge, give it a good feed, allow it to double and return to the fridge. In the first month your starter is young and it's best to feed it at least once a week (when in the fridge) while it continues to mature but eventually as it grows in strength you may leave it for longer.


Re-feed only when you see it has peaked and just starts to fall

It is commonly accepted that the starter has fully matured once it reaches peak height and just begins to fall. When the starter matures it means that the yeast microbes have reproduced and multiplied to their maximum numbers. If the starter is re-fed before it matures, the yeast population will decrease through dilution. - See example below -

Here is a hypothetical example for clarification. NOTE - most bakers use weight instead of volume.

  • the starter has equal weights of water and flour. (100% hydration)
  • the ratio of the starter to flour is 1 to 1
  • the starter is mixed using 30 grams starter + 30 grams water + 30 grams flour (1:1:1)


Assume the 30g of mature starter has 30 yeast cells. (Not near accurate, but useful for this example) Their are thousands of yeast microbes in a few grams of starter.

  • The newly mixed starter weighs 90g and it contains 30 yeast cells.
  • If the starter isn’t allowed to mature, the 90g of under fermented starter will have less than 90 yeast cells because it didn’t mature.
  • If 30g of this starter is used for your next feed (refresh) it will not be as strong as your previous feed. Remember, the original starter had 30 yeast cells in 30g starter. It is getting weaker, not stronger.

Methods to keep your starter super active and refrigerated.


Once a Week Feeding
My starter was kept on the counter without refrigeration for a couple of years, but it does take a dedicated commitment. The great majority of bakers store their starter in the refrigerator to reduce feedings to a minimum.

The matured starter is stored in the fridge and is consistently feed every Monday morning. This way it remains very active. The starter can be used anytime during the week without refreshing to reactivate. A portion of the starter is used to make a levain in a single feeding straight out of the fridge. Some of the matured levain is placed back into the fridge to perpetuate the starter. The remaining week old (original starter) can be tossed or kept for a week as a backup.

Refrigerating your starter -
This has become my method of preparing the starter for refrigeration. It works for me and you may want to consider it.

  1. Refresh your stater and allow it to mature. It should rise to maximum height and just begin to recede
  2. Add a small amount of flour (maybe 10% or so) to the mature starter and thoroughly mix
  3. Refrigerate starter

The thoughts about the above process -

  • The extra flour provide additional feed while the starter is in retardation

  • The extra flour thickens the starter a little making it a little stronger (gluten wise) for the next feeding.

**********
Temperature 
This is so important it bares repeating...

Temperature should always be considered when dealing with dough fermentation of any kind. Whether talking about a starter, bulk fermentation, or final proof - the temperature is as important as any other aspect. An active starter can triple in 4 hours @ 82F, but that same starter might take 8 hours @ 60F.

Without knowledge of your room temperature we are unable to offer accurate assistance concerning any type of fermentation. Controlling or adapting to the fermentation temperature is one of the most important aspects of bread baking. I consider normal room temp to be 76-78F. Others may think differently.
**********

It is good practice to dry some of your active starter as a backup in case something happens to your current one. The dries starter will be good for years. Should your current starter die or become weak or corrupt you can easily and quickly restore it from your dried backup.

Other sources related to Starters and Levain -

Starters vs Levains

Levain Timings and Variables 


Danni3ll3's picture
Danni3ll3

Roasted Garlic, Sundried Tomatoes with Slate River Dairy Herb Cheese


Making this by request. Bulk method changed to my usual just to see how that affects the crumb. Original called for two sets of folds at 50 and 100 minutes with a 4 hour bulk in total. I also cut back the original hydration by 50 grams as I felt the dough didn’t need it. 


Levain:

63 g starter 

63 g water 

110 g unbleached flour 

15 g freshly milled Rye flour 


Dough:

750 g strong bakers unbleached flour

100 g freshly milled Kamut flour

100 g freshly milled Spelt flour

50 g freshly milled Rye flour

750 g filtered water

22 g pink Himalayan salt

30 g Slate River Dairy yogurt

250 g levain from above


Add-ins:

90 g Roasted Garlic 

85 g Sun dried tomatoes 

90 g Slate River Herb Cheese


Three nights before:

  1. Get your starter up to speed by feeding it two times. Once that night and once the next morning. Let rise at room temperature (70-73 F ) for 12 hours each.


Two nights before:

  1. Mix the starter with the water and then add the flours. Let ferment at room temperature for 12 hours. Refrigerate until the morning of making the dough. 


The night before:

  1. Mill and measure out your flours and set aside covered.
  2. Roast the garlic and mash. 
  3. Chop sun-dried tomatoes if needed. I got julienned so no need to chop. Set aside. 
  4. Grate Herb Cheese. 
  5. Refrigerate garlic and cheese. 


Dough making day:

  1. Remove the levain from the fridge to warm up to room temperature.
  2. Mix the flours and the water in a stand mixer and mix on low for one or two minutes until you have a shaggy dough and no dry flour. Let autolyse for a couple of hours.
  3. Remove add-ins from fridge to bring to room temperature. 
  4. Add the salt, the yogurt and the starter in chunks. Mix on low for 1 minute to mix the ingredients and then mix on the next speed up for 9 minutes to develop the gluten.
  5. Add the add-ins gradually and mix for a minute or two to distribute them throughout the dough.
  6. Remove the dough from the mixing bowl and place in a lightly oiled covered tub. Let rest 30 minutes in a warm spot (oven with light on). 
  7. Do 2 sets of stretches and folds at 30 minute intervals, and then 2 sets of sleepy ferret folds (coil folds) at 45 minute intervals. Then let the dough rise to about 40%. It should have irregular bubbles visible through the sides of the container and bubbles on top as well. 
  8. Tip the dough out on a bare counter, sprinkle the top with flour and divide into portions of ~780g. Round out the portions into rounds with a dough scraper and let rest 30 minutes on the counter. 
  9. Do a final shape by flouring the rounds and flipping the rounds over on a lightly floured counter. Gently stretch the dough out into a circle. Pull and fold the third of the dough closest to you over the middle. Pull the right side and fold over the middle and do the same to the left. Fold the top end to the center patting out any cavities. Finally stretch the two top corners and fold over each other in the middle. Roll the bottom of the dough away from you until the seam is underneath the dough. Cup your hands around the dough and pull towards you, doing this on all sides of the dough to round it off. Finally spin the dough to make as tight boule as you can.
  10. Place the dough seam side down in rice floured bannetons. Cover and let sit for 15 minutes, then refrigerate overnight. 


Baking Day:

  1. The next morning, heat the oven to 475 F with the Dutch ovens inside for 45 minutes to an hour. Turn out the dough seam side up onto a cornmeal sprinkled counter. Place rounds of parchment paper in the bottom of the pots, and carefully but quickly place the dough, seam side up, inside. 
  2. Cover the pots and bake the loaves at 450 F for 25 minutes, remove the lids, and bake for another 22 minutes at 425 F. Internal temperature should be 205 F or more.


I need to go back to baking after 10-12 hours of refrigeration. I’ve been lazy lately and ignoring the amount of time spent in the fridge for proofing but these turned out really nice! 


DanAyo's picture
DanAyo

Ear, Bloom, and Oven Spring - Skin Deep Beauty!

I plan to post time lapse videos as they become available in the hope that others will find value in them. The comments of others may bring more things to light as we contemplate together. It is hoped that the visual data may help build some sort of consensus. Your are urged to share your opinions. The videos may become repetitious, but they will be posted for those that are interested.

When viewing various bakes below, keep in mind that the doughs vary in formulas, from 100% white flour to a combination of white flour and whole grains and also highly seeded loaves. Keep that in mind, since the ear, bloom, and oven spring will be greatly affected by the make up of the dough.

When judging the crumb, it is useful to know that my goal is Lacy Honeycomb crumb. Big holes are not my jam. Once I am satisfied with the E, B, & OS, the focus will be towards the crumb. I’ve got a lot of work ahead for me.

For those that are interested in the baking aspect of bread, you would do well to study these 2 works by our own Doc.Dough. Doc’s video on slashing is second to none.
Debunking the Wives Tale about Steam
In-Oven Slash Dynamics Video

For the best possible view, use the text link above each video. Maximizing the video will provide more detail and at times, using the "Playback Speed" function to slow down the video is an extremely handy tool.

Debunking the Wives Tale about Steam
In-Oven Slash Dynamics Video

For the best possible view, use the text link above each video. Maximizing the video will provide more detail and at times, using the "Playback Speed" function to slow down the video is an extremely handy tool.

Video # 11-19-19
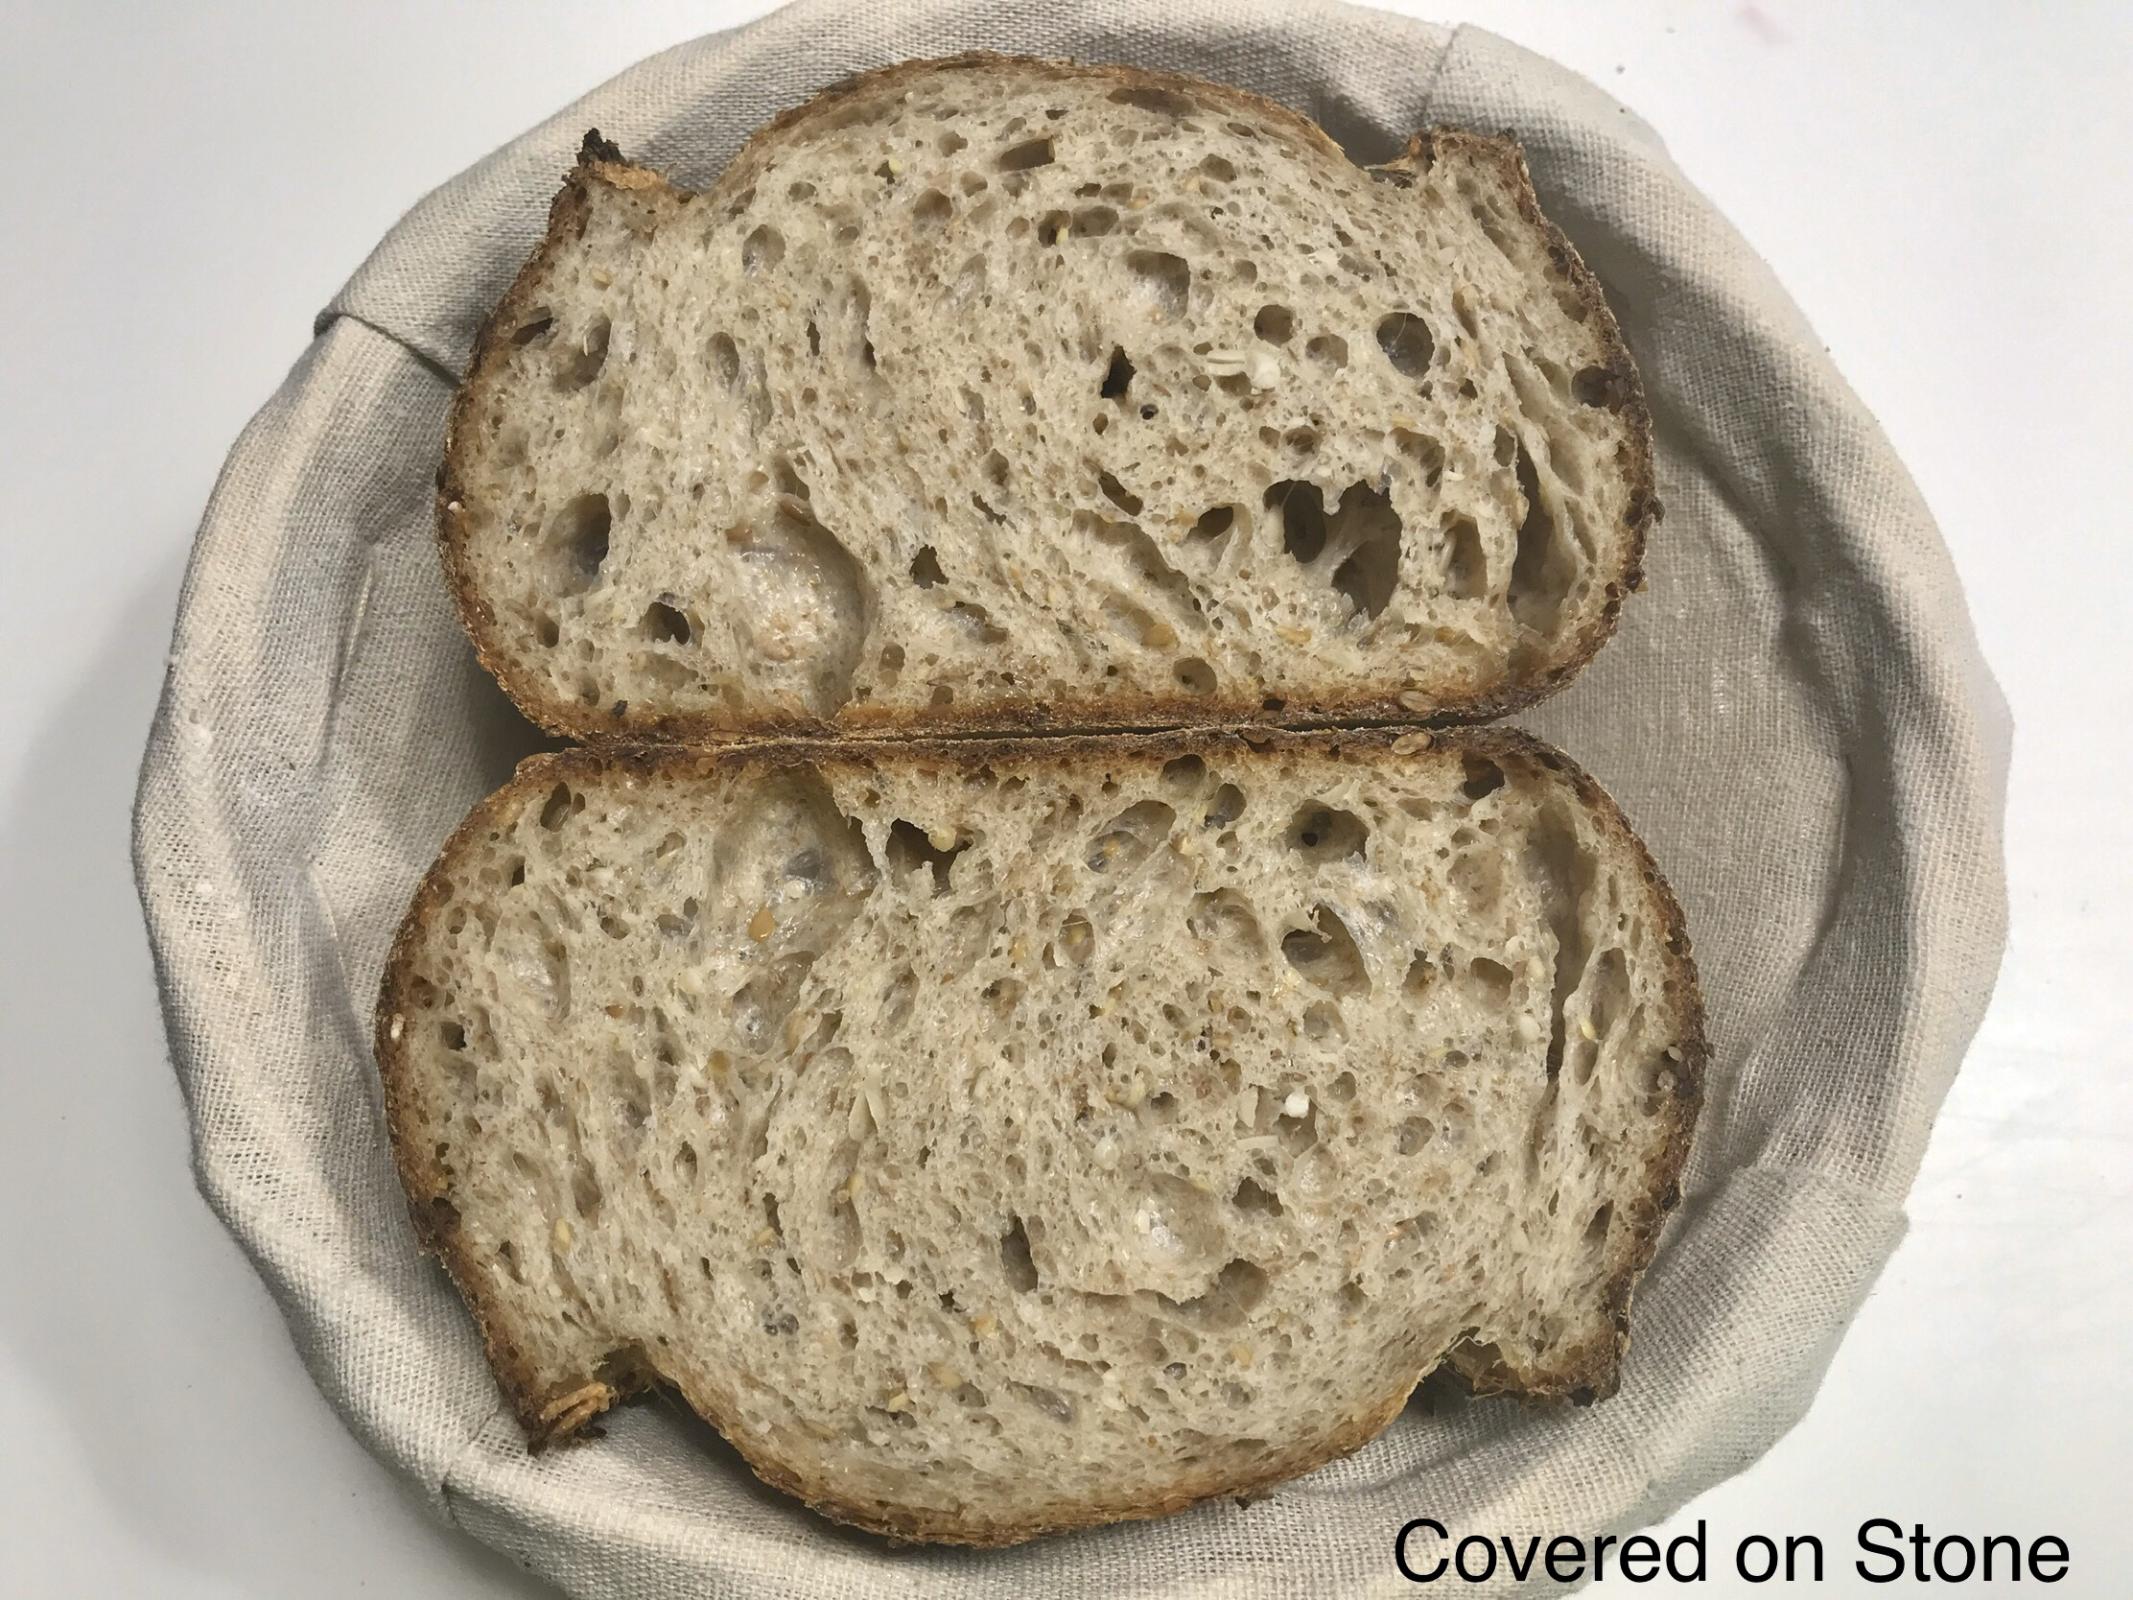
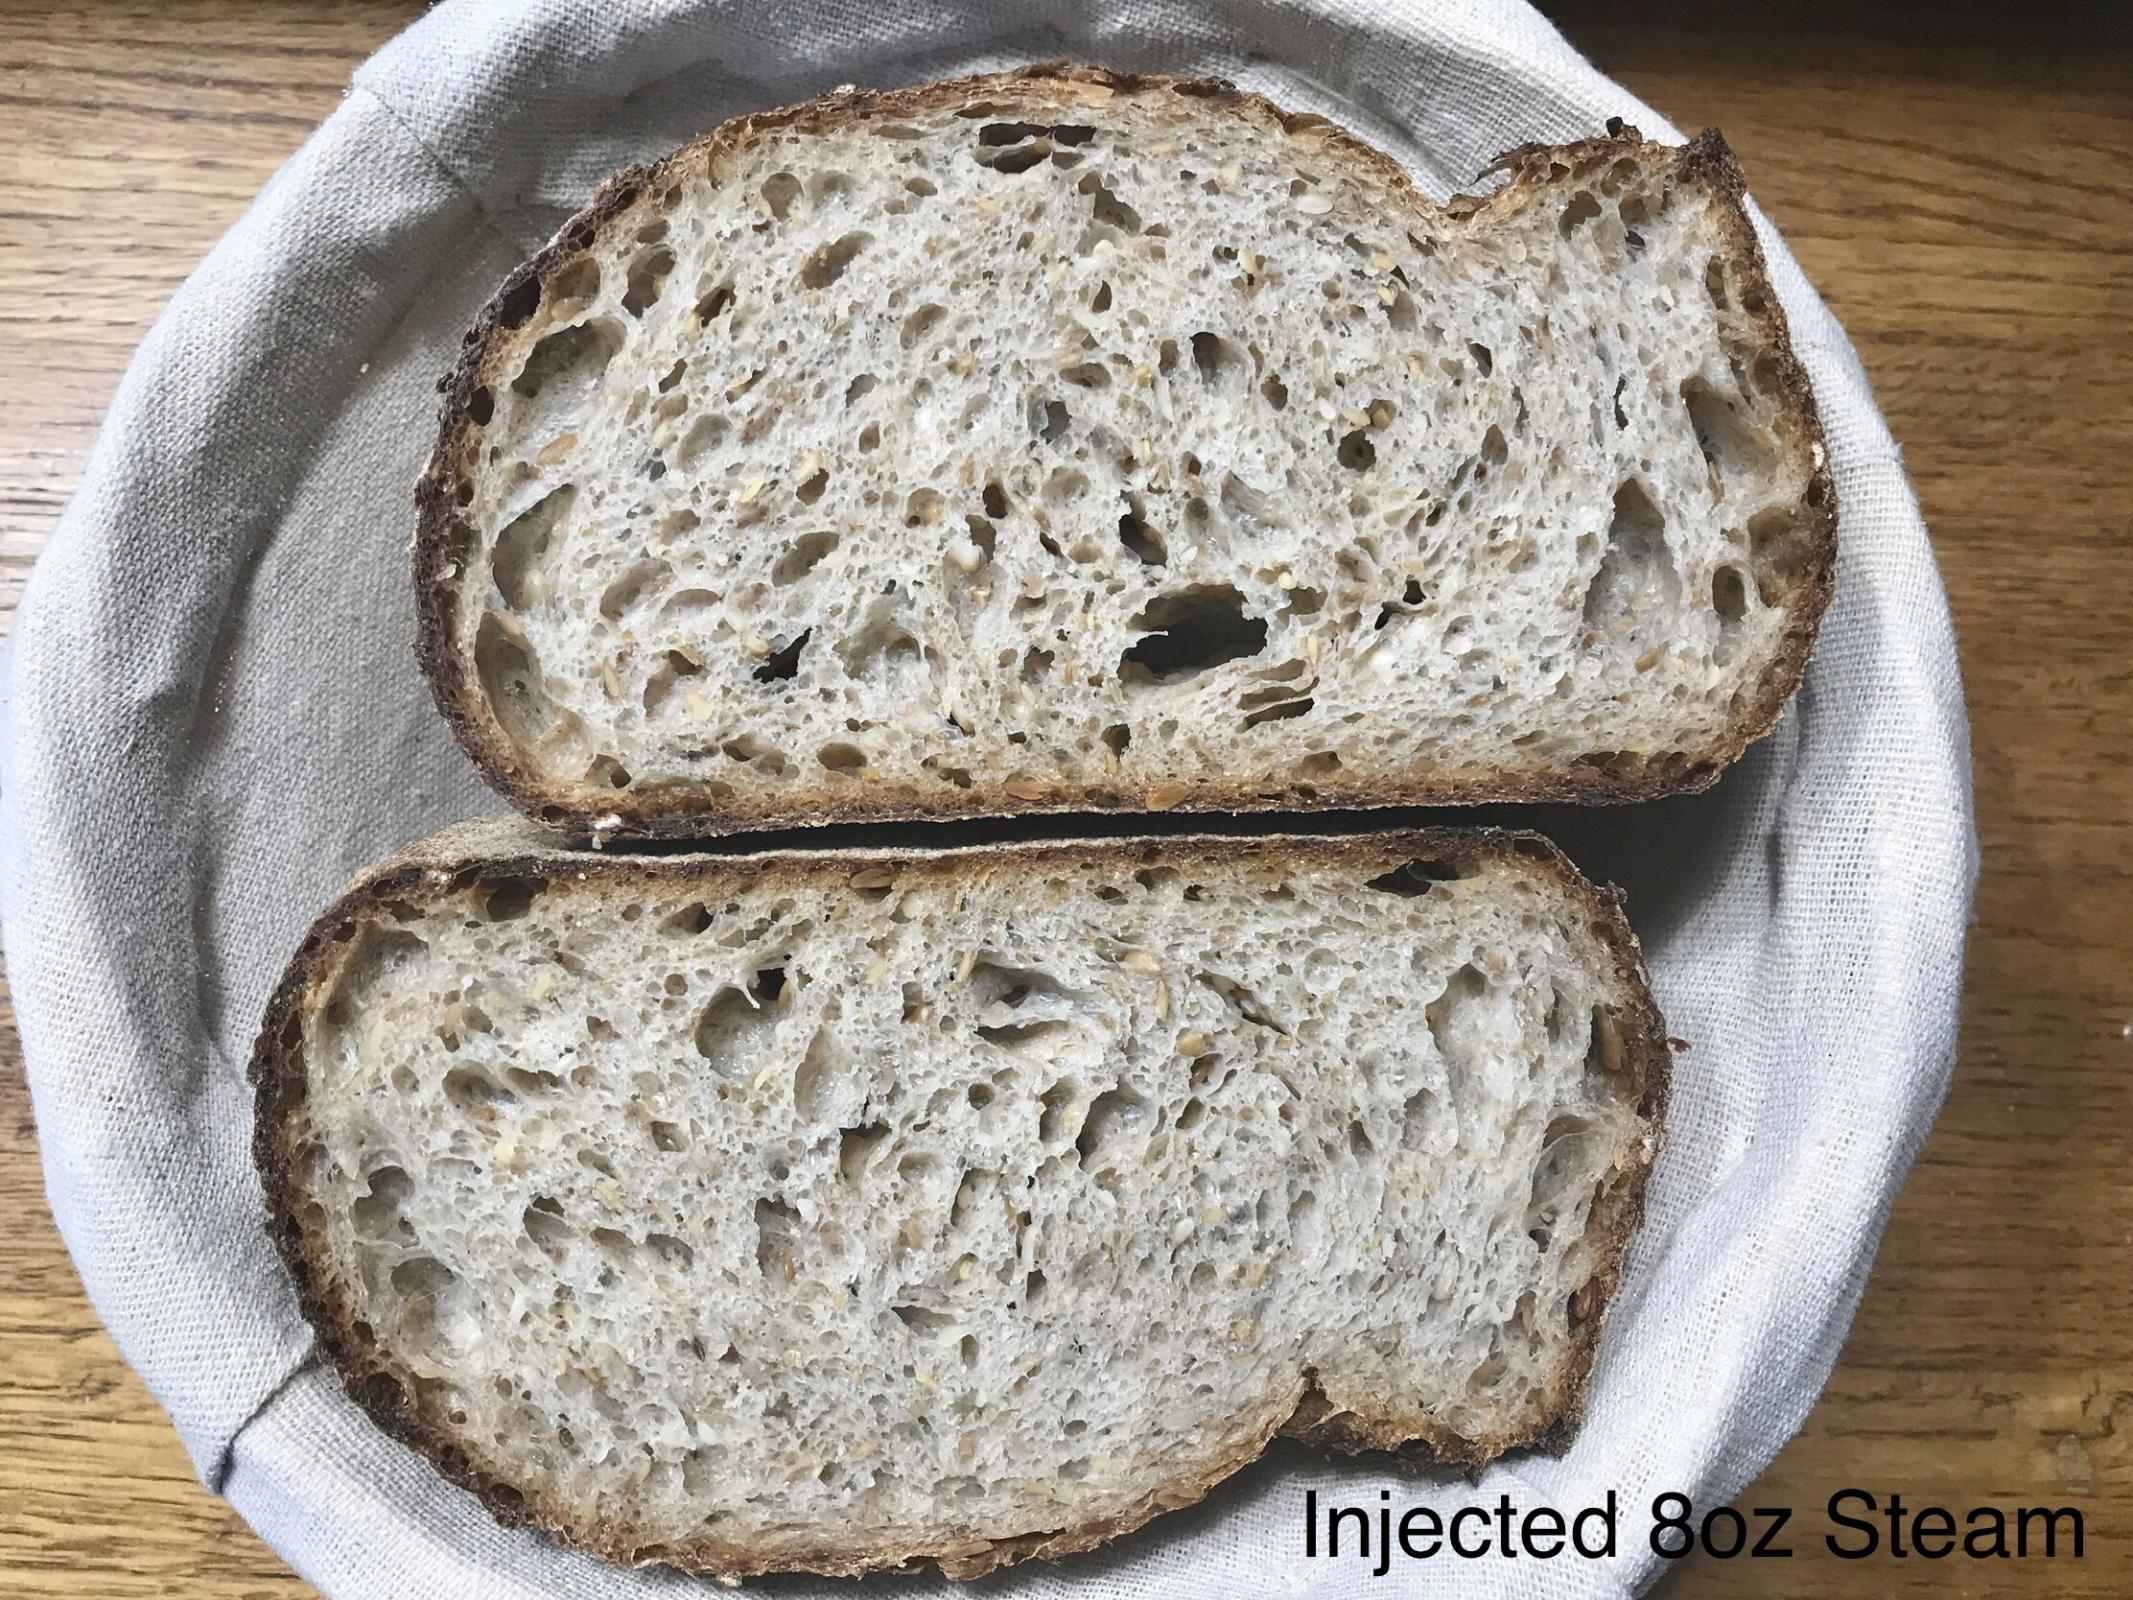
Comparing 2 doughs baked on the same stone at the same time. One covered with no additional steam and the other, 90 seconds of externally injected steam.

For a better viewing experience use this link.

These breads are Hamelman’s Five-Grain Levain. The formula calls for ~34% seed and cracked grain soaker. A dough with large percentages of add ins like this will challenge the strength of the gluten.


Video # 11-10-19
What happens when things go wrong? Why do ears sometimes "glue down" on the bread crust?
For a better viewing experience use this link.

I would imagine that at one time or another, all bakers scratch their heads, asking the same question. "Why did the ear(s) not rise, but "glued down" to the loaf?


Video # 11-05-19
For a better viewing experience use this link.

This bake turned out fair, but I was hoping for a larger ear, and more oven spring. I am not sure what prevented my expectations. I didn't think the dough was over proofed but that may provide the best explanation.


Video # 11-01-19
For a better viewing experience use this link.


Video # 10-29-19
For a better viewing experience use this link.


The size of each crumb shot can be misleading. The zoom affects the appearance of size.


Video # 10-25-19
For a better viewing experience use this link.


Danny

e: 0.9em;">Video # 11-19-19
Comparing 2 doughs baked on the same stone at the same time. One covered with no additional steam and the other, 90 seconds of externally injected steam.
For a better viewing experience use this link.


Video # 11-10-19
What happens when things go wrong? Why do ears sometimes "glue down" on the bread crust?
For a better viewing experience use this link.

I would imagine that at one time or another, all bakers scratch their heads, asking the same question. "Why did the ear(s) not rise, but "glued down" to the loaf?


Video # 11-05-19
For a better viewing experience use this link.

This bake turned out fair, but I was hoping for a larger ear, and more oven spring. I am not sure what prevented my expectations. I didn't think the dough was over proofed but that may provide the best explanation.


Video # 11-01-19
For a better viewing experience use this link.


Video # 10-29-19
For a better viewing experience use this link.


The size of each crumb shot can be misleading. The zoom affects the appearance of size.


Video # 10-25-19
For a better viewing experience use this link.


Danny

DanAyo's picture
DanAyo

Community Bake - Maurizio's Oat Porridge Sourdough

The Community Bake (CB) is featuring Maurizio's Oat Porridge SD. The bread is considered special because of the Oat Porridge. Both the soft texture and taste reflects the Oats in fabulous way. The bread is moist and keeps for a long time.

For those not familiar with our Community Bakes see THIS LINK. The idea of a Community Bake is for those interested learning and baking as a group. Be sure to post the results. This way we can all learn together. This is not a bread baking competition, everyone wins! All bakers with any skill level are welcomed to join the bake.

Here is the link to Maurizio's bread formula and instructions. They are very detailed and easily followed.
https://www.theperfectloaf.com/oat-porridge-sourdough/

I have included a screen grab of my spreadsheet. The total dough weight is set to 1000 grams. For those that choose a single loaf, you can use the screen shot to calculate any size loaf you wish. Example, you want to bake a 700 gram loaf. Simply multiple each ingredient by .70 to find the proper weight. You could easily do a 500 gram loaf by dividing everything in half.

We especially welcome new bakers. This is a learning the sharing opportunity for all.

If anyone is interested in the excel spreadsheet, send me your email address via Personal Message.

The following are links to Past Community Bakes

Danny

Maurizio has agree to answer questions concerning his Oat Porridge SD...

In order to consolidate these questions and/or comments they should be submitted to me (DanAyo) via PM. This way all questions will be consolidated (within this post), if necessary condensed, and duplicates culled. We value his time and know he is a busy guy. Please do not reply to this post with questions for Maurizio. Use my Personal Message (PM) instead. There is a reason to the madness...


 1.    Maurizio, have you experimented with lower hydrations? If so, what effect does less water have on the dough?

 As many have discovered with a porridge-style recipe, when the hydration is too high in the dough it can quickly lead to a soupy, slack mess. When I developed this recipe I started out at too high of a hydration and quickly discovered it needed to reduce the water in the dough to accommodate the porridge added later. I never took the hydration much below what my recipes states now because I really did find the sweet spot with the flour used, but you could certainly reduce the water in the dough if desired. I’d expect more rise because there would be more strength in the dough, but I would also expect a less tender/soft result, even with the porridge.  I think reducing the hydration in this recipe would be similar to any dough except that the porridge itself brings a lot of moisture to the end result, this means you could get away with a lower hydration dough expecting the porridge to bring more of it at a later time.
2.   Maurizio, it seems that a common issue with your Oat Porridge bread is the sticky, slack consistency of the dough. Please describe how oats affect the dough and what can be done to produce a dough with more strength? This is somewhat related to the hydration question above, and I see a few things one could do to strengthen the dough: 1) lower the hydration of the dough, 2) use a higher percentage of stronger, high protein flour, 3) reduce the porridge percentage, and 4) mix/knead longer. All of these will bring strength to the dough and give you more rise, perhaps a combination of each of these, in small amounts, could lead to a stronger dough overall without any negative side effect of pushing one of them too far. For example, you could decrease the hydration in the dough by 2%, increase percentage of high protein flour by 5% to 75% (while decreasing the whole wheat flour), decrease porridge by a small amount (or not), and mix/knead until the dough is much stronger or give it another set or two of stretch and folds during bulk.  I find the oats hold on to quite a bit of water when they’re cooked, this water seems to get released in the dough during bulk fermentation as the dough mass ferments further. That’s one of the challenges with these types of breads: it’s hard to predict how the dough will turn out during bulk fermentation when the porridge breaks down and fermentation plays its part.

3.   I was wondering about how he would recommend to bake this in Rofco. Same temp as for the dutch oven? I preheat at 260C and then turn down to 200 as othewise scores can glaze over too quickly or burn the oats... I was in general wondering whether stickiness has to do with not baking long or hard enough? I hope this makes sense? What I typically do is preheat at 250°C for 1.5 hours. Then I load the dough, steam, and turn the Rofco down to 170-180°C for 20 minutes. This essentially turns the heating elements off, this way the top of the dough doesn’t harden too fast and it allows the dough to expand maximally. After that 20 minutes, I turn the oven back up to 220°C for 10 minutes to give the crust some color (the heating elements will have kicked back on). After that, I turn the oven down to 150°C and finish baking, usually 10-20 mins depending on the bread. Essentially I’m toggling the heating elements on/off to give color and bake the exterior, the thick masonry stones should be plenty hot by this time and will continue to bake the loaves in an ambient way to ensure they’re baked through. If you don’t bake this bread out fully you will definitely have a gummy/dense interior. This can also be a sign of under proofed dough and/or chucks of oats not fully incorporated throughout.


SusanMcKennaGrant's picture
SusanMcKennaGrant

Focaccia Barese


 FOCACCIA BARESE

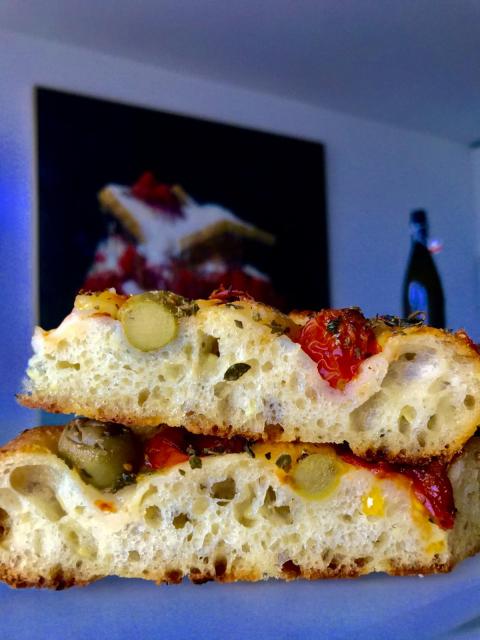
Lately I’ve been obsessing over focaccia. Its one of those deceptive breads and its not until you taste an excellent one that you understand there is so much more to focaccia than meets the eye. So much that in Italy these breads are rarely made at home, generally focaccia is left to the professionals who have not just the know how but access to the best ingredients and really hot ovens. Focaccia takes patience, the best flour and absolutely the very best EVOO you can afford. It  is an enriched dough after all, and it is the olive oil that makes all the difference. So use the good stuff and don’t be stingy!  Click on any image to begin the slide show. 

the toppingsyour slicethe crumbhard to resist!out of the oventhe dough

When it comes to Italian focaccia it is generally accepted there are two kinds worth knowing about. One from the north (Liguria), Focaccia Classica di Genova and the other from the south (Puglia), Focaccia Barese. I included a recipe for the Genovese version in my first book, Piano, Piano, Piano for any of you who might happen to have a copy of that book.

Focaccia Barese is made in and around the city of Bari in the region of Puglia. The authentic version uses lievito madre(sourdough) and is made with a combination of Tipo “0” and the semolata di grano rimacinata flour milled from sun kissed durum wheat grown in Puglia. The starter is a stiff one and should be refreshed 4 hours before being used. I used 100 grams of liquid levain,  100 grams of semolina flour and 50 grams water for that refreshment. The curious addition of boiled rice potato to the dough gives it an intriguing flavour and also enhances the shelf life. This focaccia keeps nicely for 2 or 3 days. The formula I used is the most official one I could find, from the facebook page of the Consorzio della Focaccia Barese. It makes two 32 cm (12 inch) round focacce but of course you could modify that to fit whatever baking pans you have.

  FOR THE DOUGH
  1. 200 grams stiff levain
  2. 300 grams tipo 0 Italian flour
  3. 200 grams semola di grano rimacinata
  4. 100 grams potato, boiled or steamed then riced or mashed and cooled
  5. 350 ml water
  6. 10 grams salt
  7. 50 grams EVOO
FOR THE TOPPING
  1. cherry tomatoes
  2. olives
  3. oregano, more olive oil and salt
INSTRUCTIONS
  1. The dough is mixed, divided in two, rounded and left to ferment at room temperature for 8 to 12 hours on a well oiled tray. Most of this oil will be absorbed by the dough during the fermentation period. Spread more oil over the top of the dough and cover with plastic wrap. After the dough has finished the fermentation generously oil 2-32 cm (12 inch)  round baking pans and transfer the dough to the pans. Press the dough out to the edges of the pans using the tips of the fingers of both hands. Crush the cherry tomatoes in your hands over the dough and spread them evenly, place the olives and sprinkle the oregano oven the dough before drizzling more olive oil and sprinkling more salt. The dough is not given a final proof, it goes straight into the oven once it is shaped.
  2. Bake at 270 C or 550 F for 25 minutes.
  3. When it is finished baking and still hot brush it with even more EVOO!!
NOTES
  1. you can retard half the dough to bake later for up to two daysretarded and baked the next day
Adapted from  Consorzio Focaccia Barese  Susan McKenna Grant https://www.susanmckennagrant.com/Serves 12


mwilson's picture
mwilson

Xmas Panettone (Massari)

Massari Dissapore    
     
Flour80.0%400168240
Natural Yeast20.0%1004260
Water28.0%14058.884
Sugar24.0%12050.472
Egg Yolks24.0%12050.472
Butter20.0%1004260
 
Flour20.0%1004260
Sugar20.0%1004260
Honey5.0%2510.515
Salt1.6%83.364.8
Egg Yolks26.0%13054.678
Butter30.0%1506390
Water14.0%7029.442
Vanilla0.5%2.51.051.5
Orange Zest0.5%2.51.051.5
Lemon Zest0.5%2.51.051.5
Sultanas40.0%20084120
Candied Orange30.0%1506390
Candied Citron10.0%502130
 394.1%1970.5827.611182.3


Woke up Christmas day to find a very active primo impasto.

Illustrated recipe: https://www.dissapore.com/ricette/panettone-iginio-massari/

Merry Christmas everyone

-Michael

Isand66's picture
Isand66

Porridge Maple Rye Rice Bread

  If you have been following my blog posts you know by now that I love a good porridge bread.  This one is no exception.

The addition of the coffee flavored maple syrup to the porridge and main dough added a nice slightly sweet undertone.  You don't really taste the coffee but overall combined with the rice this one is a keeper.

The crumb came out perfect; moist, soft and open.  This is one that is good enough to eat by itself.  I finished off the whole loaf using it for sandwiches and gave one away to a few of my dog park friends.

Here are the Zip files for the above BreadStorm files.

Levain Directions

Mix all the levain ingredients together  for about 1 minute and cover with plastic wrap.  Let it sit at room temperature for around 7-8 hours or until the starter has doubled.  I used my proofer set at 83 degrees and it took about 4 hours.   You can use it immediately in the final dough or let it sit in your refrigerator overnight.

Porridge Directions

Add about 3/4's of the milk called for in the porridge to the dry ingredients in a small pot set to low and stir constantly until all the milk is absorbed.  Add the remainder of the milk and keep stirring until you have a nice creamy and soft porridge.  Remove from the heat and let it come to room temperature before adding to the dough.  I put mine in the refrigerator and let it cool quicker.

 Main Dough Procedure

Mix the flours  and the water for about 1 minute.  Let the rough dough sit for about 20 minutes to an hour.  Next add the levain, cooled porridge, rice, maple syrup and salt and mix on low for 5 minutes.   Remove the dough from your bowl and place it in a lightly oiled bowl or work surface and do several stretch and folds.  Let it rest covered for 10-15 minutes and then do another stretch and fold.  Let it rest another 10-15 minutes and do one additional stretch and fold.  After a total of 2 hours place your covered bowl in the refrigerator and let it rest for 12 to 24 hours.  (Since I used my proofer I only let the dough sit out for 1.5 hours before refrigerating).

When you are ready to bake remove the bowl from the refrigerator and let it set out at room temperature still covered for 1.5 to 2 hours.  Remove the dough and shape as desired.

The dough will take 1.5 to 2 hours depending on your room temperature and will only rise about 1/3 it's size at most.  Let the dough dictate when it is read to bake not the clock.

Around 45 minutes before ready to bake, pre-heat your oven to 550 degrees F. and prepare it for steam.  I have a heavy-duty baking pan on the bottom rack of my oven with 1 baking stone on above the pan and one on the top shelf.  I pour 1 cup of boiling water in the pan right after I place the dough in the oven.

Right before you are ready to put them in the oven, score as desired and then add 1 cup of boiling water to your steam pan or follow your own steam procedure.

After 5 minute lower the temperature to 450 degrees.  Bake for 35-50 minutes until the crust is nice and brown and the internal temperature of the bread is 205 degrees.

Take the bread out of the oven when done and let it cool on a bakers rack before for at least 2 hours before eating.

DanAyo's picture
DanAyo

Community Bake - Maurizio's SD Baguettes - Everyone is Welcome

We are baking Maurizio's Sourdough Baguettes. I am in the process of baking these baguettes for the third time. After test baking, I can say that the instructions and also the flavor of this bread is very good.

Since most bakers are separated by many miles and even different countries, this “community bake” may be the best way to share information and learn together along the way. The idea, for those who want to participate, is that we document our progress with pictures and post. It is suggested that each participant start a new comment to document their progress. As more information and images are available for your bake you can edit that post and append it. We’ll share our success, and just as informative, our failures. During the process we can ask questions, compare results, or offer suggestions. Both expert and novice have a place here.

We plan to start our bake today. We will be following Maurizio's well documented instructions. They can be found here. https://www.theperfectloaf.com/sourdough-baguettes/

I hope you choose to join in. The more the merrier. Even if you don’t come aboard now you can still post your bake and results at any time in the future. All threads are constantly monitored for recent activity. Be sure, someone will be available to assist you.

Here is a screen grab of the downloadable spreadsheet.

Dan
It is good to remember, "we learn more from our failures than we do from success".
   
Post it all. The good, the bad, and (if you dare) the ugly. 

Pages