The Fresh Loaf

A Community of Amateur Bakers and Artisan Bread Enthusiasts.

Most bookmarked

Janedo's picture
Janedo

The baguette and the story of French flours

Anyone who knows me from back when, knows that one of my goals as a home baker in France was to make a great baguette. I went through a series of trials and found that the technique used by Anis Bouabsa gave great results. French bakery baguettes, much like the photos you can see in Calvel's book, are pretty much basic French baguettes and in my opnion, not that fabulous. The BEST baguette in France is either called baguette "Tradition" or a house name, such as Baguette "Catalane". The baguettes respect strict rules about their production, made only with high quality T65 without additives (unauthorized ones) and at least part of the process must be hand done (usually the shaping and oven loading). They often have sourdough in it but spiked with yeast and if there is no sourdough, the dough has probably gone through a longer fermentation period to help develop flavour and a better crumb. Not all bakeries offer this type of baguette because it is more expensive to produce and therefore more expensive to buy, usually turning around 1,05€ vs ,75€ for a regular one or even less in a supermarket. In some areas, French people don't want to spend the money and so the baker just doesn't bother with them. In general they have a more rustic appearance, either pointy ends or sometimes squared off ends, not always slashed as a usual baguette but something more creative. These are the only baguettes I find edible in France.

Now, about flour. There has been a LOT of discussion in this forum regarding French flour and the famous T55. How to get the same result in the States. Well, first of all, there are two types of flour in France... regular people flour and baker's flour. I have always used organic, stone ground flour. This provides inscredible taste but it is hard to get light, great oven springed bread. My baguettes are always on the squashed side even if the crumb is open. I prefer to eat mostly organic foods and so I didn't really look in to other options.

But as an avid home baker, I have "professional" curiosity and so I went about testing baker's flour. Now, you have to know that baker's flour is another ball game. There are a number of different millers to choose from and each bakery has the choice of either being fully independant or affiliated with a flour company (like Baguépi, Banette, etc) The bakery get's advantages when they have a contract wiht one of these companies through free training, loans for starting up a bakery, free packaging, etc. I have had the opportunity to bake with these flours and some are good and others not. I have made a decent baguette with Baguépi but I injected it with sourdough and put it through a cold retarding.

These baker's flours have some common ingredients: Wheat flour, malted wheat flour, sometimes malted barley flour, gluten, fungal amylases, ascorbic acid.

I have seen a T65 baguette flour with additions of corn flour to make the flour more cream colored!!!!

So, I have been playing around with this flour...but a special type called T55 gruau which gives the qualities of a whiter flour but has much more gluten in it... probably around 11-11,5% (I  have to check but don't have the bag because I bought it from a baker). This isn't a flour you can buy at the store and it is hard to find on the internet. Bakers have easier access and much better prices on raw materials. I payed ,74€/kilo! Not bad for a specialty flour!

I have made bagels and some other simple breads to get a feel of the flour. The I made some baguettes using Steve's double flour additon technique where the poolish (in this case sourdough starter at about 100% hydration) and only a bit of the flour and water are combined and then whipped for a minute or so. You can see his ciabatta recipe here Steve's Ciabatta. I made a dough with a 250g starter for 600g flour at 73% hydration. I then added the rest of the flour and water, did an autolyse of 20 min. Added the salt and then kneaded with a Kenwood at 2-3 for about 10 min. The dough was AMAZING! It looked alive, was silky with perfect gluten development. I let it rise about 2hrs, then did a preshaping but not too tight. Then shaped the baguettes. The dough was elastic but easy to roll out. They rose very nicely, keeping their shape. I was scared they were over-proofed as I was outside playing with the kids and sort of forgot them, but in the oven they got good oven spring. I waited til they were cool to cut (hard to do, but I managed!) I could feel the air pockets in them. Here's the result:
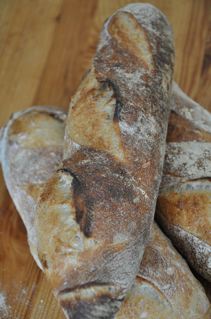
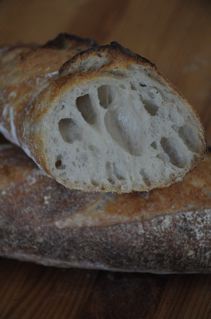
I bake my baguettes dark on purpose, I think the crust has better taste and crunch. Baguette tradition has a slightly thicker crust and a crumb with more chew to it. I don't like cottony baguettes.

Anyway, I hope that maybe we can clear up some stuff about what that famous French T55 or 65 is all about. I do think you can make great baguettes in the States without having to have our flours over here. A very good quality flour that is around 11% protein (maybe with some added malt) should do the trick, which I assume is the case since there are some bakeries making great baguettes over there. The way they are baked counts, too. They need to be on a hot stone or four à sol. The ones baked on racks just aren't as good.

I had to type this out fast, it's Wednesday over here... kid day. So excuse the style. Just wanted to share with you!

Jane

erg720's picture
erg720

Altus & formula

Hi guys.

Does anybody know how do we build formula that have an altus (left over bread)?

I mean, is this is part of the flour/the water or what? 

Thanks, Ron.

DonD's picture
DonD

Croissants & Pains au Chocolat

Does the taste of a favorite food evoke in you indelible memories of time and places where the pleasure it has given you has put a mark on you for life?

For me, a bite into a buttery and flaky croissant and my taste memory takes me back to my childhood in Saigon where every morning, I would look forward to the familiar sound of the horn announcing the arrival of the "Bread Man" riding on his scooter with twin canvas trunks full of goodies straddling the rear seat to deliver fresh baguettes and croissants to the neighborhood houses.

The sweet smell of baking croissants always reminds me of the time when I was a student in Geneva, walking by a bakery at 6:00 am, suddenly being overwhelmed by the tantalizing aroma of freshly baked croissants, summoning enough nerve to knock on the door to convince the owner to sell me a couple before the store was open and walking home in the snowy winter dawn, enjoying the best croissants I ever had in my life.

A croissant with cafe au lait for breakfast always transports me back to my first visit to Paris in the spring, sitting at a sidewalk table at the Cafe "La Rotonde" in the Montparnasse area, sipping a cafe creme and eating a croissant with confiture, watching the morning bustle and hustle of Parisian life just like Hemingway, Picasso, Nijinsky, Gershwin and other luminaries had done at the same spot so many years ago.

I have been baking Croissants and Pains au Chocolat on and off for over 20 years and until recently, my favorite recipe was from Jacques Pepin's "The Art of Cooking". It is a foolproof recipe where you can follow the instructions verbatim and end up with great results.

Last year I discovered the Esther McManus recipe from the PBS "Baking with Julia" TV Series. I have tried this recipe about half a dozen times, tweaking it along the way to suit my taste and baking techniques. It has become my favorite recipe as I find that it comes closest to the Croissants and Pains au Lait that you can only find in Europe.

This past weekend, I made a batch of Croissants and Pain au Chocolat and following are my notes and recommendations:

1- I basically followed the step by step instructions in the video which are excellent. The link is www.pbs.org/juliachild/meet/mcmanus.html

2- It is not mandatory to have the companion book " Baking with Julia" but it is nice to have as a back-up.

3- I use pretty much the same formulation except for the following variations:

    A- I use 1 1/4 cup of milk. I find the little extra milk makes the dough more pliable and easier to work with.

    B- I use 2 1/2 tsp Instant Yeast. I converted the amount into Instant Yeast because I prefer it over Cake or Dry Yeast.

    C- I use only 3-1/2 sticks of butter. More butter would only leak out during baking. I have tried different unsalted butters including imported "Le President", "Plugra"European Style and found that old "Land o' Lakes" works just as well.

    D- I use two 3 inch long "Valrhona" Chocolate Batons for each Pain of Chocolat. I splurge on a box of 350 pieces and they are disappearing fast as they are good to snack on as well.

4- I do not put a hot water pan in the turned off oven while proofing as recommended. I found out the hard way that it melts the butter in the dough.

5- I bake the Croissants in a preheated 425 degrees F oven with steam for 5 mins , then without steam at 400 degrees for 5 more mins and  finally at 375 degrees for 5 mins. I find it gives me better oven spring and a flakier crust than a longer bake with dry heat at 350 degrees.

6- The recipe should yield a dozen each Croissants and Pains au Chocolat.

Dough cut into triangles with a Croissant Cutter, not an essential tool but a nice gadget.

Shaped, proofed and egg washed Croissants ready for the oven.

Baked Croissants cooling on the rack.

The ultimate Continental Breakfast with Croissant and Pain au Chocolat

The mandatory crumb shot.

Happy Baking!

Don

venkitac's picture
venkitac

Does sifting whole wheat flour produce the equivalent of high extraction flour, with wheat germ?

As I understand it, high extraction flour has around 10% bran, and all the germ. I want to try using this, but it's unavailable in all nearby stores, and shipping 10 pounds of flour from wherever seems like a bad idea. I decided to sift whole wheat flour and use that instead. I have KA organic whole wheat and Bob's RM organic whole wheat flours at home. I sifted the KA, which seems like a coarser grind, and weighed the flour: about 11% of the whole wheat flour was removed in sifting. With BRM, which seems like a finer grind, about 7% of the flour was removed in sifting. I'm going to bake with the sifted BRM tomorrow. Question is, does sifting remove only the bran, or does it remove the germ too? If it removes only the bran, sifting whole wheat at home seems like a good idea to approximate high extraction flour..

Mini Oven's picture
Mini Oven

Starter Terminology

I know this seems a little late but I think we could all benefit if we define these terms in order to remove any confusion surrounding them.

What is a:

  • new starter
  • young starter
  • active starter
  • fresh starter
  • old starter
  • mature starter
  • ripe starter


Thanks for participating. 

Oct 31, 2009  Changed title of thread so it is more easily located using the site search machine.  I may turn this into a FAQ or anyone wanting to make a FAQ should feel free to use the information.

aryaya's picture
aryaya

1:2:2 vs 1:3:4 feeding

I am trying to figure out the differences/benefits of these feeding ratios. I see some people just say 'double it' / 1:2:2, while others say to go with a 1:3:4. I was told to do the latter, and thats how I'm feeding my little sourdough starter right now (2 tbs starter, 1/2 cup flour, a little less than 1/2 cup water)... but I'm so curious why some recommend one over the other? What is the difference????

Thanks for any input!!

foolishpoolish's picture
foolishpoolish

Rye Amylase

I have been learning about the practice of pre-gelatinization (scalding) of rye in the preparation of high-percentage rye breads.  One thing confuses me, however, with regards to the intended effect this has on the final dough. As I understand it, pre-gelatinization is a process typically used to make starches, in a given grain, MORE accessible to amylase (for example in brewing) In a wheat flour & water mixture the amylase starts to denature at temperatures above about 150Fl. In brewing (where diastatic malt is ADDED) careful control of this temperature during the mash can determine the ratio of alpha to beta amylase and thus fermentable vs. unfermentable sugars (for brewer's yeast). 

However in the case of rye, I understand that rye amylase is more heat-stable. I would think gelatinization is precisely the OPPOSITE of what one should be striving for  since the integrity of the pentosans in the rye is the major factor in preserving structure and preventing gumminess. Making them MORE vulnerable to amylase, earlier on in the 'production' process should surely be avoided? While the acidity of the rye sour should control the effects of amylase somewhat, one is still left with the question as to why scalding is done at all? A sweeter end result perhaps? 

All of which leads me to think that scalding the rye, in order to be effective, must be carried out at a fairly high temperature in order to denature the rye amylase...but what temperature might that be?  What proportion of the total rye flour (say in a 100% rye bread) should/could be scalded? Are there additional benefits from scalding rye that I am missing here?

If anyone has knowledge in this area, I'd be most appreciative of your input.

Thanks

FP

Baking

For breads that contain butter and sweeteners, I usually bake them at 350 degrees F for about 55 minutes to an hour for loaves, and 25 to 30 minutes for rolls.

For “lean” breads, which contain only the basic four ingredients, I bake them at 450 degrees F. Baguettes and rolls bake for about 20 – 25 minutes, while most other loaves bake for 35 to 45 minutes.

An instant read thermometer is a big help in telling when a loaf is done. Stick the thermometer into the bottom of the loaf and push until the tip is in the center of the bread. Breads with butter and sweeteners are done at about 195 degrees F, while lean loaves should be at about 205 degrees F.

For lean breads that are freeform (i.e. not panned), I like to use a baking stone to get better volume and a crisper crust, though you don’t need one – a greased cookie sheet will work just fine. If you use a stone, it needs to pre-heat for at least 45 minutes before baking. When you place the dough on the hot stone, it absorbs a lot of heat very quickly, causing it to spring beautifully in the oven.

You can purchase these at most cooking stores or online for anywhere from $30 to $70, depending on the size and thickness. Mine is one-half inch thick and measures 14.5” by 16”. It’s plenty big enough and works great.

If you’re feeling frugal, many people I know prefer to use unglazed quarry tiles, which can sometimes be had from home supply stores for much less than a baking stone. I haven’t used them, myself, though.

To get the bread onto the stone, either use a baker’s peel or the back of a cookie sheet that has been well dusted with cornmeal or semolina flour. Then, slide the bread off its back and onto the stone with a quick jerk.

Steaming: A crackling, crunchy crust requires more than just a hot oven. It also needs steam, and that’s not easy to do in a home oven. But it can be done. Here are a couple of methods:

•    The Cast Iron Pan Method: Under the stone, even on the bottom of the oven, if you like, place a cast iron pan and let it heat up along with the stone. Not one you like to use day-to-day, because this process will rip the seasoning right off.

Just before you put the bread in the oven, boil some water. Get a towel and, after you open the oven door, cover the glass of the oven door with the towel. This will prevent water droplets from hitting the hot glass and shattering it (ask me how I know.) You may also want to shield the front of the pan with aluminum foil so that droplets don’t jump out of the pan onto the glass and crack it (again, ask me how I know).

Load the bread and dump one cup of boiling water in the pan. WEAR MITTS WHEN YOU DO THIS. Close the oven door, and let it bake. About halfway through the bake, remove the pan so that the bread can finish in a dry oven.

•    Covered Cooker Method: In this method, do not use a baking stone. Instead, place a cast-iron Dutch oven (enameled and non-enameled both work fine) or a clay cloche (Sassafras makes a good one – you can find them at Amazon or King Arthur Flour for about $50) in the oven and let it heat up for 45 minutes. Pull out the oven rack, take off the lid, plop your bread into the bottom, score it quickly and replace the top and the rack.

About 15 to 20 minutes before the bake is done, remove the top so that the bread can finish in a dry oven.

The covered cooker captures the steam given off by the dough, and so mimics a wood-fired brick oven. Unfortunately, this method only works for round loaves (though Sassafras also makes a 14 1/2 x 5 1/8 inch clay cooker which works for batards).

Breads should cool for about an hour on a rack (or something else that will allow air to circulate underneath) before slicing.

Sourdough

Before the 19th century, sourdough was really the only leavening available (unless you’re talking about salt rising bread, which uses bacteria alone – a leavening with which this book does not deal). Sourdough is really not that hard to work with – as some Internet sage once wrote, “People who thought the earth was flat made bread like this for thousands of years.”

First, what is this stuff? Sourdough starter is a stable symbiotic culture of wild yeasts and bacteria. The yeasts break down starches into sugars, which the bacteria eat. The bacteria, on the other hand, create an acidic environment that kills off competitors to the yeasts. The yeasts were almost certainly already living on the grains when they were out in the field. As for the bacteria, that’s a trickier question, but the consensus seems to be that they come from us – studies have failed to isolate Lactobacillus Sanfranciscensis anywhere except in long-lived sourdough starters and on human teeth. The individual mix of yeasts and bacteria varies from starter to starter, and region to region. It’s part of their charm; every starter is unique, and produces bread that tastes somewhat different from those produced with other starters.

Sourdough starters work more slowly than commercial yeasts, which are much more concentrated that starters and have been carefully selected for their gas production. Typically, a sourdough loaf will rise for at least three to four hours in the bowl and will then need another two to three hours as a shaped loaf before it will be ready to bake.

Not all sourdough breads are sour. The French pain au levain and Flemish desem breads are typically not very sour at all, while San Francisco-style sourdoughs and many German ryes are very sour, indeed!

Different starters will produce different levels of sourness, but by far the most important factor in a sourdough bread’s flavor is temperature. If the dough is allowed to ferment at 80 to 85 degrees or is allowed to rise slowly overnight in the fridge or in a cool room (35 to 50 degrees F), the bread will have a markedly stronger flavor than a sourdough that rose at room temperature (65 – 70 degrees F).

Sourdough breads generally keep well, because their acid content slows down the staling process. In addition, the acid in sourdough both reduces the impact of bread on one’s blood sugar and also neutralizes phytic acid in whole wheat breads. Phytic acid prevents the body from absorbing many nutrients.

All Purpose Flour

All-purpose or artisan flour: For most artisan white breads,  bakers generally prefer all-purpose (AP) or so-called artisan flour. These flours typically have a protein percentage of 10.5% to 11.5% or so. King Arthur Flour’s regular AP flour is about 11.7%, so it’s on the very high end, while General Mill’s AP flours are about 10.5%. Most Southern brands of AP flours like White Lily are not good for making bread, because they have a low protein percentage and are also bleached, but are better suited to cakes and biscuits.

Bleached flour will produce bread if it has a high enough protein percentage, but it will not have the same golden color or rich flavor of unbleached flour.

King Arthur Flour’s Organic Artisan Flour and Giusto’s Baker’s Choice are  favorites among amateur artisan bakers. They’re about 11.3% protein and perform beautifully, striking a nice balance between rise and flavor. However, these preferences aside, one can bake very good bread from basically any unbleached all-purpose flour one can buy at the grocery store.

Pages