The Fresh Loaf

A Community of Amateur Bakers and Artisan Bread Enthusiasts.

Sourdough

ndechenne's picture
ndechenne

So I'm about three months into my sourdough "experiment", have my starter (I call him Niles) nicely sour and thriving. Having tried a number of recipes, my biggest problem has been consistency. The nice thing about making bread... one dollar experiments.

In any case, recently I've been managing a high-hydration poolish and have had some nice results. While the recipe calls for using the slap and fold method (did try it, arms fell off), I find that using my kitchenaid for half the process heps a lot and gets me what I'm looking for (pretty much). Slightly less open crumb, but that's ok. Different variations, added up to 100g of wheat flour that makes a nice loaf. I tend to like my bread a little tangy so I augment with some citric acid, which I like.

In any case, consistency. Dough issues, I've had rise issues, over-rising and really determining when the poolish is ready to work with makes a big difference. In this recipe, I started the poolish (1-1-1 ratio by weight) and after about 4hrs began to work with it. No additional yeast added, did the kitchenaid for ten minutes then a couple of tuck and folds. Repeat every ten minutes up to three times and I've got a pretty good gluten structure. Rise 2hrs, tuck and fold again and then rise another hour. 

I want a dutch oven but I'm broke right now, so I got this idea. I use a cast iron skillet,  then steam the oven. What you see here is that product, works amazingly well. The skillet really seems to help with oven spring, it just jumps up. The steam first ten minutes works well, at 425 for 40 minutes this is what I got:


mwilson's picture
mwilson

I confess, I am in no way skilled at lamination and hardly ever make croissants. It’s something I’ve done only a handful of times. These were my best yet and not only that, these are solely leavened by natural means, a first.

Original recipe found here - I scaled it down and used a lower ratio of butter for folding in.

2550111000flour 00 W 210/230   
50100222000flour 00 W 360/380 
2550221000sourdough 
20409800caster sugar 
2550221000egg yolks 
2550221000water 
19388750butter 
 
50100222000flour 00 W 210/230 
100200444000flour 00 W 360/380 
2855121100caster sugar 
75150333000egg yolks 
361120salt 
8153300acacia honey 
2550111000water 
2550111000milk 
13256500butter 
--------*butter for folding in
516g1029g%20570g 

*original recipe says to use 2.5Kg of butter per every 4.5Kg of dough. I used 1/3 butter to dough.

Unfortunately they got too warm (31.5C) whilst proving, consequently some of the butter started to melt out and there was a slight unwated acidity in the finished product. They also rose a lot making things rather cramped!

After the bake

Crumb with errors

Incredibly delicate like clouds that just flaked and melted away in the mouth!

linder's picture
linder

Here's my first go at the sourdough oat bread recipe I received from a friend of mine.  I made half a recipe and made note of the weight of each item as I went along.  The formula can be found in grams by following the original posting of the recipe at http://www.thefreshloaf.com/node/32444/sourdough-oat-bread


The crumb -


Oh no, I just tasted a slice of this bread - it takes like Bisquick!  I'm so disappointed, but maybe I can try a second batch WITHOUT the baking soda and replace the diastatic malt with honey too.

dabrownman's picture
dabrownman

With David Snyder recent post of his new take on SFSD with higher amounts of Semolina and Ian’s new bread with semolina, it was only natural that another semolina bread would fit in this week. This one had a small amount of Desert Semolina - 150g.  We wanted to see if the high gluten, not just protein, claims were true.


The bread has 35% whole grains that included millet, another yellow grain and Kamut a durum variety that has a yellow cast too.  We didn’t want the whole grains to take away from the yellow crumb color we were shooting for the Desert Durum.  The small amount of honey was there to sweeten the non yellow AP flour since the yellow ones are pretty sweet all by theselves.


This bread was leavened with combination yeast water and mainly whole grain SD starters.   For the liquid in the dough we used the left over soaker water from our last 100% whole grain pumpernickel bread.  We added some ricotta cheese in keeping with this Altamura shape and Italian leanings of this bread – plus we are growing to like cheese in bread and the moisture it imparts to the crumb.


Since the color of the dough was yellow we thought green add ins would be appropriate and included pumpkin seeds and pistachios along with some millet seeds.  This bread isn’t as complex as some of the others we bake but it wasn’t meant to be since this is about as white a bread as we usually get around to making and we were getting low on white …..eeerrrr….yellow bread.


The levains were built separately over two builds and 8 hours.  The SD portion has spent a few days in the fridge before the final build to get it nice and sour.  The method is similar to or recent bakes but only this time only a 1hour autolyse, with the salt, was used.  We did 10 minutes of slap and folds until the dough was silky smooth and the gluten well developed. 


We incorporated the add ins on the first of 3 S&F’s which were done 15 minutes apart.  After 1 hour of ferment on the counter, the dough was bulk retarded for 14 hours.  In the morning it was allowed to warm up o the heating pad for 2 hours.  It was then shaped Altamura style but once again, it came out too long for the 12” mini oven so we folded each end under to shorten the shaped dough without having to redo it all.


After a 2 hour final proof on the heating pad, we started up the mini oven for preheat with the bottom of the broiler pan 1/4 full of water.   The bread was baked at 450 F with (2) of Sylvia’s steaming cups on the top of the broiler pan with the dough.   After 12 minutes we removed all of the steam and turned the oven down to 425 F, convection this time.


After 5 minutes 3we flipped the bread over on its top  to brownnthe bottom since the bread had sprung well and the top was getting done before the bottom,  5 minutes later we turned the oven down to 400 F convection androtated the bread 180 degrees.  5 minutes later we flipped the bread over and continued to bake for another 5 minutes until the bread reached 205 F on the inside.  All total the bread baked 32 minutes 12 with steam.


The bread crust came out that usual durum color.  It was nicely brown, blistered  and crispy that went soft as it cooled.  The crumb was fairly open but not as much as we expected with the nice rise during proof and the spring in the oven under steam.  Still, it was very soft, moist and airy with the green and brown splotches of the pistachio and pumpkin and the yellow millet bits that stayed crunchy.

Can’t really makeout the ricotta cheese but the soft moistness of it was left behind.  This bread reminds me of bread with cream cheese in it.   We like the taste of this bread and it made a fine sandwich for a late lunch today.  We will be making a version of the bread again.

Formula 

Starter Build

Build 1

Build 2

Total

%

Whole Grain SD Starter

10


10

1.63%

Spelt

15

15

30

4.88%

Dark Rye

15

15

30

4.88%

AP

50


100

16.26%

Yeast Water

50


50

8.13%

Water

30


80

13.01%

Total

170

30

300

48.78%


SD Starter Totals


%


Flour

165

26.83%


Water

135

21.95%


Starter Hydration

81.82%


Levain % of Total

21.52%


Dough Flour


%


Kamut

78

12.68%


Semolina

125

20.33%


Millet

47

7.64%


AP

200

32.52%


Total Dough Flour

450

73.17%


Salt

9

1.46%


Dough Soaker Water

350

56.91%


Dough Hydration w/ Starter

77.78%


Add - Ins


%


Pumpkin Seeds

50

8.13%


Ricotta Cheese

130

21.14%


Pistachio

50

8.13%


Honey

5

0.81%


Millet

50

8.13%


Total

285

46.34%


Total Flour w/ Starter

615


Total Water w/ Starter

485


Hydration w/ Starter & Adds

79.27%


Total Weight

1,394


% Whole Grain

34.96%


Ricotta Cheese not included inhydration calculations.


hungryscholar's picture
hungryscholar

While I've recently revived a sourdough starter and have been keeping it going on my counter, I've also thought that it should be possible to have a ready to use product similar to instant yeast. Perhaps I'm spoiled by the homebrew shop where I can buy dozens of different yeast packets and even some lactobacillus for making sour beers. So when I saw packages of Seitenbacher sourdough on Amazon I bought a box and have now tried out making some bread using it directly, rather than trying to build a culture with it. This is what the company intends, but so far it's not been smooth sailing.

The first go round I mixed up a batch of wheat dough at somewhere around 65% hydration and tossed in the contents of  the 2.65 oz package. I mixed up the dough and let it hang out overnight for 12 hours. I then shaped and proofed it for something like 8 hours at 85-90 F. What I wound up with after baking at around 450 F for 40 minutes or so was a flat disc with a very gummy center. So- not enough gas, but I'm not sure if it was over/underproofed, or if the beasties in the packet objected to being required to work on wheat instead of rye, or if should have baked it longer & lower to try and bake the crumb before the crust burns. So many variables!

On the off chance that it was a shaping issue I put the other half of the dough in the fridge for 24 hrs or so before taking in out and warming it an oven at around 85-90 degrees. I did some stretch and folds and then shaped and did the final rise in a colander lined with a floured towel, again at around 85-90 degrees. The total time between coming out of the fridge and baking was about 8 hours. This time the shape was dandy, but the crust still gummy(and I could swear it sound hollow when thumped.)

So, deciding that when all else fails, read the recipe, I used the recipe for Farmers Bread from the sourdough package, which calls for some rye flour and instant yeast as well as the sourdough. The result was fine, but not up to par with bread made with my continuously maintained starter.

As folks have used this product to build a sourdough starter it should be possible to use it to make good bread without adding instant yeast, but I haven't figured it out yet. The package instructions do say to warm the packet to 100 F before using, but not how long it should be kept warm, maybe that's where I'll look next. For now I'm having better success with my existing starter.


evonlim's picture
evonlim

after reading last couple of week's blogs.. lead me to experiment with new ingredients.

with kiki's help, she gave me this tutorial website on yeast water http://www.youtube.com/watch?v=w-GmnAD4J7E

started soaking my raisins with water in a clean jar as showed in the video. to my surprised it work wonderfully.. on the 8th day i used it to make this bread. mixed 75gram yeast water with 75gram of bread flour, left it 8 hours in room temperature to mature. 

my formula

bread flour   100%     750gram

water             75%      563gram 

salt               1.5%       11  gram

starter                         150gram

since i have some 320gram of Chateau Charmail 2009 left over from saturday's dinner, thinking to myself why not.. so i did :) water 243gram. mixed with AP flour and left overnight. 2nd day added the starter. autolysed for 30mins. added the salt after. rest for 40 mins and SF. realising i had a couple of small Tasmanian purple carrot in the fridge.. i grated and added in the dough when i did my first SF. 1/2 cup of sunflower seeds and 1/2cup of soaked n drained raisins went into the dough as well. (this is because i am baking for a friend who loves raisins!!) 2nd SF after 40mins.

left it rest for another 40mins, put in the fridge to retard. 3rd day, in the afternoon after my work, took dough out from fridge. rested for an hour, scrapped out from bowl and divide into two and preshape. rest for 30mins. transfered into 2 small loaf pan. covered and proof for 1 hour. score the top, sprinkled with blue poppy seeds. baked 450F for 20 mins covered with aluminium foil. uncovered for further 15 mins. 

it smells divine during baking. lots of depth in flavor ends with a nice bitter in the mouth as you chew on it.

my lucky experiment inspired by kiki, Ian and Yuko :) thank you

happy me

evon

more pictures..


mwilson's picture
mwilson

Thanks Luciana for posting this recipe.


Gotta love chocolate!

Recipe source: http://www.panperfocaccia.eu/forum/viewtopic.php?f=33&t=16418


Final dough moulded and later fully risen.

Primo Impasto:

  • 230g flour, I used very strong
  • 90g sugar
  • 120g egg yolks
  • 100g water
  • 80g butter
  • 100g natural yeast, refreshed three times prior

Secondo Impasto:

  • 50g flour
  • 20g egg yolks
  • 15g sugar
  • 60g butter
  • 2.5g salt
  • 60g cocoa paste (1/3 cocoa +1/3 butter + 1/3 sugar)
  • 130g candied orange cubes
  • 100g chocolate chips, I used 50g milk / 50g dark
  • zest of 1 lemon
  • zest of 1 orange
  • seeds of 1 vanilla pod
  • 15-20g water to adjust dough consistency


Up close before before being scored with a cross and cooling upside down after the bake.

After cooling completely, this panettone was wrapped and left to mature for 5 days before being cut into… The texture was the best I’ve had so far, very bready and very shreddy. For my taste this could have done with a little more salt even though I did raise it to 3 grams already.


Various photos of the crumb.

Close-ups

-Michael

dabrownman's picture
dabrownman

After 4 Fresh Loafians recent trip to KA flour where they took the rye class from master baker Jeffrey Hamelman and the recent spate of posts on altus, my apprentice couldn’t help but devise a baking test to see if we could tell the difference, taste wise, when altus was added to a high percent rye and 100% whole grain bread.

Perfect bread holder for home made Pate Maison.


Our last bake was a test on ‘old dough’ that proved old dough makes a difference in taste that is noticeable and really quite profound.  Normally we would put altus in high percent rye bread, if we have it, but have never baked the same recipe at the same time under the exact same conditions with and without altus to determine first hand if there really was a noticeable taste difference.


We would have made a 100% whole rye bread for this test but didn’t have enough rye berries to grind up.  We decided to use whole spelt berries for 50% of the mix and bake it like it was pumpernickel, that had real pumperdime berries cut in half - long, low and slow, to bring out the dark color.  The instant coffee, cocoa, molasses, barley malt, honey and red malt also helped to turn this loaf dark.


The altus we used came from this bread - Multigrain SD/YW Brown Bread with Aromatic Seeds and Multi-Grain Scald which was also a multi-grain and YW/SD combo levain bread sort of similar to this one.

Today's lunch sandwich featuring the bread we used for the altus in todays bake that is still in the oven going on 7 hours.

You want to start the levain and scald the day before you bake.  We had a mainly rye and spelt 100% whole grain starter, that had been developed to its peak for the last bake.  It had been in the fridge for a coupe of days putting on some more sour.  It was used to make the combo levain with 30 g  of YW - a tiny amount in the scheme of things but YW really makes a huge difference to open the crumb in heavy whole grain breads.


All of the cracked and meal varieties of rye and spelt, half the total flour amounts used for the levain, along with some whole rye and spelt flour was used in the 1 build.  The rye and spelt berries were soaked overnight for 12 hours and then simmered for 10 minutes and allowed to cool.  The excess soaker / scald water was used to soften the altus so none of the flavor was lost.
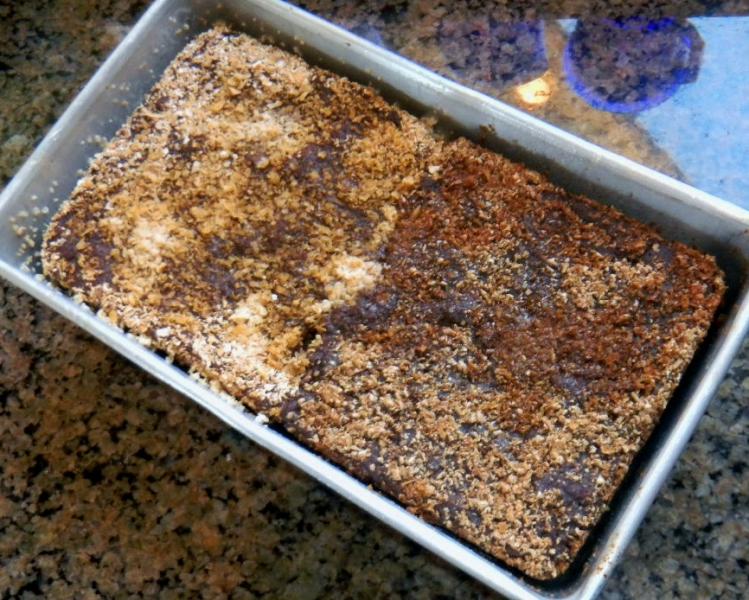
 

It took about 12 hours for the levain to double on the counter.   While that was happening, we autolysed the dough flour, salt, all the add-ns (less the altus and the scalded berries) using excess soaker water for the liquid for 4 hours.   We like longer autolyse times for whole grain breads.  We also see no difference if the salt is included to the autolyse or not… so we always put it in.


Once the autolyse and the levain came together we mixed the heavy 76 % hydration mass with a big metal spoon to try and get things acquainted before turning it out on the counter and doing 10 minutes of French slap and folds when the dough really came together nicely from a structure point of view but still very sticky.

The dough was rested for 15 minutes before the first of (2) S&F’s were completed on 15 minute intervals.  The scald was incorporated in the first one and the seeds in the 2nd one.  Then the dough as divided in two with one dough 72 g more than the other since the smaller dough would have 72 g of soaked altus added to it. 

Once the scald was added the dough felt wetter than a 76% hydration dough because of the excess scald water carried along with it – even after draining and running a paper towel through the berries.

15 minutes later, the altus went into half and a minute of slap and folds was used to distribute it properly.   A few slap and folds were also performed with the other half to get it back into better shape gluten wise.

 We then panned each into half of a PAM sprayed large metal loaf pan and covered the non altus side with the lighter colored oat bran and the altus side with the darker wheat bran to mimic their actual color since the altus had made that side darker.

We then covered in oiled plastic wrap and allowed it to proof on the counter for 30 minutes before refrigerating it for a 12 hour retard at 38 F.  After removing the loaf from the fridge the next morning, we allowed it to warm up and proof on the counter for 6 ½ hours at 68 F until it nearly doubled to the rim of the pan.

We covered the top with a PAM sprayed double layer of heavy aluminum foil and placed it on the 375 F mini oven’s broiler pan that was half full of water along with (2) of Sylvia’s steaming cups that were heated to the boiling in the microwave.   Even though the loaf tin was covered we still wanted as much steam as we could generate in the mini.

After 30 minutes we turned the mini oven down to 350 F for 30 minutes.  We continued the baking in a falling oven with steam according to the baking schedule:  Many will notice that this is similar to the baking schedule for Black Pumpernickel that Hamelman uses.  This one just starts a little higher
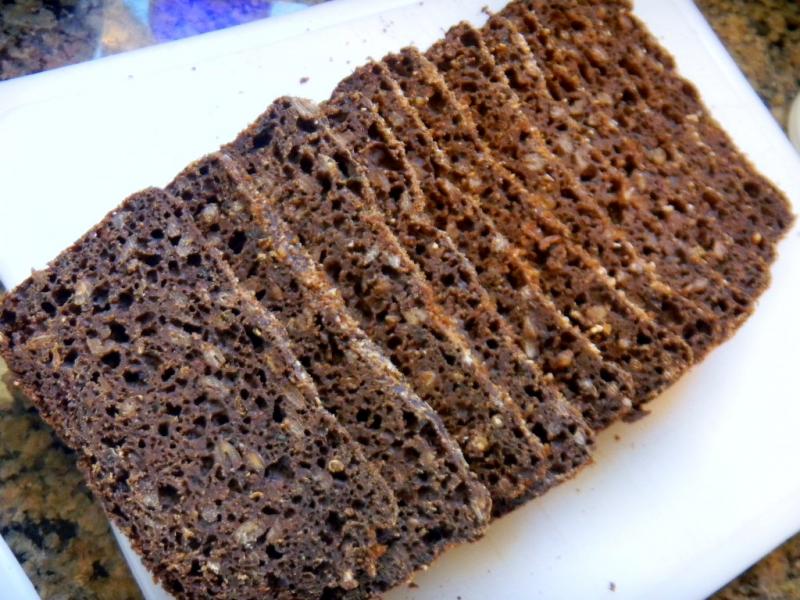
 

Theise were 3"pieces of pumpernickel (altus left) that we got 12 slices out of the altus side than the 11 slices we got out of the non altus side.  For lunch the altus wa more moist and produced few crumbs when slicing and the non altus side was more dry and produced more crumbs when slicing.  It will be altus pumpernickel from now on.

375 F - 30 minutes

350 F - 30 minutes

325 F - 30 minutes

300 F - 1 hour

275 F - 2 hours

250 F - 2 hours

225 F - 1 ½ hours

200 F - 1 ½ hours

Turn oven off and leave the bread in the oven until morning or 8 hours.  Uncover and de-pan the bread.  Wrap the cooled bread in cotton cloth or linen for a minimum of 24 hours - 36 hours would be better.

A great lunch sandwich of Pesto Infused Roasted Pork Loin with; pepper jack cheese, lettuce, tomato and homemade Dijon mustard.  The fruits and veggies, include Poblano peppers cantaloupe, carrots, a homemade kosher dill pickle and a Minneola from the back yard.  A piece of this bread with a schmear of grilled salmon and cream cheese was included because it was go fantastic at breakfast.

Beautiful sunrise this morning!

Please note that the altus actually used for half of this loaf was 72 wet grams not the 144 listed in the formula below.  The 90 g dry and 144 g wet altus would be used in a full, non test loaf of this bread.

Crumb shots will be 24 hours from now.

The great aroma of this bread didn't start permeating the house until the temperature had been reduced to 250 F.  There were some unusual things and some expected from the crust points out.  First the loaf shrank a little bit while baking instead of springing. I have never used a  long low slow baking schedule for this kind of bread before and have never had one shrink - maybe this is normal?

The altus side came out of the pan much wetter than the non altus side and it was more caramelized.  We have never had a bread come out of the pan this wet before but this too may be normal?  When the aluminum foil lid came off, the aroma was incredibly pungent and pervasive.  It sure smells like a very nice black pumpernickel and I can't wait to slice into it.  But we will wait, even though my apprentice doesn't want to her being German and this loaf dear to her heart.  The loaf is now resting in its cotton cocoon for 24 hours - making it 32 hours after it finished baking before we will slice it. 

After baking and slicing the color difference went away,  the non altus inside was more open with larger holes.  the altus side was open too but the holes more even throughout.  The crumb was glossy and moist.  The YW really helped to open the crumb and make it lighter than just about any other bread of this type that I have made, seen or eaten.  Great taste - less weight :-)

The long low and slow bake at the end produced a finished temperature of exactly 205 F . Amazing!  This loaf was perfectly baked and the taste was just the best we have ever experienced.  The difference between the altus and no altus was slight though not nearly as great as we would have expected.  The altus side had a deeper and more complex flavor though and next time we have this bread for the altus. What a great loaf of pumpernickel!

Formula

100% Whole Grain Rye and Spelt  Sourdough - The Altus Test


Starter

Build 1

%


SD Rye & Spelt Starter

15

3.83%


Whole Rye, Meal & Cracked

80

20.43%


Yeast Water

30

7.66%


Whole Spelt, Meal & Cracked

80

20.43%


Water

130

33.21%


Total Starter

335

85.57%


Starter


Hydration

100.00%


Levain % of Total

34.50%


Dough Flour


%


Dark Rye

112

28.61%


Whole Spelt

112

28.61%


Dough Flour

224

57.22%


Salt

7

1.79%


Water

150

38.31%


Dough Hydration

66.96%


Total Flour

391.5


Water

317.5


T. Dough Hydration

81.10%


Whole Grain %

100.00%


Hydration w/ Adds

76.20%


Total Weight

971


Total Weight does not include added water from the scald and altus


Add - Ins


%


Barley Malt

6

1.53%


Molasses

6

1.53%


Honey

6

1.53%


Red Rye Malt

10

2.55%


Rye and Spelt Altus

90

22.99%


Coffee Cocoa

20

5.11%


Spice Seeds

20

5.11%


VW Gluten

7

1.79%


Total

165

42.15%


Altus weighed 144 g after adding soaker water to soften

Spice Seeds - corriander, black and brown caraway, anise & fennel


Scald


%


Spelt

45

11.49%


Rye

45

11.49%


Total Scald

90

22.99%


Scald weighed 188 g when incorporated


Isand66's picture
Isand66

My last bake was a lemon sourdough which ended up as food for the squirrels unfortunately.  I decided to recover from that calamity and baking a good wholesome multi-grain bread.

I made a soaker with a bunch of different grains and let it sit for 24 hours in a bowl with hot water to soften it up.  The grains will soak up about 75% of the water which will end up making your dough very moist.

This bake came out excellent with a great dark and thick crust and open and moist crumb.

Soaker

45 grams Malted Rye Berries

80 grams Groats

75 grams Soft White Wheat

275 grams Boiling Hot Water

Mix water in a bowl with other ingredients and let sit covered at room temperature for 24 hours.

Starter Build 1

36 grams Seed (Mine is 65% AP Flour Starter)

114 grams European Style Flour (KAF)

45 grams Yeast Water

30 grams Water (85 - 90 degrees F.)

Mix seed with water to break up for a few seconds and then mix in flour until the starter form a smooth dough consistency.  Put it in a lightly oiled bowl and loosely cover and leave at room temperature for at least 6-10 hours.  The starter should double in volume.

Starter Build 2

150 grams European Style Flour (KAF)

95 grams Yeast Water

Mix the Yeast Water and flour in with the starter from Build 1 for about 30 seconds to a minute until all the ingredients are incorporated.  Cover and leave at room temperature for at least 6-10 hours.  The starter should double in volume.

Main Dough

Ingredients

425 grams Starter from above (It's possible you could have a little left over from above but I had exactly 425 grams)

100 grams White Rye Flour

100 grams Potato Flour (KAF)

300 grams European Style Flour (KAF)

All of the Soaker from above

325 grams Water (90 degrees F.)

16 grams Sea Salt (or table salt)

22 grams Honey

Procedure

Prepare the soaker 24 hours before you want to bake the bread.  When the soaker is ready, make sure to drain any of the water it has not soaked up.

Next mix the flours together with all the water except for 90 grams for about 1 minute and let it autolyes covered, for 30 minutes in your mixing bowl .    After 30 minutes add the levain, honey, salt and the soaker and mixed on speed #1 for 1 minute or by hand until everything starts to come together.  Add additional water as needed and mix  for 4 additional minutes.  Note that this is a very sticky dough so don't be afraid to use all the water but make sure you don't end up with soup.

Since this dough is very wet I put it directly into my oiled dough rising bucket and did a couple of stretch and folds.  Rest it in the covered bucket for about 10-15 minutes and do a total of 2-3 additional stretch and folds within 2 hours.  After 2 hours and several stretch and folds (I did a total of 3) place the dough in your refrigerator for 12 - 24 hours.

The next day I let the dough sit out at room temperature for 2 hours.  After 2 hours I formed it into 1 large miche and put it into my floured cloth lined basket.

Let the dough sit at room temperature for 1.5 to 2 hours.  It should start to get a little puffy but it won't rise a lot so don't be alarmed.

Score the loaves as desired and prepare your oven for baking with steam.

I pre-heat my oven to 505 degrees F. about 30-40 minutes before baking.  I add 1 cup of boiling water to a heavy-duty sheet pan on the lowest shelf in my oven and I have 1 oven stone on the top shelf and one above the steam pan.

After placing the loaf in the oven I add the water and lower the temperature to 450 degrees.  Since this loaf is so large I had to lower the temperature after 30 minutes to 425 degrees and baked another 35 minutes until it reached an internal temperature of 205 degrees F.

Let the bread cool for at least 2 hours or longer until you try it.

Pages

Subscribe to RSS - Sourdough