The Fresh Loaf

A Community of Amateur Bakers and Artisan Bread Enthusiasts.

Sourdough

JMonkey's picture
JMonkey


Laurel Robertson, I owe you an apology. I pulled a loaf of Desem bread out of my oven about an hour ago, and, unable to wait any longer, just cut a slice to eat. Without doubt, it is the most delectable, fully flavored whole wheat loaf I have ever eaten. Why it took me this long to get it right, I don't know. But I'm glad I did. When I'm making dinner bread from now on, I'll be making this.

First of all, folks should know that I didn't use a starter made according to the methods described in The Laurel's Kitchen Bread Book, which requires 10 lbs of freshly ground flour. I'm sure you can make it that way, but there's an easier method. I just took some of my regular whole wheat sourdough starter, created a dough ball at about 60% hydration when I fed it, and left it in my chilly (55 degrees F) basement to ripen. I fed it once a day for three days, building it up each time, until I had about 200 grams or roughly 7 ounces of dough. On the final build, I increased its size by a factor of 3, and let it ripen for about 16 hours at 55 degrees, more out of convenience and necessity than calculation. If you don't have a whole wheat starter, it's simple to convert. Just take some of your regular ripe starter, and feed it in the following weight ratio of 1:4:4 -- starter: water: whole wheat flour. Refresh it two or three times like this, and you'll have your 99.99% whole wheat starter. (I won't tell anyone if you don't that it's not absolutely pure).

I screwed up my math in preparing the dough, so I ended up with about 38% of the flour as starter rather than the 30% I'd hoped for, but I'm not sure it would make that much difference. You do want a fairly large amount of starter, if I'm reading Laurel's recipe right -- somewhere in the range of about 30%. I also went for the customary 2% salt and aimed at a hydration of 75%.

Here's my formula:

  • Whole wheat flour: 100%
  • Water: 75%
  • Salt: 2%
  • 30% of the flour was pre-fermented at 60% hydration.
That worked out to roughly:
  • 220 grams starter
  • 260 grams water
  • 320 grams flour
  • 8 grams salt
I mixed it up and kneaded for about 300-400 strokes, until I could stretch a small piece of it into a translucent film (i.e. the "windowpane" test). As for consistency, I was aiming for dough that felt very tacky, but not exactly sticky. Then I formed it into a ball and let it ferment for four hours at about 64 degrees F (the temperature of my kitchen). It more than doubled in size and when I poked a wet finger into the dough, it didn't readily spring back.

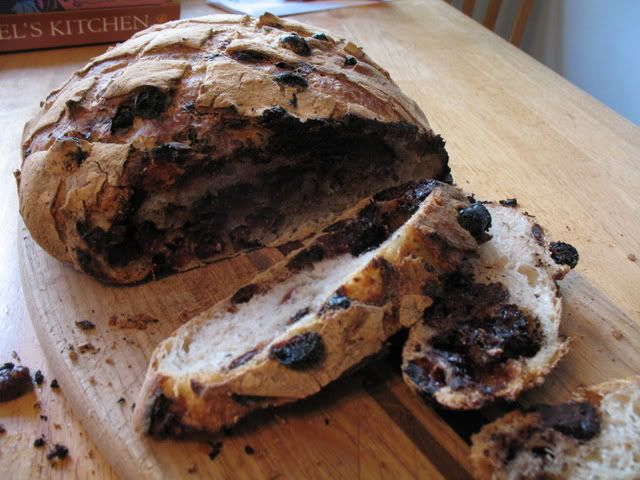
Next, I gave the dough a stretch and fold, let it rest 15 minutes, and then shaped it into a ball. I placed it in a banneton (well-floured) and then used my makeshift proof-box to keep it at roughly 85 degrees for 2.5 hours. At that point, the dough had inreased about 75% in size -- perhaps it even doubled. In any case, I slashed it and put it into my cloche, which had been warming in a preheated, 500 degree F oven for about an hour. I had a slight mishap getting it into the cloche (I was a bit too forceful with the peel, and slammed the loaf into the side of the cloche, turning it over on its side. It mushed it a bit, but nothing serious -- the bake took care of it, mostly. You can see the dent on the bottom right of the loaf above.). I repositioned the bread and covered it. The bake was 30 minutes covered at 500, then 15-17 minutes uncovered at 450. I let it cool for one hour.


As you can see, the crumb does not have the huge holes one expects in white bread (I'm just about convinced that any "whole wheat bread" that has sports huge holes probably consists of at least 50% white flour), but, even so, the bread is not at all heavy or dense. The crumb is light and chewy, with a wonderful crispy crust. The flavor? It's tangy, but not overpoweringly so. There's a buttery undertone, maybe? The flavor lingers long in the mouth after eating. Really, the flavor is tough to describe aside from being complex and delicious.

Like I said, when I have company in the future, this is the bread I'll serve. Utterly delicious.

Well done, Laurel Robertson. And thank you.
JMonkey's picture
JMonkey


I've been wanting to make this bread for years, ever since I first had a bite of chocolate cherry bread from Zingerman's in Ann Arbor, Mich. I've tried making this several times over the past few months, all of them flops. Pancakes, covered in charcoaled chocolate (Yum-o!) were the usual products of my labors. Not this time. I finally got think I nailed it. Here's how I made it (note: These cups are Laurel's Kitchen-style cups. Don't fluff up the flour and spoon it in -- dig deep and let it settle.

Ingredients:

  • 120 grams or 1/2 cup active sourdough starter (100% hydration)
  • 340 grams or 2.25 cups bread flour
  • 8 grams or 1 1/8 tsp salt
  • 210 grams or 3/4 cup + 3 Tbs Water
  • 150 grams or 1 cup dried tart cherries
  • 125 grams or 1 scant cup big chunks of chocolate

    I've found I get more flavor out of my sourdough if I let the starter ripen at above 80 degrees. It's not necessary, though. Just make sure your starter is ripe. The night before, dissolve the starter into the water as best you can. Mix the salt with the flour (You can try using all-purpose -- I think all-purpose has better flavor and texture for sourdough, personally -- but I find that bread flour gives this bread the heft it needs to rise well despite the weight of the goodies). Then dump the flour into the starter slurry and mix it all up together until it's all hydrated. The dough should be very tacky and maybe a little sticky, but not super sticky. We're shooting for the texture of wet French dough, not ciabatta.

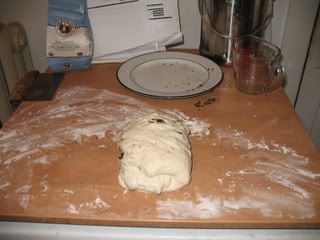
    Cover the bowl with plastic or a plate, and let it sit at room temperature (about 70 degrees F, more or less) for about 12 hours (anywhere from 10-14 should be fine). Once it's ready, it should look something like the photo to the left.

    Meanwhile, pour some boiling water over the cherries. If you can't find dried tart cherries (Trader Joe's sells them around Boston), dried cranberries will usually do almost as well. Let the fruit soak for about 15 minutes, drain and then place them on towels or paper towels to dry. You want the interior wet enough so that the fruit won't draw moisture from the dough, but dry enough on the exterior so they won't turn your dough into soup (it can happen -- believe me, I know). When the fruit is ready, mix it up with the chocolate in a bowl, and have it handy.

    Flour a workspace lightly, and then gently turn the dough out onto the board. With wet hands, lightly pat the dough into a rectangle. Stretch the dough to about twice its length, and then spread 1/4 of the chocolate cherry mixure in the center. Fold one-third of the dough on top, and again, spread 1/4 of the mixture on top. Fold the final third of the dough like a letter, and then turn the dough one-quarter. Follow the same procedure, and then cover the dough. Let it rest for about 15 minutes. Here's a photo sequence to show you what I'm talking about.


    Stretch and spread.


    Fold and spread.


    Fold again. Then turn the dough one quarter and repeat! Easy-sleazy. (That's the final product above. I skipped a few steps in the photos. It's well-established that stretch and fold only remains exciting and engaging for ... oh ... no more than three photos, I believe..)

    Folding the chocolate and cherries into the bread ensures that the vast majority of the goodies stay protected from the fierce heat to which you're going to subject the dough in order to get that lovely, crunchy crust we all adore. The yummy stuff is not as evenly distributed as it would be were it mixed in from the beginning, but uneven distribution is highly preferable to charcoal. Trust me.

    Now, after letting the dough rest for 15 minutes, gently shape the dough into a boule, and place it in a well-floured banneton. I splurged a while back and bought one of my own, but you can easily construct a makeshift banneton out of a bowl and a well-floured linen napkin.

    I like to let my sourdough proof in the makeshift proof-box you see to your right. I pour a cup or two of boiling water in there and close it up. It'll stay within 3-4 degrees of 85 degrees F for about 90 minutes. I then pour in another cup or two of hot water.

    After 3 hours, my bread looked like this.


    About an hour beforehand, I'd put my cloche in the oven and preheated it to 500 degrees F, but if you don't have a cloche, a dutch oven or oven-safe casserole will do. If you don't have that, just use your baking stone and steam the oven. If you don't have that, just put the bread on a baking sheet. Once the bread was scored, I baked it covered for 30 minutes, and uncovered for about 17-18 minutes, and then let it cool an hour (can you believe it?) until we dug in. I had a minor mishap with a bit of my bread sticking to the peel, thus the odd shape to the left. It didn't disuade us from gobbling it all up with 48 hours though.

  • mnkhaki's picture

    What & When: Sourdough

    February 9, 2007 - 5:52pm -- mnkhaki
    Forums: 

    Hello. I am new to this forum, and for the past few days have found many answers to my questions.

     I do have a question that I can't seem to find the answer to.

     If I have a recipe for bread without the usage of sourdough. In straight recipes with the straight mixing method, can I use sourdough, (recipes for baguettes, french bread, ciabatta) and if yes, how much?

     Is sourdough the same as 'poolish'?

    Thanks all,

    Nazir

    Srishti's picture
    Srishti

     Yawn.....

    Oops... I forgot to slash it.....

    Everybody seems to think I'm LAZY..

    I don't mind, I think they're crazy......

    Please don't spoil my day, I'm miles away....

    And after all I'm only sleeping..................................


    :D

    lol

    It's a 100% whole "wheat + rye" sourdough sleepping chamber


    Wayne's picture

    Wild Yeast Sourdough

    February 8, 2007 - 10:13am -- Wayne

    My wild yeast sourdough starter is now in it's 10th day.............and I cannot seem to get it to double or anything close.  It bubbles, etc. but still smells like alcohol.  Have even tried a 1:4:4 build (see picture) but it never rises or doubles.  Maybe sourdough lady or Jim can shed some light on my problem.  All help is appreciated.

    CountryBoy's picture

    Autolyse, Vital Gluten, Oven Temp ?s

    February 7, 2007 - 5:50am -- CountryBoy

    #1-Re Autolyse: some say 15 mins and others 60 mins. #2-Vital Gluten is suggested for more chewy bread but I see no difference #3-Sourness: I put my dough in the fridge after it is shaped and the final loaf is still not sour. I try thick or thin starter and still not sour.  My homemade starter is fine for having the bread rise but just not for sour.  Is the idea of homemade starter a myth and do I have to buy one for real sour? #4 Baking temp- Rose Beranbaum in the Bread Bible sets the oven at 450 and others at 350 degrees; is there a difference?

    bwraith's picture

    how/where to get/work with flour fresh from the mill

    February 6, 2007 - 9:54am -- bwraith

    I've done a fair amount baking of sourdough hearth breads using standard recipes from Reinhart, Glezer, et al. I've always used standard flours from KA, such as their whole wheat, white whole wheat, rye blend, bread flour, Sir Lancelot high gluten, and others. Recently someone brought me some "sifted stone ground whole wheat flour" from Littleton Grist Mill in NH. I found I had some trouble with it that I suspect revolves around the need for malted barley flour addition, possibly aging, and possibly hydration differences, as well as needing to figure out the protein content and adjust for that, as well. But, it did get me thinking about exploring the availability of flours straight from mills in retail quantities and motivated the questions below.

    CBudelier's picture

    Conversion question

    February 4, 2007 - 2:59pm -- CBudelier

    I'm looking for help in the method I'm using to convert standard recipes to sourdough. In either Breads from the LaBrea Bakery or The Bread Bible I read the following method: 1) add the total weights of flour and water [I'm using a weight of 140 g./cup for flour and 225 g/cup of water] 2. Find 30% of the above weight to determine the amount of starter to use. 3. With 100% starter, divide by 2 to determine weight of flour and water in the starter. 4. Subtract the weight of flour and water in the starter from the amount called for in the recipe to know how much to use.
    I tried this with the recipe for No-Knead bread and ended up after 18 hours with dough that was more like a starter than an actual dough. I'd appreciate any help!

    breadnerd's picture

    Sourdough Notes

    February 2, 2007 - 3:47pm -- breadnerd

    A question on (commercial) yeast in soudough breads made me dig out my notes from a baking seminar from a few years ago, I was extremely fortunate to take a class with Didier Rosada (who at the time was at SFBI and the "coach" of the usa bread team that won the Coupe de Monde.... It was a really cool class!

    Anyway, it was fun to look over my notes, and I found a couple of cool items I thought would be interesting to revisit:


    1. Sourdough Culture changes: When a starter starts to rise (increase in volume) it means it has switched from reproduction to fermentation. Fermentation is when the gas is being produced (causing the volume increase) and the production of acidity (lactic and acetic). I'm thinking that during feeding there is eating and the production of waster products, but by the time the amount of waste (ie gas) is pushing your volume up--that means the tide has turned and the shift has made to the fermentation (ie flavor developing) stage.

    Pages

    Subscribe to RSS - Sourdough