The Fresh Loaf

A Community of Amateur Bakers and Artisan Bread Enthusiasts.

JMonkey's blog

JMonkey's picture
JMonkey

I've been teaching four hour bread classes to raise money for my daughter's school and for the food bank, and it's been amazingly fun. For each class we bake a pizza for lunch (with wine and beer if there are adults) and make a few breads. Usually a sourdough, and a couple of others as they request. I just did a class for four middle-school aged girls where we made two soudoughs, pizza, monkey bread and cinnamon rolls -- they were a fantastic group.

Anyway, tons of fun.


JMonkey's picture
JMonkey

I've wanted to make an olive fougasse for a long, long time, but never got around to it until today. Served it for dinner along with a white bean soup that's a lot like the well-known U.S. Senate Bean Soup recipe.

Here's how I made it.

Preferment:

  • 150 grams all-purpose flour
  • 3 grams salt
  • 97 grams water
  • A pinch of instant yeast

Final dough

  • All the pre-ferment
  • 300 grams all-purpose flour
  • 50 grams whole wheat or whole rye or a mix
  • 4 grams salt
  • 1/2 tsp instant yeast (1-2 grams)
  • 40 grams coarsely chopped black olives, pitted
  • 245 grams water
  • 1 Tbs olive oil (optional)

Mix up the pre-ferment the night before, knead it and let it rise 12-16 hours. Once the pre-ferment is ripe (it should have domed and collapsed slightly in the middle), break it up into about 10 pieces and mix with the other ingredients. Develop the dough, adding the olives at the last minute (I sprinkled half on the flattened dough, rolled up the dough, flattened it again and repeated) and let it rise for 1.5 to 2 hours. Shape it into a boule and let it rise, covered with plastic or baker's linen for another hour or so. Meanwhile preheat a stone and a steam pan to 500 degrees F. Once the dough has risen about 50% or more, stretch it to half again its length and shape into a rough triangle. Using a knife or a pizza cutter, make one long cut all the way through the dough down the center, with three others along each side so it looks a bit like a leaf. Stretch the dough to open the cuts.

Bake the fougasse with steam for about 20 minutes at 450 degrees F. Serve warm.

JMonkey's picture
JMonkey

Desem bread is a favorite of mine, in no small part because I can only make it in the winter. But it's also beloved because it was one of the first sourdoughs I ever made, and because it comes from The Laurel's Kitchen Bread Book, a book that, though it is not without its flaws, is still a book that I love dearly and continue to bake from several times a month.

Desem is essentially a 100% whole grain pain au levain, done in the old French way for customers who did not like their bread sour. To keep the acid notes to a minimum, bakers kept their starters firm and chilled, both of which are the key to making this loaf. Laurel Robertson recommends making your starter by placing a dough ball in a bin of 10 lbs of flour at about 50 degrees F, and then feeding it once a day for a week or so. I've done it that way, but I've found it's not really necessary. If you've already got a starter, just feed it with whole wheat at 50% hydration (thereabouts) and store it in a place where the temperature stays in the 40s or 50s. Ideally, you want the starter at about 50 degrees F. Feed it a couple of times that way at that temp, and you should be ready to go. This is why Desem remains a winter bread for me, because only then can I rely on my garage to remain within that temperature range.

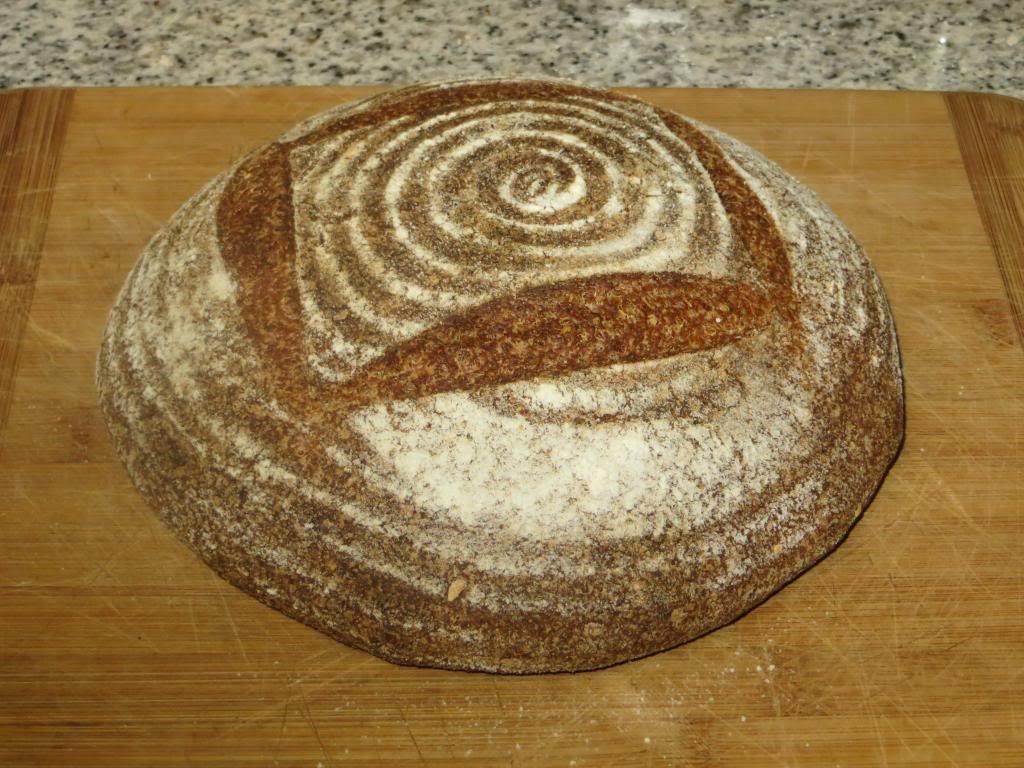
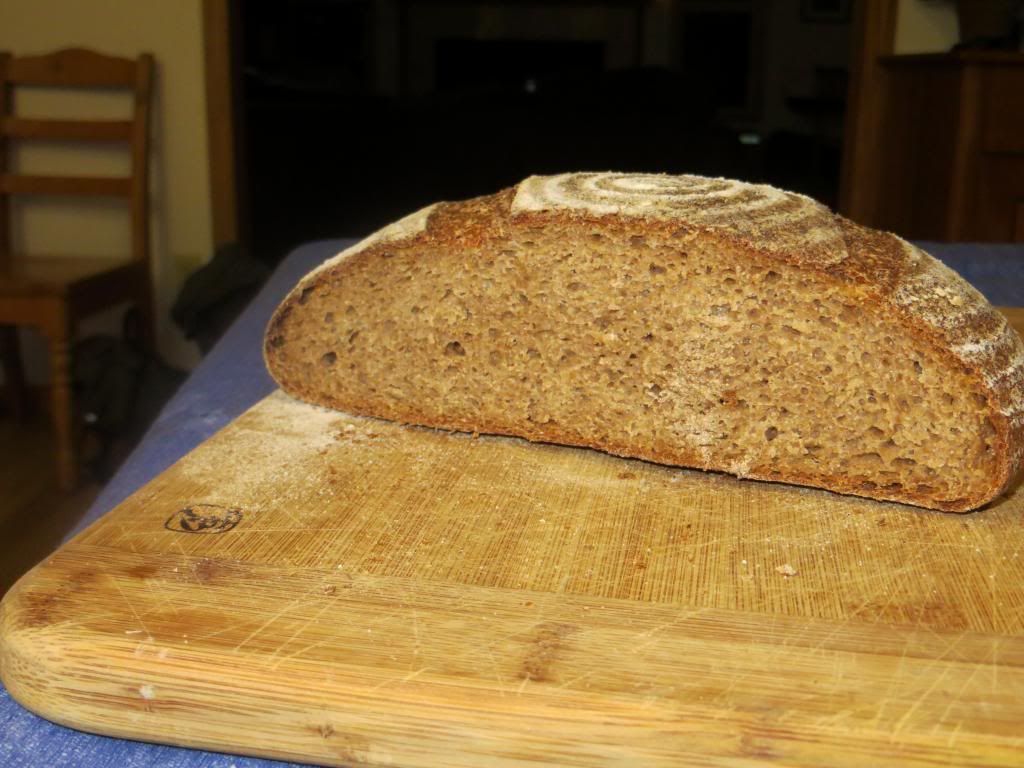
The result is a lovely loaf. Just a little bit sour, with a creamy texture and a nutty, sightly sweet flavor. It's hearty but, though it doesn't typically have the big holes one usually associates with a lean hearth loaf, it's not a dense bread. Tonight, we ate it with a corn chowder,  a dish of which I'm certain Laurel Robertson would not approve, since it's made with chicken stock and a half pound of bacon. I have to say, though, they made fine dinner companions. It will also make tasty sandwiches tomorrow, I'm sure.

Here's what the loaf looked like out of the oven:
And here's what the insides look like:
Finally, here's how I made it.

Formula:

  • Whole wheat flour: 100%
  • Water: 70%
  • Salt: 2%
  • Starter: 30% of the flour is in the starter at 50% hydration.

Ingredients

  • Whole wheat starter at 50% hydration: 225 grams
  • Water: 275 grams
  • Salt: 10 grams
  • Whole wheat flour: 350 grams

Combine the starter and the water, and mash them up together until it's nice and mushy. Add the salt and then add the flour. Stir until it comes together into a mass. I use fresh flour, because I'm one of those nuts with a grinder and a half-dozen 5-gallon buckets full of grain in his garage. If you're not (and your partner or spouse probably thanks you for it) you'll be using store-bought whole wheat flour, which is dryer, so you may want to add some more water, maybe as much as 50 grams. The dough should be shaggy and soft, but not quite sticky.

At this point, I like to let the dough sit for 10 to 20 minutes. I often time this by how long it takes to make a pot of oatmeal or a batch of pancakes, because I usually start making this bread while I'm preparing breakfast. Once the dough has sat for long enough, I knead for 3-4 minutes, let it rest for another 5 minutes or so, and then knead again for another couple of minutes. At this point, it should be done. I love and respect Laurel Robertson to high heaven, but there's really no need to do 300 strokes. Unless you enjoy that kind of thing, of course, which,  I'll admit, I sometimes do.

I try to get the dough temperature to about 70-75 degrees F if I'm thinking about it. Jeffrey Hammelman has a good trick for this. Measure the temperature of the starter with an instant read thermometer, then measure the temperature of the flour (since mine's coming right out of the grinder, it's usually close to 100 degrees!). To know how hot the water needs to be, Multiply the desired dough temperature by 3, then subtract the starter and flour temperatures. Voila! But, to be honest, I usually just guesstimate. In my kitchen, the starter's cold and the flour's pretty warm, so if the water feels lukewarm or just an eesny-weensy bit warm, I figure it's good enough. I'm not making a microchip, after all.

It usually takes about 4 hours to rise, but in the winter, my house is usually pretty chilly. It could take three hours if you keep your home at 68 or 70 degrees. Then, I shape  the loaf and proof it for two hours in a cooler with the bread on an upturned cereal bowl and a cup or two of hot water thrown into the bottom. I like to bake mine in a covered clay baker at 450 F for 35 minutes with the cover on and 10 minutes with it off. If you're using a baking stone or a cookie sheet, try 450 for 35-40 minutes. Steaming the oven is also nice, if your oven steams well and you don't mind the risk of  damaging or ruining your appliance (ask me how I know there's a risk). Let it cool on a rack for about an hour before slicing.

JMonkey's picture
JMonkey

I bake bread about twice a week for my family, and these days, it's usually either a sourdough from 50% whole wheat, 10% rye and 40% AP or a loaf of Buttermilk and Honey Whole Wheat. But for whatever reason, I was craving rye yesterday, so I set up this loaf. No caraway, as I'd run out, though i do like it.

Here's how I made it:

Formula

  • Whole Rye: 40%
  • High-Gluten Flour: 60%
  • Water: 75%
  • Salt: 1.8%
  • All the rye is in the starter with a hydration of 100%


Ingredients

  • Whole rye starter, 100% hydration: 400g
  • High gluten flour: 300g
  • Water: 175g
  • Salt: 9g
  • Optional -- 9g of caraway seed

To make the bread, mix up all the ingredients and knead. It's sticky, so I like to let it sit for 10-15 minutes first, then I knead with wet hands for 3-5 minutes, let it sit again for 5 minutes, and do a final couple minutes of kneading. Let it rise for 2.5 to 3 hours, shape, and give it another 2.5 to 3 hours to finish. I baked mine in a cloche at 450, covered for 35 minutes, uncovered for 10.

For this morning's breakfast, Iris (my 9-year-old) desperately wanted bagels, so I said I'd make them, but I only had rye starter ready to go. Could be interesting, I thought. So I plowed ahead. They turned out well!

Forumla

  • Whole Rye: 16%
  • High gluten flour: 84%
  • Water: 59%
  • Salt: 2%
  • Diastatic malt powder: 1%
  • All the rye was in the starter at 100% hydration

Ingredients

  • Rye Starter at 100% hydration: 285g
  • High gluten flour: 735g
  • Water: 375g
  • Salt: 18g
  • Diastatic malt powder

Here's how I made them. The night before, I mixed up all the ingredients until they were mostly hydrated, and then let them sit for 15-20 minutes. I then kneaded for about 5 minutes, let it sit for another 5 minutes, and gave it a final kneading of 2-3 minutes. I then cut the dough into 12 pieces of 110 - 120g each.

I pre-shaped each piece into a ball and then rolled them out into a snake, which I wrapped around my hand, sealing the ends together with the heel of my palm. They proofed overnight, covered, in my garage, which is unheated, but rarely gets below 45 degrees F.

The next morning, I brought a big pot of water to boil, to which I'd added a good handful of baking soda. Does it make a difference? Who knows? But I know I'm not messing around with food-grade lye, and baking soda is cheap. Why not? Anyway, it was apparently very cold last night. Usually, I boil them for a minute on each side, and they typically float after 30 seconds or so. These didn't float until 1:45 had passed! Anyway, I put them on a piece of parchment paper that I'd placed on my peel, and let them cool down a bit before brushing them with an egg wash (1 egg + a tsp or two of water, lightly beaten). I like the color it gives them, and it makes the toppings stick better. For toppings, I like garlic, onion, a salt & seed mix, and cheese. For the garlic and onion, I've found that what works best is to rehydrate dehydrated onion and garlic with hot water. Fresh just burns to a crisp in the oven. I add cheese halfway through the bake. Cheese on top of some garlic is particularly nice. I baked at 500 degrees F on a pre-heated baking stone for 10-12 minutes, turning once halfway through the bake.

Finally, my daughter and I have had a lot of fun with the pasta machine we got for Christmas from my parents. Last night, we made spinach and cheese raviolis, which were a ton of fun to make, and even more fun to eat.

I sauteed them in some brown butter after they boiled and then topped with grated parmesan. Just delicious. Here's Iris and me turning the scraps into noodles. They went into the freezer and will likely be added to a soup sometime soon.

Happy New Year, fellow bakers!

JMonkey's picture
JMonkey

Made a loaf of Laurel's Buttermilk Bread today and, as is typical, I simply did two bulk rises before shaping, and then did the final rise in a cooler with a cup of boiling water inside. I also reduced the liquid to about 170g water and 170g buttermilk. The difference, however, is that I completely forgot about it  after shaping and didn't remember that the bread was rising at all until it had proofed for more than 2 hours! Much longer than I ususually let it go.  If my nine-year-old had not reminded me, I'd have let it go until after I got back from the new Corvallis brew pub with my buddy, at which point it would have been an over-risen, imploded mess. 

That said, it actually turned out pretty well! Maybe I should proof it for 2+ hours every time!


JMonkey's picture
JMonkey

I've not posted much, but I've still been baking, and I think my re-engagement with this site has encouraged me to try a few new things. Most recently, I made a variant of Jeffrey Hammelman's excellent Flaxseed Bread, which contains 60% rye. I've altered his recipe a bit, using whole rye instead of medium rye, increasing the hydration to 80% (to account for the extra absorbtion of whole rye) and used a rye starter at 100%, simply because that's how I keep mine. The recipe may be found in the handbook here.

Usually, I just let the sourdough do its thing, and don't add any commercial yeast. But, I was under some time pressure here, so I went ahead and added 3/4 tsp of instant yeast like Hammelman. Wow! I couldn't tell any difference in flavor, which was hearty with a good tang, but I got quite a bit more volume. As for the rise, Hammelman calls for 80 degrees. Well, it was about 64 in my house, so I just threw a cup of boiling water in the bottom of a cooler, stood the dough on an upturned bowl and closed it up. The bulk rise took about 45 minutes and the final rise was just over an hour (I intended to go just one hour, but got stuck on a conference call, as I work from home -- augggggh!).

Here's a picture. As you can see, I sprinkled sesame seeds on the top right after shaping.

Earlier in the week, I decided to give the Sullivan Street Potato Pizza from Glazer's Artisan Baking Across America a shot. You think you've worked with a wet dough? Trust me, until you've made the dough for the crust in this recipe, you've not worked with wet dough. The hydration on this puppy is something like 104%! It's a batter, and since I don't own a stand mixer (the recipe says to leave it in the mixer for 20 minutes) I went the food processor route, a la Peter Reinhart, and let it churn away for 45 seconds.

Did it work? I've no idea. But the dough (if you want to call it that) was smooth, and I was able to spread it over the pan.

It was a good potato pizza, but a little too starchy for my taste what with bread and potatoes together. Not sure I'll make it again.

I also decided to give Ponsford's Ciabatta from this same book another go, which has previously given me fits. As usual, probably because my house is so cold (below 60 at night sometimes) it took about 36 hours instead of 24 for the biga to develop. But this time around, I actually got a decent loaf of bread. Truth be told, though, I thought the poolish ciabattas I've made before tasted better. I don't see much advantage in using so little yeast (1/4 tsp of yeast is disolved into a cup of water -- then 1/2 tsp of that water is used to leaven the biga!) for the home baker, though I can see how it would be a big advantage for a professional baker to be able to let it ripen 24 hours.


Finally, I made a couple of Colombia batards, also from Glazer's book. MountainDog turned me on to this bread, for which I'm very grateful. Clearly, as bulbous as these loaves are, I should have let them proof another 30-60 minutes, but odd-looking bread for dinner is better than day-old bread the next day (well, most of the time). They tasted lovely, as always.


And the innerds, which, had I waited another 45 minutes, would have likely been more open. But, alas, the soup would have had no accompaniment.

JMonkey's picture
JMonkey

I swear, it's just about impossible to kill a starter. I'd left my poor rye starter unfed in the fridge for at least three months, and when I opened it a couple of days ago, the top was a slimy grey with some sort of fuzzy stuff starting to take hold. But, as I often find is the case, underneath this disgusting, repulsive crust, though the starter looked tired, it also looked undamaged.

 I fed a dab of this under-crust starter a few times and it soon looked ready to make a loaf of bread. So I did -- a loaf of 40% Rye with Caraway.

Such a tasty loaf. And it paired well with Carol Lessor's Chicken with Ginger & Dill Soup from Souped Up!. I'd been admiring the recipe for some time, but it called for boiling a whole chicken, which I usually don't have handy. At the Winter Farmer's Market this weekend, however, a woman was selling stew hens for cheap, so I picked one up for about $6. For those who have the book, it seemed like overkill to me to boil the chicken and vegetables in chicken stock, so I just used water.

It's a good soup.

The bread was good, too. Here's how I made it (It's the same recipe that I put in the handbook. I adapted it from Jeffrey Hamelman's Bread so that it would work with my 100% hydration starter. I also bumped up the water in the loaf and omitted the commercial yeast. I figure the sourdough is strong enough to do the job so long as I've got the time to wait.

Formula
Whole rye flour: 40%
White flour: 60%
Water: 75%
Salt: 1.8%
Caraway seeds: 1.8%

40% of the flour (all the rye) is in the starter at 100% hydration

Ingredients
White flour: 300 grams or about 2 generous cups
Rye starter (at 100% hydration): 400 grams or 1.25 cups
Water: 175 grams or ¾ cup
Salt: 9 grams or 1.25 tsp
Caraway seeds: 9 grams or 1 Tbs + 1 tsp


Mixing
Dissolve the starter into the water, and then add the salt and caraway seeds. Add the flour and mix until everything is hydrated.

Dough development and the first rise
You’ll want to do either the stretch and fold or traditional kneading. Either way, it’ll be a little tricky because the rye will make the dough sticky. Keep at it – the dough will come together, though it will be more clay-like than a 100% wheat dough.

Shaping
Be gentle. You want to retain as many of those air bubbles as possible. Rounds and batards are the traditional shapes.

Second rise
You can let it rise for another 2 hours at room temperature. You can also speed things up (and increase sourness) by placing the dough on an upturned bowl in the bottom of a picnic cooler, throwing a cup of boiling water in the bottom and covering it quickly. After an hour, throw another cup of hot water in. The rise should only take a 90 minutes this way.

Baking
Score the bread as you like. Hash marks are traditional for rounds, and batards usually take a single, bold stroke down the center or a couple of baguette-style slashes.

I baked this in a cloche at 450 degrees for about 40 minutes, taking the top of the cloche off about halfway through.

Tomorrow: a big fat tempeh reuben for lunch! (What?! That doesn't sound good? Truth be told, it sounds awful to everyone else but me in my family, as well. But to me ... heaven.)

JMonkey's picture
JMonkey

MountainDog's blog entry on overnight Colombia loaves struck my fancy, so I made a single loaf for the family. What a hit with my family!


I was a bit pressed for time in the morning, however, since I need to have the loaf ready to make sandwiches (I get up at 5am for work, and I work from home). They should have risen another hour, probably, so the crumb was not as open as it could have been, but the loaves tasted fantastic. It's amazing what a small amount of toasted wheat germ and barley malt will do for a loaf's flavor and color.


Earlier in the week, I also made sourdough pizza.


It's easy to do, and, since I made four doughballs, it allows me to bake a couple and then put a couple more in the freezer for another time. All I have to do is put them in the fridge the night before, and then take them out a couple of hours before I'm ready to shape the pies.

Here's how I do it:

Formula

  • Whole wheat flour: 60%
  • All-purpose white flour: 40%
  • Water: 80%
  • Olive oil: 5%
  • Starter accounts for 2% of the flour at 60% hydration


Ingredients

  • Whole wheat flour: 420 grams
  • AP flour: 290 grams
  • Water: 572 grams
  • Salt: 15 grams
  • Olive oil: 36 grams
  • Starter: 25 grams


The night before, I first dissolve the starter into the water, and then add the salt and the oil. Finally, I mix in the flours, until everything is nicely mixed. Then, let it rest for about an hour, and then do three stretch and folds with about 20-30 minutes between each. I then cover the dough, and let it rise all night.

The next morning, I see whether the dough has risen enough (8 - 10 hours is usually enough) and then divide it into 4 doughballs of about 340 grams a piece. Two dough balls go into the plastic baggies in the fridge, while the others go in plastic baggies in the freezer.

I remove the fridge doughballs two hours before baking, and shape them into tight balls. I then cover each with a cereal bowl. While they warm up, I prepare the toppings.

Tomato sauce (for two pies)

  • 1 14 to 16 oz. can crushed tomatoes
  • Oregano: 1/2 tsp
  • Basil: 1/2 tsp
  • Garlic: 2 cloves, diced
  • Lemon juice or red wine vinegar: 1 Tbs

I mix this up, and set it aside, adding salt if it needs it. Some canned tomatoes are already well salted. With the brand I use, though, I usually have to add 1/2 tsp or so.

Cheese blend (for two pies)

  • Whole fat mozzarella, grated: 4 oz.
  • Parmesan, grated: 2 ounces
  • Feta, crumbled: 2 oz

Other toppings are, of course, up to you. I like chicken sausage, black olives and mushrooms, myself. Roasted red bell peppers are awesome. Fresh tomatoes are great (under the cheese), when available, as are fresh basil leaves, added just after the pie comes out of the oven.

Shaping the pie
First, an hour before I'm ready to bake, I insert a stone and set the oven as high as it will go. When I'm finally ready to shape, I generously dust my peel with semolina flour or cornmeal. Then, I make a small pile of AP flour next to where I'll shape. I coat my hands in flour, take a dough ball, coat it in flour on both sides, and then place it on my knuckles. I bounce the dough on my knuckles in a circle, gently stretching the dough with each bounce. When it's halfway there, I place it on the peel, and stretch it all the way out. make sure you stretch the edges apart -- don't stretch across the dough, because the center will be fairly thin and will tear.

Before adding the toppings, I make sure that the pie will move on the peel. Then I add sauce, cheese and toppings and then bake on the stone for 9-11 minutes. I let it cool for a few minutes on a rack before cutting into slices.

JMonkey's picture
JMonkey

It's been a while since I posted, mainly due to ramped up work and family obligations, but I've not stopped baking. And, despite the fact that both of these breads are white, the vast majority of my baking is still 100% whole grain.

But, dangit, white bread -- I just can't quit ya.

I was particularly pleased with the poolish demi-baguettes that I made for dinner last night. I had my first acorn squash of the season, and had made a soup with it. For some reason, poolish baguettes seemed just the right accompaniment.


These are, without a doubt, the best looking baguettes I've ever made. Took a lot of less-than-perfect loaves, but I think I now understand how to shape these buggers so they don't look like a string bean with big bulbous ends, how to time them so they still have some room to spring in the oven, and how to slash them so they look like ... well ... a baguette.

The insides were lovely.


Today, they were starting to get stale, so I cut the leftover baguette in half and broiled it with some mozzarella, which we ate with a chopped up tomato from the garden. These were about 12 oz each, with 33 percent of the flour in the pre-ferment and a hydration of 66%. I used about 1/16 tsp of yeast in the poolish (135g of water and flour, each) and then about 2g instant yeast in the final dough (270 flour, 135 water, 8g salt). The poolish ripened for about 12 hours, but it's pretty cold in my house -- mid 60s at bestt.

Earlier in the week, I also made a white sourdough (20% of the flour in a thick starter at 60% hydration -- the starter was 100% whole wheat, and the overall hydration was about 75%) which I let retard overnight outside. It was lovely, but the top seemed as if it wanted to peel away. Was probably a little underproofed.


Again, I was pleased with the crumb.


Hopefully, things have calmed down enough so that I can post a little more frequently. I've missed this community!

JMonkey's picture
JMonkey

I've been absent from TFL recently, as work and home have eaten up just about every waking minute, and there have been far too many waking minutes in the past couple of months. I could have stood for a tad more sleeping minutes.

Nevertheless, a family has to eat, so I've still been baking. One thing I learned: Don't double the amount of salt in a bread recipe. I did this by accident, doing the math for 2% in my head and adding 20 grams instead of 10 grams. Not even the birds would eat this stuff. Yuck.

I have had some nice loaves come out of the oven, however. Last week, I made the same doubling error as before, but with the starter. I used a 40% innoculation instead of 20% for this largely white flour sourdough (I added 10% whole wheat). All in all, the loaf was fine, though it wasn't as flavorful as I'd have liked. Rose quickly though, and looked beautiful.


I also revived my rye starter to make a 40-30-30 rye to whole wheat to white flour loaf. I didn't add caraway, and missed it, actually.

Starter is amazingly resiliant stuff. I'd not fed it for months (probably three at least ... maybe even four), and it had acquired a nasty black crust that could have been mold, could have been hoochy gunk (the rye is kept at 100% hydration, but it's still pretty pasty rather than liquid). In any case, it started right back up and made a wonderfully sour rye loaf. The shaped dough stuck a little bit to the baker's linen, so I had to slash it strangely to incorporate the rip and avoid a blown out side. Turned out OK, though, in the end.


And, of course, I regularly make my standby overnight whole grain sourdough hearth loaf (60% whole wheat, 30% whole spelt, 10% whole rye. The secret to getting a good "grigne" I think is not to proof it too long. Two to two-and-one-half hours seems to be just about right.


Mmmmmm. Grilled cheese sandwiches on whole grain sourdough hearth bread.

Pages

Subscribe to RSS - JMonkey's blog