Made my first sourdough bread and failed miserably
Made my first ever SD loaf and post in this forum. Hello everyone~
I didn't have much expectations for this first project to turn out well and I was pretty much prepared to see failure. Although my mood was pretty much sour from it this morning, that's okay, I'll take it as a learning opportunity and decided to share it here (in case some folks are kind enough to help this newbie baker :D)
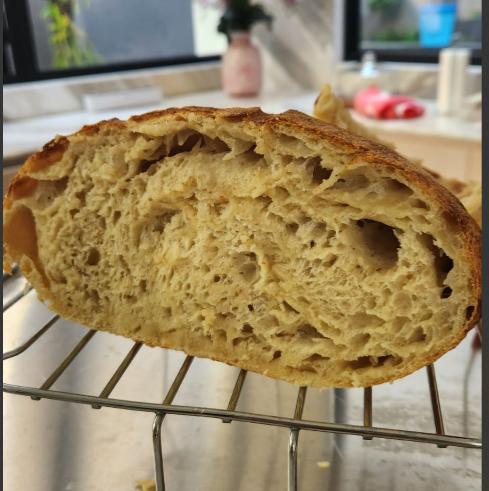
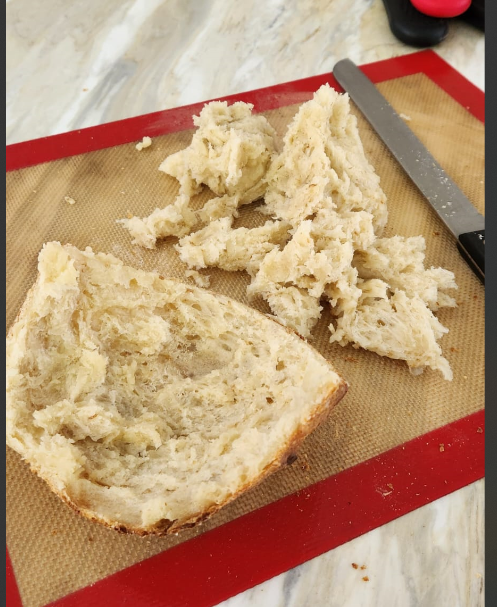
My sourdough turned out gummy and slightly wet. The crust looks pretty good, it browned well despite being a little thick. Burst a little bit at the bottom so I definitely need to work on my shaping and scoring. What confuses me is that I'm pretty sure I left it long enough for it to ferment, not sure why it's still underproofed (this is my own judgement)
Recipe: 500g flour, 70% hydration, 20% starter, 2% salt
I use the 50g bassinage technique.
room temperature is 31°C and dough temperature is 31°C constant throughout. (Tropical country with high humidity)
Workflow:
- Autolyse: 1hr
- Mix
- Stretch and Fold: every 30 mins for 2 hours
- Bulk ferment at room temp: 2hr
- Preshape, then leave for 15 mins
- Shape
- Cold Retard in Fridge 2°C: 8hr
- Bake in the morning in convection oven with steam, 220°C for 15 mins
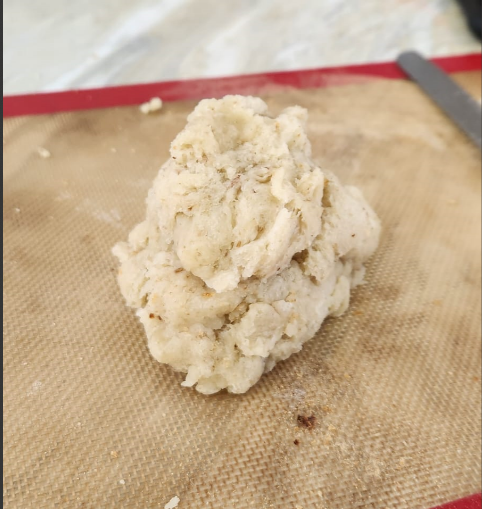
As you can see.. it is so gummy and wet that I can turn it to a ball. It was unpleasant to eat due to the texture so I threw away the inside and keep the crust. Breakfast was wonderful as I eat the toasted crust with butter~
Sourdough gurus and enthusiasts out there...this amateur baker appreciates it a lot if somebody could help troubleshoot.
Love
From Earth

^ Loaf baking in the oven looking good and giving me false hope :D

^Slight burst, skill issue

^ Inside is gummy and wet


Just watched this youtube video , the picture on minute 7:32 looks similar to mine
could this be an oven issue? maybe my oven runs hotter
I live in a pretty similar envoirment as yours, so I can maybe help a bit.
Fermentation times checks out for the temperature and this amount of starter, assuming your starter is pretty strong and healthy, and also I am assuming fermentation time before shaping (aka bulk fermentation) is 2hr s&f sessions + 2hr extra bulk fermentation, so 4 hours total. Bulk fermentation usually refers to total time from mixing the starter in to dividing the dough, so putting bulk fermentation as 2hr can be misleading if you meant that as time after stretch and folds. But if that really is the case, then, on paper, your dough is underfermented. But looking at the crumb I don't think it's underfermented, the bread looks quite well aerated.
Also, are you sure that the oven times are correct? 15 minutes only? It doesn't seem like it was baked for 15 mins due to how brown it looks, but if it is, then its probably pretty underbaked. That amount of dough would need a good 35-45 mins to fully bake through at that temperature. Underbaking results in a doughy and wet crumb because the flour hasn't fully cooked and set yet. Usually underbaked bread collapses after being put out of the oven, and the crumb photo might point to that as well (top crust seperating and bottom crust being gummy). To check how done the bread is, use a meat thermometer stuck into center of the loaf, or try tapping the bottom crust, if it sounds hollow than its fully baked.
The bottom crust also looks kind of pale (possibly contributing to underbaking as well), you can try experimenting with oven settings and placement to fix that. The burst on the bottom might mean that the top crust set too early during baking, so the top crust dried out and the loaf burst on the bottom. But I'd focus on fixing the wet crumb first.
Hello 5 is nice~
Thank you so much for taking the time to assess my bread situation, and also for taking the time to write this very helpful guide :D
And yes, it was only 15 minutes.. it is a commercial oven so maybe it might be a little bit hotter. It does have a build-in thermometer and I made sure it was 220°C throughout the baking process. So maybe tomorrow I will try to lower the temp abit while baking..
thanks thanks so much for the tip :D I will keep you posted!
Love
From Earth
There are alreaady some discussions on this site about baking in convection ovens. I won't recommend just tuning down the temperature too much, because you get reduced oven spring, although it will reduce overbrowning which also is an issue you are trying to fix. It might be worth a shot though, since it's a simple thing to change. 210°C might be as low as I would go.
If that doesn't work, I'd recommend checking out the baking methods people have developed here for convection ovens, you can use the search box for deeper diving. Usually the idea is to preheat the oven hot (~250°C or so usually with a baking stone/steel or dutch oven) for oven spring, and then immediately after the bread is loaded the steam is injected and then the oven is turned off to stop the vents and the fan from drying the bread (turning the oven off is unecessary if you are using a dutch oven, or if you can just shut the fan off by itself). The bread then bakes in the steaming stage with the oven off, and then the oven is turned on again, and set to a lower temperature than at the start (~210°C or so) to brown thoroughly.
I agree that the bread looks like it was baked too hot. Basically, the loaf looks quite good. Those larger holes are mainly related to your shaping technique, not proofing or baking.
If you haven't done so already, it's a good idea to check the temperature of the inside of the bread with a probe-type thermometer. Unless the temperature gets near the boiling point of water, the interior will be moist, probably gummy, and maybe undercooked if the temperature is relatively low. That seems to describe your loaf. For this kind of loaf, the inside temperature should be around 209 deg F/98.3C or higher (at sea level; the right temperature will be lower at higher elevations since the boiling point of water is lower).
Even at that temperature, some very wet or heavy doughs will need more time to dry out.
The baking temperature to use will be a balance between getting the crust and color you want, and drying out the inside. You can always dry out the inside further by lowering the temperature later in the bake to a point where not much browning can take place. 375 deg F/190C is usually good. You can instead cover the loaf with aluminum foil, which will reduce further browning.
If the loaf is only slightly gummy, then it probably needed to cool down and rest for several hours before it was cut.
TomP
I will try it and keep you posted~
my second loaf I did everything the same and just lower the temp to 200°C, it has better oven spring and the inside is less wet. But still, I think the crust formed too fast and the bread didn't rise optimally.
I think this looks better than the first one, and if I toast it I could eat all of it and not just the crust. I even made french toast with it~ hehe. So I think I'm going in the right direction by tweaking the temp.
I baked my third loaf after asking around fellow bakers who uses the same oven. I even reached out to the dealer to inquire about the settings. Well, turns out it is very complicated... I was pretty bummed out because it sounds very counterintuitive. I was expecting the baking process to be much easier when using this expensive oven but turns out it's not. But I'll try anything. This is the instructions from the oven dealership (baked using their thick steel tray which I don't have):
Step 1: preheat tray 260°C for 20 mins
Step 2: 100°C for 2 mins. 100% steam
Step 3: oven OFF for 10 mins
Step 4: 230°C for 10 mins
Step 5: 190°C for 5-10, to your desired color
I was watching it like a HAWK. oh my.. but it turned out good (i think, or at least better). Way better than the previous two :D
I looove how it turned out. I can't wait to try with different hydrations and also try the oven settings from other bakers as well. Thank you for everyone here who gave out tips and pointers to troubleshoot my loaf~
Thank you everyone :D
Love
From Earth
Glad that it turned out well for you, I'd be really happy with bread like that, especially the second one. The big fan on a convection oven does not cooperate with the first stage of baking. But a ripping hot start and then oven off when the bread enters works well enough.
Happy baking!
Bake for longer at a lower temp. If the starter is good - and that's always iffy. Enjoy!
I will try baking it at lower temp and also checking my oven temp with a separate thermometer. I will let you know how it turned out~
As others have already pointed out you did not bake this loaf long enough and the temperature was too low from my experience. I routinely bake a variety of San Joaquin Sourdough as set out by David Snyder on this site. I do two 500g batards at a time in my convection oven on a baking steel. I'll use American units as that is how my oven is calibrated. Oven is preheated to 500F on the bake setting and I put in a baking pan with a couple of kitchen towels that are soaked with 2 1/2 cups of water to provide steam. Loaves are loaded onto the steel and the oven temperature is lowered to 460F. After 15 minutes, the baking pan is removed. the oven is set to convection bake at 420F and bread bakes for an additional 20 minutes. The convection setting blows hot air over the loaves resulting in a dark brown and crisp crush.
I would note that there are a lot of ways to have moisture during the early stage of baking. Lots of people use a Dutch oven. this might be fine if you have a wall oven and don't have to stoop. I'm of an advanced enough age that this is completely out of the question using a slide in range and putting a heavy and very hot Dutch oven into a low cooking area is a recipe for back problems. The towel techniques I use was first describe here some years ago and works quite well.