The Fresh Loaf

A Community of Amateur Bakers and Artisan Bread Enthusiasts.

Sourdough

Cooky's picture

ISO one great rye bread recipe

May 29, 2007 - 7:21pm -- Cooky

Hey, y'all. I have finally decided to branch out and give honest-to-gosh rye bread a whirl. I have a nice rye starter working, and I'd love to use it to recreate the fabulous rye I had in southern Germany lo these many years ago. It was medium brown inside -- not as dark as pumpernickel -- with a dark, glossy, chewy crust and a fantastic spongy texture. And oh yeah, the taste. Magnifico. (My memory may be slightly colored by the fact that when I was eating this bread I was a hungry youn'un schlepping a 50-pound pack across the byways of Europe. But it really was delish.)

redivyfarm's picture
redivyfarm

It has been a busy time on the farm so the baking has been streamlined accordingly. RC asked for sandwich bread which inspired me to adapt a recipe that I had baked a dozen times or so last year and abandoned for heartier, tastier breads found here on The Fresh Loaf. This recipe is quick to prepare so the sourdough flavor doesn't develop much. Even with an overnight retard in the refrigerator I didn't get a noticable tang. When it was "my sd bread" I added ascorbic acid for taste. I used excess starter in this baking which always seems virtuous in the waste-not-want-not way. I finally got around to purchasing some single edge razor blades and wow, do they do a nice job of slashing! I noted that this recipe said to slash before the final proof and gave that a try as well for a little different look-

Sourdough Hybrid Loaf

Sourdough Hybrid Loaf

The most interesting thing was that with the practice I'm getting handling a variety of doughs since finding the good folk of The Fresh Loaf, I am able to tweak a recipe enough to get the taste and texture I have in mind. Folding the dough to a good surface tension just "felt right". Many thanks to all!

JMonkey's picture
JMonkey

I baked quite a bit this weekend, but, though it may seem I did nothing but bake, I really didn't. The nice thing about baking, especially now that I'm using the stretch and fold technique instead of traditional kneading, is that there's actually very little hands-on time required, except for bagels -- I'm sure it would work, but I don't want them to ferment that long before popping them in the fridge. So I still sometimes need to knead.

Saturday morning, we had sourdough whole wheat bagels. This time, though, I used a wet, 100% hydration starter. I think the sourdough tang was more pronounced, but it could very well be that I tasted what I expected to taste.

Later that evening, we had Desem bread. This loaf was not my best. Once again, I put the loaf on a hot stone and put the bell top the cloche over it. Once again, I pinched the edge of the loaf, which gave me a flat, burnt edge and prevented full oven spring. Still, it was tasty and the crumb was relatively open. It went beautifully with the broccoli, red pepper and cheddar chowder. Also, I highly recommend this recipe for baked peas.


That evening, I made two loaves of our weekly sourdough sandwich bread. %&*#$@Qing bread STUCK on me. Well, just one loaf. And it didn't rip in half, it just sort of opened up the side a bit. Salvagable. I knew I wasn't being thorough enough greasing the pan. That'll teach me.

Today, I had to be a bit creative. I was eager to make a recipe for Spelt Focaccia from the King Arthur Flour Whole Grains Baking book. But I also had a meeting directly after church for our environmental committee.

I had a plan.

I packed the biga, all the dry ingredients in a big Tupperware, and a small Tupperware with the wet ingredients. Then, just before the meeting, I mixed it all up. After the meeting was done, I folded it, put it in the back of the wagon, and hauled the dough and my daughter back to the house (it's less than a mile away). Mission accomplished. The topping: roasted onions and olives.


I paired it with a simple salad and cream of asparagus soup.

The focaccia was good, though next time, I'll use plain olives instead of kalamata. Far too salty.

Next week, my folks are up and we're heading to Providence, RI, to try Al Fourno, the birthplace of grilled pizza! I'll report back. (Last week, btw, I visited the Cheese Board in Berkeley, Calif., which makes just one type of pizza every day. A real hole in the wall joint, with a sourdough crust. I loved the place -- we bought a bottle of wine and sat down in one of the six chairs they've got beside the three-man jazz band playing that night. The pizza? Eh. Was OK, but I wasn't wowed.)

mse1152's picture
mse1152

Oh well...

After reading so much about people's love of the Thom Leonard country French bread, I decided to try it, following the steps in mountaindog's post. Here's the breakdown:

Starter: Early Thursday, I began the rye starter with a generous teaspoon of my active white starter, 1 T. dark rye and 1 T water; fed it the same rye and water amounts almost 6 hours later - had good bubbles at that point. Just before bed, discarded half of it, and fed same amounts again. Friday at about 6:45 a.m., I fed it 50g each of rye and water, without dumping anything. It doubled in 3 hours and was very bubbly!

Rye Starter


Levain: I mixed the levain at 7:00 p.m. Friday. The starter had not moved up or down, and I wonder if I should have feed it once more; the instructions say you can feed the starter up to 12 hours before mixing the levain, so I thought I was in the ballpark. Next morning, Saturday, the levain looked like this at about 6:40 a.m. (no such thing as sleeping in with a toddler in the house):


TL Levain


OK, looks good! I began mixing the dough around 7:00. I added no extra flour to knead, which I did for 10 minutes, then 5 more minutes after adding the salt. The dough was pretty firm, not sticky at all. I think mountaindog said it felt like piecrust dough to her, and I agree. Rested the dough for 30 minutes, then did the 3 S&F cycles with 30 minutes between each. The dough was easy to stretch out, but it felt like nothing much was happening until the 3rd cycle, when it began to feel like there was some growth going on. Then it sat in the bowl for the remaining 90 minutes, at about 69F.


Resting and Shaping: I divided the dough into 2 balls, and rested them for 15 minutes, then further shaped into boules and set them on parchment to proof (I don't have bannetons), on a baking stone. Heard plenty of bubbles popping as I tried to gently increase the tension.


Proofing: OK, here's where I deviated a little (busted!). I wanted to make sure the bread was baked before we went to a friend's house for dinner (pizza, go figure). So I used the proofing cycle in my oven, set to 85F. Covered the dough with oiled plastic, and set timers to check once an hour. After two hours, a small tragedy began to unfold:

whoops


The dough had outgrown the stone; it felt nice and light, though. The top one in the picture is mangled because I had started to try to rescue it, then (in true Fresh Loaf fashion) thought to grab the camera for posterity. At first, I had dough damage panic, then I started to chuckle sort of oddly, and thought "Wait, I really meant to make oblong loaves...yes, that's right! Oblong!"


TL reshaped


...show's over, go on about yer business, folks...back in the warm oven they went for another hour (3 hours total proof).


Bake: Since mountaindog has posted about baking this bread from a cold start, I did that too. Set the oven to 425F and made some of the ugliest slashes I've done recently...too ugly to photograph in the raw. Here's how it all turned out:


TL loaves


They rose, and they look edible, but in a sorta grocery-store-ish way. Well, let's see what's inside, shall we?


Aw, RATS!


TL crumb


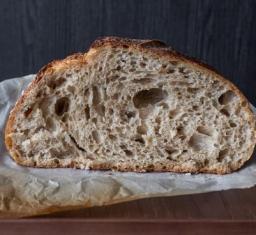
The holes were left on the cutting room floor! Though I think that any degassing during the reshaping didn't affect the interior of the loaves; I don't think the crumb would have been open even if the boules had proofed fully untouched. The flavor is mild and it's quite edible, with a slight tangy aftertaste, but I was disheartened at this result. Sounds pretty civilized, eh? Actually, I pouted a bit and exercised my vocabulary, if you know what I mean.

So I'd like to ask the Leonard veterans if anything I described in the procedure sounds like the culprit...other than extreme dough-handling mid-proof. Maybe that's the only problem, who knows?

Now I'm off to go check on TT and JMonkey's starter escapades...

Sue
Kjknits's picture

Reviving my frozen starter

May 18, 2007 - 2:19pm -- Kjknits

I seem to go through spurts of feverish obsession with things. Knitting, sewing, bread baking. Actually it goes in cycles, because I always come back to those things, even if it has been so long that you'd assume I had lost interest. Of course, right now I'm all about the bread baking again (even though I always bake bread, the rustic type hasn't been in the forefront lately--till now). After hanging around these boards for a while, I decided I should really get my old frozen sourdough starter out and try baking with it again.

JMonkey's picture
JMonkey

Well, I said I'd make this later tonight, but I didn't exactly expect it to be this late. Ah well, it'll still be "later today" for about 20 minutes.

Anyway, here's what I propose, TT.

  1. Let's use SourdoLady's method, with just a few caveats.
  2. If you've got scales, I'd prefer to use equal weights of flour and liquid ... say 1 ounce flour and 1 ounce water instead of 2 Tbs.
  3. If you don't have scales, no biggie -- we'll just follow SourdoLady's measures.
  4. My grocery store doesn't have pineapple juice so far as I know, so would it be alright to go with orange juice?
  5. I'll use freshly ground flour, as that's all I've got. Hope you don't mind, but since I've got the grains here, I'd rather not go out an buy a bag. What brand will you be using? If you can find fresh-ground flour, that'd probably help, but it's not necessary. I didn't use fresh-ground for either of the starters I made. I've got a whole wheat starter that I began with rye for the first three days and then switched to white flour -- I converted to whole wheat a few months later. That's Arthur the Whole Wheat Starter. Rhonda Rye is a pure rye starter.
  6. How about we start Saturday morning and we'll just post our pictures and commentary here. Sound good?
  7. Would you rather start with rye, whole wheat or whole spelt? I can do any of the above, though my preference would be whole wheat.
  8. Let's stick with whole grains until we're sure we've got something going. I think we'll have an easier time of it and, once we're sure the culture is alive, we can convert to white flour.


Sound good? I'm rarin' to go!
bwraith's picture
bwraith

Sourdough Whole Grain Sandwich Loaves

Sourdough Whole Grain Sandwich Loaf

Sourdough Whole Grain Sandwich Loaf

I finally decided to give a try at an (almost) whole grain sandwich loaf. Admittedly I didn't switch my starter over, but I only have a few percent of the flour contributed from the white flour starter. Many thanks to all the contributors to thefreshloaf.com, including at least JMonkey, ehanner, mountaindog, browndog5, Srishti, zolablue, sourdough-guy, sourdolady, tomsbread, and breadnerd for the very useful pointers on handling of whole grain breads. I didn't quite do justice to the good information, as you can see, but the crumb is certainly open enough, light enough, and soft enough, as well as having a nice flavor. I was happy with these results for a first try. I definitely overproofed them, partly because the cooler with warm water technique for the final proof was very effective.

I've included a few additional photos, although I didn't photograph the whole process this time. I also included a spreadsheet with weights of ingredients in ounces, grams, and baker's percentages.

Ingredients

Recipe Starter

  • 142 grams 100% hydration starter (I used a white flour starter)
  • 227 grams whole spelt flour
  • 113 grams water

Dough

  • 40 grams malt syrup
  • 4g diastatic malt powder
  • 581 grams water
  • 397 grams red whole wheat (I used KA organic WW Flour)
  • 57 grams rye (I used KA rye blend, but substitue with WW flour if you want)
  • 170 grams white whole wheat (I used KA Organic White WW Flour)
  • 17 grams salt
  • 28 grams olive oil

Mix

The night before you plan to bake, mix the starter ingredients, and knead them for about 2 minutes to make a dough out of them. Let rise in a covered container for about 4 hours at room temperature until doubled and refrigerate overnight.

Also the night before you plan to bake, mix the malt syrup, diastatic malt powder, water, and all the flours and place in a covered container. Refrigerate overnight.

The next day, cut the starter into small cubes. Spread the refrigerated mass of flours, water, and other ingredients out on the counter and press the cubes into the mass. Sprinkle the salt and oil over the mass. Press the heels of your hand into the mass to force the ingredients to mix well. Roll up the mass and knead a few times to further mix the ingredients. You can then spread the mass out again and press it flat and then roll it up. After 2 or 3 repetitions of spreading out, pressing flat, and rolling up the mass, the ingredients will be well incorporated and the mass will seem more like a dough. It will be very sticky, but if you keep the counter surface, the dough surface, and your hands wet, it is not difficult to handle.

Bulk Fermentation

Place the dough in a rising bucket. Every 30-60 minutes for the first couple of hours, turn the dough out on the counter and fold it. After a few folds, just let it rise until it has doubled. The dough should double in volume in a total of about 4 hours at room temperature. The idea is to do enough folds to get the dough feeling elastic and resilient, but not so many that it begins to feel very stiff and loses its elasticity.

Shaping and Final Proof

I shaped according to JMonkeys video. The dough should be split in two, formed more or less into batards, and placed in two loaf pans approximately 9 inches long. To form the batards, just lay one of the two halves of the dough out in a long rectangle and roll it from the short end, stretching the outside surface as you roll it. You may want to tuck some of the end of the roll in toward the center a little as you roll it up. Seal it and tuck the ends under, and place into the pans with the nice, stretched surface up. You can put a little oil on the surface of the loaf to protect it from drying out. Place the pans in a warm humid place to rise. I put them in a cooler with a bowl of warm water next to them. Allow them to rise by approximately double or a little less.

Unfortunately, the temperature was very warm in my garage, where the cooler was, probably around 85F. I let them go for 4 hours and then realized they were way overproofed. The result was no oven spring. I shouldn't have slashed them and just put them in the oven. You can see what happened in the photos. I think if I had stopped the final proof at about 2 hours at 85F, I would have had a better slash with oven spring and so on. I know I'm getting close to figuring this out, as the loaves still had a flavorful, open crumb.

Bake

I baked these starting in a cold oven for about 45 minutes at 425F.

Cool

Once the loaves have cooled for a minute or two, remove them from the pans and allow them to cool on a rack. 

Pages

Subscribe to RSS - Sourdough