The Fresh Loaf

A Community of Amateur Bakers and Artisan Bread Enthusiasts.

Blogs

Naomi Yoheved's picture
Naomi Yoheved

I have never had much success with Rye bread, and have no experience.  Can anyone suggest a good true to form marbled rye recipe?


Naomi Yoheved

Naomi Yoheved's picture
Naomi Yoheved

Hello everyone!

I'm here just to let you know that there is a new llocal flour mills just outside Thunder Bay, Ontario from Brule Creek Farms.  The wheat is grown locally and stone milled locally.  I have just heard about it through the local farmers market, but I am looking forward to trying it on my bread recipes.

Naomi Yoheved

Janedo's picture
Janedo

Hi all! I've been one busy person what with the holidays, kids, etc. But now life is settling into a more calm and regular rhythm. So, I'm BACK!

Over the holidays, Steve from Breadcetera, and I did a flour swap (yes, it cost a fortune!). We sent each other dried samples of our starter and flour. I sent him some organic stone-ground T55 and T65 and he sent me some KA AP and bread flour. Not so much because he himself uses that particular flour, but he figured it would give me an idea of the type of flour many people bake with.

I was VERY excited to try the All-Purpose flour for two reasons. I wanted to see how it felt, how it worked and what it tasted like but also I wanted to test Flo's 123 formula because many people seemed to have trouble with it.

So, here are the results:

I did up a dough of 150g starter (100% hydration), 300g water and 450g KA AP and 9g salt.

There is obviously more or different gluten in the flour. It takes AGES to get developed. With the T55 or 65, you literally only need to knead a few minutes to get a good dough formed, but with the KA AP, at initial mixing (in a Kenwood) it was rough and together, then went gloppy and then got extremely elastic (TOO elastic). It took quite a while to mix. So, this leads me to believe that for those who found the dough too wet may have hand kneaded and found it gloppy, but it would take ages to knead by hand to get the right consistancy. With French flours, the dough is wetter than with American flour which is the opposite of what people believe. I think it just the kneading time. More flour would have made a dough that would be much too firm (to my liking).

When it was finally risen and baked, I took it out of the oven and to my surprise, it was SHINY and smooth crusted. It looked plastic. Now, I did everything exactly as I always do, no changes, no more steam than usual. It was really weird. Then, with my husband next to me, we smelled it. We looked at each other and said, It doesn't smell like anything! OK, then we left it to cool and cut it. I handed pieces to my family in different rooms. My son said, it doesn't taste like anything. I went to my daughter who smiled and said, "It's good!... but it doesn't have any taste". The overall concesus was that it really didn't taste like anything at all.

So, I got thinking, and I understand a lot of things now. I understand why preferments are so important and retarding and adding rye, etc. If you bake with KA AP as your basic artisan bread flour, well, it really needs help!

In France, the non organic flours that bakers use can lack in taste but it's still a lot tastier than the KA AP. So, the French organic flour is pure bread heaven.When a loaf comes out of the oven, it smells so incredible, a blend between deep wheaty aroma and the slight tangy, yet earthy sourdough. I did  up some Mike Avery's version of The Three Rivers bread that I spoke about on my blog for a cheese fondue and even though there is no sourdough, just poolish and retarding, it could have been mistaken for a sourdough, it smelled so incredible.

I guess I'm being French chauvinistic, but ever since I joined this group and have shared and learned so much from you, the huge question that has lingered for me has been all about American flour, how it reacts and tastes. I'm sure there are some better flours out there. Many speak of some organic brands, Guisto's and some other mills. I know it's more expensive, but if you're looking for something tastier, it's a good idea to try some of them. Oh, and remember, French wheat is soft, not hard. I think that makes a big difference.

So, I invite discussion and ideas or questions. I'm all ears.

Jane


SylviaH's picture
SylviaH

I needed some easy  burger buns and these were perfect with just a few changes!  Hamburger/sandwich Buns with added 12 grain KA flour and potato.  I left out the gluten...original recipe from Beth Hensperger Bread Machine Cookbook.  She has some amazingly good recipes in this book!  These had a very nice flavor and crust with a tender crumb....great for sandwiches!


Stephmo's picture
Stephmo

In getting started down the path of baking, I'd been having problems with dough failing to rise in the oven or the second time - so the enthusiasm of this bread comes in having the faith to cut my rise times in half sine I was using Fleishman's instant yeast.  Once I did this, I was able to get the bread I finally wanted without the disappointment of a heavy, dense loaf that seemed like it should work.

After reading up on the policy of repriting recipes, it seems I'm okay to share how I got to this point.  If it's a problem, I do hope someone will let me know.  :)

Anyway, husband is a tremendous fan of all things cinnamon and sugar-based, so he was wanting a cinnamon sugar bread since the baking experiment began.  When I'd gotten the King Arthur Flour Baking Companion, he zeroed in on the recipe for Cinnamon Swirl Bread on page 206-207.  It can seem a bit daunting with the Dough, Filling and Topping ingredients, but let's break it down, shall we?

All of the ingredients pictured (some things premixed):
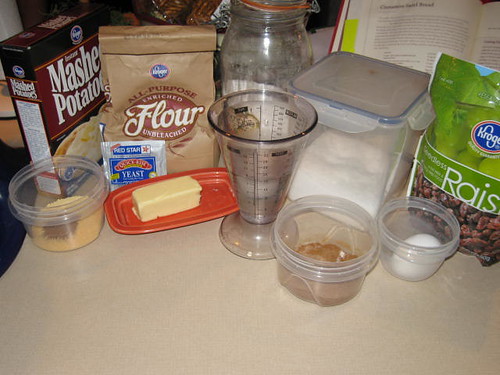
But let's start logically with the DOUGH:

3 cups (12 3/4 oz) unbleached all-purpose flour

1/4 cup (1 1/2 oz) potato flour or 1/3 cup (3/4 oz) potato flakes)

1/4 cup (1 1/4 oz) nonfat dry milk

1 1/4 tsp salt

1/2 tsp cinnamon

3 Tbs (1 1/4 oz) sugar

2 1/2 tsp instant yeast

4 Tbs (1/2 stick, 2 oz) butter

1 cup (8 oz) water

For reference, I opted for the potato flakes and used unsalted butter. All ingredients were at least room temperature.
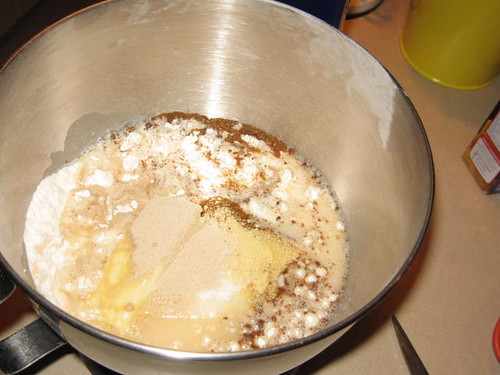
From KAFBC:

In a large mixingbowl, combine all the dough ingredients, mxing until dough begins to come away from the sides of the bowl.  Knead (about 10 minutes by hand, 5 to 7 minutes by machine) until the dough is smooth and satiny.  Transfer the dough to a lightly oiled bowl, cover the bowl ith plastic wrap and set it aside to rise for 1 to 1 1/2 hours; it will be puffy, if not doubled in bulk.

Once I'm convinced everything's going well enough, I acutally let the mixer do ALL the work on this sucker.  I was doing this after work so I took time to go upstairs and change and came back to see that the dough hook had done its job rather nicely (my mixer and I are good friends now):

I check my rise after 45 minutes and do the "poke" test - where I see if my poke sticks.  As you can see, I do have a doubled dough and a poke that's more than sticking.  So rather than risk tiring out the yeast, I decide to move onto next steps:
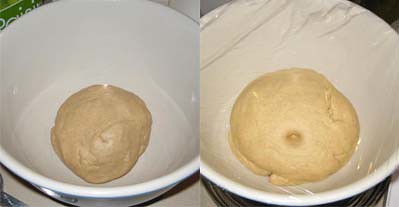
Next steps for Cinnamon Swirl Bread involve the FILLING Ingredients:

1/4 cup (1 3/4 oz) sugar

1 1/2 tsp cinnamon

1/4 cup (1 1/2 oz) raisins or currants

2 tsp unbleached all-purpose flour

Egg wash, made from 1 large egg beaten with 1 Tbs water

For my bread, I used raisins.  Husband thinks we could have doubled the swirl ingredients.  From the book:

Pulse the filling igredients except the egg wash in a food processor.

TO ASSEMBLE:  Transfer the dough to a lightly oiled work surface and shape it into a long, narrow rectangle, about 16 x 8 inches.  Brush the dough with some of the egg wash (set the remainder aside) and pat the filling gently onto the dough. Beginning with a short edge, roll the dough into a log.  Pinch the side seam and ends closed (to keep the filling from bubblng out) and palce te log int a lightly greased 8 1/2 x 4 1/2-inch loaf pan.  Cover the pan with lightly greased plastic wrap or a proof cover and let the bread rise for a bout 1 hour at room temperature, or until it's crowned about 1 inch over the rim of the pan.

I actually made this a little bit simpler than it sounds - I laid my loaf pan at one end of the counter and rolled my rectangle towards it as a guide, keeping the width slightly narrower than the pan.  The dough was very silky, so I really just sprayed some Pam on my kitchen island for the "lighly oiled" portion of the instructions.

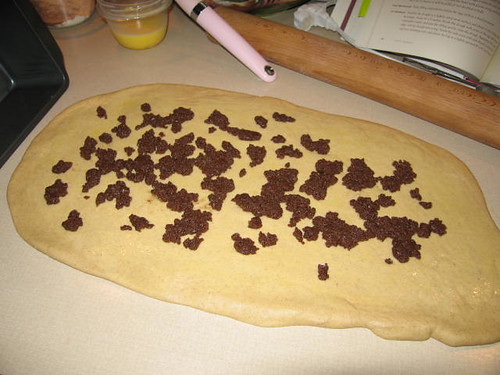
Here's the dough rolled out - you can see my loaf pan "guide" on the far left.  I don't know if it's just me, but the cinnamon in the dough really seems to come through for me:
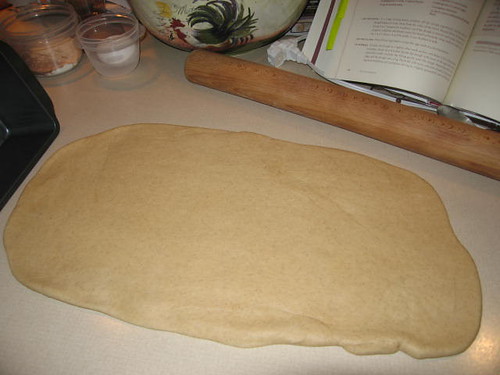
The filling was VERY clumpy (raisins!), so it didn't spready as easily as I would have liked.  This is also where the discussion of doubling the filling for future batches came in:
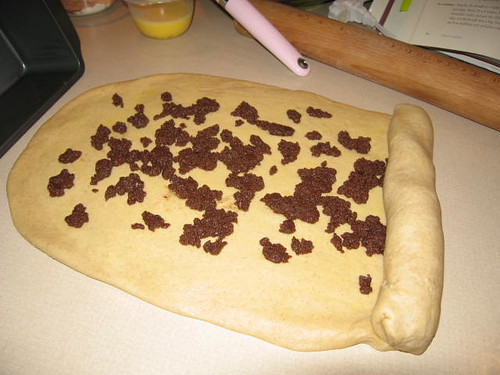
The rolling was actually a snap.  I did the side tucking as I went along and went towards my loaf pan:
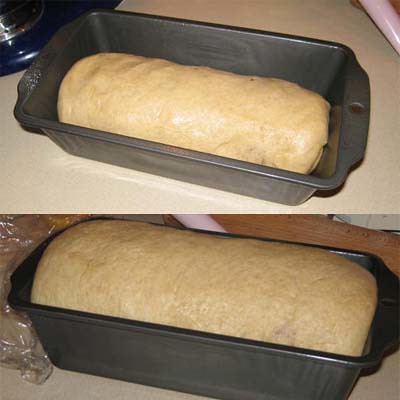
Again, with the rising, I checked out the loaf in only HALF the time - and good thing!  Doesn't it look like I'm an inch above the pan?
Now for the good suff - the TOPPING:

2 TBS (1 oz) butter

2 Tbs (7/8 oz) sugar

1/4 tsp cinnamon

1/4 cup (1 oz) unbleached all-purpose flour

I will say that this made MORE than enough of the topping.  From the book:

In a small bowl or mini processor, combine the butter, sugar, cinnamon and flour until the mixture is crumbly,  If you're using a mini processor, watch carefully; topping will go from crumbly to a cohesive mass in just a second or so.

Brush the top of the loaf with some (or all) of the reserved egg wash and gently press on the topping.

Preheat the oven to 350 degrees.  Bake the bread for about 45 minutes, tenting it lightly with aluminum foil or the final 15 minutes or so if it appears to be browning to quickly.  Remove the loaf from the oven, and after about 5 minutes, quicky remove it from the pan.  some of the streusel will fall off, but you can alleviate this by first loosening all around the edges of the loaf with a knife, then turning the pan on its side and gently pulling it away from the loaf.  Topping will continue to fall off as you maneuver the bread -- we've never figured out how htey make that stuff adere so nicely on the store-bought loaves -- but you'll still be left with a lot of the sweet topping.

I did actually score the top of the loaf lightly before baking it - you can't really tell, but I did:
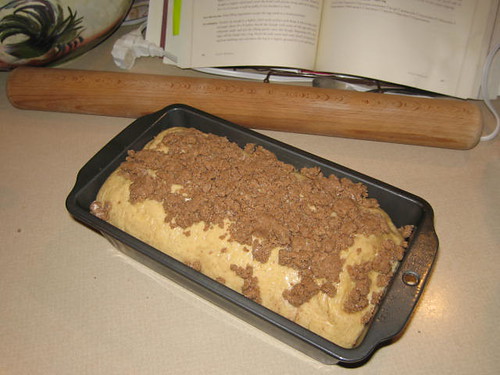
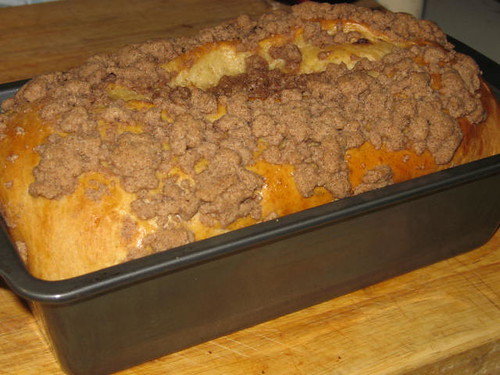
The oven browning was FANTASTIC - we did tent it for a bit to save on some of the browning and you can see that the split did come through (as did a bit of the filling, but that's okay):
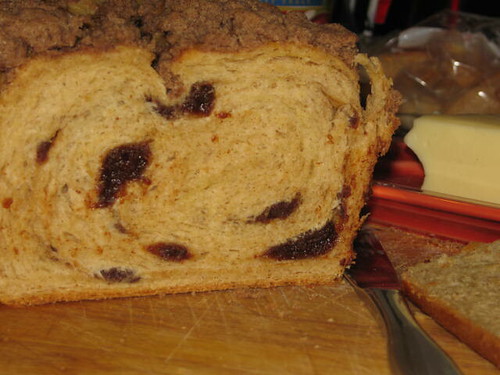
Slicing into the bread was amazing - it smelled fantastic and made GREAT toast and snacks.  It was great with cream cheese and peanut butter as well:
hansjoakim's picture
hansjoakim

I hope everyone had a merry Christmas and lovely new year celebrations!

After getting the rye sauerteig starter from Leader's Local Breads going, I have been gradually working my way through Hamelman's rye sourdoughs. I've become completely enamored with hearty rye loaves, and I feel I am getting a bit better at working with these kinds of doughs.

I've baked the straight oatbread from Bread several times, and it has served as one of my favorite "quick breads" that I make when I don't have the time to do a sourdough/pre-fermented bread. However, I've always thought that it's on the light side, and that it stales pretty fast. So, yesterday I had a go at a modified version, where I replaced some of the bread flour with a rye sauer. This is my first iteration, but I feel it turned out pretty good. I post my working recipe below. Next time, I think I'll substitute some of the bread flour with more wholewheat, to give it an even heartier feel. Suggestions are very welcome, and please let me know how it turns out if you have a go at it!

All the rye flour is pre-fermented (34.7%). Apologize for the awkward percentages, I did some tweaks to a preliminary formula, so most quantities came out with decimal percentages. The amounts below yielded two average sized ovals.

Overall formula

  • Wheat flour 260 gr. (42.1%)
  • Wholewheat flour 143 gr. (23.2%)
  • Whole rye flour 214 gr. (34.7%)
  • Rolled oats 143 gr. (23.2%)
  • Water 540 gr. (87.5%)
  • Oil 54 gr. (8.8%)
  • Honey 36 gr. (5.8%)
  • Salt 12 gr. (2%)
  • Fresh yeast 8 gr. (1.3%)

Rye sourdough

  • Whole rye flour 214 gr. (100%)
  • Water 214 gr. (100%)
  • Rye starter 11 gr. (5%)

Prepare rye sourdough 16 - 18 hrs. before the final dough is mixed. Bulk fermentation: 1 hr. Final fermentation: 50 - 60 minutes. Bake at 240C for 15 minutes, then at 220C for another 20-30 minutes.Loaves cooling

Crumb

dmsnyder's picture
dmsnyder

pain à l'ancienne

Rustic baguettes and ciabatta from Gosselin's formula (as described by Peter Reinhart)

pai

Pain à l'Ancienne baguette crumb

I made these baguettes and ciabatta from the formula Reinhart says he got directly from Phillipe Gosselin. The version in "Bread Baker's Apprentice" is a modification.

This is a very high hydration dough (about 80%), and I made my dough with KAF's "French Style Flour," which is their T55 clone. This is a low-gluten flour, by American standards. The dough started out like a batter once the additional water was added. I mixed it in my Bosch Universal Plus for something like 15 minutes before it was smooth and shiney. It still flowed like a batter. For the next hour, I did Hamelman's folding in the bowl. It then doubled over the next 90 minutes. (This technique was improvised. I thought about chucking the whole project as a lost cause at several points, but I'm glad I didn't. I learned a lot.)

The loaves were divided and stretched onto semolina-dusted parchment. The baguettes were baked without further proofing. The Ciabatti were folded in the usual manner and allowed to rise for about 30 minutes before baking.

Note: No attempt was made to score these loaves.

The baguettes had the sweet taste and cool, silky mouth-feel of ciabatta. I count them a success. Whew!

David

ejm's picture
ejm

braiding

When I made challah earlier this year, I thought I did a 6 strand braid to wrap around the 6 strand woven ball. But it wasn't until I made festive bread this Christmas that I realized how to do 6 strand braiding correctly.

Braiding bread dough is really pretty easy. Even 6 strand braiding, once you get the hang of it, is pretty easy. But you don't have to tell anyone, if you don't want to. The final result is SO impressive!

The main reason that it's easy is that dough strands stay exactly where they are placed. This is a good thing. I highly recommend that you skip the step of practicing with ribbons or chords and go directly to bread dough. What does it matter if the braid is wrong the first time? The bread will taste just as good. And chances are, the braid will be JUST right!

6 strand braid © ejm December 2008
  1. Take the 2nd from left strand in your right hand and the 1st from the left strand in your left hand. You right hand goes all the way over all the strands to the right; your left hand goes over two strands to the center.
  2. Take the 2nd from right strand in your left hand and the 1st from the right strand (just a moment ago, this strand was the 2nd from the left...) in your right hand. You left hand goes all the way over all the strands to the left; your right hand goes over two strands to the center.
  3. repeat 'til finished. Tuck ends under.

braidingbraiding
braiding

This is what the finished braid looks like. Beautiful, isn't it? Note how the ends have been tucked under.

braiding

The bread recipe and more braiding photos are here:

I could never have managed this without looking at the following several times:

-Elizabeth

edit: I made a video of 6 strand braiding!

SylviaH's picture
SylviaH

I made this danish pastry from the recipe on Breadcetera by Michel Suas.  "Thank you very much Steve, your video is wonderful!"  It's definately an improvement over the first posted Danish Pastry...being Irish I of coarse used the suggested unsalted Kerrygold Irish butter...but I really think I would have liked a Danish Cream butter better in my pastry...this is just a personal opinion....the very first time I attempted making a Danish Pastry it was a sourdough one and I used a regular unsalted organic butter and I just liked the way it baked up a lot better and the flavor seemed good to me....not quite so...I hate to say it but...oily as the Kerrygold!!  I guess it's just to rich for my taste buds!

Shaping pinwheels really flattened out my pastry....the croissants however did puff up very nicely and I was pretty happy with the way they turned out...though to rich tasteing for my buds!!  Hope you enjoy the photos:  Sylvia

This dough is ready to roll out and shape into croissants...marked with 3 imprints...showing it's had all it's folds!  It was a lot easier to work with than the first recipe I posted earlier today.

I made these pinwheels, cherry, apricot a lot smaller than the last batch...some rolls have chocolate centers.

The Croissants puffed up very nicely.

Next morning ... I have added in a crumb shot of the croissants, pain au chocolat and danish fruit pastry!

The flavor is very good!  Now I wish I would have made them all a little larger and more pain au chocolat pastries!

Sylvia

Stephmo's picture
Stephmo

A few things converged on this fateful day. I had a craving for hummus, and I was out of pita bread. I didn't really feel like going to the store just for pita bread and then I started wondering how hard pita bread was to make. So to the google! And that's when the Fresh Loaf website informed me of the greatest fact ever. Pita Bread is one of the easiest breads you'll ever make. So the first thing I discover is that it's also one of the cheapest breads that I'll probably ever make. It starts with six ingredients (left to right: kosher salt, instant yeast, flour, buckwheat honey, water and olive oil): I figure that I had less than a buck invested by the time all was said and done. Mostly that's because I'm unsure as to how many cups of flour may actually be in a five pound sack of flour, so I'm guessing 50 cents for the flour. I also find out that my mixer can do most of the work. So mucho credit to the Indigo Master: Okay, an amazing thing happens. The rising part. I set aside the dough in a bowl to rise. It's only supposed to take 90 minutes and double in size. This has been a failure many times before in bread experiments. But LOOK: Here, I've taken my ingredients and transformed them into eight pieces of future pita rounds. These need to rest a bit and you can see the action shot taking place as husband begins to lay the damp kitchen towel over the dough rounds for a 20 minute rest. In the meantime, I heated the oven up and put my pizza stone in the middle to get nice and hot. I had the pizza stone because I like cooking gadgets, but I've never actually done my own dough on it. Once the pizza dough has rested, all that's left to do is roll them into rounds-ishes. This is the fun part as things are actually looking more pita-ish. I do take the extra step of the spray bottle as mentioned in the recipe (I'm paranoid and don't want to chance anything). Mostly, I think I scared the dogs. I do think I could have stood to have rolled everything a bit thinner... Otherwise, I'm incredibly proud of my result - and the pocket that appeared! Of course it was rather late, so the hummus had to wait. This was the beginning of my bread-making adventure. I hope to get more of my stories up here soon!

Pages

Subscribe to RSS - blogs