The Fresh Loaf

A Community of Amateur Bakers and Artisan Bread Enthusiasts.

SylviaH's blog

SylviaH's picture
SylviaH

Happy Holiday Wishes to All!

It's been a long time since I've posted anything.   

I came back today searching for this yeasted bread to bake for a family Christmas breakfast bread.

 It's been so long!  I could not remember the name or where to find the recipe.  After searching I found it. 'Peter Reinhart's, The Bread Baker's Apprentice cinnamon raisin walnut bread'.

 My favorite is to use white raisins and pecans.

This bread is loved and has been baked by so many of our long time Freshloafers!

If you want a  commercial yeasted, fairly easy and super tasting bread to bake.  Try this one. 

Happy Holidays!

Sylviah


SylviaH's picture
SylviaH

Hello Freshloafers!  It's been a while.  I wanted to update a few things.  Mainly me : )   Looks like I could use some practice posting !

Always nice to check in once in a while and see so many of my favorite bakers, baking!

Here's a little helpful hint I came up with for making a fast banneton for your loaves.  Maybe other's have used this idea but I have never seen it.  SIMPLY use the top half of an egg carton...walla, instant banneton.  Just line it with parchment paper.

I baked 3 loaves today.  Using trailrunners suggested use of the roaster pan.  I wanted a fast heat up as these loaves were no particular formula.  I just wanted to use up some extra starter. The roaster pan worked great, other than the loaves burning a little on the bottom.  I sum that up to having to place the large RP in my larger bottom oven that heats from the bottom.   I particularly liked the less heating time before baking.  It's starting to warm up in San Diego. 


I love French Macarons!  This one simply has an eatable wafer I placed upon it.  Lately I've been having fun doing artfully decorated cookies.  A few can take hours of work.  But I find it relaxing and enjoyable.  They are best frozen and given away : )

Life's Good,  Keep on Baking!

Sylvia


SylviaH's picture
SylviaH


I haven't posted recently and would like to wish everyone a very "Happy St. Patrick's Day"!  

Family has kept me busy lately and in a few days my youngest grandson is having some very extensive corrective overbite surgery done.  It's going to be a long recovery.  He's taking it very well and wants to have it done.

To keep things on a cheerier note.  A little St. Pat's Day feast.  Along with the traditional dinner of Corn beef with all the trimmings.  

I make this soda bread a lot.  Everyone loves it and you will find it here on my blog along with some other versions.

http://www.thefreshloaf.com/node/11028/sylvia039s-irish-soda-bread 


Just out of the oven and warm sliced with some Kerry Gold butter.


A family tradition now for 4 generations no that would be 5.  My 22 yr. old grand daughter loves to bake.


And a little added note of fun for today!  I haven't quite been together the past few days with worry.  Can't believe I did this..but here it is.


Too late now...guess you missed it : )


Watch out for the Leprechauns!  They can be real pranksters.


Have a great green day!

Sylvia


SylviaH's picture
SylviaH

It seems everyone is enjoying cheesy bread's lately and with Ian's last post on Calzone and watching 'Diner's Drive Inns and Dives' hosting an old favorite diner of mine and it's Calzone's.  It has certainly put me in the mood for one.   

Mike had taken Saturday off from work to do a mountain bike race and neighbors were all home.  So I was make K.Forkish's levain pizza's for everyone.


Before making the pizza's.

My wood fired oven needed a pre-warm up.  I built a small fire and removed most of the coals and ash.  Thinking I might have enough heat stored in the oven for a little baking.  I decided to make up a quick one day dough for calzone's.  I found just the recipe from Beth Hensperger...mini calzone's.  So I made my version based on the one's I saw on DDID tv show and used BH dough recipe.  I liked it because it also had Semolina or Durum flour in it.

The calzone's were delicious and I was surprised at how light they were dispite the filling.  The crust was crisp and very tasty with the fillings.  Mike loved the one we cut open and ate while I prepared the pizza's.

The rest were frozen as suggested by BH. I liked that idea.  Just place them on a sheet pan freeze and then seal them in a freezer plastic bag, freeze and warm up later for a snack.

I placed them into my WFO and baked them for a few minutes.  I could see the oven was not quite hot enough so I had to remove them and finish baking them in my electric oven.  They turned out great and just needed a few more minutes in a good hot oven.

These are simple and delicious.  This was great time for simple and easy.  I had plenty to do later.


You can easily mix this dough up in your bread machine's dough cycle or by regular mixer.

Here's my version of the recipe.  You won't be disappointed and neither will your kid's, husband or game watcher's when it's snack time.

1 1/8 cups Water

3 Tablespoons Olive Oil

340 g King Arthur All Purpose Flour

63 g of Durum Flour

1 1/2 teaspoons sea salt

2 3/4 teaspoons Instant Yeast

Filling

sliced/diced, ham, pepperoni, sweet Italian sausage cooked, provolone and parmesan cheese.  A dab or two of sun dried tomato in oil with pesto.

Egg wash - one egg yolk with about a TBsp of milk

sprinkle of sesame seeds and Italian oregano on top of calzone's.


  • Pre heat oven 425F - Bake apx. 25-30 - until nice and golden.

ADDED:

After your dough has proofed.  On a lightly flour a surface.  Divide into dough balls for how ever many calzone's you wish to make.  A couple of very large one's or mini's, it's up to you.  Roll into thin rounds, fill, shape and place them onto your parchment lined pan.  Then egg wash, slash, sprinkle with sesame seeds 'opt' and bake.  I didn't proof them any farther than the time it took to put them together.  They went right into the oven and baked.

I have frozen thawed them in the frig, nuked them, frozen and unfrozen and also heated them in my mini oven.  The froze and heated up beautifully.  

Roll out your prepared dough into about 8 or 12 mini calzone circle's.

layer half of the circle, leaving about one inch.  Egg wash edge and fold over and seal.

Egg wash top and sprinkle with oregano and sesame seeds.  Cut slits to vent.

Bake till golden, about 25 - 30 minutes on parchment lined pans.

oops, looks like I'm running out of battery.  I'll have to do any further posting 'proof read' later.

Sylvia


SylviaH's picture
SylviaH

Since baking my first loaf of 100% sprouted wheat flour loaf and other recipes using this flour I have loved everything about this bread and the use of this flour.  It's health benefits and versatility is no less than amazing.

No wonder my first choice and first bake from RM new book 'From the Wood-Fired Oven' is his beautiful loaf of 100% sprouted wheat flour.

I began all my baking preparations with the intent of a WFO bake.  I made enough dough for 6 loaves of my http://wwwefreshloaf/node/29050/sourdough-semolina-country-bread and the lovely SWFS loaf.  

This time I changed my formula for the SSCB by using my Caputo Rinforzato flour in place of the KABF.  The loaves turned out delicious with a lovely chew and crust.  I think a little more chew than when I use the KABF.   All in all I was very happy with the loaves and sent one very large loaf over to my neighbor.  They said the pizza I sent them over tasted just like the ones they had in Italy.  That was such a lovely compliment.  I had told them the flour used was from Italy : ) and this bread also had Italian flour in it.

I don't normally make this many loaves of bread at once.  But since these were intended for the wfo there would be plenty of room and the more loaves the merrier the bake.


Well, to make a long story a little shorter.  Men and their bike's or motorcycles in this case come first.

Mike had a new muffler system installed on his motorcycle.  He is a cyclist bicycles at heart but loves his motorcycle too!

On his way home from the bike shop on his newly installed muffler system it went caput to say the least..the very least.  

The tow service went to the right highway but the wrong town.  Mike was left beside the road in the dark for 2 hours.  He was fit to be tied.

He asked me to take him to the bike shop today because some more parts were supposed to arrive at our house today and he wanted me to drive him to drop off the parts.  The plan was the bike would be would wait for the bike to be fixed and ride it home.   The parts not being delivered on time by our friendly UPS guy.  They arrived to late by postal service.  

I put firing up the wfo off.  To many time warps.  Mike was pretty clueless to what I was planning today.  I didn't fill him in.  He had enough on his mind.  I could fire up the oven another day :)

To make things worse.  After the parts did arrive late.  Tomorrow BMW is closed until Tuesday :/  More delays for Mike.  He'll have to wait a little longer to enjoy his birthday present.


I could not be more pleased with my new WFO bread book by Richard Miscovich.  

To quote Peter Reinhart.  "This is the book for which all wood-fired oven owners, hopeful owners, and serious bakers have been waiting."

It is beautifully written and printed on high quality paper and binding with gorgeous photos.  A wonderful addition to my collection of wfo books.  


This Sprouted wheat flour sourdough is absolutely delicious.  

The only changes I made was to do an overnight ferment and made enough dough for one loaf instead of two.


Levain

Ingredients

Sprouted wheat flour - 89g - 100%

Water -75ºF -                58g -  65%

Liquid starter                 14g    16%


Combine you flour, water, and starter.  I mixed by hand or use a mixer until the flour is incorporated and dough is cohesive.  Mix until there is no more dry flour.

Cover and let ferment at 75º for 8 hours.  Starter is ready when the volume has increased by about 2/3 and is fluffy.


Final Dough                                  Bakers %

Sprouted Wheat Flour    266g       100%

Water                              261g         90%

Sea Salt                               7g          2%


DDT - Adjust water so the dough is 76º at the end of your mixing

Autolyse

Combine flour and water in a mixing bow.  Holding back levain and salt.

Mix until throughly incorporated and homogeneous.  Does not need to develop the dough at this point.  The dough can be of a shaggy.  Cover and autolyse for about 20 to 30 minutes.

Mixing.  Either by machine or hand.

I used my KA mixer on slow.

After the autolyse, add the salt and the levain cut the levain in chunks.  I mixed on slow for about 5 to 6 minutes.  Until the dough was sticky by a little gluten formation was starting and the surface will look a little shiny.  This dough does tear more easily than if using a regular flour.  The dough will transform between mixing and shaping, especially after the second fold.

Place the dough in a covered container and let it ferment for 2 hours, flolding every 30 minutes.  Three folds in all.

Preshape.  Half an hour after the last fold, turn the dough onto a lightly floured surface.  Shape into a loose round ball.

Place on a lightly floured surface, cover and let rest for about 20 minutes.

Shape into a boule or bâtard seam side up.

Let them proof for approximately 1 1/2 to 2 hours.    I did an overnight prove. 

Score with the Carpal Sutra score mark and bake in a steamed 450ºF oven.  

I baked on pre-heated stones for approximately 30-35 minutes.


A creamy delicious crum not to dry or moist with a lovely browned crust.  I just imagine what it will taste like tomorrow toasted.


Pomegranate Jelly makes this a perfect holiday gourmet bread.  Absolutely delicious!
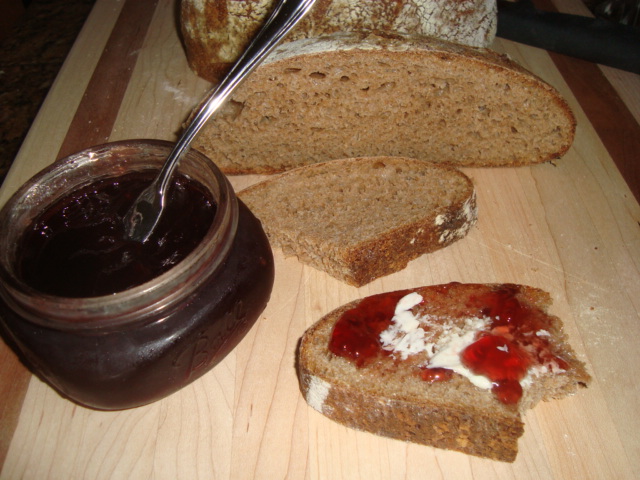
 

If this all disappears I'll cry.


Sylvia


SylviaH's picture
SylviaH

What a lovely flavor combination for such a robust and tasty loaf of bread.  It will be a staple around here through the holidays.  The corn, walnuts, molasses just seem to mingle so well with all those lovely holiday cold weather dishes.  I can't wait to have a turkey sandwich on this classic New England bread.

The black walnuts are a wonderful addition to this bread.  So very healthy, naturally wild black walnuts, none of those pesticide sprays and a flavor that no other nut can compare to IMHO.  Have you ever had black walnut caramel cake, ice cream, oh my! 

I like the formula from PR BBA.  The only changes I made were adding the black walnuts and I did boil the water that was poured over my cornmeal soaker.  I would have preferred using polenta and know I have some stashed somewhere in one of my refrigerators.   

If you haven't tried this bread and many have and love it.  Do give it a try and enjoy your own variations.  It slices up beautifully for a change of everyday sandwich bread.

Black walnuts can be found in the stores now.  I found these at my local Costco's, other large stores should have them available and fresh. 

The bad photos were taken in my kitchen light and night.  

I added about 3/4 cups lightly toasted BW.


Sylvia


SylviaH's picture
SylviaH

I fired up the WFO oven today.  The lovely weather has put me in the mood to do a little cooking outdoors.

I have been wanting to bake Ken Forkish FWS pizza formula using a poolish ferment.

Friday night I mixed up the poolish for his pizza with the intent of baking them in my wfo oven Sunday.  That's one of the good things about making pizza's 'pizze' :)   You can put it off a day or two and still hopefully have some decent dough to work with.  That's just what happened.  Pizza plans were canceled and we went out Sunday and Monday for the evening.

I followed the formula pretty much to the tee.  

The Poolish was mixed at 9pm and placed in my very cool laundry room with window open.  The nights have been very cool and just in range of the suggested temperature and time for the poolish to ferment.  12 to 14 hours.  10am Saturday the next morning I mixed and bulk fermented until 3pm..it could have went a little longer but 3pm worked good for me.  The balls were divided and shaped and placed into the refrigerator with the intent that they would be baked at about 4:30 Sunday for Monday.

Instead they were baked Tuesday for our early weekday dinner's at 3:30.

This is a highly hydrated pizza dough and one thing I won't do again is proof the dough as was suggested in the book.  Spray oiled, floured and placed into a container.  Big mistake, especially since my dough was going to be kept until tuesday.  

The best thing that works for me with a high hydration pizza dough is to place each dough ball into one of those plastic disposable/reusable bowls w/lids.  Sprayed with oil and NO flour.  Especially with a tender dough like this that you don't want to over handle or degas.  These bowls work better for me rather than oiled plastic bags.  This way I just dump the dough onto the floured counter for shaping into a pizza without over handling the dough. 

Well this dough was rough handled more than I wanted just trying to get it out of the pans.  As far as the spraying and flour dusting well that just makes raw flour clumps stick to the dough.  Not what you want.

Here's my dough in the pans proofing...next go I will use the oiled lid/plastic container bowls for each pizza.  I had 5 dough balls.  I should have picked some up because I used up the ones I had for other things.  Sometimes I use oiled outdoor plastic bowls and layer them with the sandwich plates that came with them.

I used the full hydration suggested in the formula.  With caputoo 00 flour that makes for a pretty slack dough with the extra day fermenting they were also highly extensible.

Keeping your dough like this I think is fine for same day ferment and use.  But, not any longer.  I usually do this for transporting or when you want guests to make their own pizza's.  Then this way comes in handy...but don't spray oil the balls and then flour them...just flour only.


Ready for the oven.  Very extensible and still very lively dough.  You might like to lower the hydration as suggested in the formula if you are not used to handling a high hydration pizza dough.  I think it's about 80% hydration and I may have pushed that even a little more with the wet hand mixing.


Things were happening pretty fast for me at this point, I did manage to get some pics and eat too..pizza's baked in about 2-3 minutes in the very hot wfo.

The pizza was delicious.  Mike took one over to a neighbor and photos to take to his Italian ex-baker co-worker.  He said they were 'The Perfect Storm'  our saying around here lately, when things go good : )


Crispy crust, tender creamy crumb, melt in your mouth goodness with that special flavor you only get from a WFO baked pizza.


: )  Good heat on the floor.  The bottom and top cooked and finished together just the way I like it.


Now here's a fun shape.  I said this was a very extensible dough.  

Look what happened when I picked this dough up a bit carelessly.  S t r e t c h...well this is certainly not going to make it into a round pizza.  I made a plank pizza instead.  


Now here's the biggest problem I run into when making a pizza like this.

How do I rotate it around in the oven so both sides get baked.

I found that my long handled poker with the little fork end works perfect not only for rotating this yard long pizza but also has many other uses.  Problem solved : )  


One plank pizza


Here is a wonderful Fig Newton type cookie.  Oh, these are so very delicious and easy to make.  Just make the dough dough up the day before, refrigerate and bake the next day.

These are so delicious.  Mike loves fig cookies and I think he's hooked on these.  

None of that hydrogenated oils and high-frutose corn syrup..yucky stuff in many store bought cookies.

This is a recipe by Alison Needham from a copycat recipe I found on a yahoo shine site. The only thing I've changed is using some of my homemade organic black mission fig preserves for the filling.  

These are delicious.  I'm think next batch I will try a berry preserve for the center and I still have several jars of fig jam.  Get use for figs from my tree.  These will make a nice holiday cookie gift.


Bet you can't eat just one.


I had some delicious  Sweet Apple Cider.  So tasty and it also made a very delicious Sweet Apple Cider Jelly.

So easy in my new jam/jelly making machine : )


Happy World Bread Day...Oct. 16th

Sylvia

ps  I guess you know now what  my favorite bread is

ADDED...what was I thinking... Ken Forkish...how could I have called him Sam...did anyone else notice?  Took me a while but I caught it 'lol'. 


SylviaH's picture
SylviaH

I've been curious about trying the Antimo Caputo Tipo 00 Rinforzato flour.  

A few weeks ago I called an Italian grocer 'Taylor's Market' located in CA and asked if they would repackage their Caputo Rinforzato flour into smaller 5 lb bags.  They were very obliging.  Their shipping is very reasonable for me.

Note:  I just have to tell everyone if you don't already know.  About all my jam's and jellies... Having a loaded double crop of figs on my tree this year I have been picking daily and making small batches of fig jam....Oh, so much work.  Until, I found the new 'Ball  FreshTech' automatic Jam & Jelly maker.  OMG..push a button...perfect jam and jellies.  Not to be associated with being an add or anything..but this little machine was perfect and perfect it does make..so fun, easy and simple, time and mess saver.  It just came out this summer.  Check it out on Amazon.com for the best price..normally $99.  I got mine for $79 and would have paid twice that..now I can can also use a smaller hot water canner.  Perfect holiday gift..also Walmart carries it at a great price.

Ready for holiday gifts.


Now back to the baking : )

The Rinforzato is approximately 12.5% protein, 14% moisture, 0.53% ash content.  

From what I've read it's supposed to be good for making ciabatta and focaccia type breads that have a high hydration and I have read that it's suited to long slow ferments.  I'm hoping to try an Italian type bread and rolls with this flour.

I made the S

K.Forkish overnight pizza dough with levain for these 3 pizza's and a 1/4 sheet pan focaccia with this the Rinforzato Caputo 00.  I have also made a favorite of mine Ciril Hitz focaccia and ciabatta made with a commercial yeast, using the Rinforzato 'reinforced' flour.  It was delicious.


Ciril Hitz Focaccia w/rinforzato 00 flour

One of my favorite ways to enjoy focaccia.  Just simply sliced into bread halves for sandwiches.


S

K.Forkish  Flour Water Salt Yeast - Overnight Pizza with Levain and Focaccia - using the Caputo Rinforzato

flour gives an added chew and this flour is not really designed to be used for pizza ,as many of the other Caputo 00 pizza flours are better suited for pizza's.  Non the less, the pizza's were delicious, more chewier.  Reminding me of a sourdough type pizza made with a regular bread flour.  

The focaccia was delicious and I have not tried SF version of his focaccia, using my bakers formula Caputo 00 flour.  I would not hesitate to make his focaccia.  It was very tasty.


Shaping the focaccia dough


I made 3 nice sized pizza's and a 1/4 sheet pan focaccia.

The focaccia was lightly seasoned with Italian oregano, EVOO and some lovely Fleur de Sel salt.

First the 3 pizza's were made, one was sent to a neighbor.  Using fresh mozzarella and the other two were for us.  One also with fresh mozzarella and the third pizza, used a firmer fresh mozzarella.  

I like using the firmer fresh mozzarella on a pizza that will not be eaten but enjoyed later by being warmed up.  I think using the firmer fresh mozzarella taste and reheats much nicer on a pizza that is enjoyed later or even the next day.  I don't think the fresh mozza reheats that well and losses some of it's best qualities in the reheat.


Pizza's with Rinfozato Caputo 00


One for the neighbor


One for later to be reheated.   I used a firmer fresh mozza on this one.  


Sylvia


SylviaH's picture
SylviaH

These are great crepes to make using up your sourdough discards.

Crepes make wonderful little packages.  Fill them with fruits, cream, cheeses.  Savory crepes are wonderful too!  Let your imagination run wild.

Mike loved the I served him after dinner.  He plans on putting one together for himself tonight.  Yes, even he can do it.

Make a plate piled high with crepes.  Just refrigerate them and, they should keep for a couple of days.  Separate them carefully and fill with your heart's delight.  You can even freeze them.  Though I haven't tried that, yet.


Sourdough Crepes   -     I used a Caputo 00 Flour Sourdough starter  

You will use about 1 cup of sourdough starter and it will be deluted with milk to a very thin batter consistancy.

1 Egg and 1 Egg Yolk   Beaten

2 TBsp. Melted Unsalted Butter

1/4 tsp. Sea Salt

1/4 to 1/2 Cup Non-Fat Milk  -  I used 2% -

Mix well adding more milk if needed to get a very thin batter.

Refrigerate the batter for about an hour before using.


Put a small dab of butter into a heated non-stick pan.  When it bubbles and melts, pour in about 1/3 cup batter per crepe.

Tilt pan and spread the batter around to make a thin crepe.  Cook about one minute until the edges come away and you can lift the crepe with a  medal cake frosting spatula.  

Flip and cook about another 2 minutes.  Keep them light and not browned.

Lay them on a plate while you bake up a batch.


Our 'Sweet Katie Girl' passed over the Rainbow Bridge.   


Sylvia


SylviaH's picture
SylviaH

It's pie month in my kitchen.   That time of year when berrries and stone fruits are the tastiest ever and a great excuse to make a pie or two.

I had my oven all heated up on a warm summer day and, didn't want to let the oven heat go to waste after my two large Sourdough Country Semonlina loaves came out.  I forgot to add the sesame seeds : / to them.  Still they are delicious and made wonderful garlic toast today for dinner. 

There were some raspberries, blackberries and blueberries in the frig, just enough for a mixed berry pie.  So I tossed one together.  Mike loved it.  Blueberry is his favorite pie.  It was throughly enjoyed on his days off from work.  Yes, this pie and bread were baked nearly 2 days ago.


The pie crust texture is a little less layered when I use the food processor method, mixing all except the water, which is added after the mixture is removed from the food processor.

Three even TBsp. of Tapioca Flour gives me about the right consistancy for my  9 inch berry pie to 'set up' nicely, not to dry and not to runny.

I get the best results using dark or clear glass pie pans.  I like to brush the crust with milk and sprinkle with different sugar's.  This one had raw turbinado sugar..gives a nice crispness and added sweetness to my not to sweet pies.  I always use a rim cover, bake on a round pizza pan or cookie sheet...saves for runny messes.  Start out in a hot convection 425F oven for 15 minutes and then bake at 375F-350F convection oven, until I see the filling bubbling.  Remove the rim cover, brown the crust up and remove the berry pie.

I ran short on AP flour and added some cake flour and a teaspoon of vinegar to this pastry crust with Kerry Gold Butter and Crisco, sugar and salt in it.  


I have been wanting to make a good key lime pie for sometime now.  Yesterday I purchased some key limes and baked a KL pie today.  Mike declared it the best KL pie he has ever tasted.


It is a version of a Key Lime Pie recipe I found on 'All Recipes.com' and it's a good one...given 5 stars by well over a thousand testers.  There's no egg in this pie and, that's my favorite way to enjoy a KL pie.  It's very easy to make.  The hardest part is juicing those tiny little key limes.  The best way to do it is with a 'garlic press' an absolutely wonderful way to go about juicing these little buggers.  It was suggested by one who had also made the KL pie.


Just the right texture.  This is just how I like my KL pie to taste.  Mike just loved it...I think he has a new favorite.


Here's the recipe for the KL pie and also the crust I made of gram crackers...or honey grams.  If your in the mood for a good KL pie, give this one a try.  I don't think you'll be disappointed.


Pre-heat Oven to 350F  (175 C)       -   This KL pie and crust was baked in my Toaster Oven... kept the house cool today.

Honey Gram Cracker Crust - 

1 1/2  cups Honey Gram Crackers

1/2 cup sugar

6 TBsp. Melted Butter

In a processor 'or can be done by hand'.  Process the Honey Gram Crackers broken up a bit with the Sugar and Melted Butter.  Until all holds together and is evenly moistened.

Press with fingertips and I also the smooth bottom of a cup.  Press into a 9 inch pie plate.

Bake for about 8 minutes in your 350F pre-heated oven.

Remove and let cool while you prepare your filling.


Pre- heat Oven 350F - (175 degrees C )


Key Lime Pie Filling

3/4 Cups Key Lime Juice

2 Cans of Sweetened Condensed Milk - 14 oz. each

1/2 Cup Sour Cream

1 TBsp. grated Lime zest

1.  In a medium bowl, combine condensed milk, sour cream, key lime juice and the zest.

2.  Mix well and pour into the graham cracker crust.

3.  Bake in the preheated oven for about 5 to 8 minutes.  Mine took the full 8 minutes.  

Bake until you see tiny pinhole sized bubbles burst on the surface of the pie.  DO NOT BROWN YOUR PIE.

Chill throughly before serving with some whip cream and a garnish with some sliced lime or zest.


These are also nice on a hot day. 

Frozen, chocolate dipped banana's with crushed added walnuts.  

Put your sliced banana's on a parchment lined tray with the sticks inserted while you melted your chocolate.

I melted some good quality chocolate in my double broiled and spoon drizzled it over the banana's and rolled them in crushed walnuts.


Have a very Happy Fourth of July and don't eat to much pie : )

Sylvia


Pages

Subscribe to RSS - SylviaH's blog