The Fresh Loaf

A Community of Amateur Bakers and Artisan Bread Enthusiasts.

Blogs

Sugarowl's picture
Sugarowl

I'm still baking somewhat, still struggling with energy levels, and more blood work is due (I hate needles).  As a mom of two active boys, I find myself alternating between cooking mac and cheese, homeschooling, and lots of "stop bugging your brother" moments. Thank goodness for coffee!

I had neglected my starter for a month or two (maybe 3?). I pulled it out the other day and it was NOT moldy! :) I took a small part of it that hadn't gone grey and now I  have about 150g in the fridge waiting anticipating a small loaf bake soon.

In other news, I did recently discover that Publix does carry Einkorn flour. I found some at the Port Canaveral location for $10/ 1lb. They also have the Arrowhead Mills rye flour. I'm undecided whether to try the Einkorn flour.

My goal for this week is to make a loaf of bread and a batch of biscotti. My boys have been asking for me to make more "dipping cookies." If I have time, I plan to make more tamago boro (little egg biscuits). I want to try making them in the oven this time and with different flavors.

Currently we are preparing for a road trip. We are going to Chincoteague, Virginia for a family vacation.For the trip, I plan on making mini muffins, biscotti, and probably some basic sugar cookies. The ones for my relatives will be frozen for the 3-day trip up there. I know it doesn't take 3 days to drive to Virginia, but we are taking our time since our boys have never seen mountains (Florida is very flat).

Isand66's picture
Isand66


These were made with freshly ground soft white wheat Purple Straw grain berries which is a heritage grain. This is another unique and hard to find wheat berry from Barton Springs Mill. It is not really meant to be used in bread, but rather biscuits, pancakes, pizza etc. but I wanted to try some in rolls. From the site:

This Colonial Era wheat hasn’t been tasted in over 50 years and we’ve worked hard to revive it for you! This Colonial Era honeyed wheat is most applicable in delicate situations where you want a soft and fluffy texture and don’t need too much structure. Expect subtle notes of honey!

I also added some leftover mashed potatoes and copious amounts of softened butter and a little honey. The potatoes are about 80% water so the hydration listed on the formula is not a true reflection.

Similar to my last bake, since I’ve been trying to get more consistent results with the fresh milled grains I use for 50-100% in my bakes. Getting the fermentation down correctly so it doesn’t go over or in some cases under is tricky. So far this method based on experiments detailed at https://thesourdoughjourney.com/ have worked out pretty well. His timing charts are based on using all white flour so it’s not a perfect match when using freshly ground flour. I’m still experimenting but so far so good. Unlike my past bakes with rolls/buns I shaped them after bulk and placed them on baking sheets, and refrigerated them overnight. I baked them directly from the refrigerator after around 12 hours, but they could have stayed longer if necessary.

These turned out great and were nice and soft and perfect for burgers and sandwiches.

Formula

Levain Directions 

Mix all the levain ingredients together for about 1 minute and cover with plastic wrap.

Let it sit at room temperature for around 6-7 hours or until the starter has almost doubled. I used my proofer set at 76 degrees so it took around 5 hours for me. Either use in the main dough immediately or refrigerate for up to 1 day before using.

 Main Dough Procedure

Note: I use an Ankarsrum Mixer so my order of mixing is slightly different than if using a Kitchenaid or other mixer. Add all your liquid to your mixing bowl except 50-80 grams. Add the levain in pieces and mix for a few seconds to break it up. Next, add all your flour to the bowl and mix on low for a minute until it forms a shaggy mass. Cover the mixing bowl and let it rest for 20 – 30 minutes.   Next add the salt, honey, and softened butter as well as the remaining water as needed and mix on medium low (about speed 3) for 12- 24 minutes. You should be able to achieve a nice windowpane.

Remove the dough from your bowl and place it in a lightly oiled bowl and do several stretch and folds.  Making sure the dough is as flat as possible in your bowl/container measure the dough in millimeters and take the temperature of the dough as sell. Based on the chart here, determine what % rise you need and make note. If you have a proofer decide what temperature you want to set it at and what rise you are aiming for. If the dough is fully developed you don’t need to do any stretch and folds, but if it’s not, do several sets 15-20 minutes apart.

Once the dough reaches the desired bulk rise, shape them into rolls around 135-150 grams and place them on your baking sheet. When finished shaping, cover the dough with a moistened tea towel or plastic wrap sprayed with cooking spray and place them in your refrigerator. Since there is such a high percentage of whole grains in the dough I didn’t want to leave it in the refrigerator for more than 12 hours. Depending on how cold your refrigerator is you could leave it longer and have to experiment to make sure it doesn’t over ferment.

When you are ready to bake, an hour beforehand pre-heat your oven to 450 F and prepare for steam. I have a heavy-duty baking pan on the bottom rack of my oven with 1 baking stone on above the pan and one on the top shelf.  I pour 1 cup of boiling water in the pan right after I place the dough in the oven.  Remove your rolls from the refrigerator when the oven is fully heated and brush them with an egg wash. Add seeds, toasted onions, etc. as desired and place in the oven along with the cup of boiling water.

Bake for around 25 – 30 minutes until the buns/rolls are nice and brown and have an internal temperature around 200-210 F. 

Take the rolls out of the oven when done and let them cool on a bakers rack for as long as you can resist. 

hellen's picture
hellen

My best attempt yet in my quest to make the fluffiest, shreddiest healthy-ish whole grain imbued shokupan: this 20% Rye Shokupan.

Recipe is adapted from Benito's Mochi SD Hokkaido Milk Bread recipe, a great recipe - all props to benito.

Because I am lazy I cut some steps to simplify the process a bit - namely, I poured boiling water directly from my kettle instead of heating up milk (I know - it changes the composition somewhat) and I baked the bread all in one step instead of taking it out of the tin for further baking. I also had more sourdough starter to use up so I modified the stiff sweet starter amounts.

Aside from that, the main difference is the use of whole grain rye flour for the tangzhong/yudane. This bread I am quite pleased with but later attempts to raise the rye flour content were unsuccessful - gah! I really hope to develop a high-percentage super shreddy rye bread...one day...

The hardest part of making this bread is getting the proofing right. Almost all of my shokupan failures come from overproofing. I find shokupan dough to be much less forgiving than other lean doughs, which I can chuck in the fridge if I need to go out. Further thoughts and written recipe/recipe card here on my blog, or you can follow benito's recipe above and just change the mochiko to rye.

Benito's picture
Benito

Since my last two loaves were for family members I am low on bread again.  I toasted some walnuts and decided to combine it with pepitas (pumpkin seeds) for a loaf.  I love the flavor you get from the addition of nuts and seeds to bread.  For this loaf I baked it once the total rise was 140%.  I use an aliquot jar to measure this, a company called BillieOlive makes them.  I’ve doing testing of their aliquot jars for them and most recently, they made a new one that has markings to allow me to measure over 150% rise.  These are very useful.  This loaf is a touch over fermented, you can see that by the slight loss of definition of the four lobes.  I like to see more definition, so probably for this dough 130-135% rise is optimal.

For one 9x4x4” Pullman pan loaf.


Instructions

Levain

Mix the levain ingredients in a jar or pyrex container with space for at least 300% growth. 

Press down with your knuckles or silicone spatula to create a uniform surface and to push out air.

At a temperature of 76-78ºF, it typically takes up to 10-12 hours for this sweet stiff levain to be at peak.  For my starter I typically see 3-3.5 times increase in size at peak.  The levain will smell sweet with only a mild tang.


Tangzhong 

In a sauce pan set on medium heat, stir the milk and whole wheat flour until blended. Then cook for several minutes until well thickened, stirring regularly with a spoon or heat-resistant spatula. Let cool in the pan or, for faster results, in a new bowl.  Theoretically it should reach 65ºC (149ºF) but I don’t find I need to measure the temperature as the tangzhong gelatinizes at this temperature.  You can prepare this the night before and refrigerate it, ensure that it is covered to prevent it from drying out.


If you plan on using a stand mixer to mix this dough, set up a Bain Marie and use your stand mixer’s bowl to prepare the tangzhong.


Dough

In the bowl of a stand mixer, add the milk (consider holding back 10 g of milk and adding later if this is the first time you’re making this), egg, tangzhong, salt, sugar and levain.  Mix and then break up the levain into many smaller pieces.  Next add the flours.  I like to use my spatula to mix until there aren’t many dry areas.  Allow the flour to hydrate (fermentolyse) for 20-30 minutes.  Mix on low speed and then medium speed until moderate gluten development this may take 5-10 mins.  You may want to scrape the sides of the bowl during the first 5 minutes of mixing.  Next add room temperature butter one pat at a time.  The dough may come apart, be patient, continue to mix until it comes together before adding in more butter.  Again, knead until well incorporated.  You will want to check gluten development by windowpane during this time and stop mixing when you get a good windowpane.  You should be able to pull a good windowpane, not quite as good as a white flour because the bran will interrupt the windowpane somewhat.  Add the nuts/seeds, then mix again until they are well distributed.


On the counter, shape the dough into a tight ball, cover in the bowl and ferment for 2 - 4 hours at 82ºF.  There should be some rise visible at this stage.


You can next place the dough into the fridge to chill the dough for about 1.5 hours, this makes rolling the dough easier to shape.  Remember, if you do so the final proof will take longer.  Alternatively, you can do a cold retard in the fridge overnight, however, you may find that this increases the tang in your bread.


Prepare your pans by greasing them with butter or line with parchment paper.  


Lightly oil the top of the dough. Scrape the dough out onto a clean counter top and divide it into four. I like to weigh them to have equal sized lobes. Shape each tightly into a boule, allow to rest 5 mins. Using an oiled rolling pin roll each ball out and then letterfold. Turn 90* and using a rolling pin roll each out to at least 8”. Letterfold again from the sides so you have a long narrow dough. Then using a rolling pin, roll flatter but keeping the dough relatively narrow.  The reason to do this extra letterfold is that the shorter fatter rolls when placed in the pan will not touch the sides of the pan.  This allows the swirled ends to rise during final proof, this is only done for appearance sake and is not necessary.  Next roll each into a tight roll with some tension. Arrange the rolls of dough inside your lined pan alternating the direction of the swirls. This should allow a greater rise during proof and in the oven.


Cover and let proof for  4-6 hours at a warm temperature.  I proof at 82°F.  You will need longer than 4-6 hours if you chilled your dough for shaping. I proof until the top of the dough comes to within 1 cm of the top edge of the pan.


Preheat the oven to 350F and brush the dough with the egg-milk wash.  Just prior to baking brush with the egg-milk wash again.


Bake the loaves for 50 minutes or until the internal temperature is at least 190ºF, rotating as needed to get even browning. Shield your loaf if it gets brown early in the baking process. After 50 mins remove the bread from the pan and bake a further 10 mins by placing the loaf directly in the oven on the rack with the oven turned down to 325ºF.

My index of bakes.

yozzause's picture
yozzause

Hi TFL folks anyone near OSHKOH I have a fellow Aussie Baker visiting the airshow with her partner  and she would love to have a coffee and chat with any bakers in the general area. She is currently at the Sydney  departure lounge and on her way shortly. i will pass on any details . kind regards  Derek

Isand66's picture
Isand66


I’ve been experimenting the last bunch of bakes with something new for me. Instead of doing a short bulk at around 78-80 F and then finishing the bulk in the refrigerator for 12-34 hours, I’ve been doing a longer bulk at 80 F and letting the dough rise around 30%. I have then been doing a pre-shape letting it sit for 15 – 20 minutes and then shaping and placing in bannetons, covering and putting it in the refrigerator for 12 hours and baking right from the refrigerator.

I’ve been trying to get more consistent results with the fresh milled grains I use for 50-100% in my bakes. Getting the fermentation down correctly so it doesn’t go over or in some cases under is tricky. So far this method based on experiments detailed at https://thesourdoughjourney.com/ have worked out pretty well. His timing charts are based on using all white flour so it’s not a perfect match when using freshly ground flour. I’m still experimenting but so far so good.

This bake used a combo of Star Dust WW freshly ground and sifted and milled twice plus fresh milled spelt sifted twice and milled once. I added some roasted red bell peppers and cubed mozzarella after an initial bulk at 20 minutes. The dough was laminated and the add-ins were folded in.

I was very happy how this one turned out. The dough was well fermented and the crumb was fairly open considering the high % of whole grains which came in at 74% of the total flour.

Formula

Levain Directions 

Mix all the levain ingredients together for about 1 minute and cover with plastic wrap. 

Let it sit at room temperature for around 6-7 hours or until the starter has almost doubled. I used my proofer set at 76 degrees so it took around 5 hours for me. Either use in the main dough immediately or refrigerate for up to 1 day before using.

 Main Dough Procedure

Note: I use an Ankarsrum Mixer so my order of mixing is slightly different than if using a Kitchenaid or other mixer. Add all your liquid to your mixing bowl except 50-80 grams. Add the levain in pieces and mix for a few seconds to break it up. Next, add all your flour to the bowl and mix on low for a minute until it forms a shaggy mass. Cover the mixing bowl and let it rest for 20 – 30 minutes.   Next add the salt, honey, and remaining water as needed and mix on medium low (about speed 3) for 12- 24 minutes.  

Remove the dough from your bowl and place it in a lightly oiled bowl and do several stretch and folds.  Making sure the dough is as flat as possible in your bowl/container measure the dough in millimeters and take the temperature of the dough as sell. Based on the chart here, determine what % rise you need and make note. If you have a proofer decide what temperature you want to set it at and what rise you are aiming for. If the dough is fully developed you don’t need to do any stretch and folds, but if it’s not, do several sets 15-20 minutes apart. 

After 20 minutes, place the dough on an oiled work surface and laminate it. Add the cubed cheese and roasted red pepper and place back in your container.

Once the dough reaches the desired bulk rise, pre-shape and let rest 15-20 minutes. Finish shaping place in your banneton, bowl or on your sheet pan and cover it so it is pretty air tight. You will then place it in your refrigerator so you don’t want the dough to get a crust on it. Since there is such a high percentage of whole grains in the dough I didn’t want to leave it in the refrigerator for more than 12 hours. Depending on how cold your refrigerator is you could leave it longer and have to experiment to make sure it doesn’t over ferment.

When you are ready to bake, an hour beforehand pre-heat your oven to 540 F and prepare for steam. I have a heavy-duty baking pan on the bottom rack of my oven with 1 baking stone on above the pan and one on the top shelf.  I pour 1 cup of boiling water in the pan right after I place the dough in the oven.  Remove your dough from the refrigerator and score immediately.

After 1 minute lower the temperature to 450 degrees.  Bake for around 35 minutes or until the breads are nice and brown and have an internal temperature around 200-210 F.  

Take the bread(s) out of the oven when done and let them cool on a bakers rack for as long as you can resist. 

justkeepswimming's picture
justkeepswimming

Edit: Formatting fixed. That's better!!

It's funny how these things come up. I had purchased a Zojirushi Virtuoso about a year and a half ago and have struggled to get a reasonably decent loaf of bread out of it. My most consistent problems are drastic over proofing (to the point of complete collapse of the loaf), and a pale crust. Even with cutting yeast amounts in half and trying an assortment of recipes, results were never all that great. Edible, just far short of what I had hoped for. I had reached the point of relegating it to the basement vs just getting rid of it entirely. Nobody has counter space for appliances that aren't doing anything, me included.

As I was wondering what to do with it, a discussion about a particular brand of bread machine popped up recently here.  Comments included suggestions about ways to improve the crust color as well as bake in the machine using a regular loaf pan. Several people (yipee and jo_en here) report improvement by putting a layer of aluminum foil between the glass viewing window and the interior of the machine, to reduce heat loss and improve reflectivity. Jo_en' trivet suggestion here was also helpful. I figured I didn't have much to lose at this point and went ahead with their suggestions. 

Putting the foil inside the lid was indeed easy. The Virtuoso has 5 screws: 4 Philips head and 1 torx screw, which required that specialty screwdriver. Hubby had one just the right size at the ready in his shop room - yeah!  And we had a trivet that was just the right size. It had come with an air fryer, but I had never used it. I figured if it was recommended for air fryer temps, it would be fine inside the Zo.

I haven't baked a yeasted loaf in nearly forever. My starter had been slumbering in the frig for the past week and I was itching to try out the suggestions. Rather than feed my starter and wait, I pulled up an old yeast based recipe for something similar to our usual SD sandwich bread:

375 gm fresh milled hard red spring wheat

125 gm King Arthur bread flour

350 gm water

2 tsp brown sugar

1 Tbsp safflower oil

9 gm salt

6 gm Instant Yeast

All mixed/kneaded in the Zo for 15 min, then the dough was put in a Cambro for bulk inside the Zo on the trivet. (Not sure I would do that again, it occurred to me if the dough overflows the container for some reason that would be quite a mess to clean up.) It felt nicely strong, not too elastic and not too extensible.... Just right. Dough Temp at the start of bulk: 86f. House temp 74f. The Zo was unplugged to avoid any troubles.

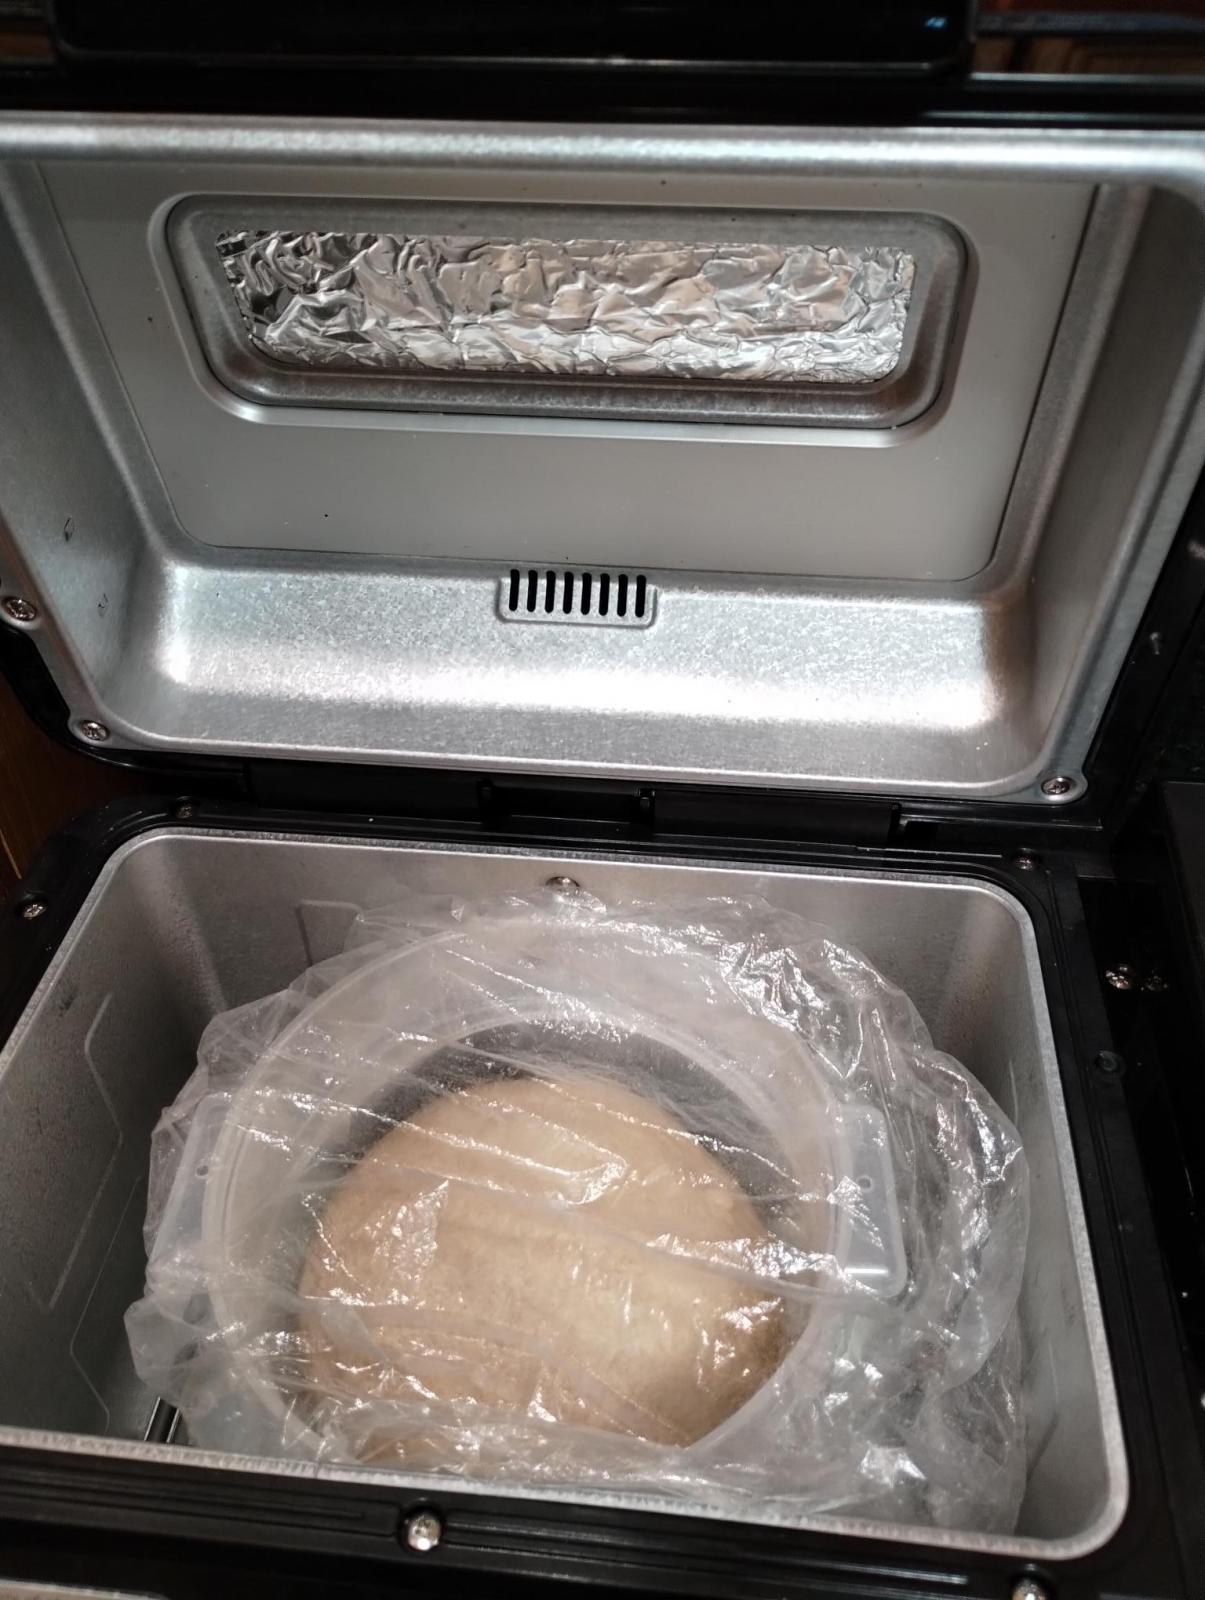
Fortunately, I checked the dough after 45 minutes - it had already doubled in size. I forgot that I usually use less of the SAF yeast than most recipes call for, because it tends to do this. Rationale: In part the yeast loves the freshly milled flour and really takes off fast with it, and in part because we live at 6,000 ft, and proofing can get away from me sometimes. The dough was shaped and put into a Pullman pan (9x4x4) with a parchment sling and covered for final proof inside the Zo, on top of the trivet. 

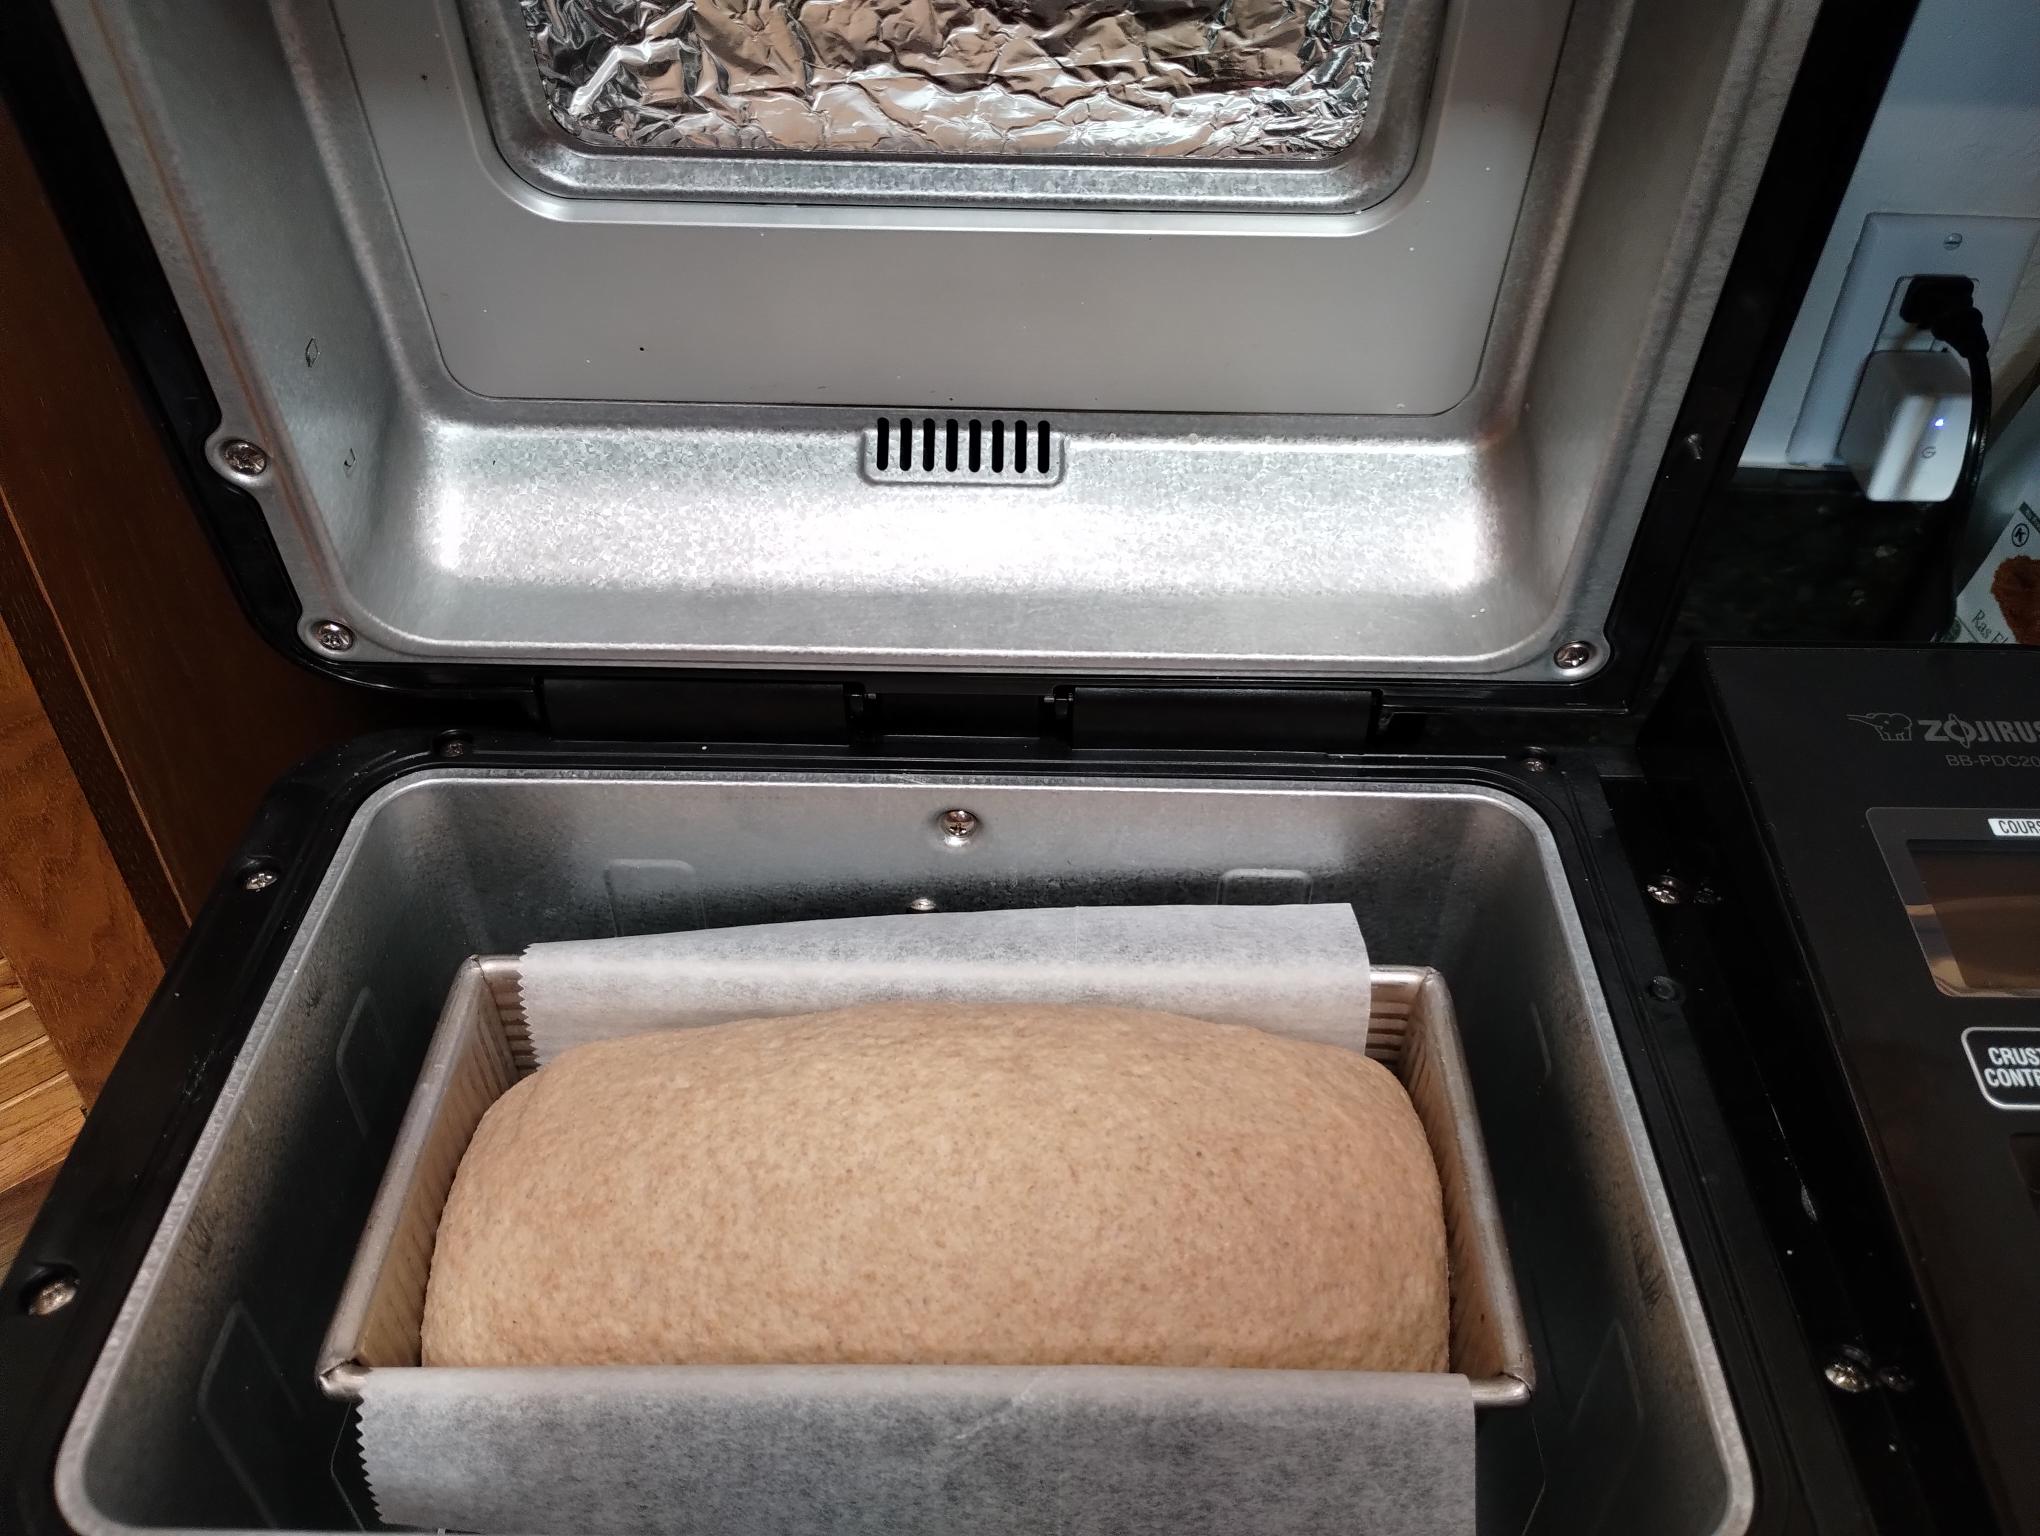
After only 30 minutes, the dough was roughly ½ in above the rim of the pan. I wasn't entirely certain how long I should bake for, so I set up a manual course to just bake for 90 minutes. (Side note for Zo users: the Virtuoso doesn't let you adjust the crust color in the manual programs, you can only do that in several of their pre-set programs... not all of the pre-set ones, just "some".) The dough got a quick brush with a mixture of 1 tsp milk and 1 tsp milk powder, and I pushed "start".

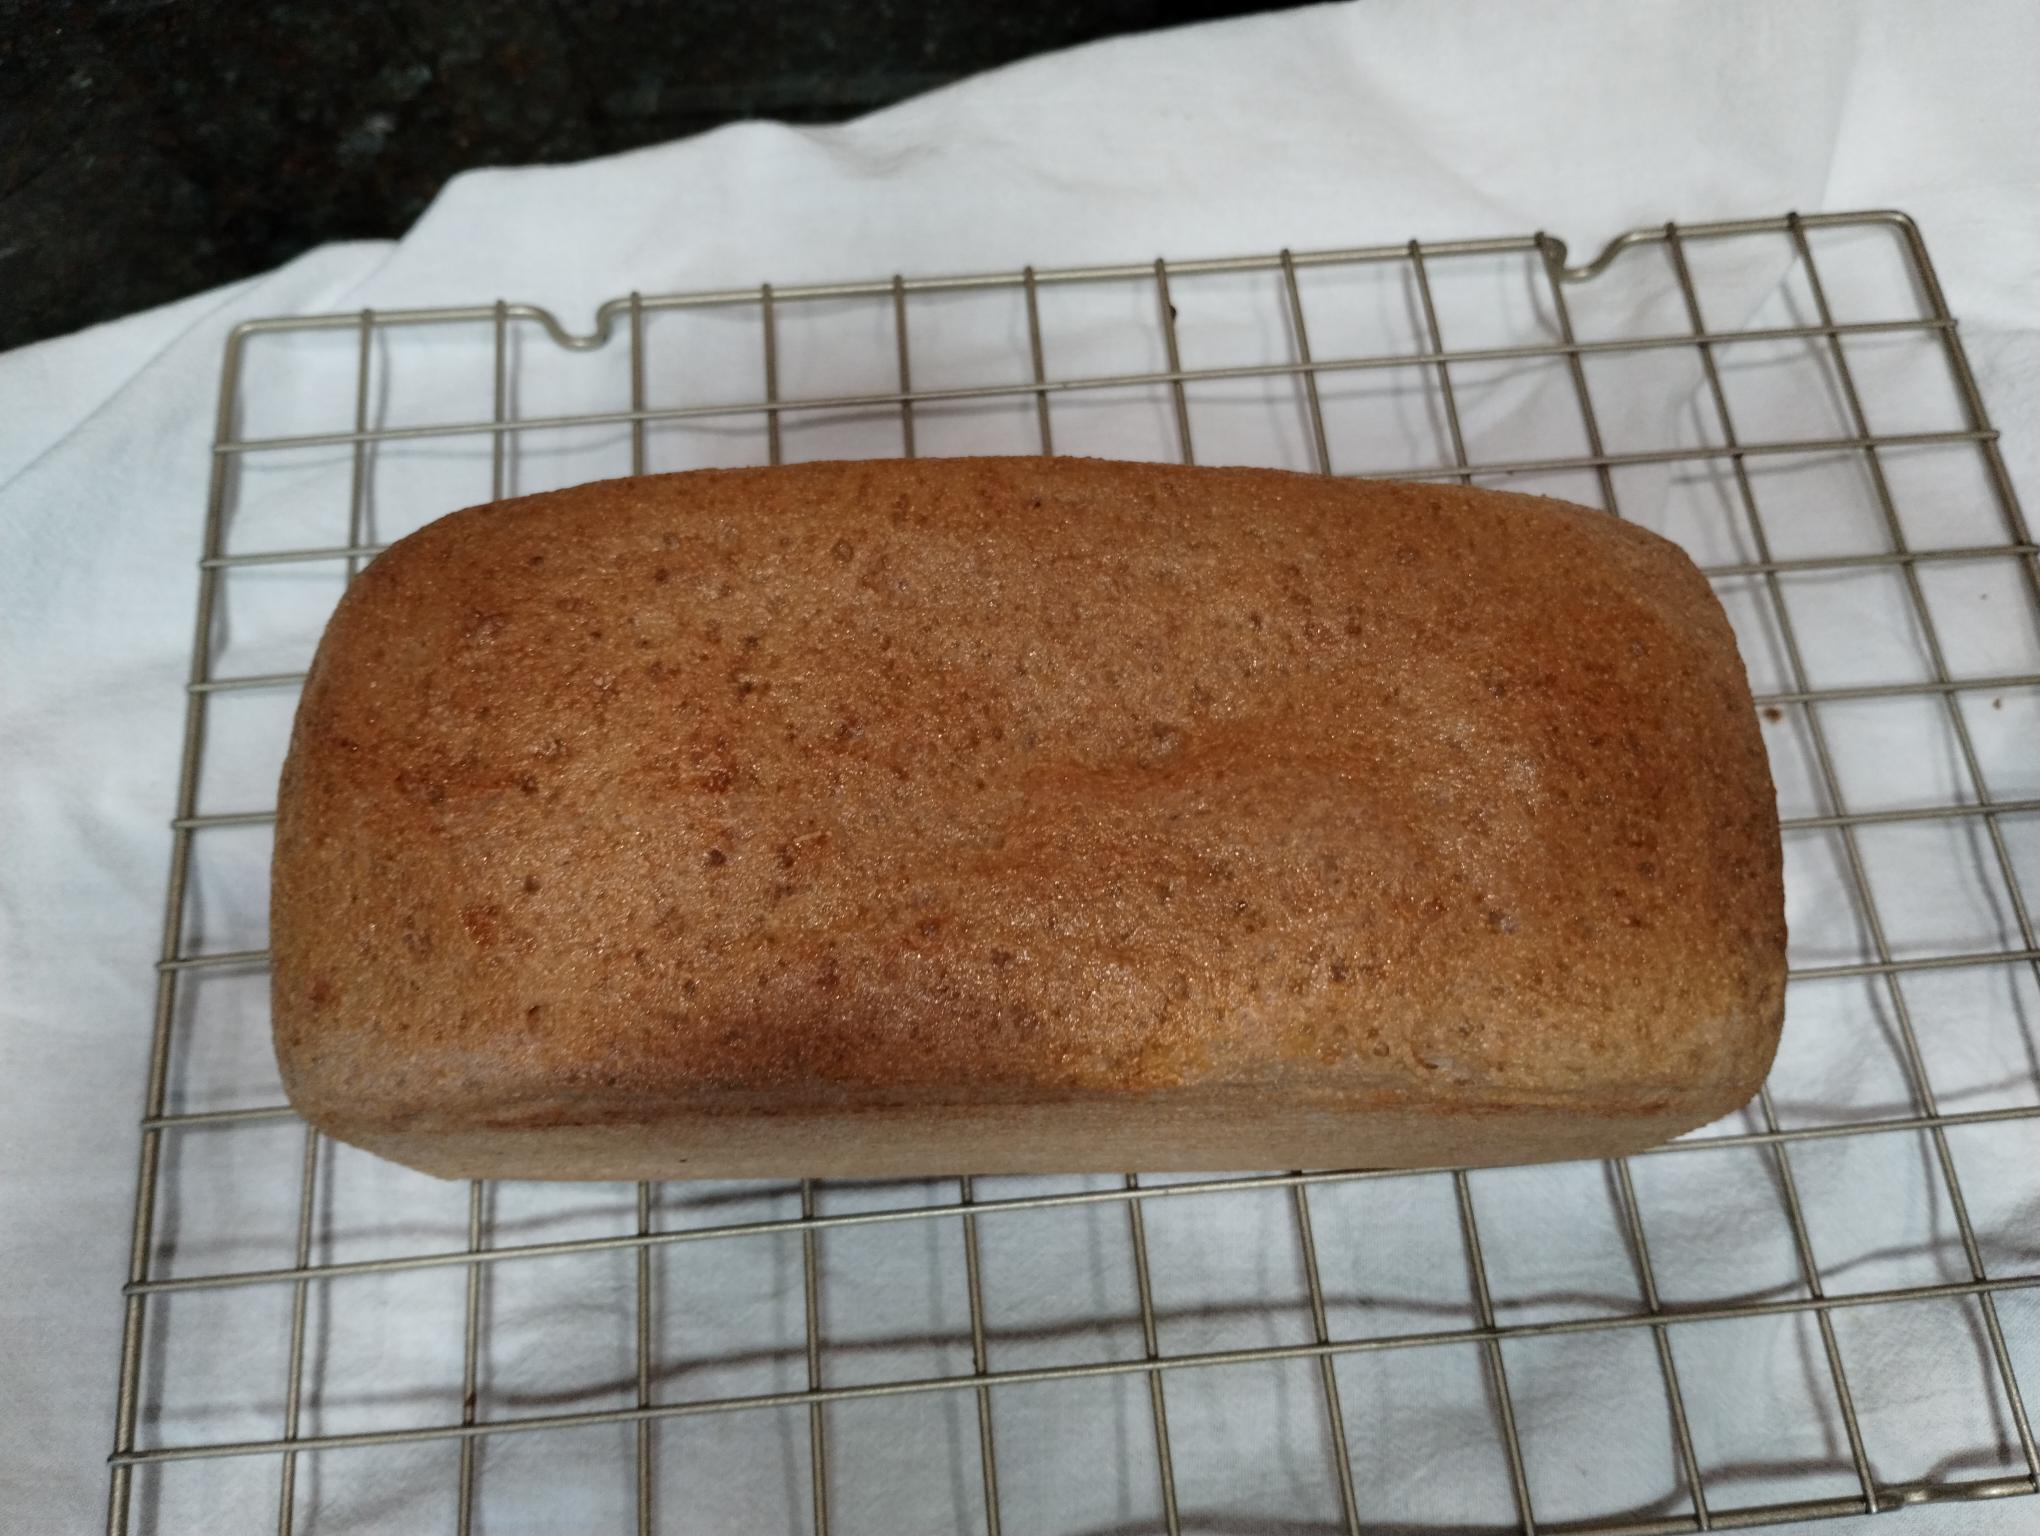
After 1 hour, I barely lifted the lid to give it a quick check.... The crust was a nice golden brown, and it smelled like it was either done or nearly so. Internal loaf temp was 197f (the best I can get here in the oven is 199f). The probe was not dry and not gummy at all.... 5 more minutes bake, then I took it out to cool. 

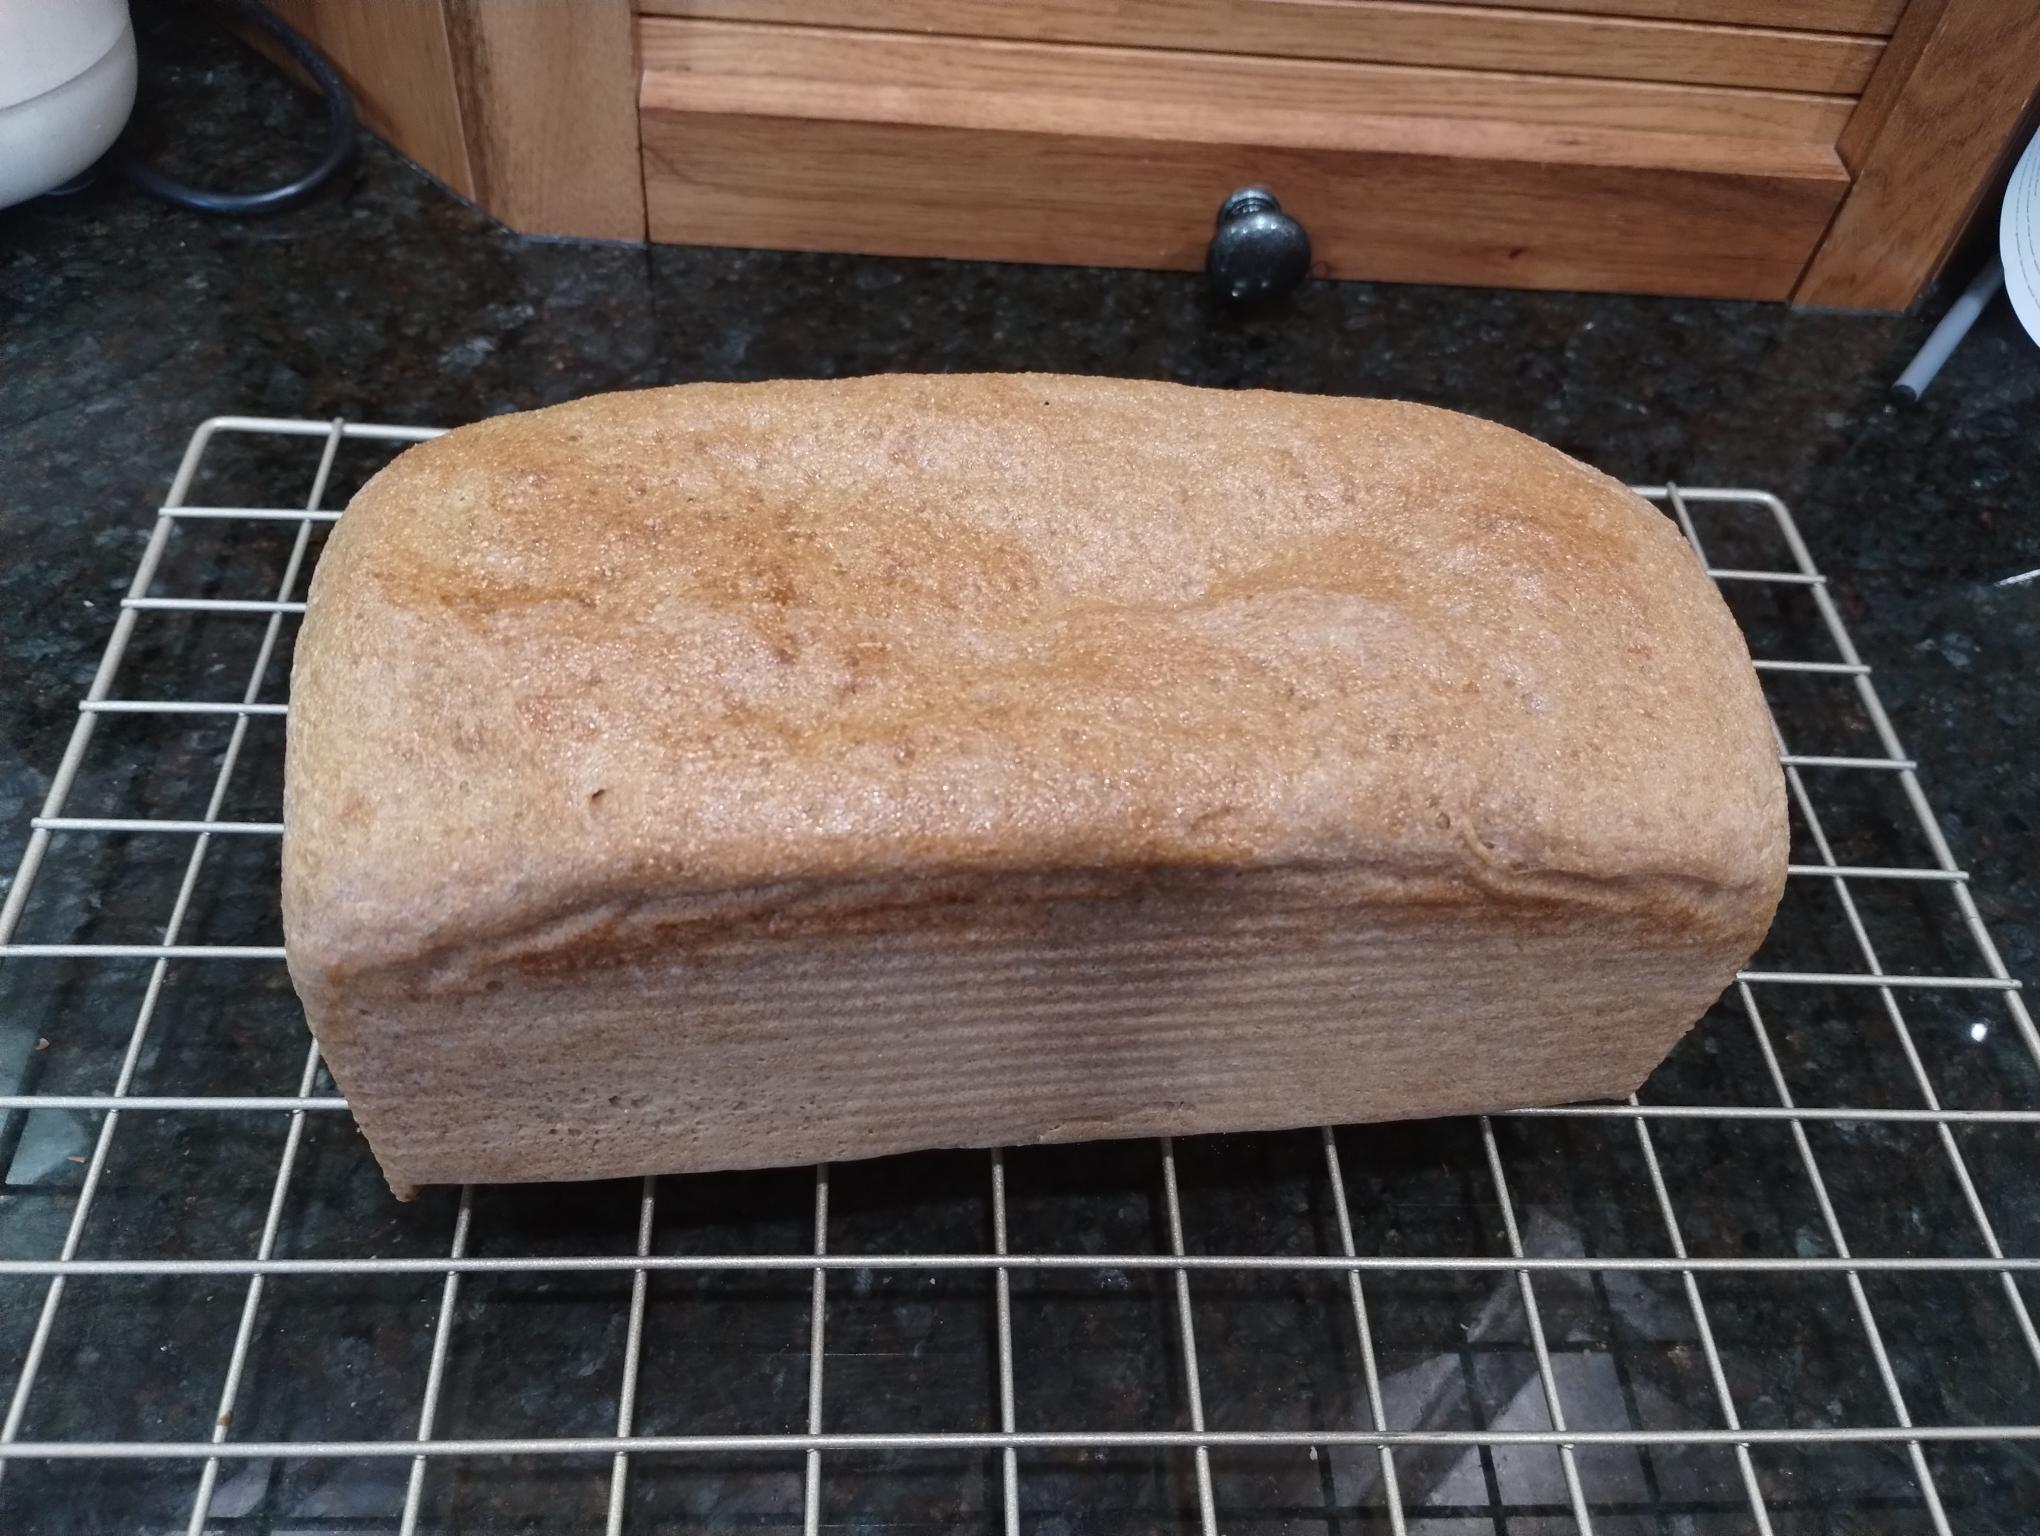
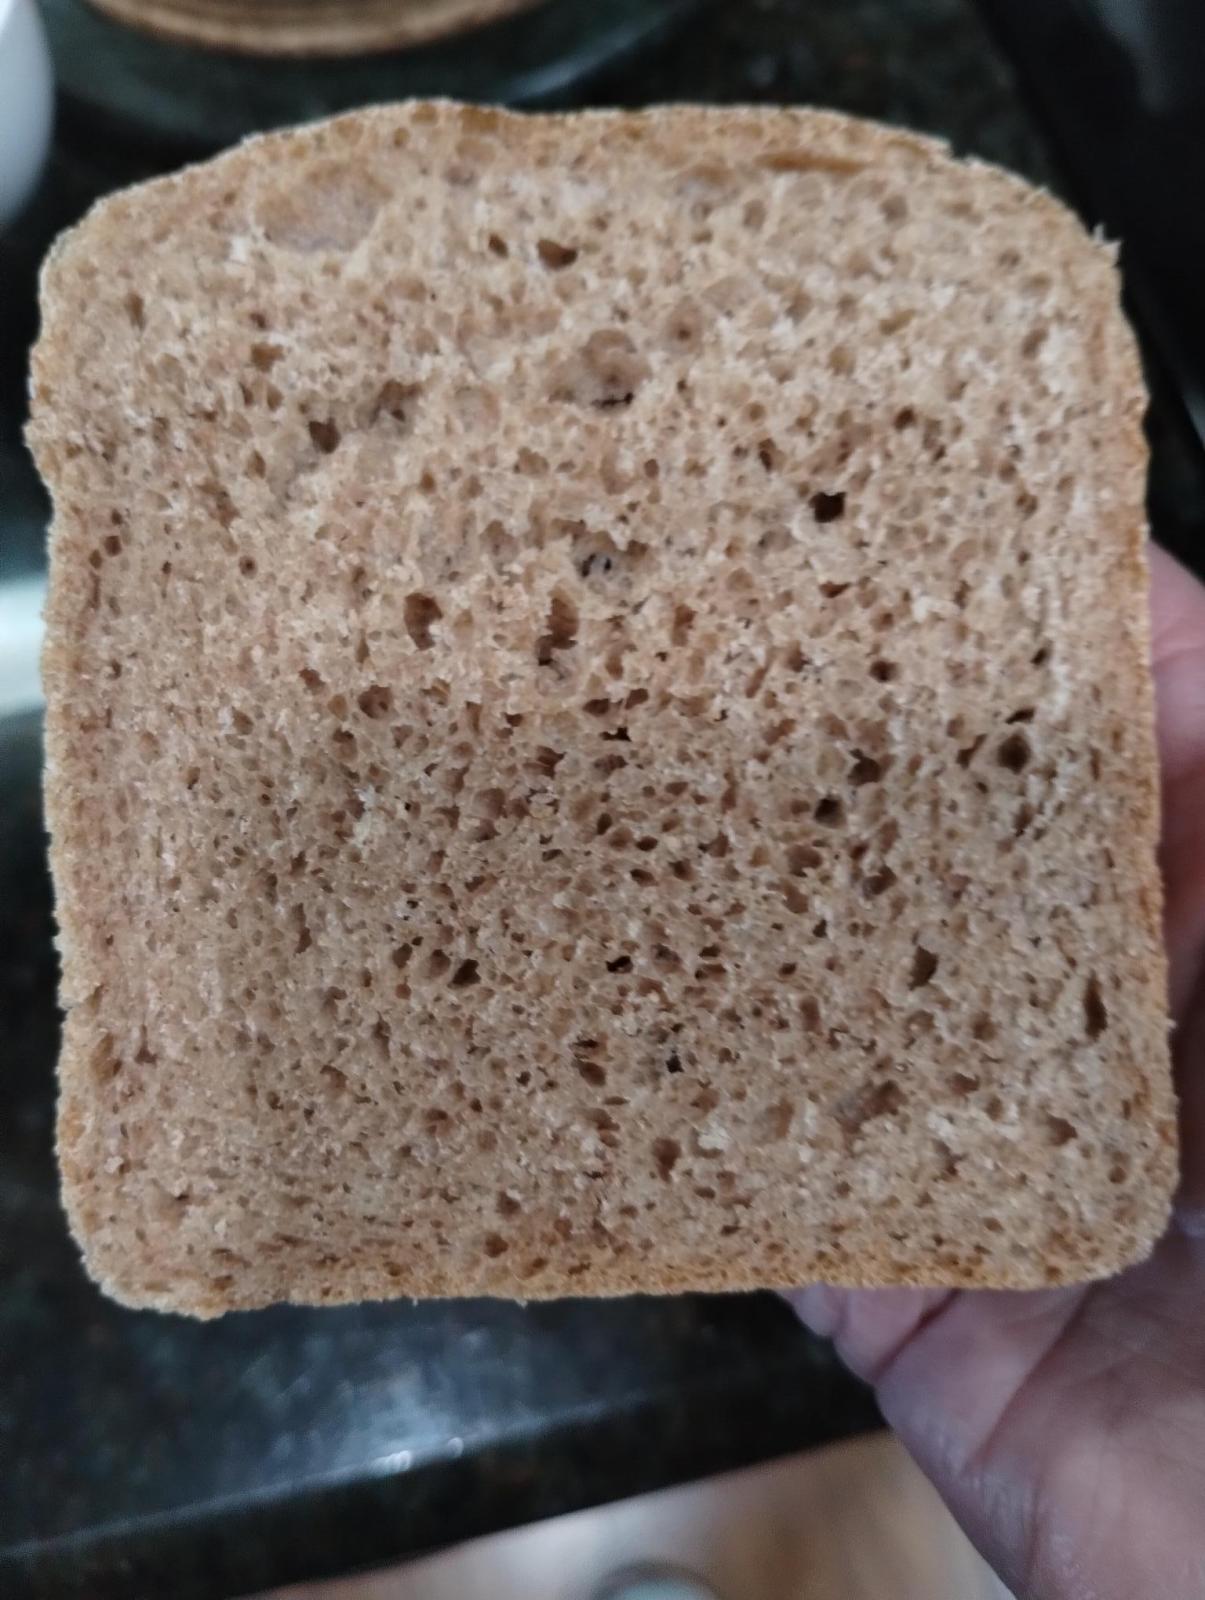
Result: Not too bad! The crumb shot is ~ 18 hours later. I think it is just a little bit over proofed. The top started to droop a bit during cooling, the crumb is fairly crumbly when cut, and the knife has a slight gummy residue which might either be from over proofing vs could have used a couple more minutes of bake time. Still - this is a bit improvement over anything I have made in it so far. The bread tastes fine, though a bit bland compared to our usual (not very tangy but more flavorful) sourdough version. 

My initial goal when I got the Zo was to have an alternative way to make bread during hot weather or when I don't have time to make sourdough for some reason (rare). It definitely worked well as far as not heating up the house was concerned. It might also be useful for times when the oven is being used for something else. I'll give it a try with a SD loaf and see how that works out and play with one or 2 other pans I often use. 

Pics:

Foil inside window, bulk starting inside the Zo. (I won't do that again, the potential for a serious mess is real.) 
 

After 30 min final proof: 
 

Initial post-bake shot, just starting to cool: 
 

Next day: real life crust color is much better than the photo suggests. It’s the same as the initial post-bake pic: 
 

Crumb shot: 
 
JonJ's picture
JonJ

There is a post from the long distant past (2017) on this site, by Wendy (Lazy Loafer) describing one of her bread tasting open house experiments where different sourdough loaves were made each with a different flour making up 25% of the flour. It was a lovely, interesting read, and a lovely interesting experiment too, especially since the flours used were quite varied and there were some non-wheat variants including amaranth, and one made with whole corn flour, which ended up being the clear winner in terms of tasting.

Quite inspiring and hence this loaf!

In the past I have made loaves with maize meal, but always made a porridge/scald first with the maize meal. Which I suppose is the 'correct' way, but also wasn't hassle free in that the porridge tended to lump and was difficult to incorporate in the final dough.

This bread was much simpler to make, simply by incorporating the maize meal as a dry ingredient with the other flours. The dough was gritty when mixing, and it didn't slump even though the hydration was a little higher than Wendy's. The grittiness didn't really come through to the crumb of the final loaf, although you could feel a slight grit in the crust.

In terms of the experience of eating the bread it was similar to eating a maize meal porridge (or as we call it here, mielie pap or uphuthu). Very filling (satiating), fairly bland to the taste, made lovely toast, and overall 'substantial' is a word I'd use to describe.

The maize meal used is a South African maize meal, which in these parts is always made with white maize and I'd say is 'medium' ground - not as coarse as the polenta that I have access to which is made with yellow maize, and certainly not as fine as corn starch! So, I guess you'd have a completely different experience if you used a yellow maize meal.
CalBeachBaker's picture
CalBeachBaker

Today's bake: East Berlin Malt Rye -  Malfabrot (Germany)

Source: The Rye Baker by Stanley Ginsberg

Notes: None

Substitutions:  None

Discussion:   Another nice rye bread from 'The Rye Baker'. This is a relatively easy bread to make  with only a sponge and main dough. It has a nice sour taste and Stanley describes it best as a 'tender close crumbed bread. The malt is incredibly sweet with strong chocolate, caramel, and coffee notes from the roasting.' I sampled a slice after cooling and then the next morning and the flavors definitely intensify with an overnight aging.

Make again? - Yes.

Changes/Recommendations:  Less flour in the bannetons and scale the formula for larger boules.

*** The Images can be made to full size by placing your cursor on the image and right clicking, and then, open image in a new tab.

Ratings:


Pages

Subscribe to RSS - blogs