The Fresh Loaf

A Community of Amateur Bakers and Artisan Bread Enthusiasts.

txfarmer's blog

txfarmer's picture
txfarmer

Recently, I have posted about my SD version of the classic Hokkaido Milk Loaf (see here: http://www.thefreshloaf.com/node/23662/sourdough-hokkaido-milk-loaf-classic-shreddable-soft-bread), this time I adapted it to use all ww flour. Yes, the original Hokkaido Milk Loaf is quite enriched, and this ww version is not any "leaner", however, I do think ww flour adds more dimension to the flavor, and all the enriching ingredients bring incredible softness to this 100% ww loaf. To me, "healthy eating" is not about restricting, on the contrary, it's about bringing in different kinds of natural food groups into my diet and thriving for a balance.


SD 100%ww Hokkaido Milk Loaf

Note: 19% of the flour is in levain

Note: total flour is 420g, fit my Chinese small-ish pullman pan. For 8X4 US loaf tin, I suggest to use about 450g of total flour.


- levain

starter (100%), 22g

milk, 37g

ww flour (I used KAF ww), 69g

1. Mix and let fermentation at room temp (73F) for 12 hours.

- final dough

ww flour, 340g

sugar, 55g

butter, 17g, softened

milk powder, 25g

egg whites, 63g

salt, 6g

milk, 150g

heavy cream, 118g


1. Mix together everything but butter, autolyse for 40-60min. Add butter, Knead until the dough is very developed. This intensive kneading is the key to a soft crumb, and proper volume. The windowpane will be thin and speckled with grains, but NOT as strong as one would get form a white flour dough. For more info on intensive kneading, see here.

2. rise at room temp for 2 hours, punch down, put in fridge overnight.

3. Take out dough, punch down, divide and rest for one hour.

4. Shape into sandwich loaves, the goal here is to get rid of all air bubles in the dough, and shape them very tightly and uniformly, this way the crumb of final breads would be even and velvety, with no unsightly holes. For different ways to shape (rolling once or twice, i.e. 3 piecing etc) see here.

5. Proof until the dough reaches one inch higher than the tin (for 8X4 inch tin), or 80% full (for pullman pan). About 5 hours at 74F.

6. Bake at 375F for 40-45min. Brush with butter when it's warm.


A crumb and flavor even whole grain haters would love.


Tear/shread away...


Sending this to Yeastspotting.

txfarmer's picture
txfarmer


When I visited south east Asia, I was impressed by the abundance and quality of Bánh mì - both the baguette bread and the sandwich made from it. In Dallas, there's a sizable Vietnam immigration population, and I can find pretty good Bánh mì at the Vietnam supermarket 10 minutes away from my house. I like the delicate mouth feel of Bánh mì bread, especially the incredibly thin/crackly crust, however I am not a big fan of the fluffy/closed crumb. The flavor tends to be "clean", which means a bit too light for me eating by itself, but great to make Bánh mì sandwiches with. After some research online, I learned that Bánh mì breads are usually made not by hand but by machine, which explains the crumb structure and cheap price. The exact recipe is hard to pin down since they are mass produced and apparently an "industry secret", however, most literature mentions rice flour in the ingredients.


In my case, I don't really want to recreate the traditional Bánh mì, instead, I want to combine the delicate crust of Bánh mì and open crumb of a traditional French Baguette, keeping a stronger flavor in the mean time. Still using my trusted 36 hour sourdough baguette formula, I used white starter rather than the usual rye starter, and replaced 10% of flour with white rice flour.

AP Flour, 375g

rice flour, 50g

ice water, 315g

salt, 10g

white starter (100%) 150g

-Mix flour, ice water and autolyse in fridge for 12 hours.

-Mix in salt, starte, then follow the basic 36 hour sourdough baguette formula here. (http://www.thefreshloaf.com/node/19830/36-hours-sourdough-baguette-everything-i-know-one-bread)


I am very happy with the result, crumb is still open with big holes, yet both the crust and crumb has a thin/delicate feel.


In terms of flavor, these are richer than traditional Bánh mì (due to the long fermentation/autolyse), but lighter than my usual rye starter baguettes. I wouldn't choose these to eat as is, but paired with flavorful/crunchy fillings, they make an very impressive Bánh mì sandwich(this one with thinly sliced picked carrots and daikon, cucumbers, chili peppers, chili sauce, and prawn sauteed in fish sauce/soy sauce/honey).


Submitting to Yeastspotting.


txfarmer's picture
txfarmer

This bread is based on the light rye formula in "Bread", however, I skipped commercial yeast, and added cumin and orange for a middle-eastern-ish flavor. The pin-wheel shaping method was from wildyeast's blog here: http://www.wildyeastblog.com/2011/05/05/shaping-a-pinwheel/

Light Rye with Cumin and Orange

*Makes 2X700g loaves

- Levain

medium rye flour, 136g

water, 108g

rye starter (100% hydration), 6g

1. Mix and rise @ room temp for 12 to 16 hours

- Final Dough

bread flour, 771g

salt, 17g

grated orange peel, from 2 large oranges

fresh orange juice, from 2 large oranges+enough water, 490g

cumin powder, 1TBSP

levain, 244g

2. Mix everything except for salt, autolyse for 20 to 60min, add salt, mix @ medium speed for 3-4 min until gluten starts to develope

3. Bulk rise at room temp (~75F) for about 2.5hrs. S&F at 30, 60, 90min.

4. Divide into two parts, round, rest for 20min, shape.

5. Proof on parchment paper or in basket until the dough spings back slowly when pressed, about 100min in my case.

6. Bake at 450F for 40 to 45min, the first 15min with steam.


The cumin/orange flavor is obvious but not overpowering, very delicious with chili or a nice soup.


The pinwheel shape is fun, but the batard came out pretty nice as well


Despite the complicated shaping, crumb remained to be open.


Sending this to Yeastspotting.

txfarmer's picture
txfarmer


Some facts first:

- Hokkaido is a place in Japan.

- Hokkaido Milk Loaf is THE most classic/common/well-loved sandwich bread in Asia. It's enriched with milk, heavy cream, butter, egg, milk power, and quite a lot of sugar - which makes it richer than most Asian soft sandwich bread recipes, pushing toward brioche territory. The finished loaf is very tall, very soft, rather rich tasting.

- Hokkaido Milk Loaf has nothing to do with the place Hokkaido. Nothing. Well, other than the name.

- Hokkaido Milk Loaf is usually made with dry yeast, a sample recipe can be found here using straight method: http://schneiderchen.de/237Hokkaido-Milky-Loaf.html, many TFLers have also done this bread successfully.

My notes:

- I adapted the recipe to use SD only. In fact it was over a year ago that I first attempted, since then, I have gone through many iterations on ingredient ratios, fermentation schedule etc. This is my measuring stick on how well my SD sandwich bread method works. What I am posting below is the latest version. In the begining I reduced sugar/fat ratio, but now I know my SD starter is strong enough to take on what the original Hokkaido recipe calls for, so I have slowly raised fat/sugar ratio back up, now it's comparable to the dry yeast version. The bread has the classic rich flavor and soft texture of Hokkaido loaf, and a slightly tangy taste thanks to SD starter.

- Like other soft sandwich breads, the success of this bread relies on intensive kneading. Please see the following two previous posts about this topic:

http://www.thefreshloaf.com/node/20669/sourdough-pan-de-mie-how-make-quotshreddablyquot-soft-bread

http://www.thefreshloaf.com/node/23061/extremely-sourdough-soft-sandwich-bread-most-shreddble-soft-velvety-ever

- The same dough can be used for rolls and other breads. Other than the sandwich loaf, I also made some rolls filled with chocolate hazelnut paste. I didn't specify ratios for the filling because I winged it, using whatever was on hand. I like to over fill the rolls with filling, which means lots of coca/hazelnut/sugar mixture, AND lots of softened butter to absorb it.

- Comparing to my previous soft sandwich breads, you might notice that baking temperature is higher (400F rather than 375), I find it gives a better lift to the bread.


SD Hokkaido Milk Loaf

Note: 19% of the flour is in levain

Note: total flour is 250g, fit my Chinese small-ish pullman pan. For 8X4 US loaf tin, I suggest to use about 270g of total flour. For KAF 13X4X4 pullman pan, I would suggest using about 430g of total flour.

Note: for the rolls, I used a 8X8 square tin, and 340g of total flour.


- levain

starter (100%), 13g

milk, 22g

bread flour, 41g

1. Mix and let fermentation at room temp (73F) for 12 hours.

- final dough

bread flour, 203g (I used half KAF bread flour and half KAF AP flour for a balance of chewiness and volume)

sugar, 33g

butter, 10g, softened

milk powder, 15g

egg whites, 38g

salt, 4g

milk, 74g

heavy cream, 63g


1. mix until stage 3 of windowpane (-30sec), see this post for details.

2. rise at room temp for 2 hours, punch down, put in fridge overnight.

3. takeout, divide, round, rest for 1 hour. shape as instructed here for sandwich loaf. For rolls, roll out the dough into 16X12in (quite thin), mix together coca, toasted hazelnut, and sugar in a blender, first brush the dough with lots of softened butter (LOTS), then spread on coca/hazelnut/sugar mixture (again, LOTS), roll up, cut off two ends, then divide into 9 pieces, and put in 8inch squre pan.

4. rise at room temp for about 6 hours. For my pullman pan, it should be about 80% full; for US 8x4inch pan, it should be about one inch above the edge. The dough would have tripled by then, if it can't, your kneading is not enough or over.

5. for sandwich loaf, bake at 400F for 45min, brush with butter when warm. for rolls, bake at 400F for 25min.


Thanks for all the protein, fat, and sugar in the dough, the bread should be very tall - if not, more kneading is needed.


With enough (but not too much) kneading, and proper fermentation, the crumb should be velvet soft.


Same for the rolls. The rich taste of the dough matches well with the filling.


I am sure I will keep tweaking the recipe, since I just can't leave a good thing alone. :P


Sending this to Yeastspotting.

txfarmer's picture
txfarmer

Yes, miracle can happen, I actually decreased hydration in my 36 hour baguette dough to make country loaves out of it. Of course I had to also try a few baguettes just to see how much crumb gets affected. I had wanted to keep it at 70%, but the new whole rye flour I am using is very very very dry/thirsty. My 100% rye starter was usually a wet paste, with the new flour, it's actually a firm dough! Had to increase the hydration to 73% just to make sure the starter can be evenly distributed, the dough handles like a 70% (or maybe even 68%) "normal flour" dough.

AP flour, 425g

ice water, 290g

rye starter (100%), 100g

white starter (100%), 50g

salt, 10g

- to make the dough and do bulk rise follow the basic 36 hour sourdough baguette formula here

- divide dough in 4 parts, each weights around 230g, preshape and rest for 40 min, two of them were shaped into baguettes, one was shaped into boule, the last one was shaped into batard

- proof for 30min, score, bake with steam at 460F for 25min.

Nice and open crumb for the country loaves

Baguettes aren't bad either. It shows that even though higher hydration help with a more open crumb, but you can still achieve a hole-y baguette at moderate hydration.

Submitting to Yeastspotting.

txfarmer's picture
txfarmer

Another soft SD 100% whole wheat sandwich loaf from me - these are our favorite breakfast item. The inspiration came from the super light banana sandwich bread in Rose Levy Beranbaum's "Bread Bible" (Farine adapted it into a free form loaf with great scoring pattern here, she also has the original formula there), I replaced all of the flour with KAF ww, dry yeast with sourdough starter, and changed fermentation schedule accordingly. Sticking to the method of intensive kneading + long cold fermentation, it was another soft, tall, flavorful ww loaf.


Sourdough 100% Whole Wheat Banana Sandwich Bread

Note: 15% of the flour is in levain

Note: total flour is 420g, fit a my Chinese small-ish pullman pan (shown in picture), for US 8X4 loaf pan, I would suggest 455g of flour.


- levain

ww starter (100%), 18g

milk, 29g

ww bread flour, 54g

1. Mix and let fermentation at room temp (73F) for 12 hours.


- final dough

ww flour, 357g (I used KAF)

banana puree, 168g

honey, 29g

water, 130g

butter, 29g, softened

milk powder, 29g

salt, 8g

all levain

2. Mix together everything but butter, autolyse for 40-60min. Add butter, Knead until the dough is very developed. This intensive kneading is the key to a soft crumb, and proper volume. The windowpane will be thin and speckled with bran grains, but NOT as strong as one would get form a white flour dough. For more info on intensive kneading, see here.

3. Rise at room temp (74F) for 2 hours. Punch down, put in fridge overnight.

4. Take out dough, punch down, divide and rest for one hour.

5. Shape into sandwich loaves, the goal here is to get rid of all air bubles in the dough, and shape them very tightly and uniformly, this way the crumb of final breads would be even and velvety, with no unsightly holes. For different ways to shape (rolling once or twice, i.e. 3 piecing etc) see here.

6. Proof until the dough reaches one inch higher than the tin (for 8X4 inch tin), or 80% full (for pullman pan). About 5 hours at 74F.

9. Bake at 375F for 40-45min. Brush with butter when it's warm.


You can't really taste the banana, but it does soften the crumb and lends a very subtle sweetness. Perfect with some PB, one of my favorite SD 100% ww sandwich loaves so far.


Sending this to Yeastspotting.

txfarmer's picture
txfarmer

Another formula from "Advanced Bread and Pastry"  - it's a yeast bread with nearly 40% of corn flour and corn meal, which yields a strong corn flavor. The formula uses both firm preferment and liquid poolish, the former for strength (since the corn flour/meal ratio is relatively high), the latter for extra flavor. There's no sugar in the dough, but corn flour/meal has a natural sweetness that shines through . I mostly stuck to the original recipe, but did increase hydration a little bit, even at 70%, the dough is on the drier side, next time, I might increase even more.

-poolish
Bread Flour, 89g
water, 89g
salt, 1/8tsp
yeast, 1/8tsp

1. mix and leave at room temp for 12-16hours

-preferment
Bread Flour, 195g
water, 128g
yeast, 1/8tsp
salt, 3.55g

2. mix and leave at room temp for one hour, put in fridge overnight

-final dough

Bread Flour, 67.5g
corn flour, 177.5g
cornmeal, 28g
water, 155g (about 30g more than original)
salt, 7g
yeast, 3.5g
butter, 4g

poolish, all

preferment, all


3. Mix and autolyse for 30min. knead at medium speed for 3 min, until gluten starts to develope.

4. Bulk rise at 80F for 1.5 hour, S&F at 30 and 60min. The dough is fairly strong.

5. Divide into two, round and rest for 20 to 30min. shape: for one piece I shaped into triangle, the other shaped according to this video. Proof at 76F for about one hour. The dough would've expanded noticably but not doubled, when poked lightly, it will spring back slowly.

6. Score , creatively. The dough is on the stiffer side, so it scores very easily.

7. Bake at 450F for 40min, the first 15 with steam.

LOVE how both loaves looked, I thought the exterior is as "corn-ish" as how it tastes.


Nice crackly crust, with good volume/ovenspring


Crumb is even, even a bit "fluffy", without big holes - as expected due to higher ratio of corn flour/meal, and relatively less water.


If you like quick cornbread or corn tortilla, which we do, you will love how this bread tastes. Not a "sweet bread" per se, but with a strong sweet corn flavor.


Easy and tasty, looks impressive too.


Sending this to Yeastspotting.

txfarmer's picture
txfarmer


Many have made similar breads, notably:

http://noelsbread.wordpress.com/2010/02/24/blueberry-hazelnut-bread/

http://www.farine-mc.com/2009/06/apple-blueberry-bread-with-spelt.html

http://www.thefreshloaf.com/node/12702/alternate-quotrustiquequot-caramelized-hazelnut-and-blueberry-spelt-sourdough

http://www.thefreshloaf.com/node/22508/blueberry-maple-walnut-spelt-bread


Here's my version, inspired by all the posts above, adapted to use ingredients I have on hand, and a fermentation process that works for me.

Fresh Blueberry Sourdough with Hazelnuts

Note: makes one 650g boule.


bread flour, 195g

ww flour, 60g

blueberry puree, 45g

water, 115g

maple syrup, 15g

salt, 4.5g

starter (100%), 90g

fresh blueberries, 84g

hazelnuts, 66g, toasted and skin peeled off

1. Mix everything together, autolyse for 30min, knead at low speed for 1min, medium speed for 3min.Gluten is mediumly developed. Add in blueberries and hazelnuts, mix in gently with hands.

2. Bulk rise at room temp (74F) for 3 hours, S&F as needed. I did 3 times at 30min, 60min, and 90min.

3. Round, rest, shape into boule, drop into basket smooth side down. Cover and put in fridge overnight.

4. Next morning, finish proofing at room temp for another 80min, until the dough bounces back slowly when lightly pressed.

5. Bake at 450F for 40 to 45min, the first 13min with steam.


While blueberry puree adds a lot of blueberry flavor to the bread, if too much is added, the acidity would disintegrate the dough completely, no amount of S&F can save it. Don't ask me how I know. Stick to fresh blueberries, frozen ones are too easy to break, release juice, then make the dough too wet - a tip I could've learned from Shao-ping's post if I had read it BEFORE making the bread. This version was my 3rd try, with the appropriate puree amount, and fresh berries, it's actually not difficult to make.


A whole wheat bread with strong blueberry flavor, while hazelnuts add a contrasting texture/taste, I would choose it over blueberry pies anyday!


Sending this to Yeastspotting.

txfarmer's picture
txfarmer


The formula is from Wild Yeast's blog, there really isn't that much rye in the dough, but has quite a lot of ww flour, as well as cracked wheat and flax seeds - two of my favoriate bread add-ins. The addition of molasses adds a subtle sweetness, makes a very flavorful and satisfying whole grain bread.


Crumb is relatively open for such a dough, not difficult to make either. With the method of "baking upside down", you can even skip scoring!


This is probably my shortest, least wordy blog entry ever, but when you have a perfect formula, no need for more words, thank you Susan!

Sending this to Yeastspotting.

txfarmer's picture
txfarmer

In my last croissant post(see here), I said I am practicing once or twice every week to perfect my lamination skill. It's been more than a month, and my croissant fever is getting hotter -- sadly, what's heating up faster is TX temperature. If you look up "mission impossible" or "self punishment" in the dictionary, you might see the following picture (28C is about 82F):
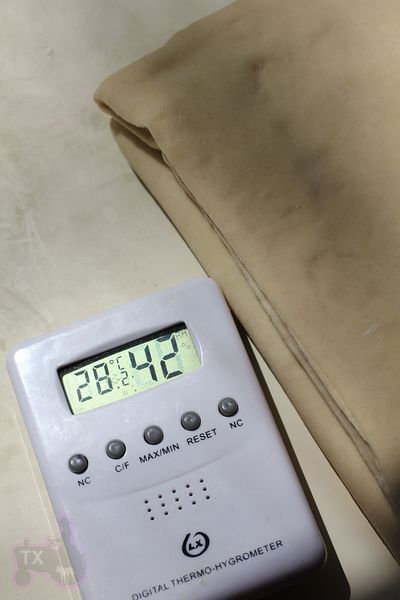
 

However, making croissant in warm weather is "mission difficult", not "mission impossible", the following are some tips I learned in the past month, I hope they will be helpful to my fellow warm weather TFLers.

1) Avoid direct sunlight. My kitchen has huge windows, and the counter space that's large enough to roll out the doug is right by the window. Under direct sunlight, the temperature could shoot to 90F in no time. My husband jokingly calls me "cold blooded" since my hands are always freezing cold, however, the few times when I was rolling out dough under the sun, my hands quickly warmed up -- so did the dough. Not a good thing. Lately, I have figured out the optimal schedule: Sunday at 5pm, mix dough and put in fridge for 2 hours; make butter block during that time; at 7pm enclose the butter and do the roll out. The temperature at 7pm is uaually still 28C (hence the picture above), but since the sun is on the way down, it won't keep heating up. After that just follow the schedule and do two more folds, usually I am done by 9:30 or 10pm. Next morning I usually get up early to run, so I do the final roll out before/during/after the run. 5am is the coolest time of the day, which is still around 24C/75F, but that's the best I can get. Usually by 7:30am, after resting a few times in the fridge, I can finish shaping. I usually freeze half for later, and put the other half in fridge until after work to bake.

2) Use the right butter. Not all European style butter are created equal, even if they have the same butterfat content. I have tried 4 or 5 different brands, when it's cooler (like a month ago), most of them would work, but now, only Plugra gives me consistent results, other brands are simply too melty.

3) Use the right rolling pin. I use a heavy duty metal rolling pin to make up for the lack of arm strength. However, lately, when it's this warm, I find it's necessary to put the pin in fridge along with the dough. At first I put it in freezer, thinking "the colder the better", nope. It was too cold for the first two folds, butter simply broke between dough layers, creating uneven crumb. Now I put it in fridge for the first two folds (when butter layers are still thick), freezer for the last fold and final roll out (when butter layers are thin and easier to melty but less likely to break).

4) Only work on the dough a few minutes a time, and put it in fridge more often than you would expect. That's the most important thing. When it's this warm, time is not on your side. Several times I tried to push my luck and roll the dough for a bit too long - warm dough == melty butter, never fails. This is where practicing comes in handy - at first I can't roll out much in the 3 to 5 min time span (longer for the first two folds when butter layers are thicker, shorter time for later folds and rolling out), which means the whole process drags on forever since the dough has to be in and out of the fridge many times. However, as I practice more, 3 to 5 min is more than enough for me to roll out the dough completely. For the last fold and final roll out I still let the dough rest in fridge once during rolling just so it's relaxed and easier to roll, but for the first two folds, it's all done in one shot.

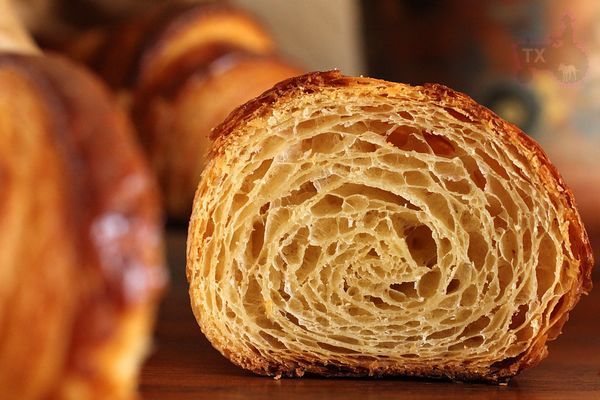
Other than dealing with the warm temperature, I am also adjusting the formula to get more flavor. I replaced the poolish in previous attempt with 100% white starter. Since there's still dry yeast in the final dough, I though it would be an easy switch - not so. Starter is more acidic than poolish, which made the dough too soft. I then mixed it longer and reduced hydration slightly. Got the even layers with no butter leakage, however, the crumb is not open enough, indicating that the dough gluten is still too weak (shown in the following picture).
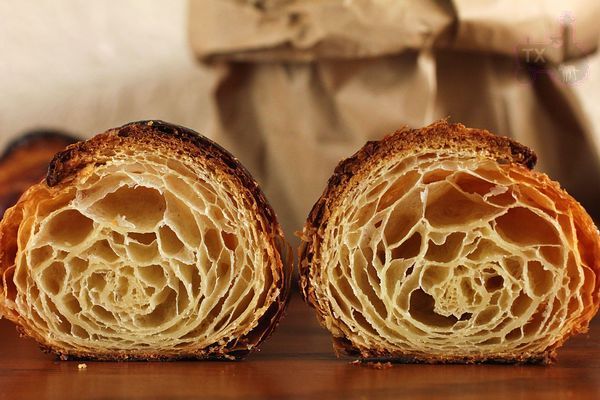
So I changed the AP flour to Bread flour, KAF bread flour at that, which has very high protein level. To my surprise the rolling out was not as impossible as I expected (or maybe I have practiced enough so it seems easier?), but the crumb became a lot mroe open (shown below).
The formula I am using now is as following:

Bread flour (KAF), 362g

milk, 130g

sugar, 67g

salt, 10g

osmotolerant instant yeast (SAF gold), 3.55g, 1tsp+1/8tsp

malt, 3.55g (I used a tsp of barley malt syrup)

butter, 22g, softened

100% white starter (fed with bread flour), 320g

roll-in butter, 287g

1. Mix everything but the rolling butter, knead until gluten starts to form. In my KA mixer, 3min at first speed, 4 min at 3rd speed.

Then following the procedure illustrated here.


Other things I have noticed:

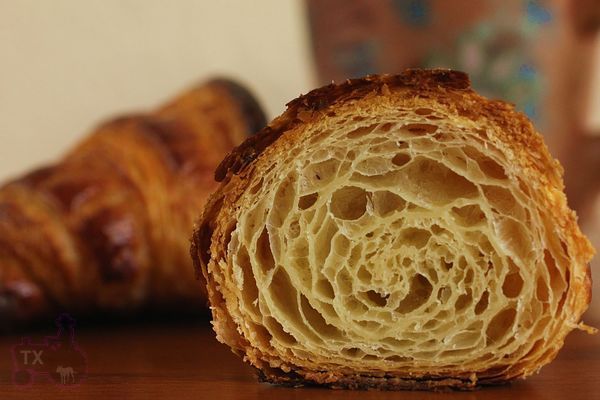
1) For the final roll out, while it needs to be as thin as 3mm to 5mm, don't go over board and roll it too thin, other than it will look like this - not bad, but not as open as possible
2) Don't squish any parts of the dough during shaping, here I must've pressed down the tip a bit too hard, look at the thick top
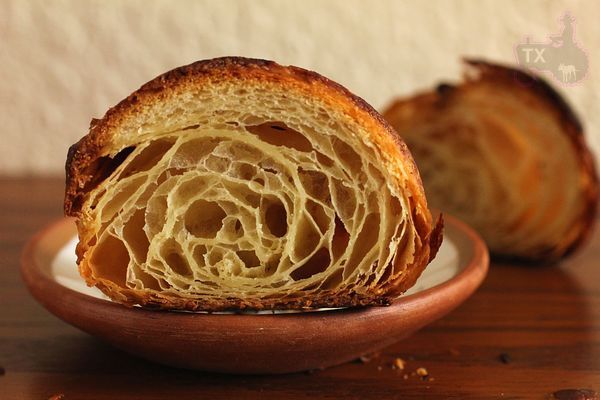
3. Don't roll the croissants too tight during shaping, it will explode as following, even when proofed fully (no leaking butter during baking)
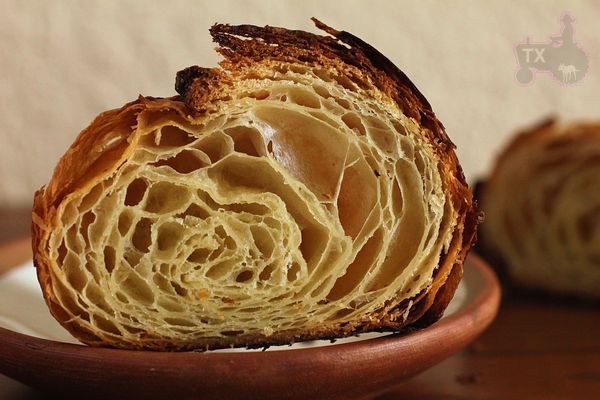
 

 My ideal croissant has very open, but even crumb with honeycomb holes, and thin walls. Still not quite there yet, but heading in the right direction. The addition of starter in the dough adds another dimension of flavor. When I brought some to my coworkers, who has no knowledge about yeast/starter, they all much prefer the starter version.


Sometimes I would make some chocolate ones, those are always gone first.
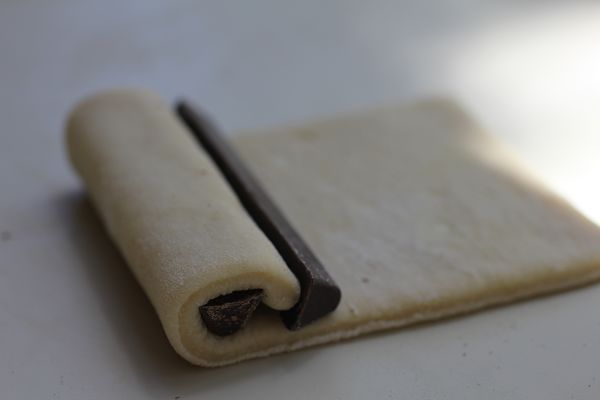
 

The temperature is still rising here in TX, let's see how far into the summer I can keep up this crazy croissant project.


Sending this to Yeastspotting.

Pages

Subscribe to RSS - txfarmer's blog