The Fresh Loaf

A Community of Amateur Bakers and Artisan Bread Enthusiasts.

txfarmer's blog

txfarmer's picture
txfarmer

Sending this to Yeastspotting.

Click here for my blog index.
 

Wow, it's been 11 months since I last posted. During that time several TFLers have reached out to me, thank you all for checking in. I have been doing very well, with no intention to "retire from TFL", life just got too busy to post for a while. Other than a super busy job schedule, several over sea big trips (New Zealand!), the biggest news is that I have been writing a Chinese baking book! It's scheduled to be out in July/Auguest 2014 (only in China unfortunately). Since I was doing all of the writing, photographing, not to mention recipe developing/testing/baking, I barely had any free time. Luckily the bulk of work is done, now that it's in publisher's hands, I can finally have my life back.

While I have been away from posting, I haven't stopped baking. Looking back at the pictures, I am surprised myself how much "not in the book" stuff I have baked. Had a tough time deciding which recipe I should post..

Certainly there have been lots of breads (almost all sourdough):

ww hot cross buns

Cocoa sourdough with chestnuts

Buns with seasame seeds

Flower light rye bread

Fenugreek, a new ingredient for me.

Everyday sourdough

Another pretty bread with Chinese preserved dried pork & mayo filling

Lye pretzel with some ww in a pretty shape I copied from http://www.ploetzblog.de/

A sourdough with millet and tons of other whole grain

Rolls with red bean paste filling

Another pretty bread with Chinese preserved dried meat inside

Bacon filled buns

Maybe some cakes:

A super rich super decadent birthday cake for hubby, pounds of dark chocolate and butter went into that.

Of course can't live without mochi cakes

Some fresh peach cupcakes for my coworkers

Tiger skin cake rolls. Almost every Chinese bakery has this.

This pound cake has parmesan in it, sounds odd but super yummy

How about pies and cookies?

In the end, I settled on these cronuts. They were inspired by those cronuts took NYC by a storm last year, sort of how my life felt like in the past while.

----------

I used my trusty croissant recipe posted here. The only difference is that the dough was finally rolled out to be 8mm, much thicker than the 4mm required by croissants. Cut out the hole in the middle, and let proof @ about 80F until very soft and jiggly. About 3 hours for me. Look at the layers, the height should triple or more:

Just like anything deep fried, oil must be hot enough, otherwise stuff gets too greasy. I heated grapeseed oil to about 350F, drop in dough carefully, fry until golden. (Chose grapeseed oil because I read somewhere it's what the inventor chose after many experiments, I have no idea whether that story was true, but they turned out pretty good.)

Did I mention I made these in August? Twice? It's rather inconvenient that my urge for lamination often comes in the summer.

Nice layers. They are essentially fat fried in fat, I thought they would be too greasy, but no, they are rather tasty (unfortunate for my arteries).

It's quite a lot of work to make them, but much less work than taking a flight to NYC and stand in the line for a few hours I think. I have heard that Dunkin Donuts is making them now, guess I am not the only copycat out there...

txfarmer's picture
txfarmer

Sending this to Yeastspotting.

Click here for my blog index.

Sourdough pancakes are a great way to use up leftover sourdough starters, I "roughly" followed the recipe here. As long as the consistency is about right, I vary liquid type/ratio a bit each time according to what I have on hand.

I got roses (in the background), husband got fluffy pancakes. OK, fine, I got some of those pancakes too.

Actually, I baked something else more "Valentine-ish" too -- cranberry curd walnut shortbread bars.

Recipe can be found here

Sweet but a little sour, just like love...

txfarmer's picture
txfarmer

Sending this to Yeastspotting.

Click here for my blog index.

First, it's the ciabatta made with my usual 36 hour baguette dough (with higher hydration to be about 81%).

AP Flour, 425g
ice water, 330g
salt, 10g
white starter (100%) 150g


1. Mix flour and water into a lump of mass, cover and put in fridge for 12 hours. (let's say Thurs morning, takes <5 min)
2. Add starter and salt to the dough, use hand to mix until roughly evenly distributed. Note that the 100% starter here has two purpose: it's levaining power to raise the bread, AND it's extra water acts as the "2nd hydration" step.
3. Bulk rise at room temp (70 to 75F) for 2-3 hours until it grows about 1/3 in volume, S&F every half hour until enough strength has been developed. Put in fridge.
4. About 24 hours later, take out dough, if it has not doubled or nearly doubled, give it more time to rise at room temp. I usually have to give it about 1 to 2 hours, depending on temperature, which means the dough can probably be stored in the fridge for even longer than 24 hours.Do make sure it has a sufficient bulk rise, so the dough is strong enough; but don't let it go too long, the dough will be so bubbly that the shaping would be difficult - this is where you need to experiment with timing a lot.
5. Divide into 4 portions (which means these were 200g-ish ciabatta rolls), put on oiled parchment paper to proof. The beauty of ciabatta is that little shaping is required, however, I find that it still helps with crumb to lightly fold the edges over to make them into squares.

6. Proof until very puffy and expanded (about 1.5 hrs for me), take each one and flip over onto another parchment.

7. Bake each @460 for 18 min, the first 8 with steam.

Cut them horizontally, and they were perfect for juicy fillings

Cut it vertically, they were great for dipping into olive oil

Second one was made with this recipe: http://www.wildyeastblog.com/2007/08/27/overnight-ciabatta/

These are bigger than the 36 hour sourdough ones

txfarmer's picture
txfarmer

Sending this to Yeastspotting.

Click here for my blog index.

I have made brown croissants (coffee), green croissants (matcha), black croissants (dark chocolate), yellow croissants (pumpkin). With some purple yam on hand, it's only natural that I want to make purple croissants.

Well, it turns out complicated. Yam puree, just like potato puree, softens the crumb and weakens dough strength. As the result, if I add too much, croissants don't open up enough (i.e. no big honeycomb holes) and the texture is tender rather than crispy. However, if I add too little, there isn't enough color. After a few tries, the following recipe is what I arrived at. Still not the vivid purple I wanted, but at least that hint of color is noticable.

Purple yam croissant with Sourdough Starter
Note: for details and tips on making croissants, please see this post & this post.
Note: this recipe makes about 12 large danishes.

-levain
starter (100%), 35g
water, 59g
bread flour, 105g

1. mix and leave at room temp for 12 hours.

-final dough
bread flour, 422g
sugar, 68g
salt, 10g
instant yeast, 7g
butter, 21g, softened
purple yam puree, 200g
water, 180g
levain, all
roll-in butter, 287g

1. Mix everything but the rolling butter, knead until medium gluten developement. Then follow the steps here.

I filled them with more purple yam filling

It's obvious that the cross section has less hight comparing to my other croissants, that's due to the weaker dough

-----------

Also want to post some chocolate puff pastery I made a while ago. Recipe is from Pierre Hermes’ “Chocolate Desserts”(recipe can be found here), like all PH recipes, it's horribly time consuming and fussy. Yes, it's also terribly delicious. Sigh.

This dough is on the drier side, then it needs to be folded six times!!! Let's just say between all the resting and rolling out and folding, it was a 24 hour process.

The first time I made it, I was so sick of the dough that I directly shoved it into the freezer after the final rolling, couldn't bear to use it until a month later. I of course didn't learn my lesson, made it again. Used some of it for this mille-feuille.

All that layers...

Used the rest for some very fancy apple hand pie.

txfarmer's picture
txfarmer

Sending this to Yeastspotting.

Click here for my blog index.


For a lot of bakers, it's an important milestone to learn to make a good baguette. I have been asked many times both at my Chinese blog and TFL what the "trick" is for those big holes in the crumb. The truth is that, there's no trick. It's everything: appropriate flour, S&F rather than intensive kneading, appropriate fermentation, precise shaping, clean scoring, good steam and high temperature baking. I have yet to make a baguette that I am totally happy with, probably it's the chase that keeps me making it again and again. For that reason, I hesitate to call this post a tutorial - how can a student in bread baking offer a tutorial at all. However, I did write it up for some of my blog friends who are new to bread/baguette baking, and in need of a simple recipe to get started. This recipe contains lessons and notes learned from many many many baguettes I have made over the years, hopefully it will be helpful to others.

Since this recipe is meant for newbies, I intentionally kept it as simple as possible. No sourdogh, just dry yeast. No long cold fermentation, just straight method. No whole grain flour or addins, just white AP flour. By taking out all those variables, hopefully it's easier to follow and repeat. Even with such simplification, as the pictures show, the crumb still can be very hole-y, and the crust still can be very crisp, however, the flavor does suffer. Its taste is not nearly as complex as my favorite 36 hour baguette formula and its many variations (see here). Therefore, once you are comfortable with this straight method, I would definitely encourage you to move on to more complex recipes.

Straight Baguette
Note: makes 4 baguettes, each 220g, 40CM in length

AP flour (I used King Arthur AP flour because most people can get that easily and reproduce the recipe with the same flour), 500g
water, 375g (this means the dough is 75% hydration, yes, it's wet, but trust me, it's managable, especially after a few tries)
salt, 10g
instant yeast, 2g

1. Mix everything together. No need for kneading. Just mix everything into a rough dough.
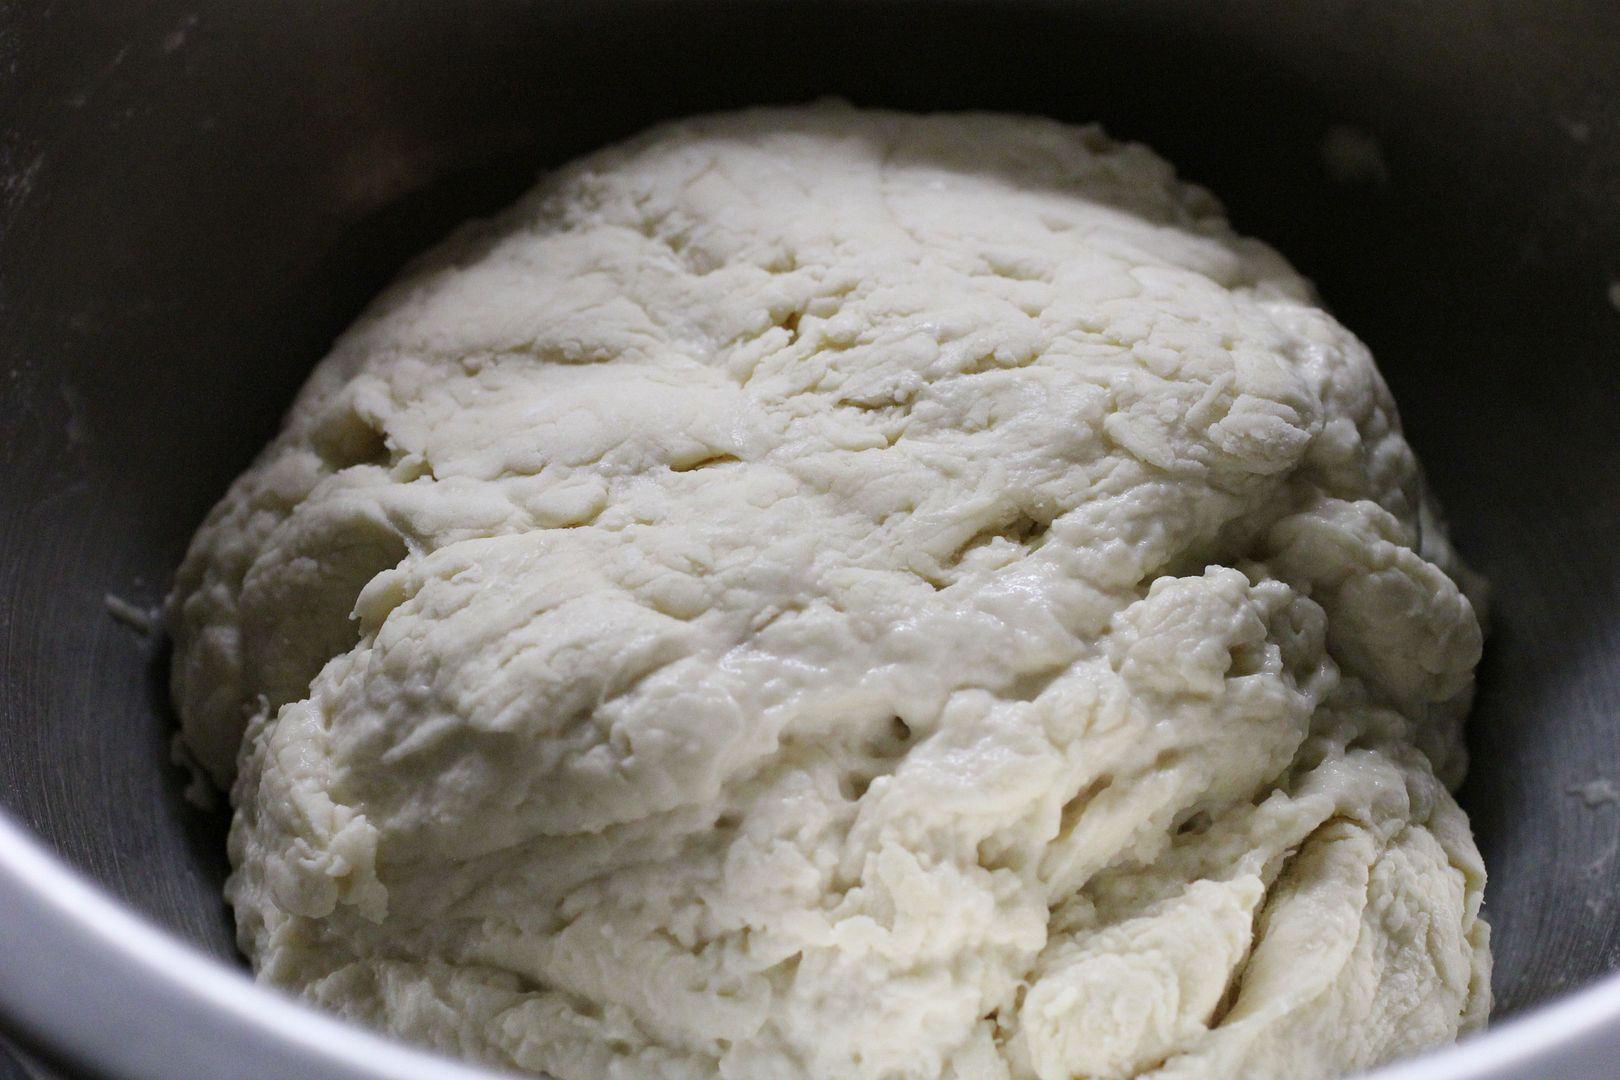
2. Cover the container, rise at room temp (22C-25C) for 3 hours. At 45, 90, 135min, do Stretch and Fold (S&F). TFL handbook has good explanation on S&F. For a dough this size, I find it's the best to water/oil/flour my hands, lift the dough out and do S&F directly in my hands. That's two quick movements, one in horizontal direction and one in vertical direction . The hand/dough touch time is so brief that sticking is not an issue. By the end of 3rd S&F, the dough magically becomes very smooth. And by the 3rd S&F, you can feel the dough offers resistence when being stretched out, that's a sign of gluten developement. Rember how the dough feels, because you want to remember how "elastic" (i.e. gluten strength)  yet extensible of a "good baguette dough" should be. Oh yeah, keep the container oiled and covered the entire time.

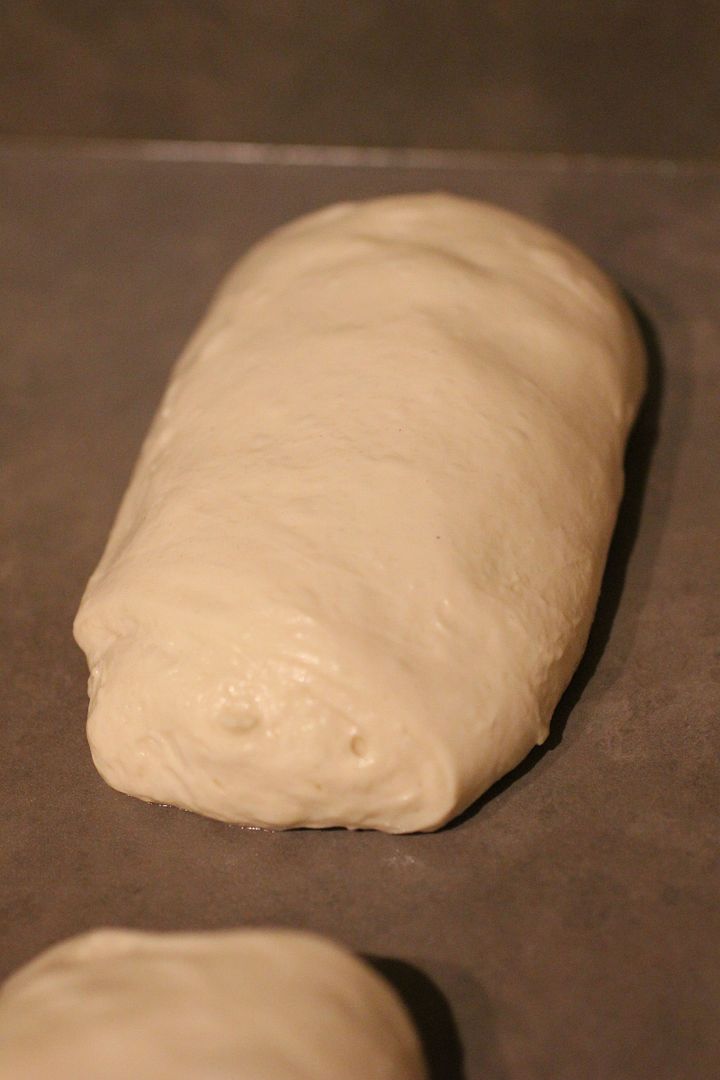
3. Dump the dough out and divide into 4 portions. Try to have less small scrap pieces. I have practiced enough to eyeball and cut 4 equal portions without too much weighing and adjustment. I find each detail in preshaping and shaping affects final crumb, in general the less I touch the dough (yet still get all the tasks done) the better crumb is. Roll each piece into a colum, with tight skin surface . This is my version of preshaping, there are other methods. Again, the key for less sticking is lightly flour/oil/water hands and surface, AND MINIMAL TOUCHING. Cover and rest for 25-30 minutes.
4. Shaping the baguette. Now there are so many good ways to do this, my method below is just what I am used to. As long as you can shape the dough into desired size/shape with minimal handling, your method is good. The key here is 1)keep skin surface tight, AND 2)don't destroy too much of internal bubbles. Be gentle yet effective.If you find it hard to roll the dough long enough, the dough is too strong, S&F less next time or use a weaker flour. If you find the dough to be limpy, extensible but offers zero resistence when being rolled long, can't keep a tight surface, the dough is too weak, use a stronger flour or S&F more next time.
a. Lightly pat the preshaped column into a rectangle, roll the top edge down twice
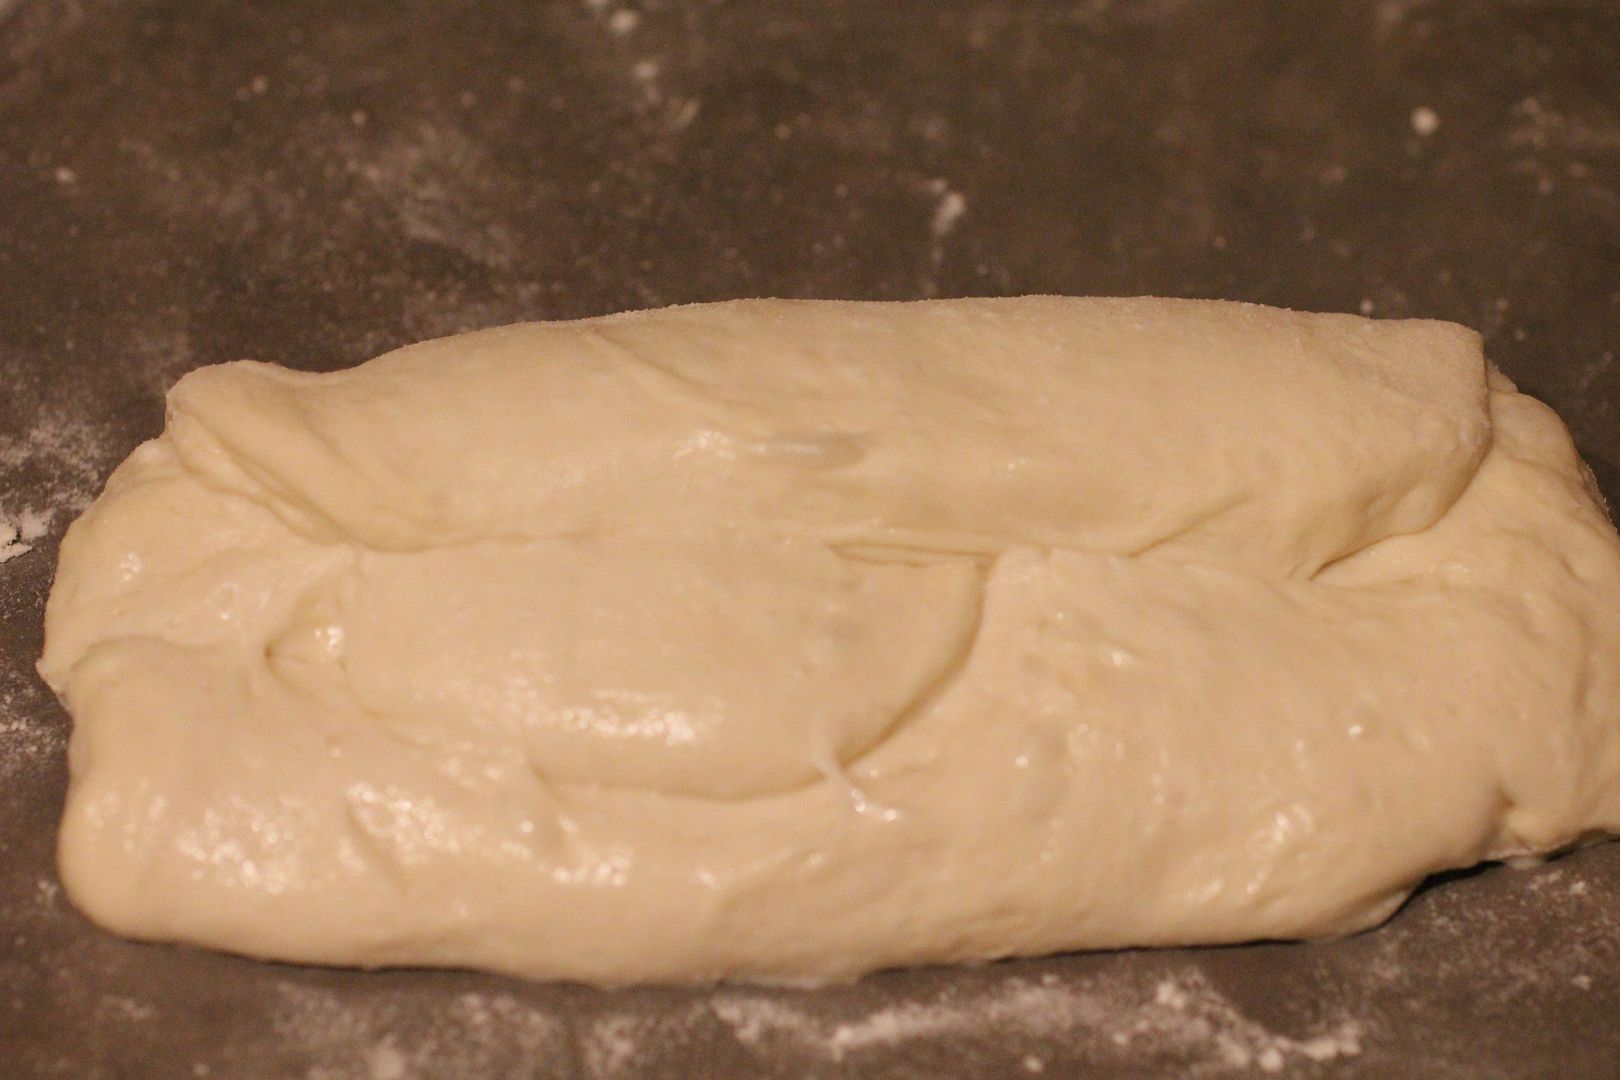
b. Turn the dough 180 degrees, and fold the now top edge to middle

c.Fold in half again, top edge meeting bottom edge, seal. Roll it to 40cm long. "Light", "firm", and "even" are the key words while rolling out. Start rolling from the middle, move both hands outward until the ends, while applying light force downward and outward. If the skin of the dough is tight enough, it should be enough to just lightly flour the surface for the dough not to stick. Most of the flour should end up on skin, rather than inside of the dough anyway. If you find the dough slipping while rolling, you might be flouring the dough and surface too much. Put them on lightly oiled parchment paper (and the whole thing sits on the back of a baking sheet), with middle part of the parchment paper srunched up to act as dividers. Note that there are people who prefer bakers couche such as this, and I have seen/used it in a class using profession oven with great success, HOWEVER, in a home environment, I much prefer to use parchment paper so that I can slip the dough along with paper together into the small home oven onto the steaming hot stone. I don't want risks associated with moving the dough onto a peel, then moving the dough again from peel onto stone. It's just safer, neater, and quicker.
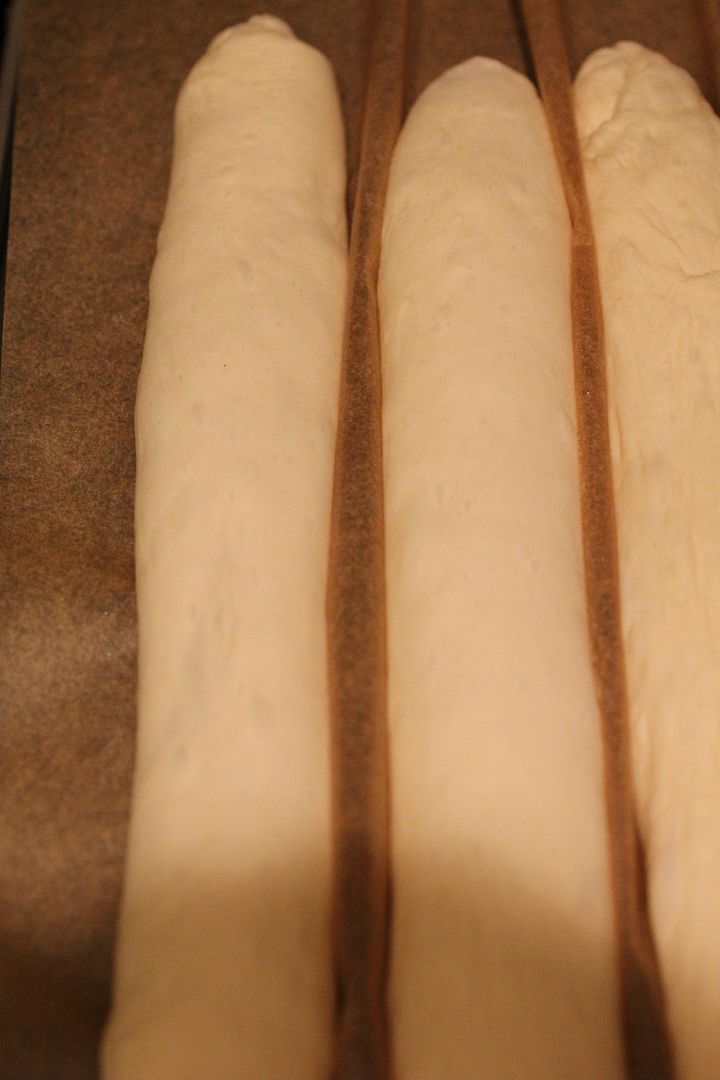
5. Cover and proof at room temp (22C-25C) for 30-60minutes. The dough should have grown noticably but still have enough bounce left. If you dough does not grow much in oven, you have over-proofed, proof for less time next time. If the dough grew too much in oven, resulting in bursting seams and uneven distribution of holes, proof longer next time. Score. For tips on scoring, please see this great tutorial from David. For baguettes in general, the dough is pretty wet, which means you need to be quicker and firmer with your movement for the blade not to drag and stick. Dipping thd blade in water before each cut sometimes help. Furthurmore, David's tutorial mentions "classic cut", which is done by cutting at a shallow angle to get "ear/grigne/bloom". With a 75% hydrated dough, you might at first have trouble cutting at the shallow angle without sticking, don't worry, just cut perpenticular to the surface for now, once you get all the other components correct, you can then start cutting at an angle and try to get "ear" for your cuts. The dough may seem deflated somewhat when you score it, don't worry, a well executed baguette dough would recover and expand beautifully in the oven.
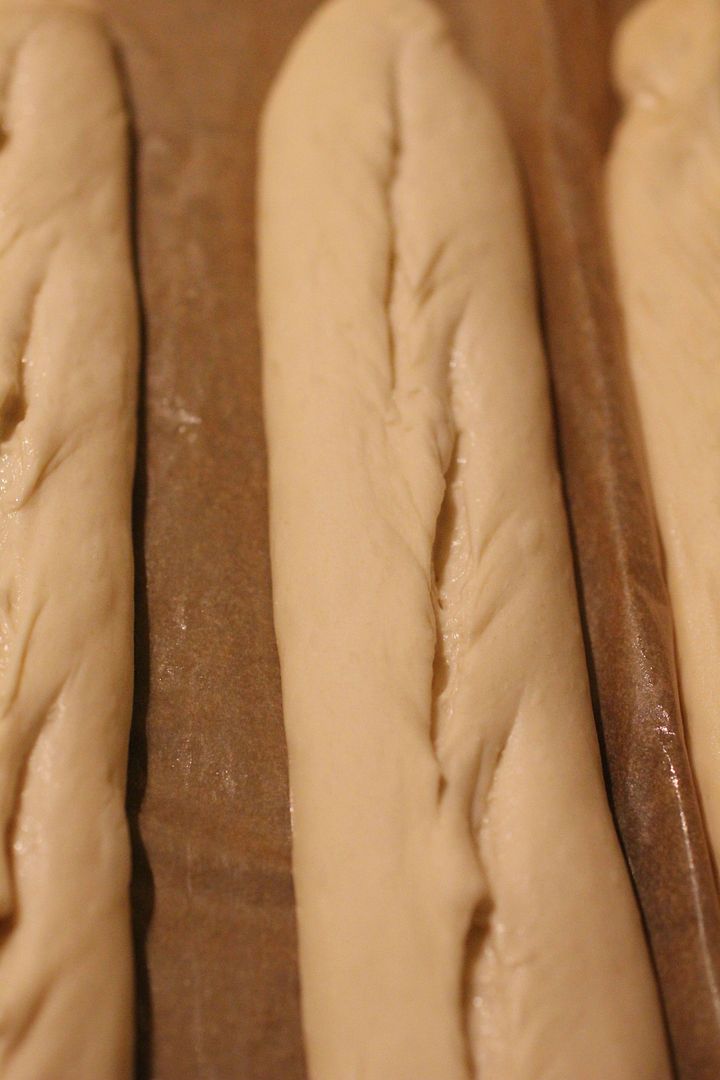
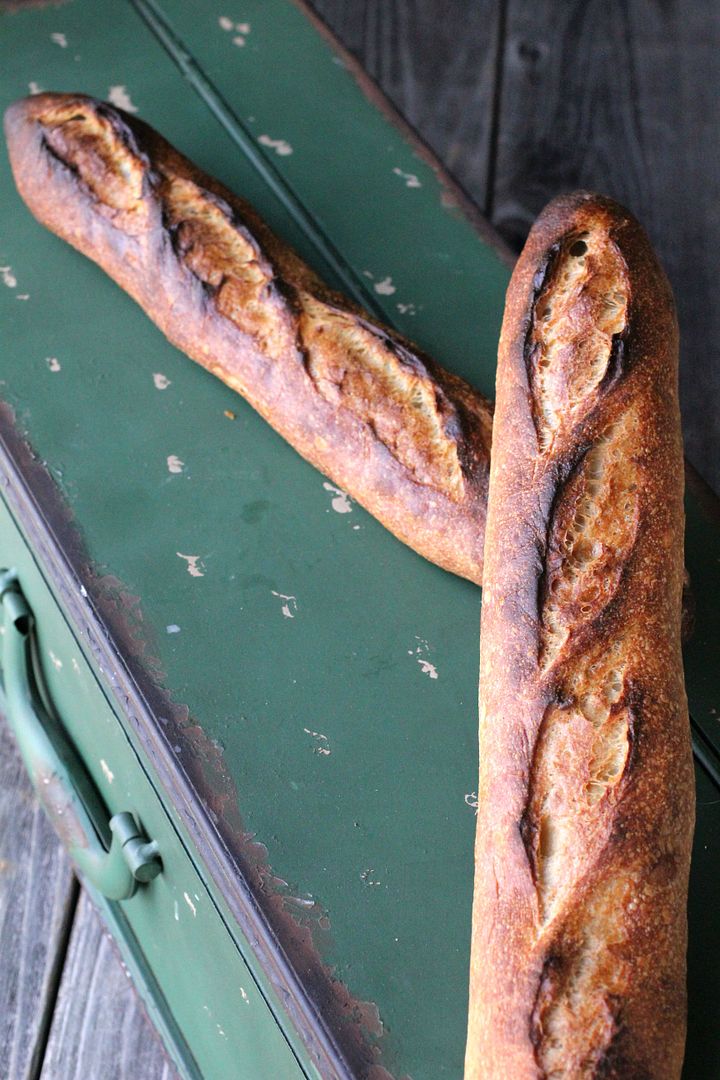
6. Bake at 460F for 10 min with steam, then 15min without steam. Turn off oven, crack the door open, and keep baguettes inside for about 5 minutes. Take out and cool. Note that I preheated my stone at 500F for an hour to make sure the oven is hot enough, only reduce the temp to 460F when the dough is loaded. There are many ways to steam and load, each oven seems to prefer a different way. I use the most common method for my very ordinary electric home oven: a cast iron pan on a rack below the stone with some rocks inside; it's preheaded along with the stone; once the dough is ready to be loaded, I pour a bit of boiling water onto the cast iron pan (steam comes out, watch out!), close the door and get the baking sheet (with the dough/parchment on top) in hand; open the door again and slide parchment paper along with dough onto the hot stone; pour another cup of boiling water into the cast iron pan (watch out again, more steam comes out); close the door. The whole operation is pretty intense, my husband is still amazed that I haven't lost a finger loading bread doughs ... yet. However, it does get easier with practice.

Comparing to my 36 hour baguette doughs, this dough is much easier to score!
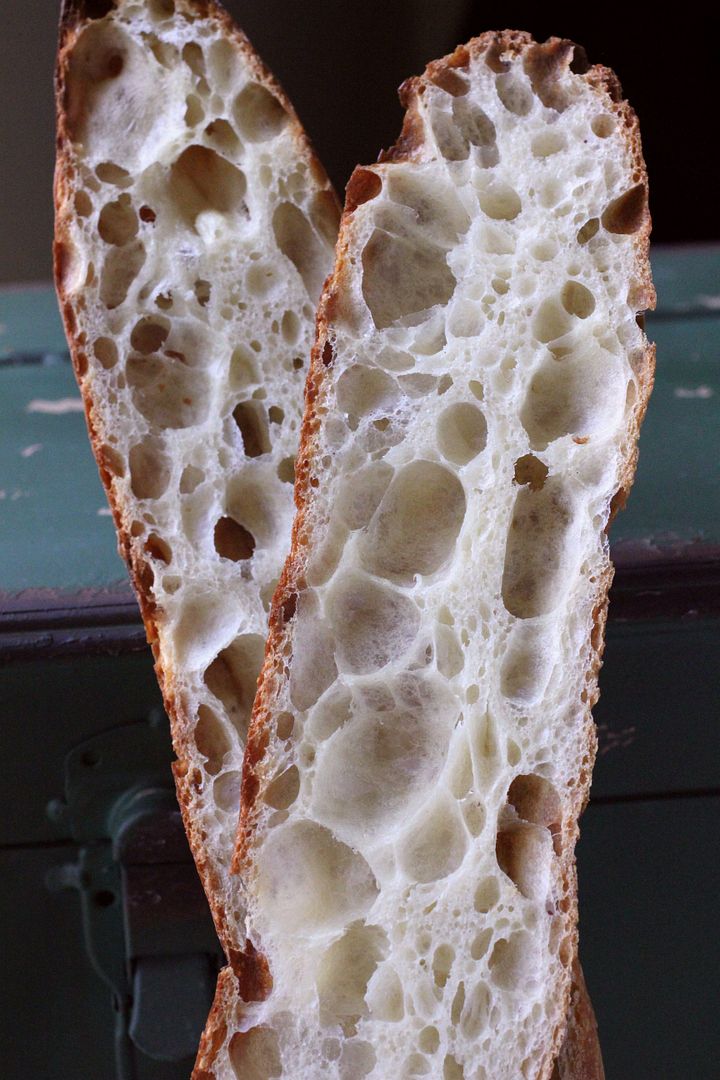
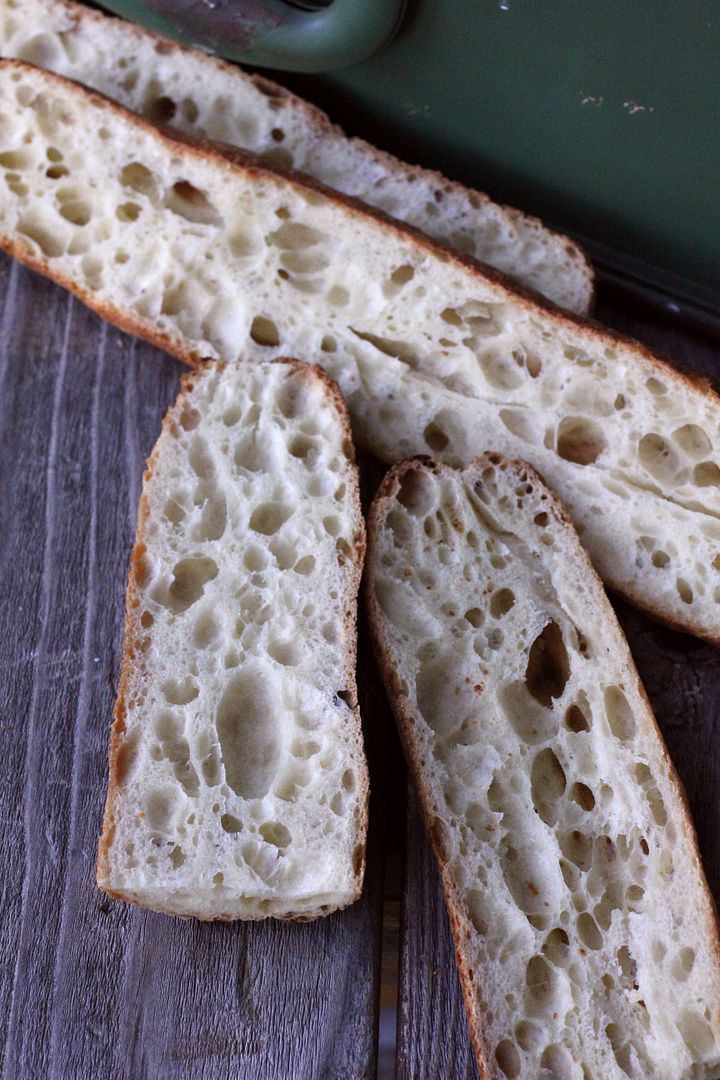
Crumb is decently hole-y, and even. :)

Crust is thin and crispy. If they are baked enough, they should be singing for a long time while cooling, which means a lot of tiny cracks on the crust.

However, I am never completely happy with my baguette. Holes can be bigger, more even, and I can live without the line in the middle of the crumb coming from the seam at the bottom. But hey, like I said at the begining, the fun is in the chase. :)

txfarmer's picture
txfarmer

Sending this to Yeastspotting.

Click here for my blog index.

Phew, it has been a busy holiday, and just turned into an even busier Janurary. Still baking a ton though, here are some stuff I have baked during the holiday but didn't get to post about before.

The formula for these rolls were based on Kaisor rolls from BBA, however, I made it into sourdough, used some rye, added pumpkin (must use pumpkin during holidays), and adjusted water accordingly. By the end, it probably is nothing like the BBA formula but still delicious.

Norm once posted a video here on TFL on how to shape Kaisor rolls, he made it look so eas, well, but I just can't get that method to work. Then I bought the Kaisor stamps to try, they worked, sorta, but not really. In the end, the following shaping method was what worked consistently for me to get that five petal look.

Pumplin Rye Rolls
Note: makes 9 medium rolls

- levain

rye starter (100%), 18g
water, 29g
rye flour, 54g

1. Mix and let fermentation at room temp (73F) for 12 hours.

- final Dough
bread flour, 357g
oil, 21g
egg, 50g
salt, 8g
pumpkin puree, 150g
water, 85g
levain, all

1. Mix everything until stage 3 of windowpane (-30sec), see this post for details.
2. Rise at room temp for 4 hours until double
3, Divide into 9 portions, round, rest, shape as following: roll out to long stripe, tie the first knot

Take the long end and do the 2nd knot

Take the long end and stick back into the middle


4. Rise at room temp for about 4 hours.
5. Brush with egg, spread chopped green onions or leeks
6. Bake at 375F for 20min. Take out of the oven and brush with melted butter.

This formula doesn't have sugar, fat ration is pertty low, however pumpkin still kept crumb moist and light. I'd say the mouthfeel is very close to Kaisor rolls -- soft yet still got some bite.

----------

Also made some gift box cookies(recipe here), incredibly time consuming but my friends' kids totally were in love with these.

-------------------------

A pumpkin chocolate marble pound cake. Did I mention I heart pumpkin?

--------------

Still practicing my pie crust. Got the best crimped edge on this chocolate pecan pie (recipe here) so far.

Just like baguette and croissants, pie crust is my current obsession project. I am practicing to make it more tender, more even, prettier, yummier....

Oh, the pie itself is pretty delicious too. How can you go wrong with lots of dark chocolate, lots of toasted pecans, and quite a bit rum?!

txfarmer's picture
txfarmer

Sending this to Yeastspotting.

Click here for my blog index.

I have made sourdough Pandoro before (here), the process was similiar to soudough panettone - sweet starter, long rises, and thorough kneading. Just when I thought that was labor intensive enough, I came across this post, nicodvb's answer really peaked my interest: lamination AND sweet starter? Wow, that's like combining two most difficult breads in one, how can I not try?!

I followed this recipe nocodvb linked to, essentially, the steps are: sweet starter->first dough mix and rise at 26C for 5-6 hours->2nd dough mix and rise at 28C for 5 hours->lamination, fold 3 times->shape and rise until ready ->bake. Looks clear enough and the original poster's picture tutorials were so helpful. But of course the reality was a tad different ...

I decided to push my first dough to rise for 8hours, the dough has expanded 4 times by then. I feel a fuller first rise will help the crumb and rising speed later (...maybe not so much actually). Since I mixed 2nd dough to full developement, a strong windown pan was achieved.

After 5 hours, 2nd dough has expended a bit, but not too much, I started lamination. OMG, the dough's much stronger than my usual croissant dough AND not that wet. The most difficult part is that the amound of fold-in butter to dough ratio is significantly lower than croissant or my laminated sandwich dough. All that means it's hella difficult to roll it out evently without smearing butter into dough. Given that butter ratio, I knew the crumb won't be honeycomb like, however I still tried my best to keep layers. It was an arm breaking 4 hours.

Now it comes to shaping. According to the recipe link, my larger pandoro mold should take in 750g of dough, and my smaller one should take 550g. However, my previous attempt showed that 550g was enough for the larger mold. I debated and put 650g into the larger mold, and the rest (500g) into the smaller one. Well, now I know it's too much for both. Then it comes to final rise, and it went on, and on, and on... Due to the laminated butter layers, I didn't want to have temperature higher than 26C in fear of buter melting, so it took fully 24 hours for the dough to reach the top!! I felt the dough, it's still strong and bouncy, it could've used more time to proof. However, 24 hours was my mental limit for proofing, I could take no more! Of course, the ovenspring was tremendous due to slight underproof. And, judging from the pic below, 550g (rather than 650) would've been enough for this larger mold. This huge dome was rather inconvenient when I had to flip it upside down.

And the smaller mold was even more overfilled. 400g would've been enough (there's 500g of dough in there).

The good news is that all that work and time was worthwhile. First noticable effect from lamination was the flaky croissant like crust.

Crumb was light as air, with some random pockets from laminated butter

Note some honeycomb like cells near the top, from lamination

It's very  "shreddable", I am guessing due to both intensive kneading and lamination.

Best eaten by "peeling off". Thank you nicodvb for directing me to this wonderful recipe, happy holidays everyone!


txfarmer's picture
txfarmer

Sending this toYeastspotting.
Click here for my blog index.

Golden, fragrant, delicious, pretty crust, holey crumb, what's better than these pumpkin laminated sandwich loaves as festive holiday gifts? Ok, maybe sourdough panettones are as good, but these come close.

Procedures are similar to what was posted before(here), but ingredient ratios are a bit different to accomodate pumpkin puree:

-levain
starter (100%), 44g
water, 75g
bread flour, 134g

1. mix and leave at room temp for 12 hours.

-final dough
bread flour, 361g
pumpkin puree, 155g
water, 60g
egg, 77g
sugar, 52g
salt, 10g
instant yeast, 7g
butter, 41g, softened
levain, all
roll-in butter, 245g

2. follow the instructions here: http://www.thefreshloaf.com/node/26357/laminated-sandwich-loaf-best-both-worlds

Another difference is that this time I folded twice, each was a 4-fold, less layers than one 4-fold then two 3-folds here, but more layers than one 4-fold then one 3-fold here.  The more layers the more holes, but they will be smaller, the less folds the less holes even though they are larger.

Peopel are as taken by the layers on the crust as the open crumb

The dough makes mroe than one sandwich loaf, here are some mini loaves. Nice stocking stuffers?

-------------

Going with the holiday pumpkin theme, fueled by my recent addiction to perfecting pie crust, here's a pumpkin pie. THE best pumpkin pie I have ever made/eaten.

Cooks Illustrated sometimes gets too nerdy and fussy, but this time they got it right. Recipe can be found here, I only use the filling recipe though.

The reason I love this pie is because it's not overloaded with spice. With the addition of sweet potato puree,natural pumpkin flavor shines through, and texture is silky indeed. Pumpkin spice ratio is controlled, and a full tsp of salt makes the flavor profile very sophiscated. However, if you eat pumpkin pie for the strong "spice" flavor, this is probably not for you.

----------------------------------------------

I modified this pinwheel cookie recipe to combine two of my favorite flavors: chocolate and matcha.

Not the easiest cookies to make, but the look and flavor combo made the extra effort worthwhile.

------------------

Pignoli cookies, recipe from The Italian Baker by Carole Field

Crispy and fragrant, it also uses only egg whites, which I have 60+ left over from panettone and pie making.

txfarmer's picture
txfarmer

Sending this to Yeastspotting.

Click here for my blog index.


Sourdough panettones have become holiday gift of choice from me to my friends, they are amazed by the look, the smell, the taste, and the labor/time that's involved, certinally leaves a long lasting impression ... until they ask for it again next Christmas! This year I was inspired by mwilson's post here: http://www.thefreshloaf.com/node/30801/perfect-panettone. Many thanks!

This recipe is originally from Iginio Massari, which is very close to the one I made last year (here) in terms of butter/yolk/sugar ratio. However, there's a main differece in procedure: Francesco Elmi's formula last year has a lot more butter/yolk in the first dough, while Iginio Massari's version has most of butter/yolk in the second dough. This small change does lead to quite a bit of difference in fermentation timing and final taste.  Francesco Elmi's formula require a longer rise time for first dough (since it's richer, 14 hours for me), but the 2nd dough only took 5-6 hours; Iginio Massari's first dough took less time (it's leaner, 11 hours for me) and is easier to knead, however both rising and kneading for the 2nd dough took longer (8 hours for me). There's also a subtle difference in terms of flavor profile. If I remember correctly, last years's version is a tiny bit more tangy than this years. Both are decliciou and light, just ... slightly different.

For each batch I can only make two loaves since that's how many my ad hoc proof box would fit. In fact I have so far made 3 batches,  expecting to make at least one more -- that leaves 68 leftover egg whites! Just like last year post holiday days, a lot of angle food cakes are coming my way.

One thing make sourdough panettone great holiday gift is how long it keeps. I am mailing a couple to other cities (one is even on the way to Canada!), even after 5 days on the road, they would still be moist and fresh.

Light as air ... which leads to a question my friends always ask me: is it a cake or bread?

txfarmer's picture
txfarmer

Sending this toYeastspotting.
Click here for my blog index.

Holiday season is pumpkin season. Pumpkin in dishes, in pies, in cakes, in breads, and in croissants!

Pumpkin Croissant with Sourdough Starter
Note: for details and tips on making croissants, please see this post & this post.
Note: this recipe makes about 12 large danishes.

-levain
starter (100%), 35g
water, 59g
bread flour, 105g

1. mix and leave at room temp for 12 hours.

-final dough
bread flour, 422g
sugar, 68g
salt, 10g
instant yeast, 7g
butter, 21g, softened
pumpkin puree, 200g
water, 120g
levain, all
roll-in butter, 287g

1. Mix everything but the rolling butter, knead until medium gluten developement. Then follow the steps here.

Tried out two fillings. The ones at bottom were filled with dark chocolate, a safe bet that never disappoints; the top ones had a caramelized cranberry walnut filling, how very seasonal! Chocolate ones were easier to roll than the soft/mushy cranberry filling, that's why the bottom ones had more turns and appeared to be fuller/taller.

Both had pretty open crumb though. Love the golden hue.

Makes great holiday gifts

Pages

Subscribe to RSS - txfarmer's blog