The Fresh Loaf

A Community of Amateur Bakers and Artisan Bread Enthusiasts.

Recent Blog Entries

Isand66's picture
Isand66

I needed some nice semi-soft rolls for burgers and hot dogs. These are not like those air-whipped supermarket rolls that are so soft and tasteless but are the perfect consistency to hold a juicy burger or some natural casing hot dogs.

I decided to follow my new method of taking the dough temperature, measuring the rise for bulk, and then shaping and refrigerating for at least 12 hours before baking. The dough was allowed to rise to 30% at 80 F.

I used fresh milled and sifted Butlers Gold whole wheat along with some KAF bread flour, egg yolks and butter.

The end result was a flavorful roll with a nice soft and open crumb.

Formula

Levain Directions 

Mix all the levain ingredients together for about 1 minute and cover with plastic wrap.

Let it sit at room temperature for around 6-7 hours or until the starter has almost doubled. I used my proofer set at 76 degrees so it took around 5 hours for me. Either use in the main dough immediately or refrigerate for up to 1 day before using.

 Main Dough Procedure

Note: I use an Ankarsrum Mixer so my order of mixing is slightly different than if using a Kitchenaid or other mixer. Add all your liquid to your mixing bowl except 50-80 grams. Add the levain in pieces and mix for a few seconds to break it up. Next, add all your flour to the bowl and mix on low for a minute until it forms a shaggy mass. Cover the mixing bowl and let it rest for 20 - 30 minutes.   Next add the salt, and egg yolks and softned butter, and remaining water as needed and mix on medium low (about speed 3) for 12- 24 minutes.  The dough should pass the windowpane test.

Remove the dough from your bowl and place it in a lightly oiled bowl and do several stretch and folds.  Make sure the dough is as flat as possible in your bowl/container and measure the dough in millimeters and take the temperature of the dough as well. Based on the chart from the Sourdough Journey.com, determine what % rise you need and make a note. If you have a proofer decide what temperature you want to set it at and what rise you are aiming for. If the dough is fully developed you don't need to do any stretch and folds, but if it's not, do several sets 15-20 minutes apart.

Once the dough reaches the desired bulk rise, shape into rolls around 135 - 150 grams each depending on how big you want them. Place them on a cookie sheet lined with parchment paper and cover them using plastic wrap sprayed with cooking spray. I also put a moist tea towel over the tray a well. Place the cookie sheet in your refrigerator for around 12 hours or longer. The dough will continue to ferment so if you are using fresh milled flour you have to be careful not to leave it too long or it may over-ferment.

When you are ready to bake, preheat your oven to 445 F and prepare for steam. I have a heavy-duty baking pan on the bottom rack of my oven with 1 baking stone above the pan and one on the top shelf.  I pour 1 cup of boiling water in the pan right after I place the dough in the oven.  Remove your dough from the refrigerator and using a scrambled egg yolk, coat the rolls and top with seeds, toasted onions, cheese, or whatever you desire.

Bake for around 20-25 minutes or until the rolls are nice and brown and have an internal temperature around 195-200 F. 

Take the rolls out of the oven when done and let them cool on a baker's rack for as long as you can resist. 


Yippee's picture
Yippee


Over the years, you’ve no doubt heard me rant about the Brod & Taylor 'proofer'. Anyone who’s used it knows it has a major design flaw—its insulation is terrible. This leads to frustrating temperature fluctuations, which are a real pain in the 🌼🌼🌼 when you need precise temperature control, like when I’m making a thermophilic starter. They market it as a multipurpose, space-saving tool, but it can’t even do its main job right: being a reliable proofer. I’ve felt completely ripped off paying hundreds of dollars for a piece of crap like that.

While I had no better choice then, things are different now—I have the $50 Walmart toaster oven. With an additional ~ $10 investment in soldering plates from Aliexpress, I can turn it into a well-insulated, reliable proofer using a thermostat I already have. These soldering plates heat up incredibly fast—reaching 260°C in just 30 seconds! I make sure to position the plates so their wires don’t come into contact with anything inside the oven.They provide a consistent and reliable heat source but also cool down quickly. You can easily remove them using stainless steel tongs or oven mitts.  

Plus, I can bake bread in this small oven without preheating it, so proving my bread in it doesn’t interfere with prepping the oven for baking, which is often necessary with a conventional big oven.

The bread shown is a Vollkornbrot made with 80% whole rye and 20% whole wheat, 650g each in a 7" x 3.5" x 3" (17.5cm x 9cm x 8cm) tin.To bake this bread in the Walmart toaster oven, I:

  1. Place the TRAY (not the rack) in the lowest slot.
  2. Put the graniteware roaster (15" oval end-to-end) directly on the TRAY.
  3. Line the roaster with two layers of aluminum foil.
  4. Put the lid on the roaster.
  5. Seal the oven glass from the inside with a large piece of heavy-duty aluminum foil.

Here are my baking settings: 

  1. Cold oven, no preheat
  2. Toast feature
  3. 450°F x 15 mins, check, rotate
  4. 450°F x 15 mins, check, rotate
  5. 450°F x 8 minutes, check, top the loaves with a layer of aluminum foil
  6. 450°F x 7 mins, check
  7. 450°F x 5 mins


see it with better lighting:


P.S. 20241106


Snagged two 14-inch trays for about $7 each from Temu and AliExpress, respectively, and now I’ve set up a multi-layer proofer!


Total cost ~$85 + tax and its breakdown:

Walmart toaster oven: $50

soldering plates: $10

extra trays: $15

old reptile thermostat: $10~


gavinc's picture
gavinc

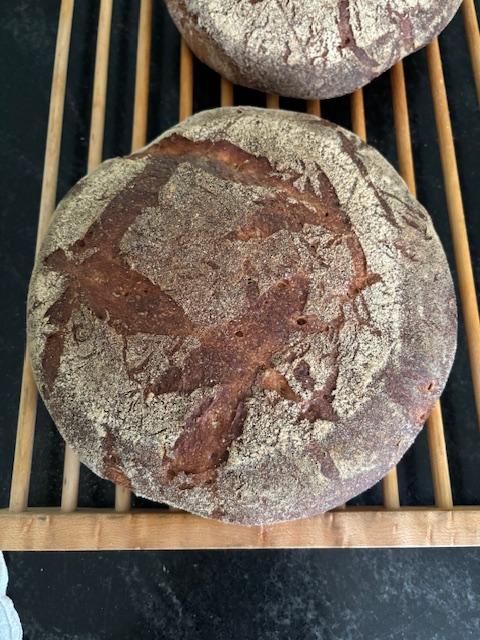
80 percent Sourdough Rye with a Rye-Flour Soaker

Baked 22nd August 2024.

This is first time baking this recipe. I do not usually bake rye breads, so I did as much reading on what to expect and handle the rye as possible leading up to this attempt. I stone-milled the rye berries the day before so they would be as fresh as possible and have an abundance of microbes. My firm whole-rye culture as fully active when preparing the sourdough stage overnight for 14 hours. The hot rye-flour soaker was prepared at the same time.

I found that the whole-rye was very thirsty and needed the hydration to be adjusted until a moderately loose texture was evident. The mixing, bulk fermentation and final proof went quickly, much faster than wheat. Careful attention to the dough temperature gave me some prediction of time for each stage. The boule was proofed in the banneton with the seam down, so that the seams would be on top for the bake. This allows the cracks to open. Baked free form on stone with steam.

The picture was taken when I removed the loaf from the oven. I need to let it cool and sit for 24 hours before I cut it. I will upload a crumb picture then.

EDIT: Tasting notes and crumb picture.

Being a 80% whole-rye I expected the loaf to be dense, but to my surprise the weight against volume was better than expected.

The crumb has an even texture and is moist without any sign of gumminess, visually appealing. The hot rye-flour soaker gave the bread a smooth mouthfeel and a subtle sweet note. The crust was chewy but thin.  The pleasant taste lingered.

I thinly sliced the loaf to about 8mm slices for open sandwiches. A great affinity for cheeses, cured fish and meat, or butter and jam.


I would definitely bake this again.

Benito's picture
Benito

I just baked this today and I think it is my favourite pan bread that I’ve made so far.  I absolutely love the crumb, nicely open for a pan loaf.  The flavour from the toasted walnuts, toasted sesame seed oil, touch of honey and the 20% whole spelt are just fabulous.  There is a mild tang since I did not use a stiff sweet levain to suppress the acidity, but instead used a regular stiff levain.  This bread is so soft yet the crust is pretty thin and crisp.  No tangzhong or butter or milk used in this loaf, it isn’t quite lean but only has 2.5% sesame seed oil and that bit of honey.  I’ll be making this again, but not right away since we are headed to the UK for a vacation and won’t be back home for about 3 weeks.

For 1 loaf in a 9x4x4” Pullman pan.


Build stiff levain, ferment at 74°F for 10-12 hours overnight.


In the morning salt and honey to the water and dissolve.  Then add the levain and break down the levain as well as you can.  Add both the flours and mix well until no dry bits are left. After 10 mins of rest start gluten development with slap and folds or use your mixer.  Once the dough is well developed, while the mixer is running, drizzle in the toasted sesame oil until well incorporated.  Next gradually add the walnuts until well incorporated.   Bench letterfold, remove aliquot, then at 30 mins intervals do coil folds until good structure is achieved.


Once the dough has risen 40% then shape the dough into a batard and place in prepared pan.


Final proof the dough until it has reached 1 cm of the rim of the pan or a total rise of 85%.  Pre-heat oven at 425°F and prepare for steam bake starting about 45 mins prior to dough reaching 85%.


Once oven reaches 425ºF score top of dough and then brush with water.  Transfer to oven and bake with steam for 25 mins.  Vent the oven (remove steaming gear) rotate the pan and drop temperature to 350ºF.  Bake for another 25-30 mins rotating as needed until browned.  Remove from the pan and place directly on the rack baking for another 5-10 mins to firm up the crust.

My Index of Bakes

Benito's picture
Benito

I’m working on improving my spelt baguettes by slowly increasing the hydration 1% at a time trying not to overshoot and have a disaster LOL.  At only 9% of the total flour, whole spelt should give some good whole grain flavour while also helping the dough’s extensibility.  Also this should help achieve an open crumb which is quite desirable for baguettes.  I don’t think I’m quite there yet with this bake.  I also had some trouble releasing one of the baguettes from the couche causing some degassing.  As well, by using my Ankarsrum Assistent to develop the dough I have been increasing the final rise.  This time I started the preheat of the oven when the dough had a total rise of 60%.  During the oven preheat, the shaped en couche baguettes were cold retarded in the fridge.  I believe next time I will increase the hydration to 79% and start the cold retard at 65% rise.

I have been dropping the temperature of the oven sooner and more and like the effect on the crust.  I have been able to get a thinner crust this way which I love for my baguettes.

Overnight levain

Built and fermented at 76°F to be ready in 10-12 hours.


Fermentolyse - mix 359 g water with all the levain, salt 10 g and diastatic malt 5.3 g to dissolve, then add AP flour to combine.  Rest 5-10 mins. Slap and fold x 100 or use mixer to knead until moderate gluten development,  then add hold back water 27 g gradually working in until fully absorbed then slap and fold x 100 or use mixer until mod-full gluten development.


Bulk Fermentation 82*F until aliquot jar shows 20% rise.

Do folds every 30 mins doing 2-3 folds

Could do cold retard at this point for  up to overnight. (Aliquot jar 20% rise)


Divide and pre-shape rest for 15 mins

Use spelt flour for couche

Shape en couche with final proof until aliquot jar shows 60% rise then cold retard shaped baguettes en couche for at least 15 minutes for easier scoring. 


Pre-heat oven 500*F after 30 mins add Silvia towel

Transfer to peel on parchment

Score each baguette and transfer to oven bake on steel

Bake with steam pouring 1 cup of boiling water to cast iron skillet dropping temperature to 480*F 

The baguettes are baked with steam for 9 mins.  Decrease the temperature to 450°F and continue to bake with steam for another 4 mins.  The steam equipment is removed venting the oven of steam.  The oven is left at 450ºF but convection is turned on and the baguettes bake for 8 mins rotating them halfway.  The oven temperature is then dropped to 375ºF and the baguettes rotated again if needed and baked for another 3-5 mins to achieve a rich colour crust.

My index of bakes

Benito's picture
Benito

I’m am behind on my posting here.  I baked this loaf a while back and it is already gone.  I recently found ground black sesame seeds at a local Asian market, this saves me the trouble of grinding the seeds myself.  I love adding the ground seeds to the dough as it gives the crumb a lovely grayish colour and a great black sesame flavour to the bread.  If you cannot find already ground black sesame seeds, then I would use my coffee grinder to grind the seeds.  You’ll just need to clean the grinder before and after use.

For one 9x4x4” Pullman pan loaf.


Instructions

Levain

Mix the levain ingredients in a jar or pyrex container with space for at least 300% growth. 

Press down with your knuckles or silicone spatula to create a uniform surface and to push out air.

At a temperature of 76-78ºF, it typically takes up to 10-12 hours for this sweet stiff levain to be at peak.  For my starter I typically see 3-3.5 times increase in size at peak.  The levain will smell sweet with only a mild tang.


Tangzhong 

In a sauce pan set on medium heat, stir the milk and whole wheat flour until blended. Then cook for several minutes until well thickened, stirring regularly with a spoon or heat-resistant spatula. Let cool in the pan or, for faster results, in a new bowl.  Theoretically it should reach 65ºC (149ºF) but I don’t find I need to measure the temperature as the tangzhong gelatinizes at this temperature.  You can prepare this the night before and refrigerate it, ensure that it is covered to prevent it from drying out.


If you plan on using a stand mixer to mix this dough, set up a Bain Marie and use your stand mixer’s bowl to prepare the tangzhong.


Dough

In the bowl of a stand mixer, add the milk (consider holding back 10 g of milk and adding later if this is the first time you’re making this), egg, tangzhong, salt, sugar and levain.  Mix and then break up the levain into many smaller pieces.  Next add the flours.  I like to use my spatula to mix until there aren’t many dry areas.  Allow the flour to hydrate (fermentolyse) for 20-30 minutes.  Mix on low speed and then medium speed until moderate gluten development this may take 5-10 mins.  You may want to scrape the sides of the bowl during the first 5 minutes of mixing.  Next add room temperature butter one pat at a time.  The dough may come apart, be patient, continue to mix until it comes together before adding in more butter.  Again, knead until well incorporated.   Next add ground black sesame and mix again until well incorporated.  You will want to check gluten development by windowpane during this time and stop mixing when you get a good windowpane.  You should be able to pull a good windowpane, not quite as good as a white flour because the bran will interrupt the windowpane somewhat.  Add the nuts/seeds, then mix again until they are well distributed.


On the counter, shape the dough into a tight ball, cover in the bowl and ferment for 2 - 4 hours at 82ºF.  There should be some rise visible at this stage.


You can next place the dough into the fridge to chill the dough for about 1.5 hours, this makes rolling the dough easier to shape.  Remember, if you do so the final proof will take longer.  Alternatively, you can do a cold retard in the fridge overnight, however, you may find that this increases the tang in your bread.


Prepare your pans by greasing them with butter or line with parchment paper.  


Lightly oil the top of the dough. Scrape the dough out onto a clean counter top and divide it into four. I like to weigh them to have equal sized lobes. Shape each tightly into a boule, allow to rest 5 mins. Using an oiled rolling pin roll each ball out and then letterfold. Turn 90* and using a rolling pin roll each out to at least 8”. Letterfold again from the sides so you have a long narrow dough. Then using a rolling pin, roll flatter but keeping the dough relatively narrow.  The reason to do this extra letterfold is that the shorter fatter rolls when placed in the pan will not touch the sides of the pan.  This allows the swirled ends to rise during final proof, this is only done for appearance sake and is not necessary.  Next roll each into a tight roll with some tension. Arrange the rolls of dough inside your lined pan alternating the direction of the swirls. This should allow a greater rise during proof and in the oven.


Cover and let proof for  4-6 hours at a warm temperature.  I proof at 82°F.  You will need longer than 4-6 hours if you chilled your dough for shaping. I proof until the top of the dough comes to within 1 cm of the top edge of the pan.


Preheat the oven to 350F and brush the dough with the egg-milk wash.  Just prior to baking brush with the egg-milk wash again.


Bake the loaves for 50 minutes or until the internal temperature is at least 190ºF, rotating as needed to get even browning. Shield your loaf if it gets brown early in the baking process. After 50 mins remove the bread from the pan and bake a further 10 mins by placing the loaf directly in the oven on the rack with the oven turned down to 325ºF

My index of bakes

tpassin's picture
tpassin

I want to pose a number of questions that I hope will stir up some discussion.  I have ideas about some of them but no real facts.  Here's the first.

I have measured the volume of a starter as it rose after feeding.  I've done this several times with various starters and a poolish. The general pattern was the same.  The starter would, after a delay, start rising and build up to a roughly constant rate, then start to taper off.

If at this time I stirred the starter, it would naturally deflate and then start rising faster than before with little or no delay. I've even stirred it up again and again it would start to rise even faster. I also did this with a piece of dough, which I had to knead instead of stir, and got a similar pattern.

My overall question is: What is going on here?  It comes with sub-questions:

1a. After the initial mixing of the starter, there is the usual delay before rising starts.  But after stirring there isn't much if any delay. Why the difference?

1b. Wouldn't the handling during shaping act like kneading or stirring, and is this the reason proofing usually goes faster than bulk fermentation?

1c. Is there a way we can put this behavior to use?

Before any stirring, the samples I've measured increase in volume at a more-or-less constant rate.  If there were a lot of multiplication of the yeast, the rate should increase since more yeast cells would be available to emit gas.  I think this confirms what we're all taught, that the conditions during bulk fermentation are mainly anaerobic and the yeast cannot multiply.  But why would there be faster growth right away - without that initial lag -after stirring?

TomP

CalBeachBaker's picture
CalBeachBaker

Today's bake: Laminated Honey Rye

Source: Living Bread by Daniel Leader

Notes: Doubled original recipe of TDW 1.055kg.

Substitutions:  AP flour for Type 55, Used plant-based butter.

Discussion: I wanted to try something different and this bread and process caught my eye. This bread is a nice combination of AP and rye flours giving it a rustic taste. The combination of herbs and lemon flavors makes is really quite nice. The only major issue was with the baking, the 'butter' was running out of the bead and it was fortunate that I was using rimmed pans or there would have been a pool of butter on the flour of the oven.

Make again? - Yes with modifications.

Changes/Recommendations:  75% Less butter and increase the amount of lemon juice and lemon zest by 25-30%.

*** The Images can be made to full size by placing your cursor on the image and right clicking, and then, open image in a new tab.

Ratings:


Chilled dough and butter, ready to start the lamination process.


Tony


gavinc's picture
gavinc

I’ve been making our favourite sourdough weekly for years and have not varied the process at all (don’t fix something that’s not broken). Same flours, same temperatures, same hydration, same process and same kneading technique, which is hand stretch and folds for 15 minutes, quite an effort towards the end. Recently, I broke four ribs and punctured a lung and therefore haven’t baked in four weeks. With the help of painkillers, I got back into the kitchen today. While convalescing I read that I can achieve good dough strength by kneading for 5 minutes and then rest for 15 minutes. Repeat the cycle until you get a windowpane. This simple advice has proven very helpful as it has saved me a lot of effort. I’ll continue with this method from hereon and I wish I had known about it years ago.

Cheers,

Gavin.

EDIT Todays result:

pmccool's picture
pmccool

I've had Daniel Leader's Living Bread book for a couple of years now but have baked scarcely any (one?) of the breads that it features.  One reason for not having dived into it enthusiastically is that I am, admittedly, a rather pedestrian baker whereas many of the breads in the book exemplify a high degree of the baker's craft.  Another reason is that some of the breads are in the "That's cool but it isn't what I want" category.  And, a number of the breads call for ingredients that, here in northern Michigan, range between exotic and Unobtanium.  Since I'm cheap thrifty, spending $10 or more on flour alone for one loaf doesn't appeal. 

Still, I thought I owed it to myself to at least take a stab at some breads that do appeal to me. 

The Pain au Levaine Moderne was appealing, so I chose that as my starting point.  I've made a lot of pains au levain over the years, so I have a good baseline for working with this style of bread.  The Moderne in the title is apparently a reference to the use of a liquid levain.  I maintain a stiff starter but didn't worry about it since the levain only requires 25g of starter, knowing that it wouldn't shift the final hydration by even a tenth of a percent.  The levain itself, at 100% hydration, isn't very loose.  It's on the boundary between a soft dough and a thick batter.

The formula calls for Type 65 flour.  I have none.  A bit of reading led me to the suggestion that a combination of 77% bread flour and 23% whole wheat flour would make an acceptable approximation of the Type 65 flour.  So, not the real deal but close enough for my purposes. 

The process outlined in the formula begins with an overnight levain.  The next morning, the final dough flour is autolysed with all but 90g of the final dough water.  The autolyse is then combined with the levain, salt, and yeast and mixed for 2 minutes at speed 2 on a KitchenAid mixer, then another 4 minutes at speed 4.  Finally, the remaining water is dribbled in over a 7 minute period, still at speed 4, untill the bassinage is complete.  Then, still at speed 4, the dough is mixed another 4 minutes "until the dough is elastic and shiny".  The dough is turned out onto the countertop and given a letter fold.  It is then placed in a container for 1.5 hours, at which time another letter fold is performed.  After a further 1.5 hours in the container, it is placed in the refrigerator for an 8-12 hour retard.  It is then removed from the refrigerator and allowed to warm up for a couple of hours, rounded, bench rested, shaped into a large boule and placed in a banneton for final fermentation.  It is then baked in a preheated Dutch oven.

A couple of comments are appropriate at this point.  First, the final dough hydration is just slightly more than 80%, hence the bassinage.  Second, Mr. Leader refers to speed 4 on a KitchenAid mixer as "medium low" speed.  True enough, in terms of the mixer's range of selectable speeds.  But it's a relatively high speed for kneading with the dough hook.  And it goes on for a total of 15 minutes at speed 4.  From what I observed, the dough was already well-developed at the end of the bassinage and did not require the last 4 minutes of mixing, even though I followed the instructions for the first attempt.

My third deviation from the formula (if you're keeping count) was to skip the cold retard step and subsequent warm up.  My fourth deviation was to shape the dough into two boules, rather than one large boule.  My fifth deviation was to bake the bread on a baking sheet in a steamed oven, rather than in a Dutch oven.  Now you know why I appended "sorta" in the header. 

What I got for my first attempt was an extremely sticky dough that was also quite extensible.  This, eventually, baked up into two loaves that were each the approximate size and shape of a smallish Frisbee.  They are currently in the freezer awaiting their fate as croutons or bread crumbs.

My second attempt, which is pictured in this post, had a better outcome.  The two changes that I made from the first attempt was to lower the hydration to 75% and to shorten the mixing time.  The resulting loaves have a higher profile and a more-open crumb that those from the first attempt.  

While I like the bread, I doubt that I will use this formula again.  It leaves me with the feeling that Leader chose to push the boundaries as far as he could for this particular style.  That may be appropriate for Olympic gymnastic routines but it isn't necessarily what I want to do when making my daily bread.  Life is too short for doing things the hard way.

Another couple of pics:
I will admit that the shape was particularly useful for the BLTs that we made for dinner last evening.

There are some other breads in the book (the ryes, especially) that look interesting, so I'll check those out, too.

Paul

Pages

Subscribe to Recent Blog Entries