
Sourdough Whole Grain Sandwich Loaf
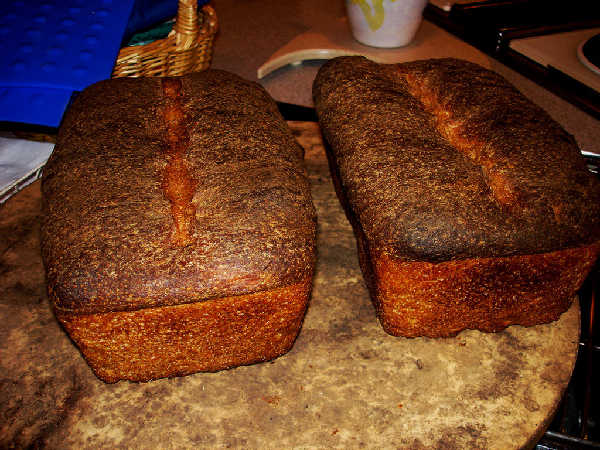
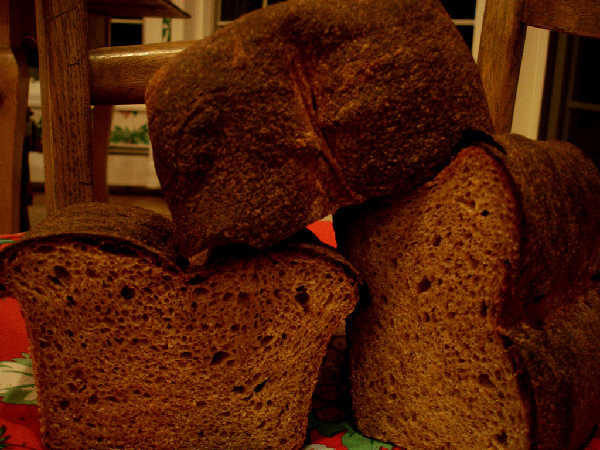
I finally decided to give a try at an (almost) whole grain sandwich loaf. Admittedly I didn't switch my starter over, but I only have a few percent of the flour contributed from the white flour starter. Many thanks to all the contributors to thefreshloaf.com, including at least JMonkey, ehanner, mountaindog, browndog5, Srishti, zolablue, sourdough-guy, sourdolady, tomsbread, and breadnerd for the very useful pointers on handling of whole grain breads. I didn't quite do justice to the good information, as you can see, but the crumb is certainly open enough, light enough, and soft enough, as well as having a nice flavor. I was happy with these results for a first try. I definitely overproofed them, partly because the cooler with warm water technique for the final proof was very effective.
I've included a few additional photos, although I didn't photograph the whole process this time. I also included a spreadsheet with weights of ingredients in ounces, grams, and baker's percentages.
Ingredients
Recipe Starter
- 142 grams 100% hydration starter (I used a white flour starter)
- 227 grams whole spelt flour
- 113 grams water
Dough
- 40 grams malt syrup
- 4g diastatic malt powder
- 581 grams water
- 397 grams red whole wheat (I used KA organic WW Flour)
- 57 grams rye (I used KA rye blend, but substitue with WW flour if you want)
- 170 grams white whole wheat (I used KA Organic White WW Flour)
- 17 grams salt
- 28 grams olive oil
Mix
The night before you plan to bake, mix the starter ingredients, and knead them for about 2 minutes to make a dough out of them. Let rise in a covered container for about 4 hours at room temperature until doubled and refrigerate overnight.
Also the night before you plan to bake, mix the malt syrup, diastatic malt powder, water, and all the flours and place in a covered container. Refrigerate overnight.
The next day, cut the starter into small cubes. Spread the refrigerated mass of flours, water, and other ingredients out on the counter and press the cubes into the mass. Sprinkle the salt and oil over the mass. Press the heels of your hand into the mass to force the ingredients to mix well. Roll up the mass and knead a few times to further mix the ingredients. You can then spread the mass out again and press it flat and then roll it up. After 2 or 3 repetitions of spreading out, pressing flat, and rolling up the mass, the ingredients will be well incorporated and the mass will seem more like a dough. It will be very sticky, but if you keep the counter surface, the dough surface, and your hands wet, it is not difficult to handle.
Bulk Fermentation
Place the dough in a rising bucket. Every 30-60 minutes for the first couple of hours, turn the dough out on the counter and fold it. After a few folds, just let it rise until it has doubled. The dough should double in volume in a total of about 4 hours at room temperature. The idea is to do enough folds to get the dough feeling elastic and resilient, but not so many that it begins to feel very stiff and loses its elasticity.
Shaping and Final Proof
I shaped according to JMonkeys video. The dough should be split in two, formed more or less into batards, and placed in two loaf pans approximately 9 inches long. To form the batards, just lay one of the two halves of the dough out in a long rectangle and roll it from the short end, stretching the outside surface as you roll it. You may want to tuck some of the end of the roll in toward the center a little as you roll it up. Seal it and tuck the ends under, and place into the pans with the nice, stretched surface up. You can put a little oil on the surface of the loaf to protect it from drying out. Place the pans in a warm humid place to rise. I put them in a cooler with a bowl of warm water next to them. Allow them to rise by approximately double or a little less.
Unfortunately, the temperature was very warm in my garage, where the cooler was, probably around 85F. I let them go for 4 hours and then realized they were way overproofed. The result was no oven spring. I shouldn't have slashed them and just put them in the oven. You can see what happened in the photos. I think if I had stopped the final proof at about 2 hours at 85F, I would have had a better slash with oven spring and so on. I know I'm getting close to figuring this out, as the loaves still had a flavorful, open crumb.
Bake
I baked these starting in a cold oven for about 45 minutes at 425F.
Cool
Once the loaves have cooled for a minute or two, remove them from the pans and allow them to cool on a rack.