
I need some help diagnosing my sourdough
Hey!
Long-time lurker, first-time poster here. I'd really appreciate some help diagnosing my sourdough–I'm not getting the results I'd like.
My guess is that I’m having problems with my starter, but I’m not sure. I’ve had the same results with the Tartine Country Sourdough, so I’m a bit lost on what exactly it is I’m doing incorrectly. And a similar issue with another recipe, also using a stretch and fold technique, although I do not have a link to it. I tried it again with @a_warming_trend’s recipe (link here), and this was the result:
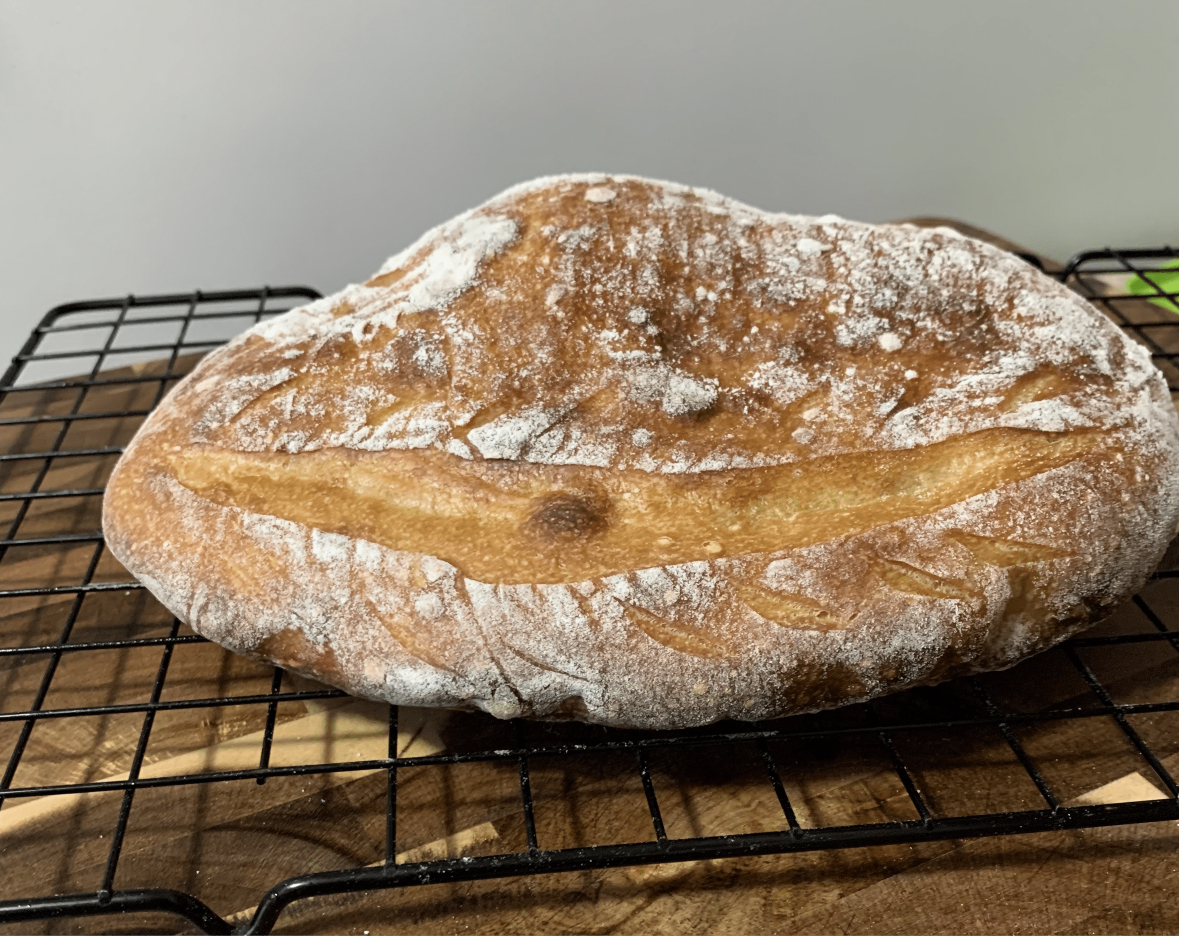
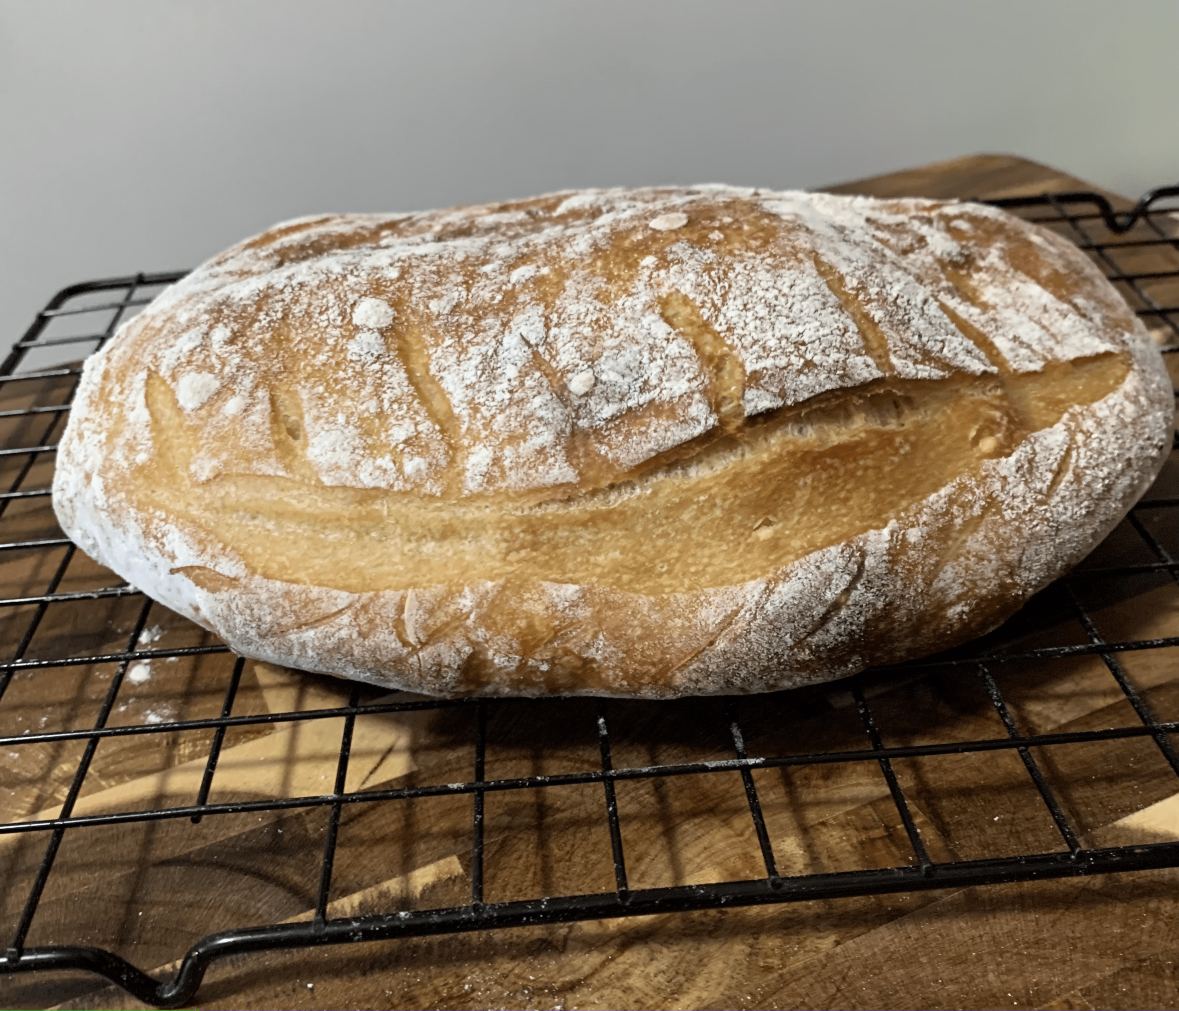
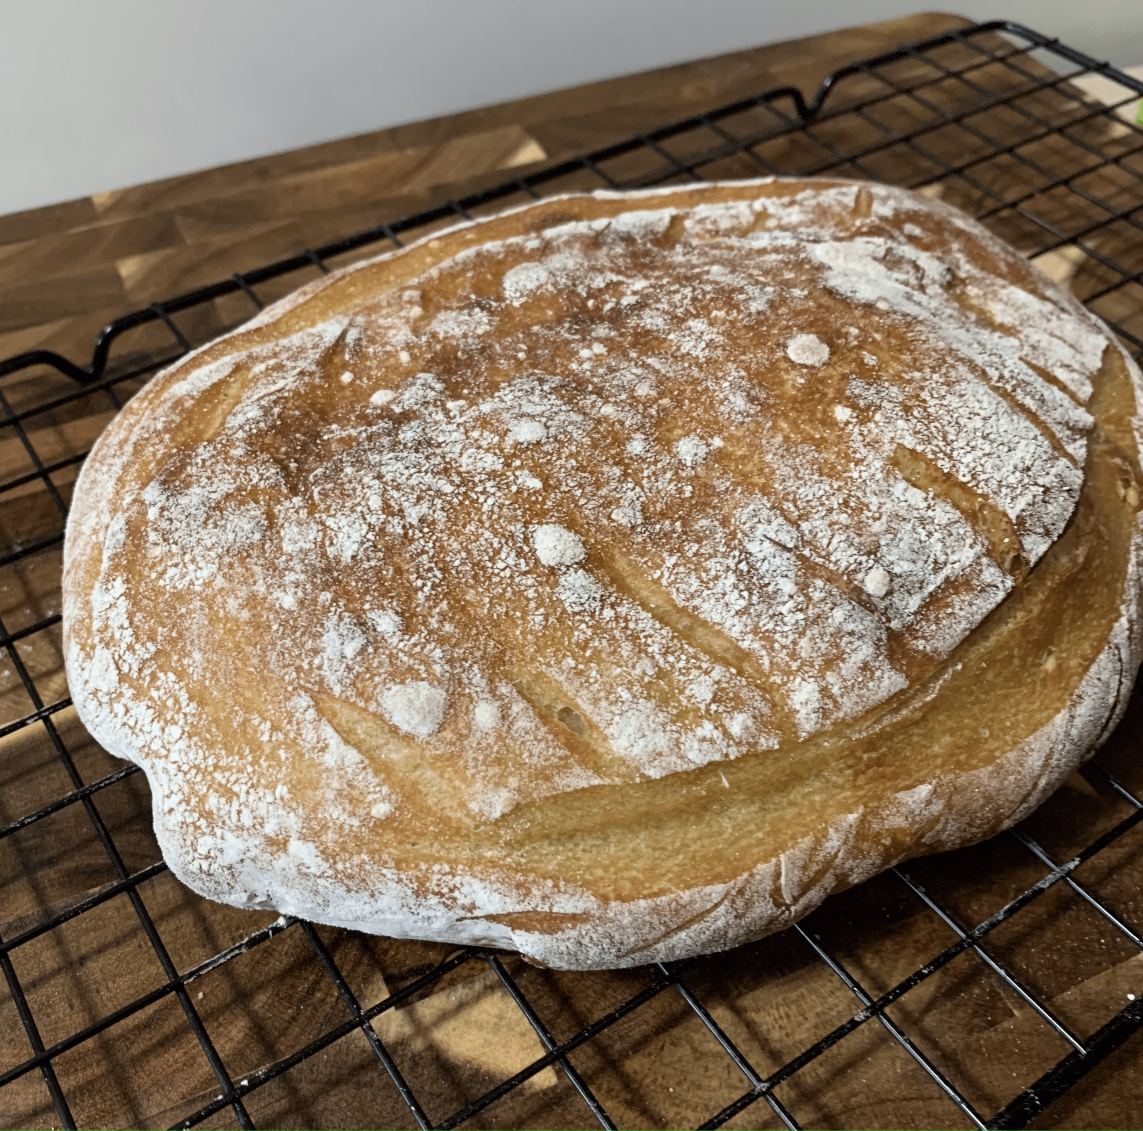
I took some basic notes as I went, shown below.
Ingredients
425 g AP flour (around 12-13% protein)
50 g whole wheat flour
375 g water
10 g salt
10 g sugar
50 g 100% starter
1. Autolyse at room temperature (67 F) for 5 hours. (I know this long autolyse wasn’t necessary, but I mixed it in the morning and continued when I got back later in the day.) Starter was pulled from the fridge and fed the previous night, so was likely on hour 17 or so since last feed. On the sides of the container were numerous small bubbles, although I have never had a starter with large porous bubbles visible on the sides on the container (maybe this is the issue?). Room temp overnight was likely 64-65 F.
2. Add in starter, salt, sugar.
3. S&F every 30 minutes for 3 hours. Room temperature was approximately 67 F. Note: 5 minutes off schedule @SF no. 5.
4. Rest at room temp for 3 hours, covered with plastic.
5. Cold ferment 16 hours in the fridge, covered with plastic.
6. Bench proof 10 minutes, covered.
7. Shape and place in banneton. Proof for 1.5 hours at 68 F.
8. Freeze banneton + dough for 15 minutes.
9. Score and bake at 475 for 25 minutes with steam, 20 minutes without. I use a Dutch Oven for this.
Thank you!


I'm guessing with 10% starter at 67F six hours wasn't enough. Why did you move onto to shaping after six hours? Was it well risen? Doubled? Aerated and bubbly? If not, then it needed longer.
Please also give details about your starter.
The starter is AP flour. I discard most of the starter and replace with 50/50 flour and water. For this batch I think I discarded down to about 10 g of mature starter and added 20 g AP flour and 20 g water.
Shaping happened after 22 hours after incorporation of the starter to the dough (3 hour S&F, 3 hours at room temp, 16 hours cold ferment). There were a few large air bubbles, but I could not see the sides since it was in a metal bowl.
So you did most of the bulk ferment in the fridge. If I were to bulk ferment in the fridge then i'd either use a much higher pre-ferment or make sure the bulk ferment was further along before refrigerating.
10% starter for six hours in a cool temperature then into the fridge will result in an under fermented dough unless you gave it more room temp time after taking out of the fridge.
A rethink of your method is need and then I think it'll be fine. Do you definitely want fridge time? Because using a low percentage of starter enables you to stretch out the ferment at room temperature anyway.
Hmm that makes a lot of sense, thank you!!
The reason behind using fridge time is because I have a time-intensive job so I need to do most of my bakes in the evening, with little "hands-on" time most days. I likely would not have more than 3 hours in a row to dedicate to baking, but would have more time the following day. If you were bulk fermenting in the fridge, what percent pre-ferment would you use? I've seen some with 20%, but not with quite the same method I'm trying here.
Any chance you think this recipe could work with an overnight bulk ferment at room temp followed by fridge time in the morning until I can bake it? This would give me more flexibility.
My two cents ( and I normally have the same limitations on time as you ) is to cut back on the starter, and try a overnight room temp bulk ferment - but take notes on the temp, the amount of starter, and the last time you refreshed the starter. I would also be sure to BF in a straight sided container so you can get a good idea of how much rise you are getting from the overnight BF. Different starters and different flours will give different characteristics, and slight differences in room temp ( my room temp in the winter with the heat on is about 6 degrees cooler than summer with the AC on , so I need to adjust the amount of starter ) but with a few test runs, you should be able to dial it in pretty quick. If you want to speed up the testing process, just make several smaller batches, with varying amounts of starter, and label them, and you will soon find out whether 5% starter is enough or too much for your overnight BF. For me, the ideal is have BF done when I awake in the morning, which gives time to preshape, shape, then rest in a banneton at room temp for a short while, then into the fridge for FP, before I take it out of the fridge and bake in the evening.
Without delving too much into the recipe, and making changes, if you bulk fermented for 6 hours and it was still under then no reason why you couldn't do an all night ferment at room temperature.
It's always good to make one tweak at a time, instead of many, so you work out what the issue is. I think through the night, especially when it's quite cool, then aim to have the final dough made 8 - 10 hours before refrigerating.
Say you leave the house at 8-ish am. Have the final dough made by 11-ish pm. Come morning see how far it's fermented. If it looks quite bubbly and has a bit of a wobble when you shake the bowl then that's good enough. Give it one more fold then into the fridge. If it looks even further along, let's say it's doubled, then you could even shape then refrigerate saving you time in the evening.
Try that. I'm sure even if it's not perfect it'll be an improvement. If it still doesn't suit your schedule then you can tweak it again looking at the recipe itself.
If I were to do it all in the fridge then it all depends on time and temp. It can vary but you can't go too wrong per-fermenting too much if the whole bulk is refrigerated.
Hi!
There is some activity in your starter which is good, just make sure your starter is fully active before you use it.
Since you work with tiny amounts of flour and water, then watch this lesson on how to manage 50g of starter and how to know that it is ready for baking with it.
Feed your starter just as Kristen does it and once it looks and behaves like the starter in the video you can then be sure that all of your ingredients are good, including the leavening ingredient, and begin to work on your breadmaking techinque.
64-67F is OK, both your starter and your bread dough will rise just fine at that temperature. But it will obviously take longer at 65F than at 75F, so give it more time than in the recipe, not less.
Besides your starter not rising, your method as described also differs from the linked recipe. Next time, pay attention to those details, they are important. Because your room temperature is at the lower edge of "normal", all of your steps will take longer than in the recipe:
Steps:
1) Mix flour and water, and autolyse at room temperature for 6-12 hours.
You autolyzed for only 5 hrs.
2) Incorporate all other ingredients using the pincer method. This should take about 4 minutes. You'll notice that because the dough was already so wet, incorporating that small amount of 100% hydration levain salt, sugar, and wheat germ is a surprisingly smooth process.
Make sure that your levain (starter) has doubled, tripled or even quadrupled in volume before using it in the recipe. If not, you would have to add 1% yeast to your bread dough along with the starter in order to make an edible bread.
3) Stretch and fold vigorously every 30 minutes for 3 hours. The number of turns depends on how the dough feels! Anywhere from 1-4 turns (4-16 folds), each session, performing the turns until the whole mass of dough wants to lift from the container.
4) Rest on the counter for 8-12 hours, until dough has increased 80% - 100%, but no more.
You let it bulk ferment for only 3 hrs at cool room temperature and you most likely did not track its volume?
5) Retard for 2-24 hours.
6) Sprinkle flour over the top of the dough in the container, and allow the flour to coat the edges as you gently release it. Pour onto a floured surface and rest for 10 minutes.
7) Shape and place seam-side up in a a brotform of some kind, cover with plastic, and proof at room temperature for 1.5 hours.
Here, by room temperature they most likely mean something like 22-24C and your room temperature is 17-19C, so your proof should last about 3 hrs at 64-67F. Again, watch the volume, it should about double.
Hi,
Thanks for the in-depth comment! I'll definitely be referencing this the next time I try this recipe. It looks like I fell for going by timing rather than how the dough was actually doing. Thank you!!
The advice you've been given is truly great. Abe, mariana, and barryvabeach know way more than me.
Still, if the biggest impediment you are facing regarding this recipe is your work schedule, perhaps you can consider trying the 'jail break' method that's been posted recently -- https://www.thefreshloaf.com/node/71540/jail-break-bake & https://www.thefreshloaf.com/node/71560/jail-break-bread-twist.
Basically, with the jail break formula, the dough does all the work. You only get involved three times. At the start, you mix all the ingredients & do some stretch & folds. Then the dough takes over with a 12 hour bulk ferment at room temperature. Following that, you divide & shape. Then, once again, the dough takes over, with a 12-hour proof in the fridge. After which, you bake.
Might that fit better with your schedule?
Rob
Hey Rob!
Thanks for the comment! This looks like something that would fit my schedule better. I'm hoping to have more time to dedicate to my bakes in a few years, but we'll see. I'll definitely try this out!
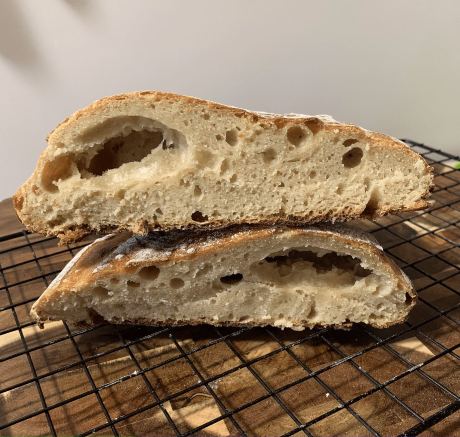
Looking at your loaf cut through, much of the slice is almost devoid of any bubble activity at all. It looks quite glue-y. If this was just under fermented then I would expect a more even but not totally developed bubble matrix. Your dough doesn't look happy at all.
My first though when looking at your loaf, was the crumb looks very similar to when dough is overworked. However, I have had similar when my water filter needs changing. I know most people may overlook it so I thought I would mention the possibility.
I'm not sure how old my water filter is, but something worth checking out. Thank you!
Bread is usually quite forgiving. Sure, perfection is an art, but it is very rare for it to fail.
In your slice, it's not the big bubbles, but the remainder that I suspect is the key to your issue.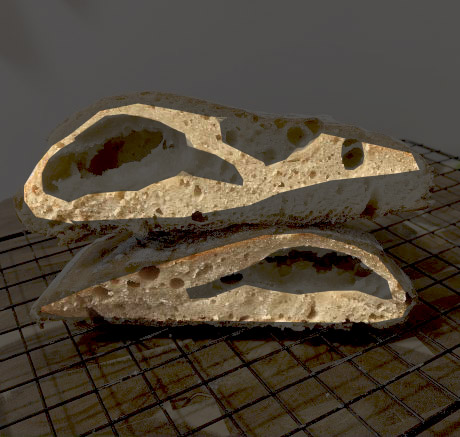
Once you blank out the large bubble you can see what is really happening. The large pocket, now looks more like a bubble that was trapped in the final shaping. The small bubble around the periphery are artefacts of the initial heat of the oven.
The rest of the loaf has no real sign of yeast activation at all. The bottom of the 2 halves in the image is particularly stark.
Another recipe that might fit your schedule is the Do-Nothing Sourdough Bread from King Arthur. It uses a small quantity of starter for inoculation and has a bulk fermentation of 16–24 h at room temperature, followed by a short proof after shaping.
When I last made it, I used unfed starter and the BF was 16 h. It could conceivably be set up the night before, BF until the next evening, and then baked.
This recipe might also fit my schedule better! Since my kitchen runs cold, I think I might try to experiment with differing amounts of starter.
What I really need to do is divide my dough up and treat it like a scientific process, but I'll save that for some other time.
Thanks!