The Fresh Loaf

A Community of Amateur Bakers and Artisan Bread Enthusiasts.

Most bookmarked

Benito's picture
Benito

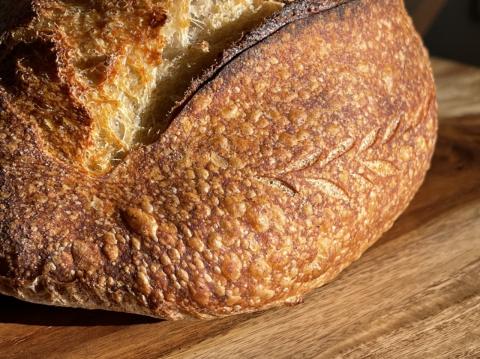
Saccharified Polenta Sourdough

A recent blog post about grain mash is awesome if you haven’t read it yet. Reading it motivated me to apply saccharification to the polenta porridge thinking it might enhance the flavour of the polenta. As you know saccharification of the polenta brings out its sweetness that is hidden in the starches in the polenta. Adding the diastatic malt and holding it at a warm, but not too warm temperature will allow the diastatic malt (amylase) to break down theses starches to sugars which we will be able to taste as the natural sweetness in the polenta that otherwise would be hidden from our tastebuds.

I used my Instant Pot and after a bit of experimentation found that using its Keep Warm setting Normal holds a temperature of 148°F for up to ten hours. After cooking the polenta I placed it into a jam jar lightly capped and placed it into a water bath in the instant pot and cooked it for 6 hours. Comparing the flavour pre and post water bath the difference was remarkable. After six hours the porridge had a lovely sweetness that wasn’t there prior to the six hours at 148°F. When using the Instant Pot for this saccharification process put the lid on but keep the vent open so there is no pressurization of the pot.

Cook coarse corn meal with the water until softened and water fully absorbed. Once the temperature is down to 150°F or less add the diastatic malt and mix well.
Place the corn porridge in a jar, covered lightly and place in a water bath in an instant pot. Set to [keep warm] normal (148ºF) for 3-6 hours. I did 6 hours.

 Build levain overnight with the aim to be at peak in the morning. At 76°F 3x rise and dome flattening at 11 hours.

Add water and salt to the bowl of a stand mixer, dissolve salt. Add the stiff levain and break into small pieces. Add the bread flour, mix on speed 1 until no dry flour remains. Rest for 10-15 mins. At medium speed mix to develop the gluten. When the gluten is moderately to well developed add the polenta porridge in small aliquots. Mix until well incorporated.

Bulk fermentation aiming for 40% rise to shape. Perform coil folds every 30 mins until dough is strong and isn’t spreading.

Once the pH has dropped by 1.0 then shape the dough into a batard and then start final proofed shaped and resting in a banneton.

Once the pH has dropped by a further 0.3 it will be time for baking. Place the dough in the freezer when the pH drops by 0.25 and then pre-heat oven at 500°F with cast iron skillet in the oven and set up for open steam baking. 30 mins prior to baking, pour 1 L of boiling water into metal loaf pan with Sylvia towel and place on baking steel on the lowest rack of the oven.
Once oven reaches 500ºF turn dough out of banneton, brush excess rice flour off, score and then brush with water. Transfer to oven. Pour 250 mL of boiling water into the cast iron skillet on a high shelf, high enough that the dough have fully bloom. Drop temperature to 450ºF and bake with steam for 25 mins. Then vent oven and remove all steaming gear and drop temperature to 425ºF. Bake for another 25-30 mins rotating as needed.

My index of bakes.

GaryBishop's picture
GaryBishop

Flourless Sourdough Starters

We've been discussing flourless starters of various kinds in another thread and Mariana brought up flourless sourdough starters. I'm going to move the discussion over here so I don't have to keep searching for her comments.

First I'll quote comments from Mariana.

I prefer other flour based sourdough starters. But I love flourless sourdough starters. They are the greatest, really. As the topic starter mentioned, they are unbelievable as bread improvers, they improve both wheat and rye breads. Mine are true sourdough starters, with wild yeast, not just with LAB, prepared in at 32-33C, ready to bake with them in 2 days. This is how it looks like, flourless rye starter, this one was made from 20g of rye flour and a cup of water.

it is really all about temperature ranges. Otherwise nothing is different from FLAS method. You could easily use the same rye malt and keep it at 28C, instead of 43-45C and obtain a true sourdough starter in the end. It would have a healthy yeast community in it, because sourdough yeasts multiply best at 28-30C (whereas lactic acid bacteria prefer 32-50C range).

So, you could try this experiment, do exactly as you do for FLAS, but set it to 28C and you will have a true sourdough starter from scratch. DO NOT close the cover tightly. Cover with plastic wrap with a small hole in it.

Now, rye is famous for being low on yeast and high on LAB, so you would do better if you add a tsp of any wheat grain, whole wheat flour (soft or hard, durum, spelt, etc) to your rye malt solution, or even a spoon of raw wheat bran would do - as a source of while yeasts. You can also add wild yeasts the way YW people do - by adding a few chopped raisins, or fruit peels.

Another way to develop a sourdough starter is to add yeasts to your already existing lactic acid starter. If you like its flavor that is (because at 28-30C OTHER lactic acid bacteria would thrive in flourless starter even if made from the same rye malt and it will smell differently). I did it once with LAS based on white bread flour (again, a very pour source of yeasts and a rich source of LAB) and it worked just fine.

I added to my LAS a few squished grapes and a spoon of spelt flour and kept it at 28C for a few hours and la voila. It became a true sourdough starter with plenty of yeast in it.

It became boozy, gassy, like sparkling wine. Such intense yeast propagation can take up to 2 days at 28C/82F if there was really zero yeasts in your LAS.

You use flourless starters in the same way you use flour-based starters. There are two ways of making bread

- straight method (starter -> bread dough)

- sponge method (starter - > levain -> bread dough)

So, you use your flourless starter

either to prepare a flour-based starter as in the recipe (or even directly mix your bread dough using flourless starter as liquid or part of liquid)

or to prepare a levain with it and from there - bread dough.

Example of flourless starter based levain: a sourdough poolish, so to speak (100% hydration)

at peak (max volume, domed top surface)

mature (flat top surface)

When you get there, I will give you specific examples.

I will also describe another, ancient, method of preparing a flourless sourdough starter by using scalded flour later. It's very good.

But for now, Gary, experiment with the two methods described above. Either use FLAS method, starting from scratch, but at 28-32C (keep it for 12hrs at 32C, then for 12hrs at 28C, alternating during the three days of starter development), or add to your existing FLAS some wheat (or wheat bran) and some fruit peels and keep it at 28 to populate it with wild yeast. Remember to add some sugar or even molasses. Yeast needs sugar.

Have fun with it, Gary! Seeing how different sources of microbes and of their food in combination with temperature and hydration affect your outcomes is eye opening, but most importantly it is fun. I am more into bread than into sourdough starters, but I had to learn about them in a hard way, to troubleshoot or to at least make "normal" bread dough, and now I am glad that I did.

Afaik yeast water and FLAS combo should give you the same outcomes as FLAS with commercial yeast with one exception: the crumb might be a shade darker. Also, flas&yw combo will never have the same aromas as true sourdough, because in true sourdough yeasts and LAB live in symbiosis and produce three kinds of flavors: typical of yeasts, typical of LABs, and typical of yeasts in symbiosis with LABs. It's impossible to reproduce those aromas and tastes by blending CY or YW with LAS.

My first attempt.

I used 50g of rye malt, 25g of whole wheat flour, 25g of raisins 700g of water, and 1.1g of vitamin C crystals. I set my controller to cycle between 28C and 32C at 12 hour intervals for 3 days. I fed it 1 tsp of sugar every 24 hours.

It smelled bousy and fruity. I had company so I couldn't bake with it right away but I did mix 93g of the liquid with 93g of WW flour to see what it would do. It tripled in 8 hours at 27C. I then refrigerated it for 5 days and finally got a chance to bake with it.

I baked with the 100% hydration flour/starter combo today and the loaf tastes great. I really like the complexity of the flavor.

Mariana had some further comments.

It obviously has yeast in it and can be used in sourdough baking, especially in rye breads with overnight warm preferments, but its value is even higher in yeasted breads.

Try feeding that flourless SD starter as well to propagate its microbial culture. Usually half a cup of the old starter is enough to make a quart of new starter.

If you like its flavor and do not want to alter it, you can use the same ingredients as in the initial batch, except for making water very warm, about 45C/115F. This is to encourage its SD bacteria, to make them multiply first.

To one quart of 115F water add rye malt, wwf or whole rye flour (or any other whole grain flour or flakes), chopped raisins, half a cup of previous starter (liquid or the sediment, the bottom portion)and keep it at 28C/82F for 3-4hrs or longer, until it feels slightly, but distinctly sour to taste and its temperature slowly drops from 115F down to 80-85F so that its yeasts may begin to multiply as well. Then add sugar and refrigerate for up to one month.

After 24hrs, use directly from the fridge, it does not need to be refreshed before using it.

DanAyo's picture
DanAyo

Super SD Sandwich Bread Formula & Method

How we miss TFL user, “TX Farmer”. While active she was a prolific baker and everything she did was top shelf and excellent. Her BLOG has so many bakes that it fills 21 pages of her bread links. I was thrilled to find TX Farmer’s BLOG Index.

Lately I have been searching for the perfect sandwich bread. I thought it could only be achieved using commercial yeast. But her SD Sandwich Bread set me straight! This lady is a “Bread Wizard”. The formula seems somewhat unusual to me, but I followed it and her method to the letter. At this it took faith to not deviate a bit. The results were miraculous.

Caroline, thanks for the tip of greasing the pullman pan with butter. Look closely below at the dough in the pan. You can see the smeared butter on the sides. You are right when you say how golden brown and slightly crunchy it is.

Great Tip, Benny! The “reverse roll” worked swell.

I hope this post excites others to try this bake…


The crumb super soft, light, and shreddable.
The crust is thin with hints of buttery goodness (thank you Caroline) and has the perfect sandwich texture.
The flavor has a very slight hint of sourdough. It differs from the mundane sandwich bread that is stocked in all grocery stores.
And WOW, does the loaf look beautiful.

TX Farmer, I hope you can see this. I am thankful and appreciative for the time, expertise, and willingness to share this bread and so many others.
God Bless You!
Danny

The spreadsheet is set to 1000 Total Dough Weight.
If you want 850g TDW, multiply all ingredients by .85
If you want 1500g, multiply by 1.5

 Update -
After testing various Levains. It looks like TXFarmer’s formula and method produces the very best flavor profile for me. Her fermentation temperature of 73F can be difficult to achieve on warm days, so that is the reason experimentation with various Levains were conducted. If improperly fermented, the flavor was a little too sour for sandwich bread, IMO. It will require a temperature controlled retarder during warmer months.

The following leavening agents were tested and are separately posted to replies below -

  1. TX Farmer’s levain (starter (100%hydration), 13g milk, 22g bread flour, 41g) I was concerned about sour milk during the ling ferment, but it was a problem.
  2. Yeast Water Levain
  3. Sweet (brown sugar) Levain
Kistida's picture
Kistida

Braided loaf with Sharbati atta, matcha coconut loaves and other bakes

Hey everyone,
It's been very HOT lately! I'm so glad August is almost over and the weather is getting slightly cooler. On our way home from Niagara, we stopped by a branch of Panchvati for some Indian snacks and sweets. I left with a bag of Sharbati atta and murukku. I like how smooth this version of atta is compared to others. And at about 25°C, this flour made my starter double in 2.5 hours! I converted my AP/spelt starter to atta for by feeding it 1:5:5, 3 times. I'm convinced this flour would create new starters way faster (I made mine with spelt long time ago).

So, I made some breads these last few weeks between trips to Gaspésie and going for a 'shower' at the Niagara Falls (poncho kept my bag dry only). My apologies for the long post. :P

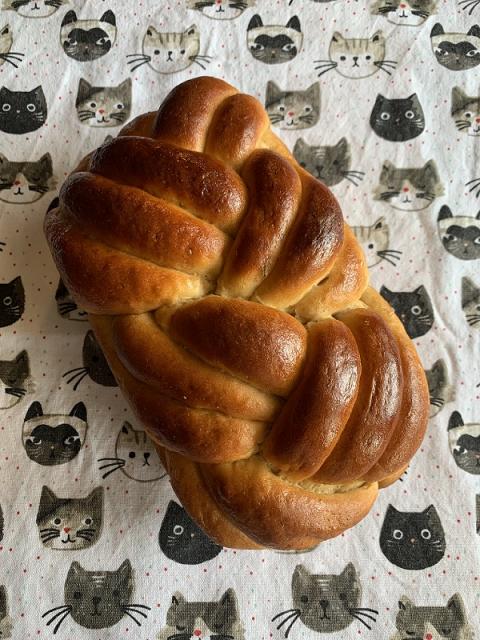
Braided atta loaf


A lil bit of instant yeast was added to this loaf as I wanted this loaf ready in a few hours and I didn't know how the atta starter worked. Baked in a 9 x 5" loaf pan at 180°C 40-45 minutes

Tangzhong
20g all purpose flour
100g milk

Dough
165g soured milk (1 tbsp lemon juice + 160g milk)
90g atta starter (100% hydration)
1 large egg
40g sugar
2g instant yeast
207g atta flour
84g Kamut flour
64g all purpose flour
7g salt
40g ghee

Eggwash: egg, milk and a pinch of salt

Matcha coconut loaf


I made two loaves of the same bread for our trips. I wanted to see how the colors would look like with different ways of rolling the doughs. I think laminating the doughs together might give me more uniformed lines. Either way, matcha + coconut is tasty! Baked in a Pullman 9 x 4 x 4" 180°C 25 minutes with lid on, 20 minutes without. The second loaf had a longer 2nd proof because life got in the way. :)

Tangzhong
20g all purpose flour
100g milk

Dough
All of the Tangzhong
115g soured milk
90g starter (100% hydration)
1 large egg
40g sugar
4g instant yeast
6g salt
200g all purpose flour
120g Kamut flour
20g unsalted butter
20g coconut oil

Just after mixing the dough:
to 1/3 of the dough:
Mix 2g matcha powder with 5g water. Add to the dough and mix until dough is pale green and smooth.

to 2/3 of the dough:
Add 20g unsweetened desiccated coconut to the dough and mix until smooth.


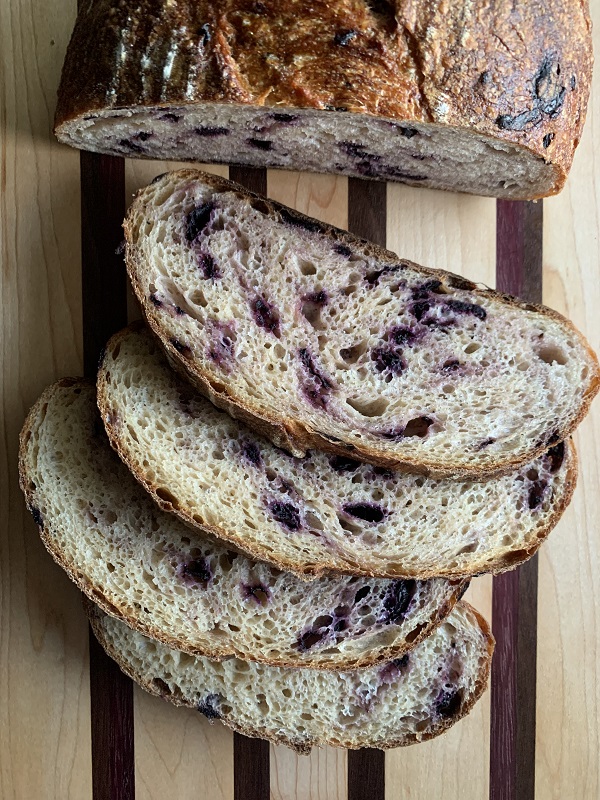
Blueberry sourdough with atta flour


While making blueberry compote, I reserved some blueberry skins (I read about this from: Natasha's Baking) to test with atta flour in a sourdough loaf. This is a same-day loaf that I find rose faster than the others before probably due to higher ambient temperature on that day and the flour. The blueberry skins  were laminated into the dough with some pulp. I forgot about adding a lil bit of citrus zest for a lil burst of flavor. While this was fun to make, I realize it's much too tedious just to get blueberries in the dough without changing its pigments' intensity. For a same-day loaf, this one had a light sourness which I like!

Dough
200g water
80g atta starter (100% hydration)
110g atta flour
100g all purpose flour
50g Kamut flour
5g salt
5g coconut oil
40g blueberry skins (from about 150g blueberries)
3 tbsp blueberry pulp


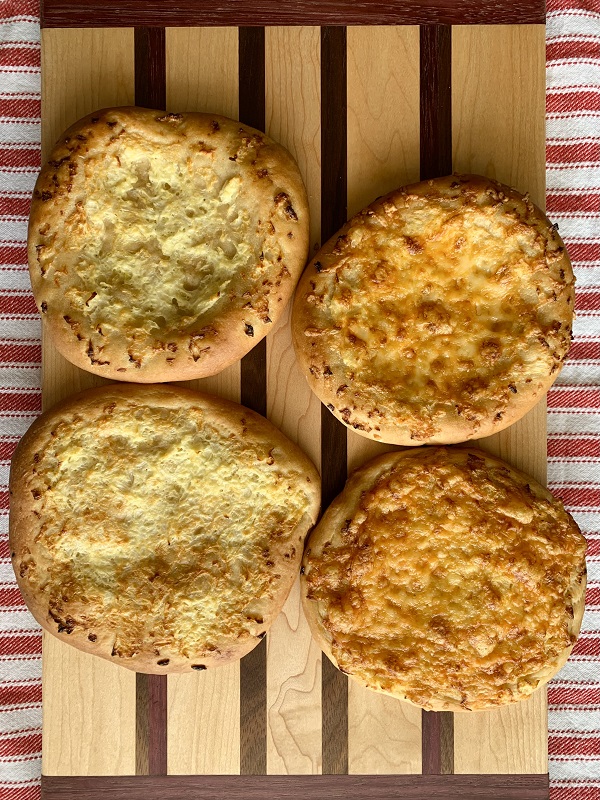
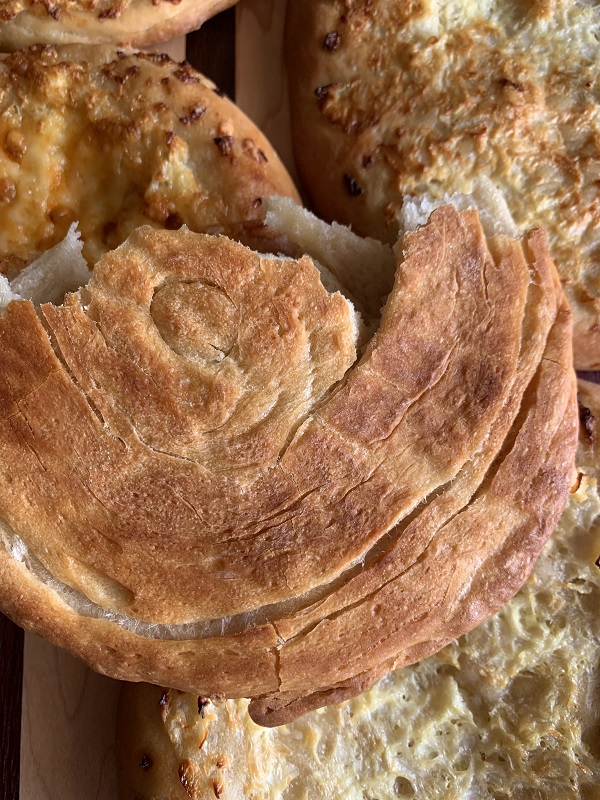
Onion & yogurt flatbread
Qashqari patir and qatlama layered breads


Adapted from: The Art of Uzbek Cuisine and Tasty Arbuz

Unlike piyozli that are usually rolled with onions (raw or caramelized), these were topped with a mix of chopped onion, yogurt and egg yolk.

Shaping the dough for qashqari patir was quite easy, but I wanted to see if the dough can be used in layered bread/qatlama patir instead. This method of making flaky flat bread is very similar to our Malaysian roti canai (I must attempt this soon).


The atta and Kamut made this dough soft and easy to stretch and shape. Once baked the layered version had crispy layers and tasted so good thanks to the brushing the dough with some ghee, onion topping and cheese. The normal qashqari patir is softer and chewy. Onion + yogurt + cheese =  yum!

190°C 25 to 30 minutes until the edges and topping are golden brown - I noticed Malika did not include baking temperature and time on her site.

Dough (6 flat breads)
230g *onion water
90g atta starter (100% hydration)
2g instant yeast
115g Sharbati atta flour
240g all purpose flour
7g salt
10g ghee / butter, a bit more to brush on dough for layered version

*Onion water
200g onions, chopped fine (I used Vidalia)
200g water
Short cut: mix these roughly chopped onions in a food processor with water, use 'chop' mode and pulse for 30 seconds until the onion bits are smaller than 1cm.
Pour the mixture through cheesecloth or a sieve and squeeze out the water. Set aside the leftover onion pieces for the topping

Onion topping
Onion bits
1 egg yolk
2 tbsp plain yogurt (I used plain Greek)
Optopnal: shredded cheese (I used cheddar and Swiss


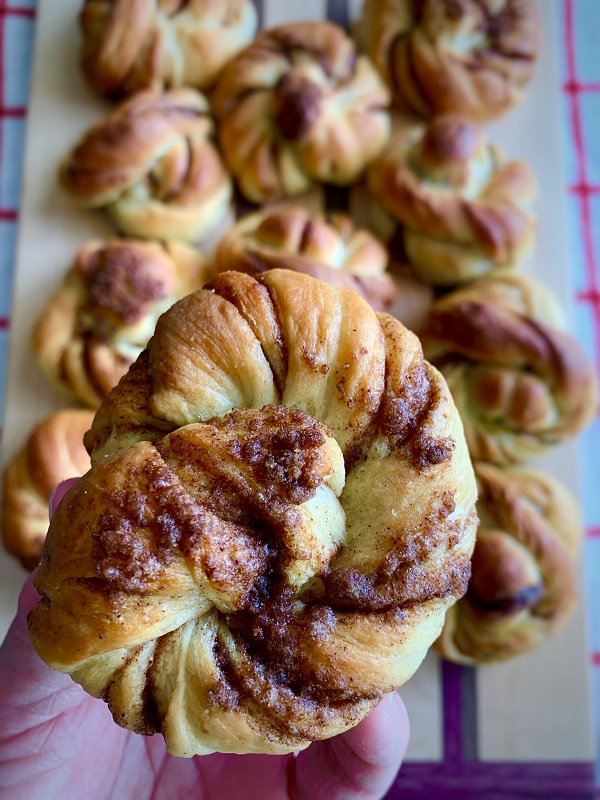
Cinnamon twists


We love these cinnamon buns/twists as they're really great snacks on our road trips. I have posted one in the past, but this time, I used my other recipes. There are so many ways to shape buns, I simply spread the filling, letter fold the dough, roll it out a bit, slice into 8-12 strips, and twisted each strip until they formed a bun, almost like making a hair bun!

Bake at 180°C 18 to 25 minutes until the tops are golden brown.

Tangzhong
20g all purpose flour
100g milk

Dough
All of the Tangzhong
120g milk
1 large egg
1/2 tsp vanilla extract
280g all purpose flour
50g Kamut flour
5g salt
a pinch of ground cinnamon
25g sugar
6g instant yeast
60g unsalted butter
10g light olive oil

Filling
15g unsalted butter, melted
80g brown sugar
15g all purpose flour
3 tsp ground cinnamon (or more)
a pinch of salt


Banana bread with blueberry compote
Here's where the blueberry compote went into.


Mix wet and dry ingredients separately, then mix them together until just combined. Pour half of the batter into the greased pan, drop teaspoonfuls of compote over the surface. Top with the rest of the batter. Add spoonfuls or pipe the rest of the compote and swirl.

Bake in 8 x 8" pan (have yet to test in a loaf pan), 180°C 40 to 50 minutes

Wet ingredients
300g mashed ripe bananas, with some chunks (about 3 bananas)
50g coconut oil
30g sugar
30g brown sugar
1/2 tsp vanilla extract
2 large eggs
120g yogurt

Dry ingredients
140g all purpose flour
60g whole wheat flour
1 tsp baking soda
1/4 tsp ground cinnamon
1/4 tsp salt

Filling & topping
1/3 cup blueberry compote


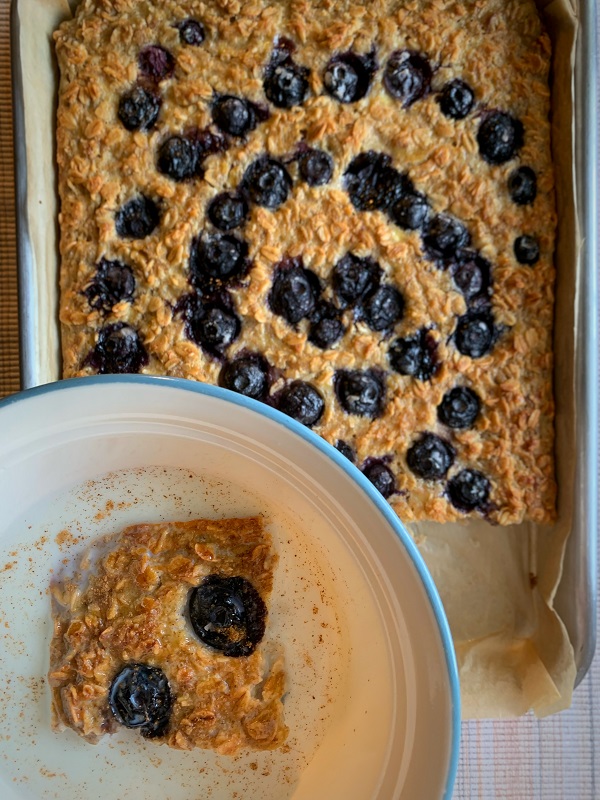
Banana coconut baked oatmeal


There's barely any traces of flour in this one. It is one of my favorite breakfasts with a bit of cinnamon and milk and sometimes with some fruits or berries. A tray usually gives me breakfast for about 4 to 6 days depending if hubby is eating as well or not. He eats them like a soft cookie. I place these baked and sliced bars in a resealable bag and chill them to keep moisture and air out.

Wet ingredients
300g mashed ripe bananas (about 3 bananas)
20g unsweetened desiccated coconut
240g milk
120g Greek yogurt
30g maple syrup (or honey)
1/2 tsp coconut extract (optional)
1 large egg
30g unsalted butter, melted
20g coconut oil

Dry ingredients
200g rolled oats
1/2 tsp baking powder
1/4 tsp ground cinnamon
1/4 tsp salt

Topping
120g blueberries tossed in 1 tsp flour or fine sugar
Other toppings or add-ins: cranberries, toasted nuts, sliced banana, chocolate chunks/chips, cinnamon crumb or anything you like with breakfast

Mix wet and dry ingredients in 2 separate bowls. Add dry ingredients to the wet ingredients and mix until just combined. Pour into greased and lined baking sheet (quarter or 8" square). Add toppings and bake at 180°C for 50-60 minutes until the top is firm and golden brown.


Okay, until next time! :)
- Christi

gavinc's picture
gavinc

100% Whole Wheat Sandwich Loaf - Debra Wink

Today I baked Debra Winks 100% Whole-Wheat Sandwich Bread from Hamelman’s Bread Edition 3. I never thought that 100% whole-wheat would produce such a soft and pleasantly tasty sandwich loaf. I milled the whole wheat yesterday, but I’m not sure of the protein level as Debra recommends about 14% protein. Debra also recommended some recent changes to the formula and process tweaks for the home baker that I adopted. This was my first attempt and I’m very happy with the result, however, I will increase the dough amount for these loaf pans (21 x11 cm / 8 ½ x 4 ½ inches) as they would be a better sandwich slice if taller.


This was a very different process than what I’m used to and have extended my experience and knowledge.


RainingTacco's picture
RainingTacco

Acidity effect on gluten strength

Seems there are no clear answers on the internet. So does acidity from sourdough starter or from long fermentation [does long fermentation actually increase acidity?] strenghten or weaken the gluten?

Doc.Dough's picture
Doc.Dough

The 2% weight loss method for judging levain maturity

A few years ago, I was experimenting with various ways to increase the acidity of sourdough bread and found that I needed a way to produce levains that were similarly mature but at various hydration levels, including some as high as 250%. The “normal” method was to watch for the volume of the levain to rise and when it began to fall back it was declared to be “mature”.  But for high hydration mixes, there was not any rising and falling because it was simply too liquid to retain enough CO2 to allow it to increase in volume (other than producing some surface foam which did not seem to be very useful).

After thinking about this for a while, I wondered if there was enough CO2 escaping from the levain to measure the weight that was lost in the process.  To find out if there was enough being produced, I did a rough calculation based on the fermentation of glucose to ethyl alcohol and

C6H12O6 → 2 C2H5OH + 2 CO2

One mol of glucose weighs 180g and is converted into 2 mols of ethyl alcohol (46g/mol) and 2 mols of CO2 (44g/mol), so in the process 88g of CO2 is produced of which some escapes and the rest either remains dissolved in the liquid phase of the dough or is retained as gas in the bubbles of the dough.  When a levain is mixed, the amylase enzymes in the flour begin to break down some of the starch in the flour (which starts with a just a little maltose and some broken starch granules and after about 6 hours has as much as 6% maltose along with some other fermentable polysaccharides). [Saunders, Ng, and Kline]  And the enzymes are recycled so the process of starch degradation continues for as long as there is broken starch for it to work on and the rest of the required conditions are met.  So, if we take 10g of flour and after getting it wet and letting the enzymes do their thing for 6 hours, it contains about 600mg of maltose, and because maltose is made up of two glucose molecules, we have 600mg of glucose equivalent.  If the formula above held true, about 48% of the weight of the 600mg glucose should show up as CO2.  This would yield something like 293mg of CO2, and that should be measurable but would require a high resolution/high accuracy scale.

So, the initial estimate of how much CO2 might be lost was high enough to make it interesting to pursue measuring actual weight loss in a high hydration levain. My expectation was that the amylase enzymes would continue to produce sugars from the starch and the process would run until something (perhaps metabolic byproducts or pH sensitivity might poison the environment) slowed it down.

The next question was what else might be going on that could look like CO2 loss.  The first guess was that evaporation of water off the levain surface might be high enough to be a problem, and to address that I ran a simple experiment, measuring the weight of a container of water (about 36g of water in a 4g polypropylene food service cup with a snap-on but not gas-tight) lid in place) over a few days to see if it lost enough weight to get in the way of seeing the loss of CO2.


As you can see, the fluctuation in the weight of the water at refrigerator temperature (38°F) averages to be a very small number, with measured weight differences of less than 20mg over multiple hours when temperature variations may have affected scale accuracy.  Once the water was allowed to return to room temperature, evaporation became measurable, losing about 4% of the weight of the water over 15 days or ~0.25% per day. So, it is clear that evaporation is a measurable quantity but when it is refrigerated and the vapor pressure is low, the loss rate is effectively zero.

Now, how much weight does a levain lose over a refresh cycle?  And how does that compare with water evaporation?  To measure the weight loss on a consistent basis, I use the weight of the added flour to normalize the weight lost to CO2, so for a refresh cycle that starts with 6g of starter, adds 12g of water and 12g of flour, the weight loss is divided by the 12g of added flour to arrive at a percentage that grows with time.  If we use the 0.25% per day weight loss due to evaporation and assume (a conservative assumption) that the evaporation of water from the mix will be the same as from a container of pure water and that it will lose 0.25% of the weight of the water over 24 hrs, the weight loss looks like this:
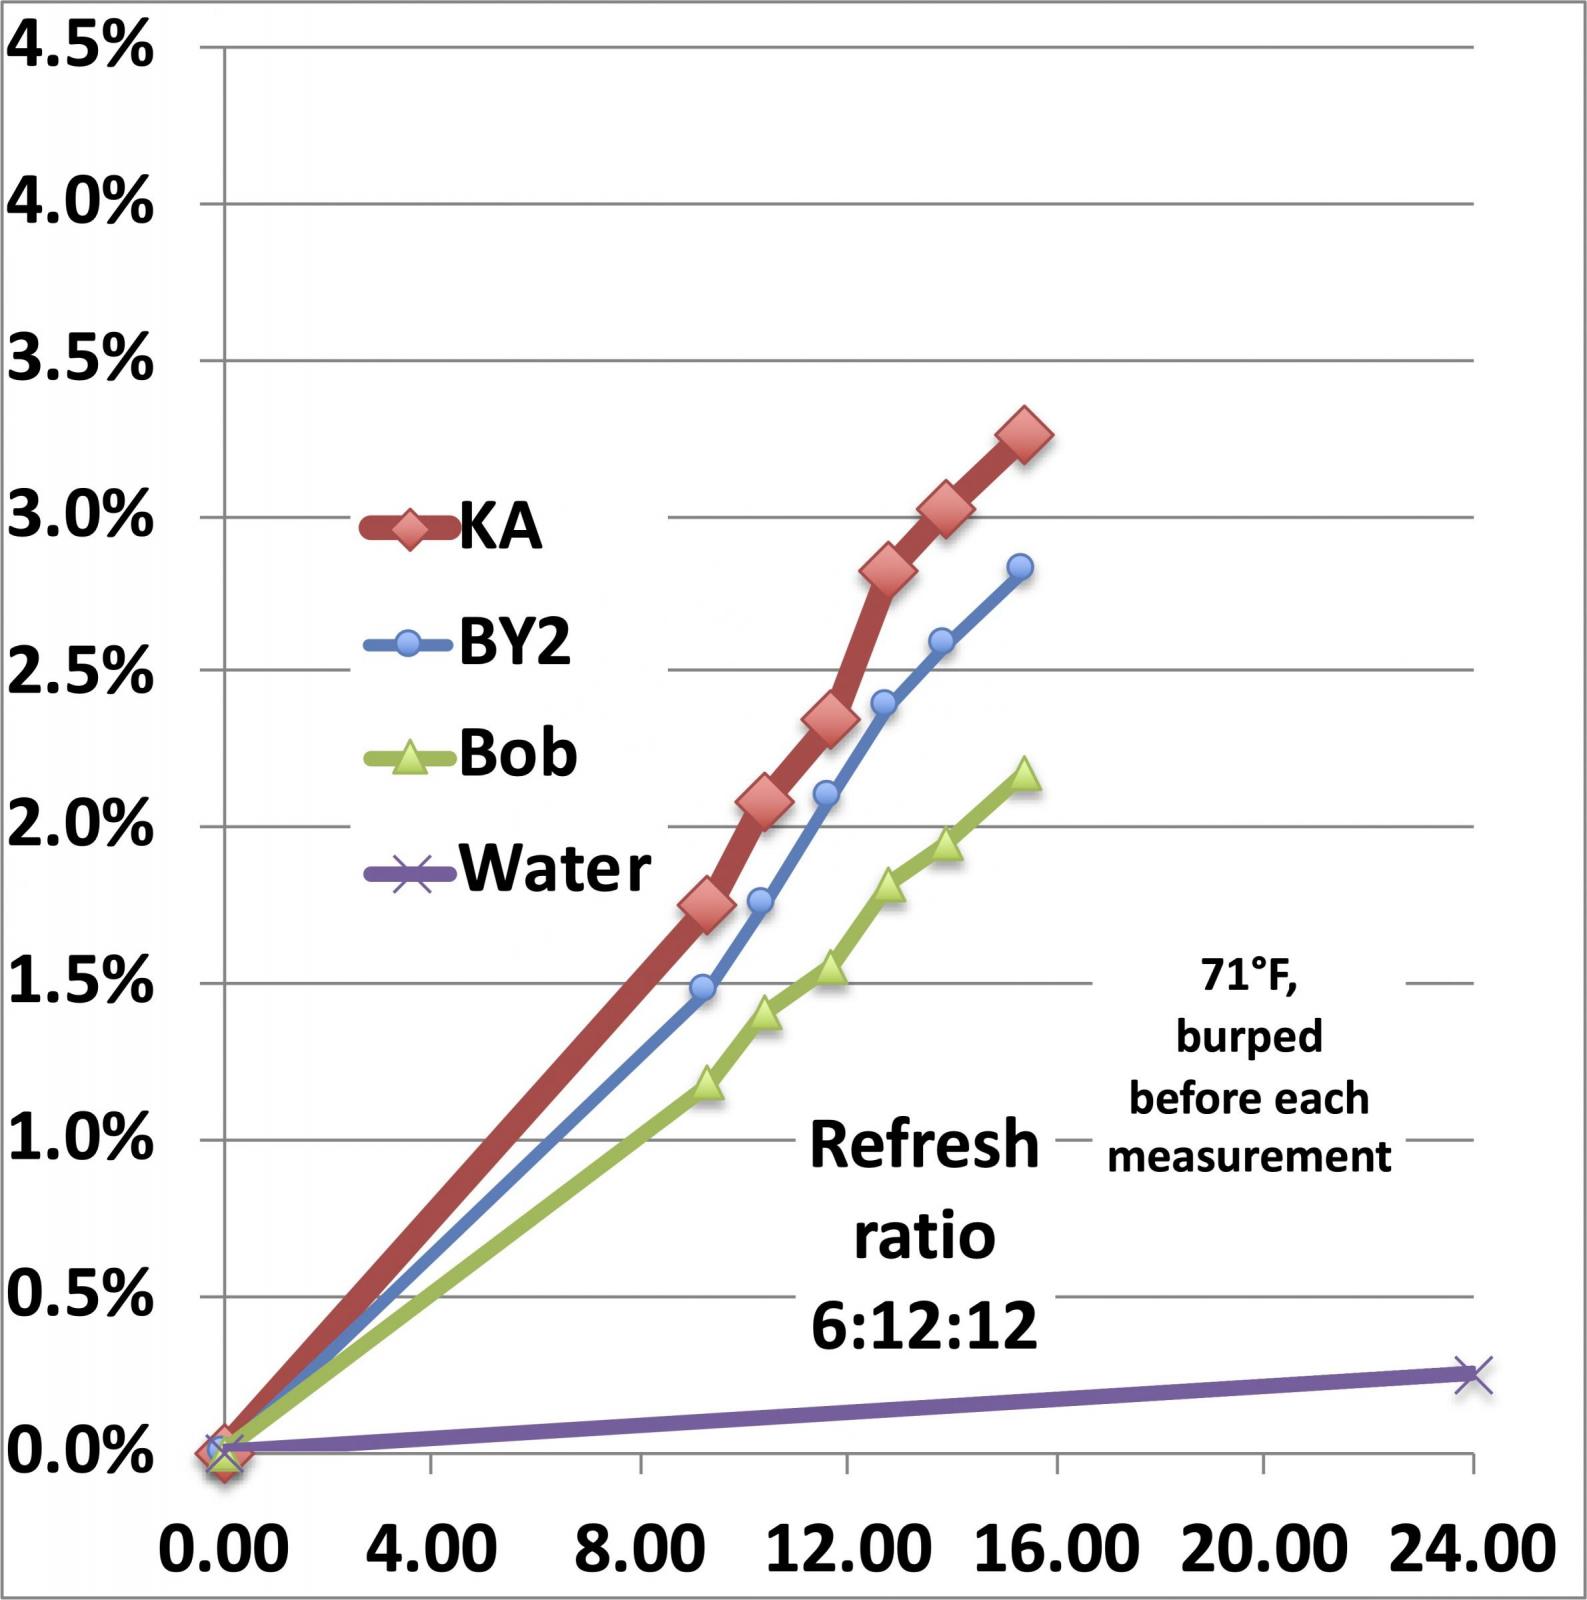
The different starters each exhibits its own weight loss because each one is growing and giving off CO2 at a different rate and in this case, I have plotted a line at the bottom that models the evaporative loss. Thus, the weight loss of an actively growing starter is large enough and fast enough that we don’t have to worry about mistaking water evaporation for CO2 loss.  And we can differentiate between the growth rates of different starters (which doesn’t tell us much more than perhaps something about the numerical density of living yeast cells in the seed starter (which sets the initial growth rate).

If the growing starter is refrigerated at any point during the growth cycle, growth effectively stops (it does continue to grow but very slowly and we will see how fast it continues to grow a little later).
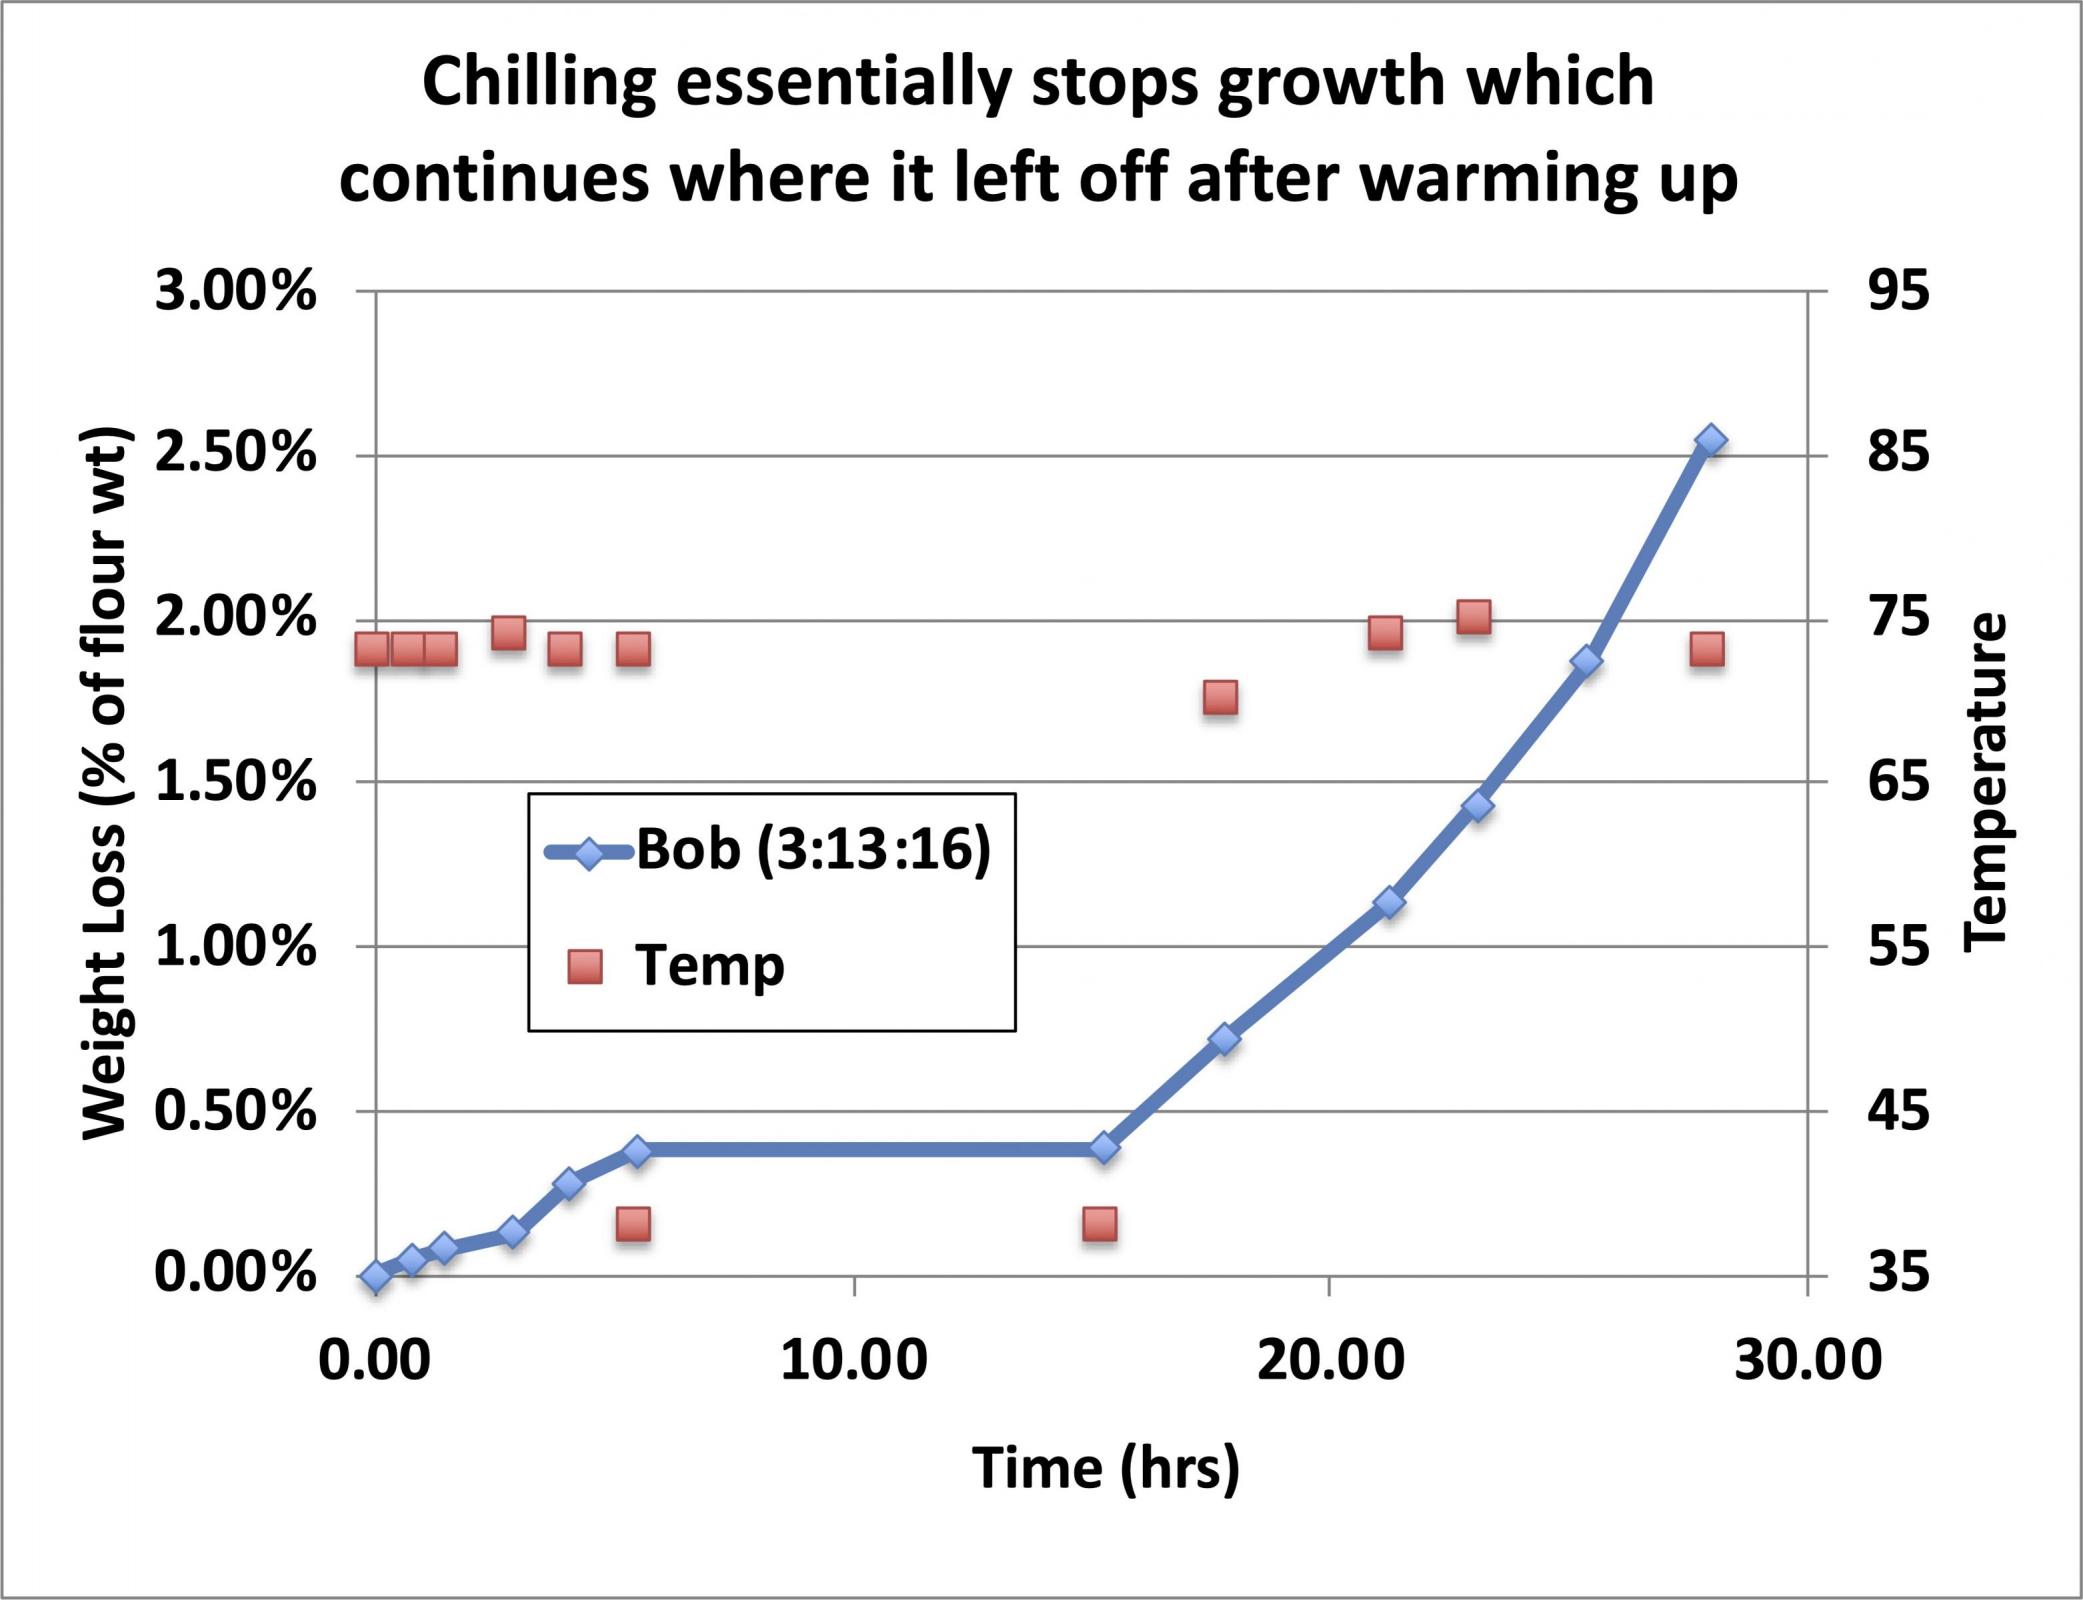
My observation has been that from the appearance of the rise and fall of the starter as it matures, the point at which it begins to fall is generally at the point where it has lost about 2% of the weight of the added flour, so I use this as a guide to judge when a starter is ready to use, even when I can’t tell whether it has begun to fall (perhaps because it rose up and contacted the cover of the container and I thus can’t tell if it fell because of that, or because it was of such high hydration that there is no bulk volume expansion of the growing starter, just some foam floating on the surface of the liquid.  When it has lost 2% of the weight of the added flour, it is (by definition) ready to use.  It works for me.  If you want to use a different number, feel free. “Trial and success” is the name of the game.

Now let’s look at how long you can leave a starter in the refrigerator before you need to feed it. For that experiment I didn’t let the starter get going before I refrigerated it, just mixed it, capped it, and stuck it in the refrigerator. And they were mixed stiff, using a refresh ratio of 5:10:15.
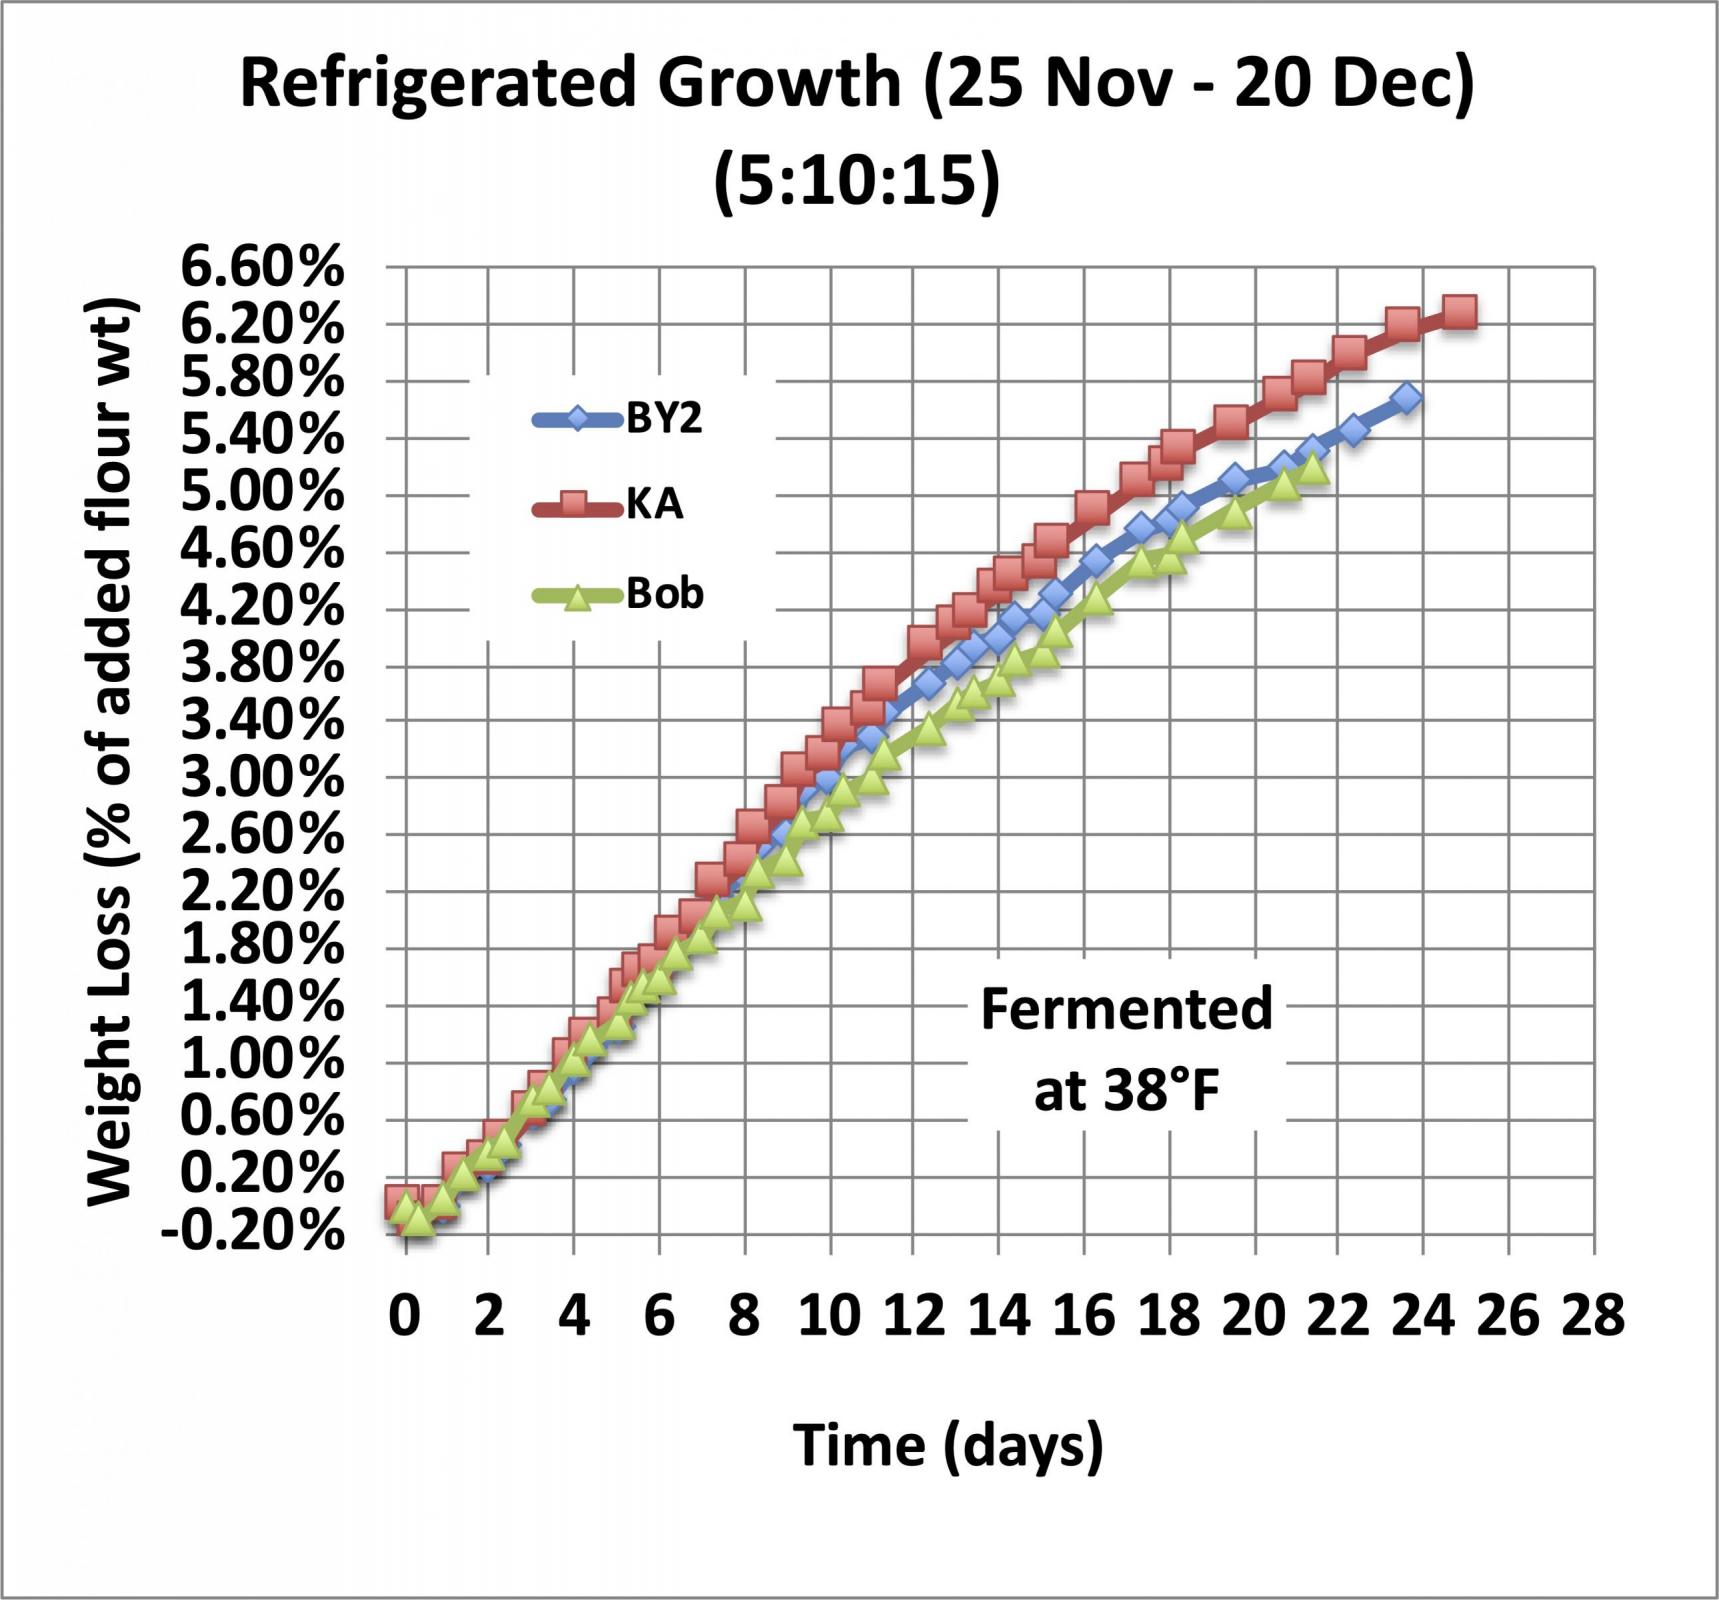

As you can see, in the refrigerator at 38°F, it takes about a week to lose 2% of the weight of the added flour, so if you don’t let your starter grow before you refrigerate it, it will take a week to mature but you can use it without feeding it again.

By day 14, there is some small divergence between the three starters in this test, but the growth rate is still fairly constant (linear growth) for all of them, and I have found that I can still use it to start a levain without an intermediate feeding.

By the end of the third week, there is additional divergence between the three samples shown here, and the weight loss curve is clearly beginning to flatten out, but there is still a significant amount of CO2 being produced.  I find that after three weeks I get better performance if I do a double refresh before making a levain.  I take this as strong evidence that the native amylase enzymes remain active and continue to convert broken starch into maltose, and the yeast continues to convert the maltose into CO2 and other metabolic products until something limits the process.

Now while all of these experiments demonstrate that weight loss is an adequate method for judging the maturity of starter, it is equally good for gaging the maturity of levain, and it has the advantage that you don’t need a milligram scale to use it.  For any levain where you are adding at least 100g of flour and assuming that you have a digital scale that is accurate to 1g, you just cover the bowl of levain with plastic wrap and weigh the bowl, levain, and plastic wrap, and make note of the total weight of the combination, calculate 2% of the weight of the added flour and subtract it from the total and that becomes your target weight for the bowl of starter when the levain is mature.  And from the extended cold propagation experiment we know that you can lose as much as 4% of the weight of the added flour and it doesn’t make much difference in terms of the health or proofing capacity of the levain.

Notes:

For stiff starters, there is less water in which the CO2 can dissolve, and any dissolved CO2 will not escape, plus CO2 will be trapped in the alveoli of the expanding starter. In all cases, there is little or no CO2 released until the starter is saturated with CO2 at which point it cannot hold any more. So, when you plot weight loss, expect for there to be a lag between when you mix the starter and when it starts to lose weight. Part of that is due to not having a lot of yeast cells actively consuming sugar and making CO2 soon after being mixed, and part is due to the fact that the early CO2 is being absorbed by the liquid in the starter as well as being stored in internal alveoli (bubbles) within the starter.

While both mechanisms are operating, you need a way to get accurate measurements, and I found that if I would thump (burp) the container on a towel or my hand, it would deflate the bubbles in the starter releasing trapped CO2 and knocking it down to some common (low) level of porosity.  If/when I did not do this, the weight loss data was very noisy since the starter will deflate on its own after a period of time and you can’t control it and probably don’t even observe it (it looks like surface bubbles popping but it gives off CO2 which impacts what you weigh). It is also important to remove the lid of the container and blow out any accumulated CO2 that is trapped in the head space between the top of the starter and the top of the container.  While CO2 is a gas, it is a heavy gas, and it is measurable and it contributes to measurement noise if you don’t flush it out.  Note that larger containers trap more CO2 and the difference in buoyancy is the difference between the molecular weights (at sea level that is 44g per 22.4 liters for CO2, and 29g per 22.4 liters for air).

Fifteen grams per 22,400 ml is 15 mg per 22.4 ml, and half of a 5.5 oz polypropylene food service cup (78 ml) filled with CO2 instead of air adds about 53mg to the measured weight if you don’t replace it with air before measuring.  You can do the same calculation for large bowl filled with levain and covered with StretchTite; there is a substantial amount of trapped CO2 and you need to flush it out before you weigh the starter when determining if it is mature.


HungryShots's picture
HungryShots

100% Whole Grain Rye Sourdough Bread

I tried this bread several times to be sure I was doing it the right way. On this journey, I learned that:

- mixing this dough with a standing mixer has no benefit comparing to a simple stir with a spatula

- this bread is a "Speedy Gonzales" of all the sourdough bread loaves I ever made

- in the oven it has a little oven spring then it is retracting itself, no matter if you proof it longer or shorter

- it looks like a stone / brick when taken out of the oven, but wrapped in towels will recover its moisture on the crust.

But in the end, all my experiments were perfectly good to eat and I ended up with delicious, healthy and nutritious bread. I do not know why, but when I see this bread I think of some cheese spread on it.

The recipe is:

Ingredients:

Preferment:


  • 50g rye sourdough 100% hydration
  • 420g water
  • 420g whole grain rye flour
Dough:
  • 825 whole grain rye flour
  • 725g lukewarm water
  • 15g salt
  • 50g barley malt (optional)

I made a video that gathers all my findings and lessons learned with such a high rye content bread.

Although I have done some tests with different proofing times, I am still impressed to see that the bread retracts in the oven after the initial small oven spring. I have tried to cut the fermentation shorter and I've got a little bump on the top but the crumb was denser. On the other side, when I let it longer, I got the classical big cave under the crust. The version presented has the optimal timing for this bread.

I have to mention that I didn't take the recipe from a specific source and I created it respecting some well-known principles and adapting it until I liked it.

Did you have similar experience in baking 100% whole grain rye or am I missing something here?

Denisa. 


DanAyo's picture
DanAyo

A list of past and present Community Bakes

Table of Contents for my BLOG

The following are links to our Community Bakes

Danni3ll3's picture
Danni3ll3

Caramelized Onion Sourdough with 4 Cheeses


Last weekend, we had a pizza party at the barn where my daughter leases her horse. The deal was that we provided the pizza oven, the dough, the sauce and the cheese. The rest of the gang brought the toppings. For us, we made Fig and Prosciutto pizza and Tarte flambée. The fig pizza called for caramelized onions. The last time I made caramelized onions, it took me 3 hours standing at the stove stirring the silly things. I thought that there had to be a better way and there is! It takes longer but there is no standing at the stove. Basically, one fills a crockpot half to 3/4 full of sliced onions, put in a pinch or two of salt, drizzle melted butter and olive oil over the lot, stir, and put it on low for 10 hours. Then, crack the lid and let it go for another 4 to 5 hours. The results is beautifully caramelized onions with no fuss! This made a huge batch and I froze quite a bit of them in ice cube trays. I also had a lot of left over cheese from the pizzas. So between the onions and the cheese, this bread was meant to be! 


Recipe


Makes 3 loaves

400 g unbleached flour

300 g bread flour

250 g high extraction red fife flour (I milled 285 g of red fife berries and sifted it. Save the bran for the levain)

50 g buckwheat flour (I used 50 g of buckwheat groats and milled them)

2 tbsp of dried Italian herbs

725 g water

100 g of shredded 4 cheese mix (parmesan, gouda, provolone and mozzarella)

72 g caramelized onions

30 g full fat plain yogurt

20 g salt

200 g levain (explanation below)

Plus high extraction whole wheat flour (local Brûlé Creek partially sifted flour) for levain


The morning before:

  1. Take 15 g of starter and add 15 g of high extraction wheat flour and 15 g of water. Let sit for 12 hours.

The night before:

  1. In a tub, put in the unbleached flour, the bread flour, the high extraction red fife flour, the buckwheat flour and the Italian herbs. Cover and reserve for the next morning.
  2. Use the bran from the red fife as well as some high extraction whole wheat flour to equal 30 g. Add this and 30 g of water to the levain. Let sit overnight.
  3. Thaw the caramelized onions if you have some frozen in advance. (Otherwise, slice one large onion and caramelize slowly on the stove with 1 tbsp of olive oil and a bit of butter as well as a pinch of salt.) Cover and reserve.

Dough making day:

  1. Very early in the morning, feed the levain 60 g each of high extraction whole wheat flour and water. Let rise for about 5 hours in a warm spot.
  2. About 2 hours before the levain is ready, add the water to the tub of reserved flours from the night before, mix well and let sit (autolyse) until the levain is ready.
  3. Add the caramelized onions, the shredded cheeses, the yogurt, the levain and the salt to the dough. Mix well and let rest about 30 minutes.
  4. Do three sets of French slaps and folds at 30 minutes intervals. The first set has 75 slaps, the second set has 40 slaps and the last set has 10 slaps. Continuing on 30 minute intervals, do gentle stretches and folds until the dough feels billowy, has bubbles on the surface, bubbles can be seen through the walls of the container and it giggles when shaken. I ended up doing two sets of folds but then the dough had to take a trip to the fridge because the kitchen got taken over by the daughter (She is a very messy baker ?). It spent almost 2 hours there. I was happy to see that the dough had risen only about 20% when I got back to it. 
  5. Tip the dough out on a bare counter, sprinkle the top with flour and divide into portions of ~710 g. Round out the portions into fairly tight rounds with a dough scraper and let rest one hour on the counter. 
  6. Do a final shape by flouring the rounds and flipping the rounds over on a lightly floured counter. Gently stretch the dough out into a circle. Pull and fold the third of the dough closest to you over the middle. Pull the right side and fold over the middle and do the same to the left. Fold the top end to the center. Finally stretch the two top corners and fold over each other in the middle and continue stitching the rest of the loaf. Roll the bottom of the dough away from you until the seam is underneath the dough. Cup your hands around the dough and pull towards you, doing this on all sides of the dough to round it off. Finally spin the dough to make a nice right boule.
  7. Place the dough seam side down in rice floured bannetons, cover, let rest for a few minutes on the counter and then put to bed in a cold (38F) fridge for 10 hours. 

Baking Day:


  1. The next morning, heat the oven to 475F with the Dutch ovens inside for 45 minutes to an hour. Turn out the dough seam side up onto a cornmeal sprinkled counter. Score the dough if you wish (I don’t as I like the rustic torn look). Place rounds of parchment paper in the bottom of the pots, and carefully place the dough seam side up inside. 
  2. Cover the pots and bake the loaves at 450 F for 30 minutes, remove the lids, drop the temperature to 425F, and bake for another 17 minutes. Internal temperature should be 208F or more.

Pages