The Fresh Loaf

A Community of Amateur Bakers and Artisan Bread Enthusiasts.

Most bookmarked

Artisan Pompeii Miche

RoundhayBaker's picture
RoundhayBaker

Description

As promised in AbeNW11's post on Making 2,000 Year Old Bread this is my now thoroughly tested recipe for the Pompeii loaf.

For those of you who don't know the back-story, when the Pompeii Live exhibition was staged at the British Museum in 2013, one of the items on display was a carbonised loaf of bread found in a bakery oven. On the day of the eruption in 79AD, it received a slightly longer and higher temperature bake than the baker intended. Not that he cared any longer.

Museo Archeologico Nazionale di Napolii (© Fotografica Foglia).

Apart from surviving the eruption, the loaf is notable for three things. There’s the bread stamp on it which reads ‘Property of Celer, Slave of Q. Granius Verus’. It is also wrapped in a cord . And it’s divided into eight wedges.

The museum asked chef Giorgio Locatelli to recreate the bread. And you can watch him and his kitchen staff doing just that on this video here. It’s fascinating stuff but, viewing it, my reaction was that this is was a restaurant loaf, one made using modern techniques (yeast, gluten powder etc.). Why not have a go at making a true artisinal loaf instead and have a go at baking it wrapped in a cord?

So I did.

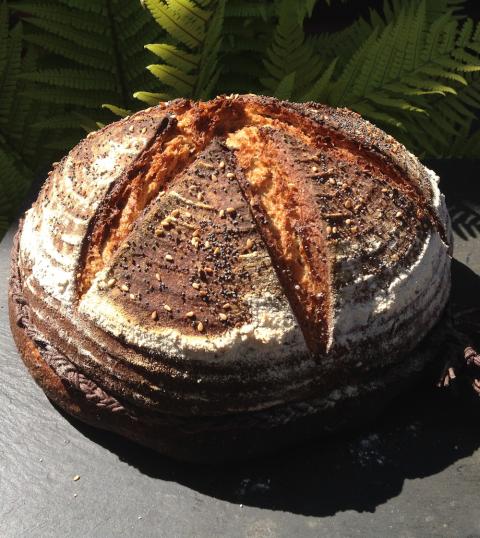
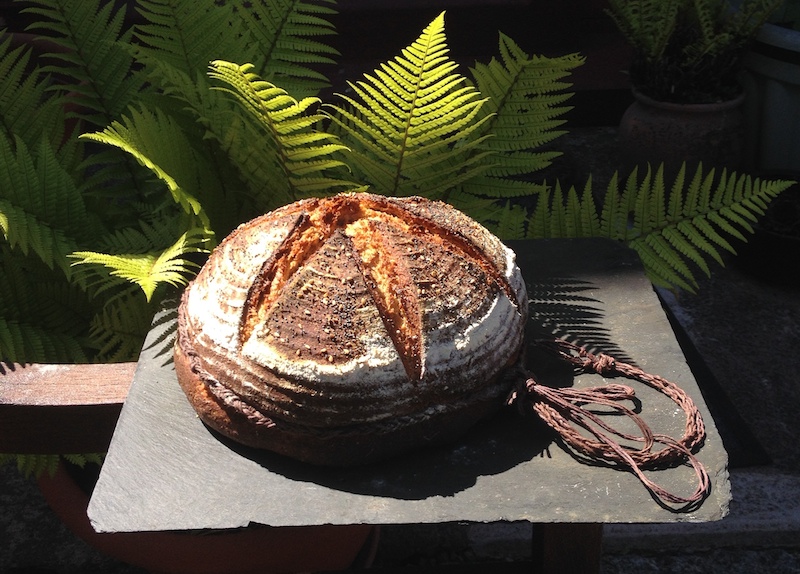
Here it is. It’s a whopper. 

Out went the modern flour, yeast, and gluten additive. In came a sourdough preferment, ancient flours, and artisinal techniques to develop gluten. I used Kamut, rye, and spelt flour; all grains common in the Roman world. I suspect Prof. Calvert was not the first person to come up with the idea of autolysis. After all, bread-making’s been around for eight thousand years. Many, many bakers must have noticed the benefit of giving hydrated flour a rest, so an autolyse was in. The same applies to double-hydration.

I used a 100% hydration dark rye sourdough starter, but any will do (however, you do need to adjust the water quantity if you use a lower hydration starter).

Although it makes a delicious, nutty-textured bread, Khorosan is horrendously expensive, so I tried the miche with varying proportions of all the flours, including replacing the Khorosan with wholemeal/wholewheat or buckwheat. All worked very well. The recipe is adapted from the ever-reliable Weekend Bakery's Miche formula and is is therefore fairly disaster-proof. I sprinkled the loaf with anise, poppy, and sesame seeds because it’s known they were used by Roman bakers and because I like the their taste.

Here’s the obligatory crumb shot.

Summary

Yield
Servings
Prep time18 hours
Cooking time1 hour, 15 minutes
Total time19 hours, 15 minutes

Ingredients

50 g
Rye sourdough culture (100% hydration) (preferment)
180 g
Kamut Khorosan flour (preferment)
40 g
Strong Bread Flour (preferment)
180 g
water (preferment)
540 g
water (or less (depending upon sourdough hydration))
405 g
Spelt flour (wholemeal (wholewheat) spelt)
405 g
Kamut Khorosan (or wholemeal (wholewheat) flour or buckwheat flour)
24 g
salt
2 t
Anise, poppy and sesame seeds (optional)

Instructions

Adapted from the WKB Miche 

  1. PREFERMENT: Mix the ingredients for the preferment together into a stiff-ish dough and leave at room temperature (18-24℃ - 65-75F) for 12 hours or overnight.
  2. MIX. When ready, and if you have a thermometer at hand, determine the Desired Dough Temperature (I aimed for 25℃ - 77F) and adjust your water temperature to achieve it.
  3. Stir the preferment into half the water.
  4. Add the flours and stir to incorporate. 
  5. Gradually add the rest of the water and let the dough come together (you may need all of the water or even a bit more, depending on the flour you use). If you canreserve 10% of the water for later double-hydration.
  6. KNEAD: Knead for 1 minute into a shaggy mass.
  7. AUTOLYSE: Cover and let the dough rest for 30 minutes
  8. KNEAD: Add the salt and knead for 3 minutes on a stand mixer (5-6 minutes by hand).
  9. DOUBLE-HYDRATE. Continue kneading and dribble a little of the remaining water into the mixing bowl (or sprinkle on your work surface). Wait until it is absorbed before making the next addition. Do this for 2 minutes on a stand mixer (3-4 minutes by hand) 
  10. KNEAD: Continue until you achieve a good window pane (with these flours it’s never going to be great). 
  11. BULK FERMENT: Return to a greased bowl and let it rest for 50 minutes.
  12. FIRST S&F: Wet your hands and, either do one complete stretch-and-old turn in the bowl, or tip onto a floured work surface then do one stretch-and-fold. Return to bowl, cover, and leave to rest for 50 minutes more. 
  13. SECOND S&F: Repeat and leave for another 50 minutes
  14. THIRD S&F. This is optional depending upon the strength of gluten development in the dough. When I replaced the Kamut flour with either buckwheat or wholemeal it was needed. 
  15. PRE-SHAPE: On a lightly floured surface, gently de-gas the dough, tuck the edges into the centre, flip over, then, with floured hands (the dough is quite sticky), drag it into a loose boule in four quick turns, making sure not to overwork it.
  16. Cover with a damp cloth (or similar) and let it rest for 20 minutes.
  17. Prepare a large (1.5kg) banneton.
  18. SHAPE: Lightly flour your surface and hands again then shape the dough into a tighter boule, making sure not to tear its skin. It’s a big loaf, so you’ll need to use both hands and/or a bench scraper to do this. Make sure you flour your hands again if they begin to stick to the boule.
  19. Sprinkle the top of the boule with flour, gently turn it upside down, then carefully place it in the banneton.
  20. PROVE: Cover again and leave to prove for up to 90 minutes. Precise time varies with the ambient temperature. When you think the bread has risen enough, use your finger to carefully make a very small dent in the dough. If after 30-45 seconds the dent remains, the bread is ready to bake, if the indentation disappears, the dough needs a little bit more time. 
  21. Preheat your oven to 225/205(fan)ºC (440/400F).
  22. When the loaf is ready, turn the oven up to 240/220(fan)℃ (465/430F). Prepare your steam tray.
  23. Carefully turn the miche onto your baking peel. Spray it lightly with water then sprinkle on the seeds.
  24. Dust your peel with flour then turn the boule onto it. 
  25. Tie the cord around the loaf, knotting it to make a carrying loop from its tails.
  26. SCORE: Make four cuts from rim to rim across the centre to create eight segments. You need to slice down to the cord. I used a sharp bread knife to do this; my lame was not up to the task. I’ve also cut it some loaves into six wedges rather than eight. Either way is good.
  27. BAKE: Slide the miche into your oven and immediately turn the heat down to 225/205(fan)ºC (440/400F) and bake for 50-75 minutes until dark brown. 
  28. Remove the steam tray 30 minutes into the bake.
  29. When baked, transfer to a rack and leave to cool. 

Notes

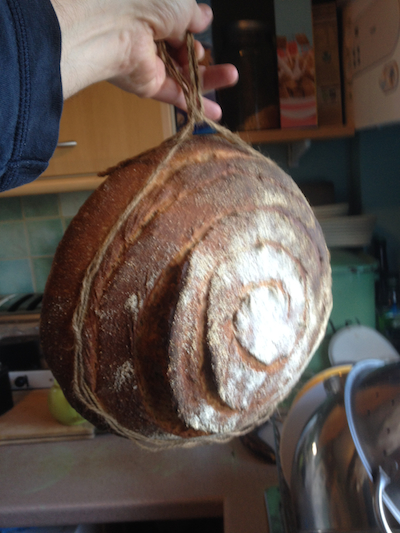
Okay, why the twine? First, as you can see from the bread selfie below, it helps you carry a whopping 1.7kg miche. Handy for the Roman shopper/house slave. Then there’s the division of the loaf into wedges. They’re deep cuts but, if you tie the cord around the loaf first, the miche keeps the shape it would lose if it was sliced without the cord.

I baked my first Pompeii miche using a cord made from garden twine. It worked well but left hairs embedded in the crust. Not so good. I tracked down some 20lb hemp cord which comes lightly waxed with corn and potato starch. To make a cord thick enough for the miche, I cut three lengths, wove the strands together, repeated the process twice more, then braided the three-ply cords into one strong 9-ply cord. Problem solved.

Why the wedges? No seems sure, but the simplest explantion is that the loaves could be sold or served by the slice, just as some miches are sold in France today. I’ll have a go at my next farmers' market.


(Beatrice, Creative Commons)

And the bread stamp? Roman bakers didn’t just sell their own bread (like the unstamped Pompeii loaf above). For a fee you could have your own loaves baked in their ovens (a communal tradition that only recently died out in France but survives in Morocco - read Bill Alexander's superb 52 Loaves for more) hence the need to identify which loaf was your own.

Bread stamps have been much discussed on TFL. I’ve yet to decide how to make mine, but I will.

______________________________________________

A bit more about baking in Pompeii at the time of the eruption:

More than thirty bakeries have been excavated in Pompeii and Herculaneum. Almost two-thirds were large enough to have their own donkey or slave-powered flour mills. They also had communal ovens to which you could bring your dough (bread-stamped, of course) to be baked overnight.

(Carole Raddato, Creative Commons)

Ironically, basalt rock from old lava flows was used to make both the millstones and the floors of the wood-fired ovens.

Despite the devastation of the eruption, quite a few loaves have been found. Eighty charred loaves alone were recovered from the ovens of one baker, Modestus. Their (ultra) dry weight is 580g on average, all were divided into six or eight wedges, and each has a diameter of about 20-25cm. Luckily, about the size of a 1.5kg banneton.

And here’s a portrait of another baker, Terentius Neo, and his wife. It's a fresco from inside their house in Pompeii. He holds a scroll, showing he was literate. She holds a wax tablet, showing she was numerate too.

(Public domain)

They look like a pleasant couple, but then, of course, they're bakers. :)

wassisname's picture
wassisname

Rosemary Arkatena Twist


This is the Arkatena bread from Bread Matters by Andrew Whitley, except with rosemary instead of fennel, more salt, more heat, steam, an autolyse, some stretching and folding, and a shortcut using my own starter to create a chickpea starter.  The chickpea, aka garbanzo, aka gram flour is the unique feature of this bread.


I feel like I stuck to the spirit of this bread even if I didn’t stick to the letter of the formula.  The only really substantive change was the switch from fennel to rosemary.  I meant to use fennel up until the last minute.  I have nothing against fennel, it’s just not something I get really excited about.  When I remembered the bit in the book that says fennel probably isn’t used in the original bread on which this one is based, well, out went the fennel.  I really do like rosemary and it seemed like a good fit for this loaf so, in went the rosemary.

The dough was strong and not particularly wet so I couldn’t resist shaping it with a twist.  I might add more water in future tinkering. 

The rest of the changes were made for the sake of habit and convenience.  Reworking the formula took some wrangling because the book has you make a chickpea starter from scratch and then make loads of extra leaven during the builds.  I’ve included the numbers I came up with. I left out the nitty-gritty details of the process – best to check the book for that and then modify as you will.

If you don’t have this book it is worth taking a look at.  Mr. Whitley is refreshingly blunt, even if you don’t agree with every last thing he has to say.  “Constructive neglect” – brilliant!  Steaming “a fruitless exercise” – you underestimate me, sir!  One nice takeaway from this book is to worry less and go with what works.  It is good to be reminded of that once in a while.  It is, after all, your bread. 


This is one tangy bread.  Maybe it was the long, cool leaven builds.  Quick, warm fermentation might yield a different result.  Right out of the oven it reminded me of hummus with lots of lemon juice.  Good stuff.  The chickpea flavor faded over time but still lends its unique tang to the bread.  The rosemary flavor comes through nicely.  I think I'll be baking this one again!

Marcus

dmsnyder's picture
dmsnyder

Baker's Math: A tutorial

In October, 2008 I posted a formula for Greenstein's Jewish Sour Rye which converted his recipe, which was written in volume measurements, to ingredient weights. I have made this bread many times since, but I've never bothered to calculate the baker's percentages for the formula. I decided to do so today and thought I would post the procedures as a tutorial on “baker's math” for new baker's and others who have just never gotten comfortable with this very valuable tool.

Here is the formula I wrote in 2008.

Ingredients

Wt (g)

First Clear flour

500

Water (80-199ºF)

240

Sea salt

12

Ripe rye sour (100% hydration)

750

Instant yeast

7

Altus (optional)

1/2 cup

Caraway seeds

1 T

Cornmeal for dusting parchment


Cornstarch glaze


Converting the formula to baker's math

Baker's math is a method of expressing the quantity of all ingredients, always expressed as weights, as a proportion of the total flour in the formula. This provides a way of comparing formulas and of easily converting them to make a larger or smaller batch of dough. By convention, the total flour is always 100%. If your formula uses more than one type of flour, their total is 100%. So, to use a simple baguette-type dough as an example, the formula might be:

Ingredients

Baker's %

AP flour

100

Water

65

Salt

2

Instant yeast

1

Total

168

Note that the total is over 100%. This is confusing to many initially. Get used to it. This total baker's percentage is an important number, as you will soon see. Again, this formula does not tell you how much of any ingredient to use, so far, only their proportionate amounts. In fact, knowing these proportions gives you all the information you need to make any amount of dough you need for a bake, whether its 500 g or 100 kg.

We have the ingredient amounts for a “batch” of Greenstein's rye bread, and we want to calculate the baker's percentages, so we can make a bigger (or smaller) batch of dough than the original recipe produces.

This bread uses a rye sour – a rye sourdough starter. When working with a pre-ferment like a poolish or a rye sour, there are two ways of representing it in baker's math. One is to treat it a distinct ingredient, like water or salt. The other is to break the pre-ferment down into its flour and water content and add the flour to the total flour and the water to the total water in the formula. These two approaches are equally accurate, but the second approach provides the more accurate representation of the dough characteristics, especially in regard to hydration. In the following table, I have used the second approach.

The rye sour is 100% hydration. That means that the amount of water in it is exactly equal to the amount of water (water = 100% of total flour.) So, 750 g of rye sour consists of 375 g of rye flour and 375 g of water. Therefore, for example, the total water in the dough consists of the 375 g from the rye sour plus the 240 g added to the final dough.

Total Ingredients

Wt (g)

Calculations

Baker's %

First Clear flour

500

Total flour =500+375=875. 500/875=57.

57

Rye flour

375

Total flour =500+375=875. 375/875=43.

43

Water (80-100ºF)

615

Water/Total flour=615/875=70

70

Sea salt

12

Salt/Total flour=12/875=1.4

1.4

Instant yeast

7

Yeast/Total flour=7/875=0.8

0.8

Total

1509


172.2

Now we can see that the original recipe makes 1509 g of dough. (Well, it is actually more because the weight of the caraway seeds and altus, if used, is not included in these calculations.) Adding up the Baker's percentages, you have 172.2. Think of this as meaning that the dough consists of 172.2 “parts,” 100 of which is flour, 70 of which is water, etc. Recall that these numbers represent the relative amounts of each ingredient.

Scaling the recipe

Now, let us assume you want to make Greenstein's Jewish Sour Rye, but you want to make 600 g loaves, and you want to make two of them. So you will need 1200 g of dough. 

Since you know your formula consists of 172.2 parts, to determine the weight of each ingredient needed to make 1200 g of dough, what you need for your calculations is the weight of each part. If the total is 1200 g, you get this by dividing 1200 g by 172.2 parts. This equals 6.97, rounded off. This number is called “the conversion factor.” Now we can calculate the amounts of each ingredient in 1200 g of dough. Weights are rounded to the nearest gram.

Total Ingredients

Baker's %

Calculations

Wt (g)

First Clear flour

57

57x6.97=397

397

Rye flour

43

43x6.97=300

300

Water (80-100ºF)

70

70.6.97=488

488

Sea salt

1.4

1.4x6.97=10

10

Instant yeast

0.8

0.8x6.97=6

6

Total

172.2


1201


What this way of representing the formula does not show is how much rye sour you have to build. However, we know from the original recipe that the weight of the rye sour is 1.5 times the weight of the First Clear flour (See the first table, above.) So, for the 1200 g of dough, we will need 1.5x397=595 g of Rye Sour. In the bread books written for professionals, for example, Hamelman's Bread and Suas' Advanced Bread and Pastry, the formulas have separate tables for “Total Dough” which takes the second approach described above and another for “Final Dough” which takes the first approach. You get the best of both worlds. The “Final Dough” would be as follows:

Final dough ingredients

Wt (g)

Baker's %

First Clear flour

397

100

Water (80-199ºF)

191

48

Sea salt

10

2.4

Ripe rye sour (100% hydration)

596

150

Instant yeast

6

1.4

Total

1200


Altus (optional)

1/2 cup


Caraway seeds

1 T


Cornmeal for dusting parchment


Cornstarch glaze


You can see that, while this representation of the formula is more helpful for making the final dough, the Baker's Percentages distort the ingredient proportions. They make the dough look like it has a lower hydration than it really does, and it makes the amounts of salt and yeast seem very high.

Baker's math is an invaluable tool. Once you understand the basic approach and scale a few of your favorite recipes, it becomes easy to use. After a while, if you use it regularly, it becomes intuitive. You will find yourself doing it in your head as you look at new recipes. You can use it for modifying recipes you want to tweak. It will make you a better baker. It is not yet known if it prevents senile dementia, but I bet it helps. I'll let you know, if I remember to.

Addendum 5/1/16: I just found a very good Baker's Math reference on the King Arthur Flour web site. Here is a link to it: Baker's percentage

Enjoy!

David

yy's picture
yy

New England Style Hot Dog Buns

After having delicious lobster rolls with New England style buns at RM seafood in Las Vegas, I became obsessed with soft, toasty rolls with just the right amount of crunch. I decided to buy a New England hot dog bun pan (of course, the buns can be made with an ordinary sheet pan, but I just felt like purchasing a unique piece of equipment).

I used a 3/4 recipe of the  golden pull-apart butter buns on King Arthur Flour's online blog, replaced all the liquid with milk for flavor, and increased the hydration to about 70%:

314 g ap flour
16 g potato starch
15 g dry milk
18 g sugar
43 g soft butter
220 g milk (scalded and cooled)
1 tsp salt
1 tsp instant yeast

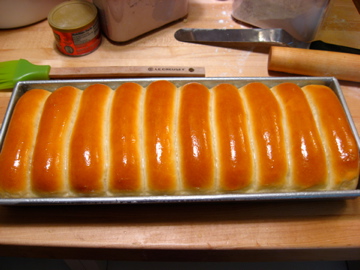
I followed the instructions on KAF's blog, but I divided the dough into 10 equal pieces, and in the shaping step, I rolled each piece out to a thin sheet and rolled them up into logs. Each log was placed into a groove in the pan:

Here they are, fully risen and just placed into the oven. A 3/4 recipe makes a pretty good amount of dough for the size of pan. The proper amount of kneading will allow this dough to triple, almost quadruple in size.

Immediately after taking them out of the oven, they were brushed generously with butter to soften the crust:

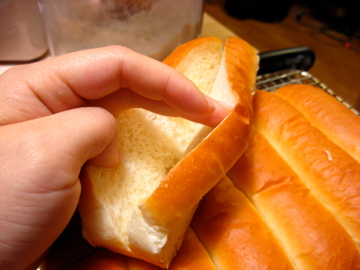
Just before eating, they were sliced apart and then slit in the middle, like so:

Toasted them on each side with a little butter

The crunchiness of the toasted surface went perfectly with the snap of the natural casing hot dog. The king arthur recipe is very rich, buttery, and sweet.

I love how these buns stand up so straight:-). I'm pleased with how this pan makes a bun that's not too big and not too small. One of my pet peeves is a hot dog that's drowning in a mountain of bread. Personally, I'm addicted to the toastiness of the New England style roll. I don't think I'll go back to regular soft hot dog buns. Was it worth the $25 to buy this special "unitasker?" I would say yes, but I just wanted a new toy. I'm thinking of it as a pre-moving gift to myself, before I make the great schlep from San Francisco to New Haven, CT.  Maybe there are other uses for it, too. Enchiladas?

There are 2 of us in this household, so the 10 buns give us enough for dinner and plenty for leftovers tomorrow. I'll probably use the remaining 6 buns to use up the leftover chicken meatballs in marinara and the leftover Italian sausage.

hanseata's picture
hanseata

Dinkel-Walnussbrot - Spelt Walnut Bread

This German 100% spelt bread is one of my most favorite loaves. When I bake it to sell to our natural food store, I always make one extra loaf for us.

This is made with a biga, but a sourdough would certainly be good, too. And, of course, you can also work just with the soaker and S & F.

I know many American find the idea of using bread spice quite outlandish, or even repulsive (thinking, perhaps, of the caraway overdoses in some Jewish ryes) - but PLEASE don't follow the old German adage "Was der Bauer nicht kennt, dass frisst er nicht" (= what the farmer doesn't know he won't eat") - at least TRY it with the anise and fennel. These spices are not predominant, but add a subtle very nice flavor to the bread.


DINKEL-WALNUSSBROT - SPELT WALNUT BREAD

SOAKER
47 g spelt chops                     (1.66 oz)
180 g spelt flour                     (6.35 oz)
4 g salt    (1/2 tsp.)                (0.14 oz)     
210 g buttermilk                     (7.41 oz)
 
BIGA
227 g spelt flour                      (8 oz)
1 g instant yeast  (1/4 tsp)       (0.04 oz)
170 g water                             (6 oz)
 
FINAL DOUGH
57 g spelt flour                         (2 oz)
12 g agave nectar or honey       (0.42 oz)
7 g salt                                    (0.25 oz)
3 g instant yeast                       (0.18 oz)
2 g anise seeds                         (0.07 oz)
2 g fennel seeds                        (0.07 oz)
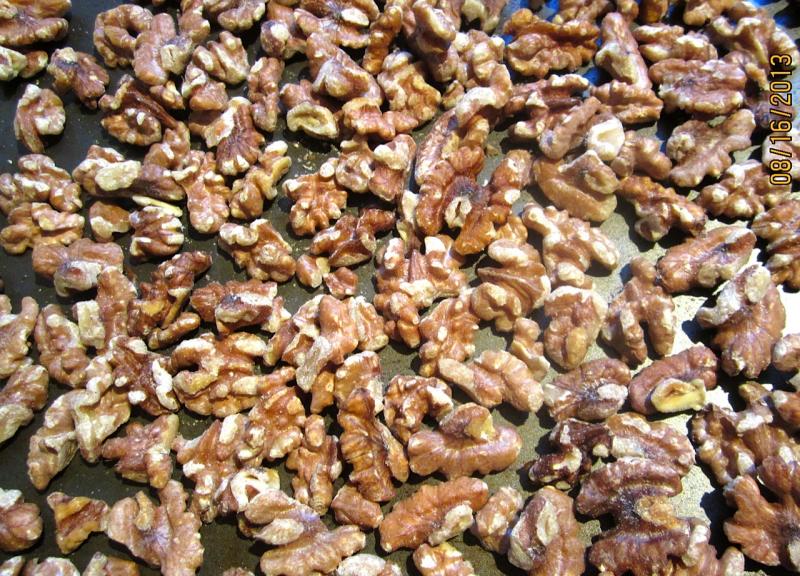
70 g walnuts, toasted and coarsely chopped  (2.47 oz)

The walnuts taste better when slightly toasted

DAY 1
In the morning, prepare soaker and biga. Refrigerate biga.

In the evening, prepare final dough: mix all ingedients (except for the walnuts) at low speed for 1 - 2 min., until coarse ball forms. Then knead at medium-low speed for 4 min., feeding the nuts slowly to the dough. Let dough rest for 5 min., resume kneading for 1 more min. (or work just with a soaker and S & F). Transfer to lightly oiled container, and place in refrigerator overnight.

DAY 2

Remove dough from refrigerator 2 hrs. before using.

Preheat oven to 425 F/220 C. Prepare for hearth baking with stone and steam pan.
Shape batard, place in banneton, and let rise to 1 1/2 times its original size. Turn out onto peel or parchment lined baking sheet. Slash.

Bake bread at 350 for 20 minutes, steaming with 1 cup of boiling water. Rotate 180 degrees, remove steam pan and continue baking for another 30 minutes (internal temperature should be at least 195 F, and loaf should sound hollow when thumped on the bottom)

Let cool on wire rack.

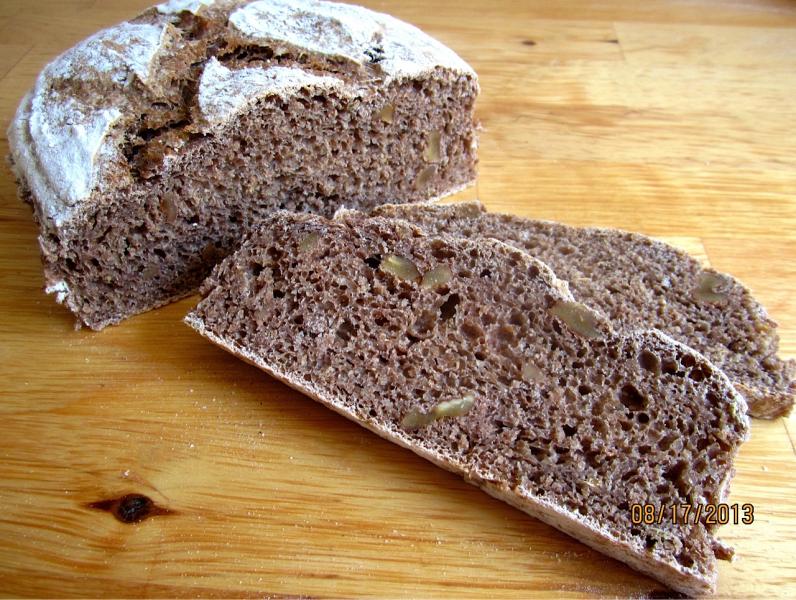
Walnuts dye the crumb to a dark, reddish brown

8/19/13 updated with new photos and some adjustments to the formula.


RonRay's picture
RonRay

Culturing, Growing and Baking with a Range of Wild Yeasts


This Forum Topic will hopefully provide a location for those interested in all forms of Wild Yeast. While certainly most of us are well aware of the sourdough type of wild yeast, many may be unaware that there are countless other useful wild yeast. I was recently introduced to a impressively large group of other wild yeast - As Akiko explained "In Japanese, we call it " MIZU SHU" -水種 (水ーWater 種ーYeast)".

With the help, translations, and veteran comments of RobynNZ and Mini Oven I had captured, grown, and baked bread from an Apple Water Yeast in 4 (four) days.

My first introduction came when Daisy_A suggested I might find a 2 year old TFL thread of interest, and I did find it fascinating. Wao started the thread here on TFL, but also has a very informative website devoted to original yeast water. Whether you call it Yeast Water, or Water Yeast is unimportant, but the process is rich with possibilities for those interested in expanding their choices in home bread baking with a variety of wild yeast levain.

If any of this sounds interesting, you might wish to look at these links, for starters (no pun intended):
http://www.thefreshloaf.com/node/6012/baking-natural-wild-yeast-water-not-sourdough
http://originalyeast.blogspot.com/
and most recently, where I got pulled into this interest area:
http://www.thefreshloaf.com/node/20460/banana-saga-%E9%95%B7%E7%AF%87%E6%95%85%E4%BA%8B#comment-141821

It was thus that Yeasty 雛菊 Yeasty 亜希子 Yeasty 雷朗書家
..........that is Daisy, Akiko, and I, considered starting this Forum Topic.

Ron 雷朗

************ Update Warning ********** 101122

Akiko (teketeke) mentioned to me something that I thought I should warn anyone trying to make yeast waters levains about. Certain fruits should not be used for yeast waters intended for leavening bread. They are those fruits (or vegetables) that contain Actinidain (or actinidin) kiwi, pineapple, mango and papaya. This protease enzyme breaks down protein. If you make a yeast water from these fruits, you can still use it as a meat tenderize, but NOT in your bread dough.

************ Update For Details on methods READ postings below ********** 110222

Or, start here:

   http://www.thefreshloaf.com/node/20693/culturing-growing-and-baking-range-wild-yeasts#comment-143857


dwcoleman's picture
dwcoleman

Gordon Family Cinnabon Cinnamon Rolls Clone Recipe

I found several postings mentioning their recipe, but their website is down(for good?).

Hopefully we can preserve it here at TFL.


Cinnabon Cinnamon Rolls Clone Recipe

Cinnabon's® World Famous Cinnamon Roll

Recipe By: Ron and Shallen Gordon
Serving Size: 15 Rolls
Preparation Time: 3 to 4 Hours
Categories: Baking, Bread, Muffins, Rolls, Sticky-buns

We've worked very hard over the past several years to develop an accurate clone or copy-cat recipe that you can prepare at home for Cinnabon®Cinnamon Rolls. The recipe below is not their recipe, but one we've engineered through extensive research, careful tests and much experimentation.We've improved upon our earlier recipe and after many test batches, we're convinced that this revised copy-cat recipe will enable you to recreate that wonderful taste!

You may wish to visit their Web site, The Cinnabon Experience, and review their wonderful presentation, The Cinnabon Story. There's some interesting information at their site, but alas, no recipe since the actual recipe is proprietary. Although several other Web sites claim to have the real recipe, we hope that you'll find that the one presented here provides the most accurate taste and appearance. We've made every effort to closely reproduce their results and clone that great cinnamon roll flavor!Judging from the many letters we've received from readers around the world who have used our recipe and achieved great results, we've evidently succeeded!

This recipe has been sized so that the dough may be prepared using a large capacity (2 pound) bread machine.


Dough

Amount Measure Ingredient and Preparation Method
1/4 Cup Water (2 oz)
1 Cup Whole Milk (8 oz)
1/2 Cup Butter, unsalted sweet cream, melted (0.25 lb, i.e. 1 stick)
1 1/4 ea Egg, Large Grade AA, well beaten
1 tsp Vanilla Flavor (preferably alcohol free)
1/2 tsp Salt (0.0075 lb)
1/2 Cup Sugar, preferably Superfine Granulated (0.224 lb)
4 1/2 Cup Unbleached White Bread Flour (1 1/4 lb)
1 Tbsp Vital Wheat Gluten (0.021 lb)
1/4 oz SAF Perfect Rise® Gourmet Yeast (1 envelope, 7 g)

Remove a large egg from the refrigerator and permit it to reach room temperature. Gently melt the butter. Add the Water and Whole Milk. The resulting liquid mixture should be permitted to cool so that it is between 75°F (24°C) and 85°F (30°C) before proceeding further. Then add the remaining ingredients, in the order listed above, to the bread machine and prepare using the dough setting. (Follow your bread machine instructions for dough preparation.)

To help you achieve the very best results, see also our additional notes on ingredients and preparation.


Filling

Amount Measure Ingredient and Preparation Method
1 Cup Light Brown Sugar, firmly packed (0.4255 lb)
5 Tbsp Cinnamon, Korintje Grade AA (0.0745 lb)
1/2 Cup Margarine (0.25 lb, i.e. 1 stick)

Remove the margarine from the refrigerator once you've started the dough cycle and allow it to reach room temperature. In a small bowl, mix the brown sugar and cinnamon.

After the dough cycle has completed, roll and stretch the dough out on a lightly floured surface into a 15" by 24" (38 cm by 61 cm) rectangle.

Cinnabon Rolls, ready to slice!Mark off 1" along the 24" edge of the dough, closest to you. You will not spread any Margarine or Sugar-Cinnamon mixture on this edge so that you can seal the roll. Spread the softened Margarine over the dough with a rubber spatula and then evenly distribute the Sugar and Cinnamon mixture.  Be careful to leave your 1" edge clean. As a final step, use your rolling pin to lightly roll the Sugar and Cinnamon mixture.

Starting at the far edge of the dough, roll it up tightly.  Begin at the far edge and roll up the dough toward the 1" clean edge. The clean 1" edge is used to seal the finished roll. Trim the left and right ends of the roll. The result will be a 24" roll. Trim off the left and right ends of the roll so that you have a flush end at each end of the roll. Then mark the roll every 1 1/2 inches (3.8 cm).  Cut the roll into 1 1/2" long portions. This may be done with a knife, as they do at the store. However we've found it easier to use dental floss. (We use cinnamon flavored dental floss just for dramatic effect!) Cutthe roll by placing the thread under the roll at your mark, crisscross over and pull it to cut. You should get 15 rolls.

Line your baking pans with parchment paper. Place 5 rolls into 8" square baking pans 1" apart. (One roll in each corner, and one in the center.) Cover with a lint free cloth and let rise in a warm, draft free place until almost double, approximately 1 hour. After rising, rolls should be touching each other and the sides of the pan. This is important for best results. This gives the resulting rolls the soft, moist outer edge that most people prefer.

After rising, bake in a convection oven at 310°F for 15 minutes. If you are using a conventional oven, bake at 335°F for 20 minutes. The resulting rolls should be only lightly browned. We bake only one 8 inch square pan of rolls at a time to obtain uniform results.


Cream Cheese Frosting

Amount Measure Ingredient and Preparation Method
4 oz Cream Cheese (0.25 lb)
1/2 Cup Margarine (0.25 lb, i.e. 1 stick)
1 3/4 Cup 10x Powdered Sugar (or Sugar Fondant) (1/2 lb)
1 tsp Vanilla Flavor (preferably Alcohol Free)
1/8 tsp Lemon Flavor (preferably Alcohol Free)

There are several steps involved in the preparation of the frosting. But it is not difficult, and you'll be surprised at the wonderful results you achieve. For the fluffiest frosting, use Vanilla and Lemon flavors that do not contain alcohol. A total of 50 minutes is required to prepare the frosting, from start to finish. We normally prepare the frosting while the rolls are rising.

Generally, we use 10x Powdered Sugar. However, Sugar Fondant yields a smoother frosting. Please refer to our notes.

Remove the cream cheese and margarine from the refrigerator and place it into the mixing bowl. Leave it for about half an hour so that it will not be too cold.

Use the Flat Beater (or Paddle) to blend the cream cheese and margarine for 6 minutes. Use a speed of 65 RPM, or the "slow mixing" speed on your machine. We use setting #2 on our KitchenAid Mixer.

Switch to the Stainless Steel Whip and whip the cream cheese and margarine mixture for 10 minutes. Use a speed of 150 RPM, or the "medium fast whipping" speed on your machine. We use setting #6 on our KitchenAid Mixer.

Add 1 cup of the powdered sugar and mix for 1 minute using the Stainless Steel Whip at 65 RPM. Add the remaining 3/4 cup of powdered sugar and mix for an additional minute.

Lastly, add the Vanilla Flavor and Lemon Flavor and whip for 1 minute using the Stainless Steel Whip at 150 RPM.

Here's an easy to follow table for the preparation of the frosting:

Add Cream Cheese and Margarine to mixing bowl and let stand for 30 minutes.
Mix using Paddle at 65 RPM for 6 minutes
Use Stainless Steel Whip at 150 RPM for 10 minutes
Add 1 Cup Powdered Sugar.
Use Stainless Steel Whip at 65 RPM for 1 minute
Add 3/4 Cup Powdered Sugar.
Use Stainless Steel Whip at 65 RPM for 1 minute
Add Vanilla and Lemon flavors.
Use Stainless Steel Whip at 150 RPM for 1 minute

Transfer the finished frosting to a convenient covered container and refrigerate it. Once the rolls are finished baking, frost them while they're still very warm and serve them immediately. Yum, yum!


dmsnyder's picture
dmsnyder

Tom Cat's Semolina Filone from Maggie Glezer's "Artisan Breads"

Tom Cat's Semolina Filone

Tom Cat's Semolina Filone

Tom Cat's Semolina Filone Crumb

Tom Cat's Semolina Filone Crumb

Tom Cat's Semolina Filone

Poolish
Instant yeast     Disolve 1/4 tsp in 1 cup of 110F water. Use 1/4 cup of the resulting suspension.
Water               135 gms (in addition to the above 1/4 cup)
Flour                 150 gms of King Arthur AP (or 75 gms lower-gluten AP and 75 gms Bread Flour)

Dough
Durum Flour           250 gms
AP Flour                 50 gms
Water                    205 gms
Instant Yeast         1/4 tsp
Poolish                  All of the above
Salt                      9 gms
Sesame seeds       About 2 cups

Procedure
The night before baking, mix the poolish and ferment 8 hours, covered tightly.

The day of baking, combine the flours and water, mix and autolyse, covered, for 15-60 minutes. Mix the yeast with the poolish and add to the autolysed dough for 5 minutes. The dough should clean the sides of a stand mixer, according to Glezer. (But it didn't, even with 3-4 T of added AP flour.) Sprinkle the salt on the dough and mix for another 2 minutes. The dough should be sticky but not "gloppy." (The dough was what I'd call "gloppy," even with mixing another 10 minutes at Speed 3 on my KitchenAid. I decided to proceed anyway.)

Scrape the dough into a bowl 3 times its volume, cover and ferment for 2-3 hours, folding every 20 minutes for the first hour. (The dough started coming together better after a short time and was still sticky but smooth and puffy after 2 hours in a 75F kitchen.) Preheat the oven to 400F and prepare your steaming apparatus of choice. Scrape the dough onto your bench and preform it into a boule. Let it rest for 20-30 minutes to relax the dough, then form it into a batard.

Roll the loaf in seseme seeds and place it, seam side up, in a linen or parchment couche. If using a parchment couch you will bake on, place the batard seam side down.) Cover it well and allow it to expand until quite puffy. (Glezer says this should take 30-60 minutes. My dough was very puffy, and I shaped it very gently to retain the bubbles. I let it proof for 20 minutes only before proceeding.)

Roll the batard onto parchment (If using a linen couche). Spray with water and score with one cut from end to end. (I cut holding the knife at and angle to get a nice "ear" and "grigne.")

Transfer the batard to the oven and bake with steam for 15 minutes, then continue to bake another 30 minutes or so until the bread is well-cooked. (Golden-brown color, hollow thump on the bottom and internal temperature of 205F.

Cool completely before slicing.

Comments
I have made 3 other semolina breads, but this was the first time I used fine-ground Durum Flour. The recipe is Tom Cat's Semolina Filone from Maggie Glezer's "Artisan Breads."

I used all King Arthur AP flour, as Glezer says this has the desired gluten level for this formula. I found the dough to be much wetter than I expected. I did add extra flour, as she says one might have to, but it remained a very wet dough. I was concerned it might be quite impossible to form a real batard, but, after the stretch and folds and 2 hours total fermentation, the dough behaved much better than I anticipated. It did have to be handled very gently, but I'm learning to do that.

I was also surprised how well this soft, puffy, wet dough took my cut,and the oven spring and bloom were phenomenal.

I think the result was a quite attractive loaf, and the crumb was even more open than I expected - a real "rustic"-type crumb. The texture and taste of this bread are both outstanding. The crust is crunchy with a prominant hit of toasted sesame seeds. The crumb is very soft and tender with a cool, creamy mouth feel. it has a definite semolina flavor that is most often described as "nutty." I don't know what kind of nut it's supposed to taste like, but it tastes really good.

I have been a little disappointed in the taste and texture of the other semolina breads I've made. I've not made any of them more than once. Maybe the durum flour makes the difference. Maybe it's Tom Cat's recipe. Maybe my skills in handling dough have advanced. Whatever. I'll be making this one again, for sure!

David

BrotBoy's picture
BrotBoy

Converting a recipe that uses Instant yeast to a sourdough starter recipe

Can anyone tell me... Is there a simple approach to convert  a recipe that uses commerical yeast to a sourdough starter , I have been very happy with the sourdough starter that i am using  and now want to convert more recipes to this style of bread making,

  Looking forward to some ideas

 Brotboy


bwraith's picture
bwraith

Sourdough Bagels Revisited

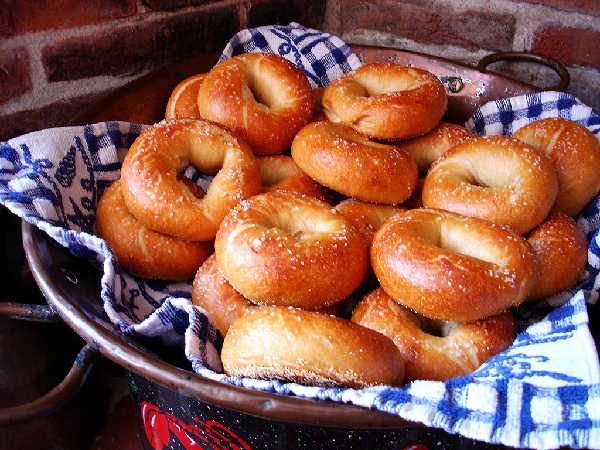
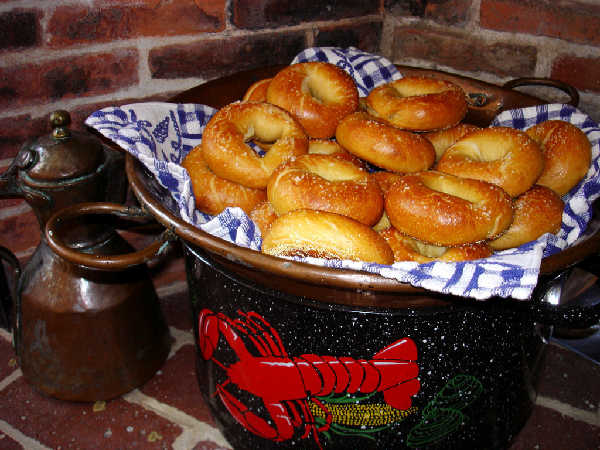
Many thanks to Susanfnp for posting a great sourdough bagel recipe based on Nancy Silverton's bagel recipe. She also provided a number of key tips as I made these. I posted photos of the first time I did these, and now I have some photos of my second attempt, as well as a spreadsheet with more details such as bakers percentages and preferment percentages.

Sourdough Bagel Recipe (revisited version)

Ingredients:

  • 335 grams (12 oz) 90% hydration white flour starter
  • 20 grams (0.6 oz) sugar
  • 12 grams (0.4 oz) malt syrup
  • 14 grams (0.6 oz) salt (I made salt bagels, so the salt in the dough is reduced to avoid too much salty flavor. Use 17 grams salt normally)
  • 2.8 grams (0.1 oz) instant yeast
  • 359 grams (12.5 oz) water
  • 186 grams (6.5 oz) first clear flour (I used KA First Clear Flour. Substitute a high ash or whole grain flour - maybe rye, whole wheat, Heartland Mills Golden Buffalo, or just use white flour)
  • 587 grams (20.5 oz) high gluten flour (I used KA Sir Lancelot High Gluten Flour. Substitute bread flour or other high protein white flour.) This time I corrected an error in the previous version and made the hydration lower, probably around 56%, which unexpectedly made the bagel dough stiff enough that it was a bit more difficult to shape the bagels. However, I used Susanfnp's suggestion to spray the surface of each 3 oz piece with a fine mist before shaping. This makes a world of difference.

Mix Dough - Day Before Baking

I had to mix and knead these by hand, since I have no mixer in this house. While reading the Nancy Silverton recipe, the idea seems to be to get a very stiff dough. I mixed all the dry ingredients in one bowl. I mixed the water, levain, and malt syrup in another bowl and then poured the wet mixture into the dry ingredients. Using a dough scraper I worked around the bowl a few times to get the ingredients initially mixed. I then vigorously kneaded the dough, using a traditional squeeze and fold kneading technique. This was not so easy with the stiff dough, but after about 5 minutes, the dough started to become elastic and fairly smooth, even if very stiff. After a few more minutes, the dough seemed fairly similar to what I had with the mixer in my first attempt at this recipe, documented in a previous blog entry. Since the dough is so dry, there is no need for dusting the counter with flour. In fact, you should avoid any extra flour, as the dusting can interfere with the smooth sheen of a proper bagel.

Shaping

Divide the dough into about 18 3 ounce pieces. Since the dough is so dry, it may develop a dry skin fairly quickly, so proceed smartly to the shaping stage. Don't dilly dally at this point, as the dough pieces will become too puffy quickly if they are allowed to sit at room temperature for very long. However, the pieces need to rest a short time, maybe 5 to 10 minutes, so that the gluten will be relaxed enough to shape the bagels.

I was more experienced and faster at shaping this time. The first batch of nine was placed on a jelly roll sheet, and immediately refrigerated. I discovered the next day that the first batch needed to rest on the counter for about 1/2 hour to ferment enough to come to the surface while boiling. The second batch, which had risen a while longer, was ready for boiling immediately out of the refrigerator the next morning.

If you have a fine mist spray (I have an atomizer meant for olive oil that I use for water), you can make shaping easier and avoid the dry skin, particularly on the pieces you shape last, by spraying a tiny amount of water on the pieces before you shape them.

To form the bagels, roll out an 8 inch rope shape with your palms. If the dough is too stiff or you make a mistake and want to start over, let that piece rest a few more minutes, and move to the next piece. Take the 8 inch rope and hold it between your palm and your thumb. Wrap the rope around your hand and bring the other end together with the end you are holding between your palm and thumb. You now have a "rope bracelet" wrapped around your hand. Rub the seams together on the counter to seal them, then take off the bracelet, which should look a lot like a bagel, hopefully. Stretch it out so you have a large 2.5 inch hole. It looks big, but it will shrink or even disappear as the dough rises during boiling and baking. The hole needs to be big looking compared to a normal bagel.

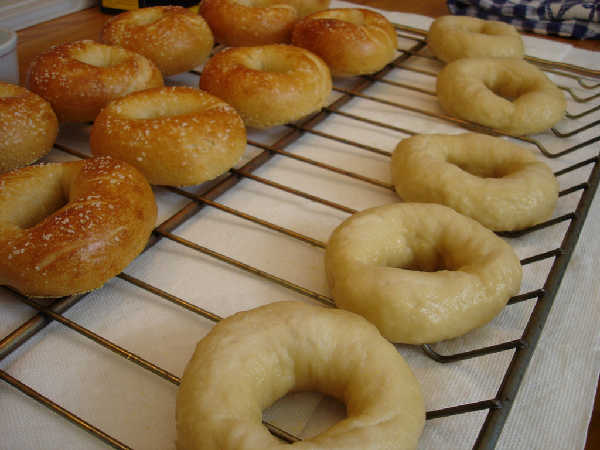
Place the bagels on parchment dusted with semolina flour on a sheet.

This time I used coarse corn meal, as I had no semolina available. This worked fine and seemed to make no difference to my results.

Cover with saran or foil or place the whole sheet in an extra large food storage bag (XL Ziploc is what I'm thinking here). The idea is to lock in moisture to avoid any dry skin forming yet allow room for some slight expansion as they puff up. Place the sheets in the refrigerator to retard overnight.

Boiling

Bring 5 quarts of water and 1 tablespoon of baking soda in a good sized stock pot to a boil. Place a bagel in the pot and make sure it floats to the top. If so, you can do 4-6 bagels at one time. They should only be in the water for about 20 seconds. Push them under periodically with a wooden spoon, so the tops are submerged for a few seconds. In my case, I never managed to get the bagels out before about 30 seconds were up, but they came out fine. If the test bagel won't float, lift it out with a slotted spoon, and gently place on a rack to dry and allow the bagels you have removed from the refrigerator (I did 6 of them at a time) to sit at room temperature for about 20 minutes and try again.

In fact, the batch I had shaped first the night before did sink to the bottom when I tested one. So, I left the first batch out for about 1/2 hour before it was ready. I then put them back in the refrigerator, since the baking and boiling process for the other batch was extending beyond 1/2 hour. I could tell the first batch was beginning to be ready, since I could detect a very slight puffiness in them after 1/2 hour.

The first batch floated immediately out of the refrigerator, probably because my second batch were formed and shaped after a rest of about 20 minutes while I was working on the first nine the previous night. Except for letting the first batch rise on the counter for 1/2 hour, I kept the bagels waiting to be boiled in the refrigerator to avoid any excessive rising. If you let them rise very much, they will puff excessively and become more like a bun than a bagel.

Dip in Seeds

Make plates of seed beds. I made three seed beds. One was 2 parts caraway seed, 1 part anise seed, and a pinch of salt. Another was 2 parts dill seed, 1 part fennel seed, and a pinch of salt. The last was poppy seed and a pinch of salt. I also made salt bagels, but those were done by just sprinkling a little kosher salt on some of them with my fingers.

Right after the bagels are removed from the boiling water with a slotted spoon, place them on a rack to cool for a few seconds. After they have cooled of slightly and dried enough not to ruin the seed bed with too much wetness, pick one up and place it round side down (the tops down), and gently press them into the seed bed. Pick them up and place them right side up on a sheet lined with parchment paper and dusted lightly with semolina flour or coarse corn meal.

This time I made only salt bagels. It wasn't convenient to get seeds, and my kids and I both love the salt bagels anyway. I just sprinkled a very, very light layer of kosher salt on them with my fingers while they were sitting on a rack just after they were boiled. The salt sticks to the wet surface, so you don't need to do anything but just sprinkle the salt on them. Careful, you can definitely put too much salt on them, even if you use a somewhat smaller amount of salt in the dough, as I did in this case.

Baking

Preheat the oven to about 400F. No preheat may work, but I'm not sure. It seems easy, from my limited experience, for them to rise too much. The result will be an open bread-like crumb, instead of the very chewy, more dense crumb expected in a bagel. So, I didn't risk a no-preheat strategy in this case.

If you have a stone, you can transfer the parchment paper on a peel to the stone and bake directly on the stone. I baked them for about 20 minutes at 400F. You can also bake them on the sheet.

Cool

Allow the bagels to cool.

Results

The bagels were chewy and delicious, as they were last time. However, I think the lower hydration was a definite improvement. I succeeded in getting a stiffer, drier dough this time. They had less tendency to rise excessively, even though I let them sit on the counter a little longer than last time. The resulting crumb was a little more dense and seemed just like the real thing this time. Last time, the slightly higher hydration gave me a slightly more open crumb, which seemed just a hair too soft and open like ordinary bread. This time, the crumb was dense and chewy and just right for a bagel.

Pages