Sourdough Ciabatta
Sourdough Ciabatta
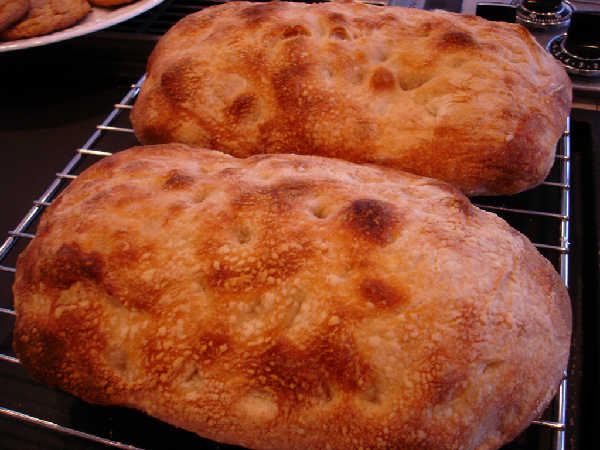
 Sourdough Ciabatta Crust: Sourdough Ciabatta Crust
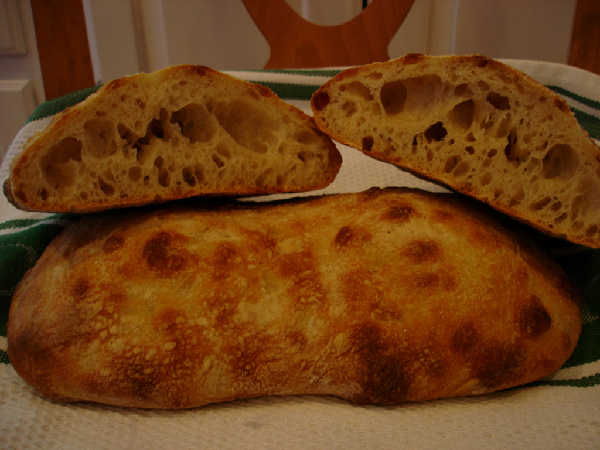
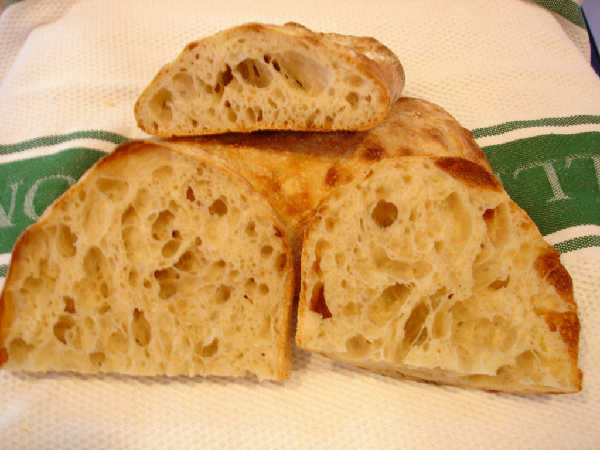
 Sourdough Ciabatta Crumb
 Sourdough Ciabatta Crumb (lengthwise slice)
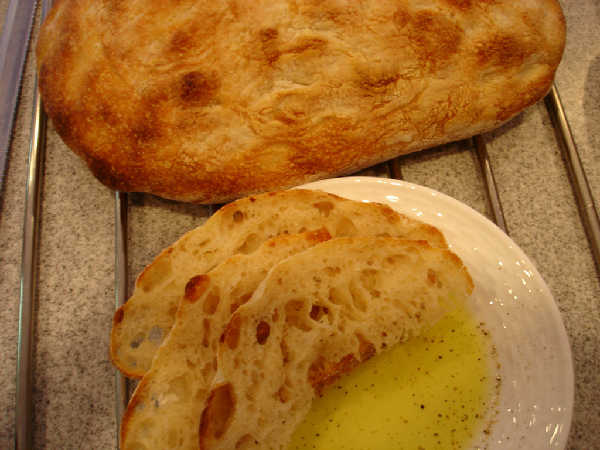
 Sourdough Ciabatta w/Olive Oil
One of the favorite family breads seems to be ciabatta, and this sourdough version is clearly preferred (wolfed down) by my kids for its flavor. I've achieved a little better crust and crumb with yeasted versions, particularly the one in Maggie Glezer's "Artisan Baking", but the sourdough flavor is hard to beat, especially with salty grilled left over meats in sandwiches. The recipe is loosely based on the BBA (Reinhart) "Poolish Ciabatta", as well as incorporating ideas from Maggie Glezer's version in "Artisan Baking".
This is a work in progress, but I like the way this one turned out. The flavor is a little mild, which may mean I need to lengthen and/or retard the fermentation, or maybe use somewhat more ripe starter, an exercise for future attempts.
Many thanks to various contributors to this site as always, and especially in this case to Zolablue, who encouraged me to pay more attention to ciabatta with some just great photos and discussions about how to achieve better holes in ciabatta through hydration, proper handling, and flour choice, all of which were used here.
Photos of process have been posted for this ciabatta and a sourdough raisin focaccia I made at the same time. A spreadsheet is also posted showing weights in ounces or grams.
Starter:
- 16 oz BBA style barm fed w/KA organic AP flour (1:1 by weight flour:water)
The day before this bread was baked, I took my "BBA style barm", a 100% hydration starter fed with KA Bread Flour, out of the refrigerator. I fed it 1:2:2 (starter:flour:water) three times over the course of the day at room temperature, which refreshed the starter and built enough starter for this recipe, the sourdough raisin focaccia I also made the next day, as well as some left over to return to storage in the refrigerator. The larger amounts were made by feeding with KA organic AP flour, to convert to KA organic AP flour, a choice of a slightly lower protein flour that should be good for irregular, large holes and artisan style bread.
Dough:
- 16 oz 100% hydration starter using KA organic AP Flour
- 15 oz KA organic AP Flour
- 2 oz KA Rye Blend Flour
- 12 oz water
- 0.5 oz salt (14 grams)
Autolyse:
Mix the flours and water together in a bowl (I used a dough hook for this). Let sit for about 30 minutes.
Mix:
Mix flours and water above with the 16 oz of starter, 0.5 oz salt, and mix for a couple of minutes - just long enough to thoroughly mix the starter and salt with the flour and water from the autolyse step. The dough should be quite "wet", meaning it will not clean the bottom or even much of the sides of the mixer bowl. It should be fairly sticky and already have a fair amount of gluten development.
Bulk Fermentation and Folding: (about 4.5 hours)
Make a fairly thick bed of flour on the counter about 12 inches square. Using a dough scraper, pour the dough out into the middle of the bed of flour. Allow it to rest for a few minutes. Then, fold the dough by flouring or wetting your hands, then grabbing one side of the dough and lifting and stretching it, folding it over itself like a letter. Do this for all 4 sides. Brush flour off the dough as you fold over the sides that were in contact with the bed of flour. You don't want to incorporate much flour into the dough as you fold. After folding, shape it gently back into a rectangle or square, spray it with a light coating of olive oil or some other oil spray, and dust very lightly with flour. Then cover it with plastic wrap, and drop a towel over it. If the dough seems a little stiff at this point, it unfortunately probably already doesn't have enough water in it. You can put it back in the mixer and add 1 oz of water and try again. Or, soldier on and adjust your water next time. Repeat the folds approximately every 45 minutes two more times. If the dough seems very resistant to stretching, only fold it from two directions instead of four. You don't want the dough to get really stiff from too much folding. The amount of folding you will need will be more if you have more water and less if you have less water. Note that even an ounce can make a very big difference in the consistency of the dough. After three folds, let the dough rise for another 2.5 to 3 hours, at which point, the dough should have doubled roughly in volume. Use the "poke test" to get a feel for how long to continue the bulk fermentation.
Shaping:
Divide the dough into four pieces of equal size, roll them in the bed of flour to dust the cut ends, and let them rest a few minutes. To shape, take one of the four pieces, stretch it out and roll it or fold it over itself very gently. With ciabatta this amounts to a gently stretch and fold like a letter. You want to create some tension in the surface of the dough by folding it over itself that way, then if you place the dough folds down on a couche, it will seal up the seams. Use the couche to create folds for the ciabatta and then nestle the folds between supports, such as bags of flour or whatever system you may have similar to what you might do for baguettes.
Final Proof:
Let them rise in the couche for about 2.5 hours, until they are puffy and have increased significantly in volume.
Prepare to Bake:
Preheat oven to 500F (yes, you can probably do it without preheating, as mentioned elsewhere on the site, but it's not what I did this time). While that is going on, take each loaf out of the couche, gently stretch it in one direction by about double, lay it on a peel, maybe with parchment paper underneath, maybe sprinkled with corn meal or similar, and use your fingertips to flatten out the loaf. You can press down fairly firmly to feel the peel underneath. It sounds crazy, but the loaf will bounce back just fine in the oven if it is not overproofed. This step is important to avoid "separation of crust and crumb" or "one gigantic hole" instead of many holes. It also evens out the loaf so it has a nicer shape after baking.
Bake:
Place loaves in the oven and lower temperature to 450F. Bake for about 13 minutes, until the internal temperature is around 207F (I'm near sea level), rotating them after about 9 minutes. You can bake them longer to get a darker, harder crust. Actually, I think this KA organic artisan AP flour may benefit from a little bit of added diastatic malted barley flour, as the breads I baked with this flour today were more pale than previous results with KA AP or KA Bread Flour combinations. I don't think I overproofed them, but maybe that's a factor. The loaves should spring up from their "flattening" with your fingertips, such that not much evidence is left of the dimples you made with your fingers.
Cool:
Let bread completely cool, if you can stand to wait.
This bread is especially good for sandwiches, sliced in half and then sliced along the "flat" direction to open up like a hamburger bun. It is great for burgers, steak sandwiches, ham, or just with olive oil and pepper.


Comments
Hi Da Crumb Bum,
When you say it proofed for 3 hours, do you mean bulk fermentation or final proof or both? I've had a lot of trouble knowing just how long to run the fermentations, since I've only done it as a pure SD this one time myself. How long did each part of the fermentation run in the two above? Also, did you take relatively young SD starter and refrigerate it overnight? To me, they look a little bit like mine used to when I used a larger percentage of starter in the dough. I used to use 50% flour contributed by the starter and added 1 tsp of instant yeast to get them to rise. However, my results above used no instant yeast, but the percentage of flour contributed by the starter is more like 30%. Anyway, sorry, I'm not sure what could be the issue, other than how old the starter is. The only other thing I can think of is if the couches have too much flour in them? Sorry, just clutching at straws here.
Bill
What don't you like? The dusty crust? That's just flour. Either mist it good with a sprayer before going in the oven or take a stiff brush to it when it comes out. Sometimes I stand my cooling rack directly over the sink and use my "Bread Brush" and then there is always the buttered pastry brush on hot bread trick but that will also soften the crust. Anyone try spraying or brushing a cold loaf with olive oil?
Wow Zolablue, great looking bread, great photos, I think you've discovered your calling. Throw these photos into your portfolio! Did you put anything onto your crust? --Mini
I just threw 200g old starter into my bread and yeasted it. One kilo in the making! If I rub the pictures, will something rub off? Wish me luck... :)
Hey Bill
Bulk Fermentation was approx. 4.5 hours. Three hours was the final proof for the one on the left. Almost five for the one on the right. My starter is well established and was refreshed three times before use. I did make a 60% firm starter using 284g of flour in the starter yours used 227g. I make the firm starter, let it show a good sign of rise and fridge it overnight. Its weird, the one on the left baked and browned as usual. The one on the right had that dull look and never did brown up well. I even left it in the oven an extra 10 min. I did brush the excess flour off before dimpling. The bottoms of both breads look similar though the one on the right is a little darker. All were baked using the cold start method. I know it sounds as if I am nit picking but I was suprised at how different the appearances of the two were considering the only difference was an extra 2 hours proofing. I will be making this again for sure.
Da Crumb Bum
Da Crumb Bum,
Thanks for all the extra info on your process.
I do have some similar things going on. I noticed in my other version that I just blogged, that the loaves that only proofed for an additional 1/2 hour didn't spring as much, and they had a creamier crumb but a more pale crust.
I think one reason the right conditions aren't easy to figure out for this recipe, is that the window for success may be small. On the one hand you want a good strong culture to make all those big bubbles. At the same time, the gluten can't be too stiff or the bubbles won't stretch and grow. On the other hand, the gluten can't get too beaten up by the rising acid levels in the dough, or it will start to leak and stiffen so you get no oven spring, and you also need some sugar left over for the crust. That means it can't run too long and it can't run too short or you lose some of the key characteristics of the bread, like the big holes, the big rise, or the dark crust.
I have to guess that if you did everything the same, then 4 hours would be right for the proof. The fact I get different results over just 1/2 hour in this latest version could mean that there is a lot going on between 3 and 5 hours (using your timing).
I'm not sure why yours runs a little longer than mine, i.e. my proof was only 2.5 hours, and yours was 3-5. It's tricky to compare my new version, since I ran the bulk fermentation at about 78F in the new version, so it ran shorter because of that.
Sorry, just thinking out loud and hoping one or another of these things will help next time.
Bill
I have no earthly idea why it comes out that way - call it luck, so far. What I have learned is that my loaves were not turning out quite so well when I stopped steaming. Glezer states it is a waste of effort and oven heat to do repeated mistings at the beginning but I've tried it both ways and I do think misting at first helps. Having said that, I need to do a lot more baking to learn for sure.
I have small ovens - one gas and one electric, which would be another good discussion because I've baked the exact loaves at the same time, same temp and gotten remarkably different results. However, I digress. I have smaller ovens - their interior measurements are 15 1/4 W x 12 H x 18 D and they are equipped with sliding heavy metal drip trays that I simply have placed on the bottom of the ovens since they are not self cleaning. But I found they work perfectly for pouring a cup of hot water into right after I place the loaves on my also smaller baking stone. I then wait 30 seconds and spray the sides of my oven and repeat that 1 or 2 times at 30 second intervals and then keep the door shut for at least ten minutes.
I should have mentioned that I preheat the baking stone at least an hour prior to baking. I preheat the oven always at 500 - 550 degrees. Once I first put the loaves in I leave it at that high temp because the steaming and opening the oven door really cuts the heat. Once 10 or 15 minutes have passed I check the bread and check my oven thermometer and make any adjustments necessary to make sure the temp holds at the proper baking temperature. Oh, and if I've loaded it with a piece of parchment I always yank it out half way through if not before but I don't think that matters.
Bill, your creation is truly inspiring, and I have spent the better part of the last two weeks wanting a ciabatta like yours.. to no avail.
Eventually, I settled on a all-white sourdough version and I got the crumb that is somewhat in the league, but still does not compare. Nevertheless, I have decided to post. I like this version more than the rye addition, as the dough lost its stickiness once I introduced the rye flour. As a result, the crumb was way denser than what I expected. Here, at least, I get some of the air I was so counting on!
Just curious why you use AP instead of bread flour...?
I don't remember, to be honest, what I was thinking at the time. However, as a general comment, the lower protein flour could create a different dough texture and maybe I was experimenting. Also, certain AP flours like some of the King Arthur products or Wheat Montana products have a higher more bread-like protein content. Maybe that was the flour I had on hand at the time? What this may tell you is that the process wasn't that well thought out, lol.
Am I safe in saying that you would recommend using bread flour then? I started making Jason's Ciabatta bread in my kitchen aid mixer with commercial yeast. But now I want to switch to a sourdough version and do it by hand. You bread looks really nice. I want those blisters on my Ciabatta too.
I would say bread flour will work fine. The KA Organic AP flour I was using at the time had a fairly high protein content for an "AP" flour, so it was probably not that different from a typical "bread flour". As long as the protein content is in the region of 12% +/- 1%, it should work well on any type of hearth bread. Probably the hydration is the important variable, assuming you have reasonable protein content in the flour. Generally a sloppier, wetter dough should result in the irregular holes and blistering that will happen more in a high hydration dough that is allowed to ferment long enough for the gluten to begin to break down a little. After that, there is the issue of possibly adding a touch of barley malt syrup, if it looks pale and washed out from the fermentation, and adjusting the hydration down a little or the rise time down a little, if the fermentation seems to result in the dough breaking down too much.
Pages