Sourdough Whole Grain Sandwich Loaf


Sourdough Whole Grain Sandwich Loaf
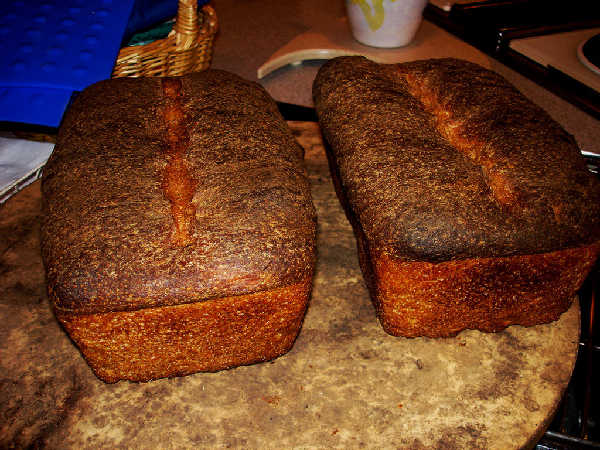
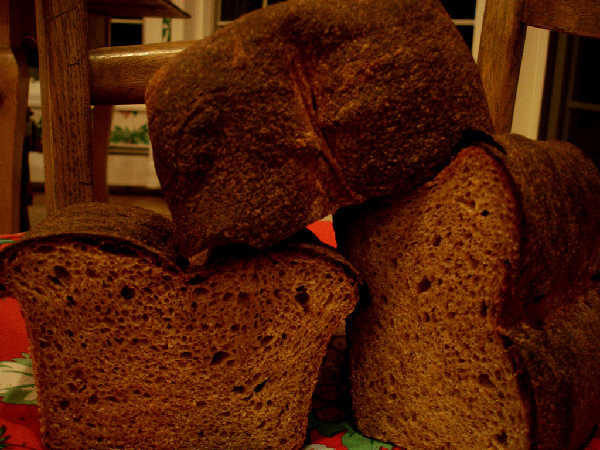
I finally decided to give a try at an (almost) whole grain sandwich loaf. Admittedly I didn't switch my starter over, but I only have a few percent of the flour contributed from the white flour starter. Many thanks to all the contributors to thefreshloaf.com, including at least JMonkey, ehanner, mountaindog, browndog5, Srishti, zolablue, sourdough-guy, sourdolady, tomsbread, and breadnerd for the very useful pointers on handling of whole grain breads. I didn't quite do justice to the good information, as you can see, but the crumb is certainly open enough, light enough, and soft enough, as well as having a nice flavor. I was happy with these results for a first try. I definitely overproofed them, partly because the cooler with warm water technique for the final proof was very effective.
I've included a few additional photos, although I didn't photograph the whole process this time. I also included a spreadsheet with weights of ingredients in ounces, grams, and baker's percentages.
Ingredients
Recipe Starter
- 142 grams 100% hydration starter (I used a white flour starter)
- 227 grams whole spelt flour
- 113 grams water
Dough
- 40 grams malt syrup
- 4g diastatic malt powder
- 581 grams water
- 397 grams red whole wheat (I used KA organic WW Flour)
- 57 grams rye (I used KA rye blend, but substitue with WW flour if you want)
- 170 grams white whole wheat (I used KA Organic White WW Flour)
- 17 grams salt
- 28 grams olive oil
Mix
The night before you plan to bake, mix the starter ingredients, and knead them for about 2 minutes to make a dough out of them. Let rise in a covered container for about 4 hours at room temperature until doubled and refrigerate overnight.
Also the night before you plan to bake, mix the malt syrup, diastatic malt powder, water, and all the flours and place in a covered container. Refrigerate overnight.
The next day, cut the starter into small cubes. Spread the refrigerated mass of flours, water, and other ingredients out on the counter and press the cubes into the mass. Sprinkle the salt and oil over the mass. Press the heels of your hand into the mass to force the ingredients to mix well. Roll up the mass and knead a few times to further mix the ingredients. You can then spread the mass out again and press it flat and then roll it up. After 2 or 3 repetitions of spreading out, pressing flat, and rolling up the mass, the ingredients will be well incorporated and the mass will seem more like a dough. It will be very sticky, but if you keep the counter surface, the dough surface, and your hands wet, it is not difficult to handle.
Bulk Fermentation
Place the dough in a rising bucket. Every 30-60 minutes for the first couple of hours, turn the dough out on the counter and fold it. After a few folds, just let it rise until it has doubled. The dough should double in volume in a total of about 4 hours at room temperature. The idea is to do enough folds to get the dough feeling elastic and resilient, but not so many that it begins to feel very stiff and loses its elasticity.
Shaping and Final Proof
I shaped according to JMonkeys video. The dough should be split in two, formed more or less into batards, and placed in two loaf pans approximately 9 inches long. To form the batards, just lay one of the two halves of the dough out in a long rectangle and roll it from the short end, stretching the outside surface as you roll it. You may want to tuck some of the end of the roll in toward the center a little as you roll it up. Seal it and tuck the ends under, and place into the pans with the nice, stretched surface up. You can put a little oil on the surface of the loaf to protect it from drying out. Place the pans in a warm humid place to rise. I put them in a cooler with a bowl of warm water next to them. Allow them to rise by approximately double or a little less.
Unfortunately, the temperature was very warm in my garage, where the cooler was, probably around 85F. I let them go for 4 hours and then realized they were way overproofed. The result was no oven spring. I shouldn't have slashed them and just put them in the oven. You can see what happened in the photos. I think if I had stopped the final proof at about 2 hours at 85F, I would have had a better slash with oven spring and so on. I know I'm getting close to figuring this out, as the loaves still had a flavorful, open crumb.
Bake
I baked these starting in a cold oven for about 45 minutes at 425F.
Cool
Once the loaves have cooled for a minute or two, remove them from the pans and allow them to cool on a rack.


Comments
Wow, sourdough whole wheat sandwich loaf! Yummy looking crumb! I wish I had the time to bake as often as you ! You didn't describe the flavor..I guess I needn't ask..: )
Paddyscake,
The malt syrup might have been a little much, and it turned out just a touch more sour than I like, probably from letting it overproof at a higher temperature. The spelt in the starter does give it a slightly sweet nutty flavor, recognizable from those German breads from previous blog entries. I've decided I like spelt as a flour for the recipe starter in sourdough breads with whole grains. Overall, I'm very happy with the flavor. The crumb texture is very soft, which surprises me.
I think next time I'll go with a tiny bit of honey, less or no malt syrup, about half the olive oil, and somewhat shorter rise times and final proof. I think what this boils down to is that the flavor and texture of the miche I've been doing has become a stalwart favorite, and I'm having a hard time with textures any softer or flavors any more grassy or bitter than what I get with the miche recipe.
Bill
And before I comment further, please note that I am a sourdough whole grain virgin so I certainly can't take credit for helping you at all on that note. I have been struggling mightily over the past few days to find sources that I can understand in order to proceed with my own WW sourdough. Alas, I find bits of incredible information in many places but not altogether in one spot so it is like putting together a puzzle. As a new bread baker I am so grateful to your very inclusive and informative posts.
Your bread looks delicious. I am so intrigued by the look of the SD WW in everyone's photos. I'm just trying to figure out how to plan my baking so I don't get into a situation (as I just did with the Pagnotta - more on that later on your SDP thread) where I tried to save some time and instead caused myself much more. I guess I just need to dive in and try something.
Thanks again for posting such great notes. You have no idea how much it means when I feel like I've wasted hours searching for proper recipe and instruction while instead I could be baking bread. :o)
Zolablue,
Maybe you're a whole wheat virgin, but you gave me a lot of ideas about how to handle wet sticky dough. This was pretty easy compared to very wet ciabatta dough. The whole grain flours can take a lot more water, so this was only somewhat wet. The difference is that the whole grain seems to be more sticky, even if not so slack. That's why I like working with wet hands and counter surface, rather than with flour dusting.
I'm not sure, but it seemed like leaving the mixed flour and water in the refrigerator overnight was helpful to the dough texture in the morning. I separated the "recipe starter" from the flour and water and let them both soak overnight. Then I mixed everything in the morning. Although the ingredients started out cold in the morning, the bulk fermentation took no more than 4 hours at room temperature.
I think a little less malt syrup would have been better, and maybe a touch of honey could have been added.
I didn't do this one in one big batch overnight, but that might be easier. I would imagine you could do it overnight by starting with about 50-100 grams of starter and making the hydration the same by adding spelt and water to the rest of the dough to make the same total flour and water in the final dough.
Bill
Another notch on your wooden spoon, I see. Your loaves look really appealing and impressive--I have to say that what you and other folks here are doing with whole wheat has me reevaluating my own ideas about it, I find the flour mix you used to be particularly interesting. Do you often use white whole wheat? I'm not an expansive thinker and I usually choose 'alternative' flours like spelt or teff or www just for the novelty factor, and not very often. So I'm thinking I should take them more seriously. They certainly pack nutritional punch. Do you find they noticably affect flavor or texture when you have a very specific outcome in mind?
Hi browndog,
It's good to hear from you, K. I enjoyed the dutch crunch photos, by the way. I've been experimenting here and there with white whole wheat and spelt. I was speaking to a front office person at Homestead Grist Mill who did some baking with their white whole wheat and red whole wheat. She got me going on the idea that the slightly bitter flavor in red whole wheat can be mixed with the slightly bland flavor of white whole wheat to get something better tasting than either one. Then, I got into using spelt mostly for those German breads I mentioned in a couple of blog entries, although I had tried spelt in those miche recipes, too. Anyway, the overall conclusion I've come to is that I tend to like a mixture of half red whole wheat and half some combination of white whole wheat and spelt.
Bill
I dunno -- I kind of like the split over proofed look myself, though the taste is always way too sour for me. Geez, I remember making a multigrain sourdough a few months ago that over proofed. Not sure whether it was the time (3+ hours) or the other grains, but it tasted, quite literally, like vomit. Ugh.
I find that 2 to 2.5 hours is usually just right for the final proof. And 85 degrees is a perfect temperature.
I always enjoy your write-ups, Bill. Thanks!
Hi JMonkey,
Yeah, I'm not a big fan of too sour either. This bread wasn't way too sour, but you could taste the sour flavor. I was lured in by the continuing fast rise in the cooler with the warm water. I should've stopped at 2 hours, and this might have been a WW masterpiece more worthy of your instructions. I had some this morning, and it was very good, nonetheless.
One thing I think you said somewhere along the line was you would soak the flour and water overnight, as I did here. Are you an advocate of that approach? The mass that came out of the fridge was easy to work with, and the flavors seem good other than some overproofing sourness.
Bill