The Fresh Loaf

A Community of Amateur Bakers and Artisan Bread Enthusiasts.

varda's blog

varda's picture
varda

Update:   A photographer and reporter from the local paper stopped by our meet-up.   Here is the link to the article.   In the print version we were the top front page story.  

On Saturday, we had our Boston Area TFL meet up.   Ten intrepid bakers plus family members broke bread together.   Lots of bread.   Lots of really amazing, delicious, and varied bread.    We all had a great time chatting, and each had a chance to describe their bread, show and tell, and so on.   Ian and I took a lot of pictures, so I'll let the pictures do the talking.   (Ian's are the wider ones.   I shrunk mine down.)

The scene

Kristen's Volkornbrot and Hotcross Buns,  Colin's scrumpy buns

Ian's guacamole loaf

Jong Yang's multi-seed sourdough

Mike's many breads

Barb's dinner rolls, Bill's bagels and baguettes

Varda's breads

Ian's corn feta

Barb's Jalapeno rolls

Kirsten's Volkornbrot

Kristijan's Levain

And not just bread:

Jong Yang's egg custard tarts

Mike's pastrami

Lisa's chocolate chip and raspberry bread

Kristijan's salt cod salad next to his Levain

And people too:

Bill, Ian, Kirsten

Vinni, Mike, Bob

Kristijan and Olga

Barb

Lisa

Me and bread

Jong Yang speaking

Kirsten

Colin, Bill, Kirsten

And stuff:

Jong Yang's homemade brotform next to Bob's Olive Rosemary Levain, Kristijan's Levain behind

Another Jong Yang wooden brotform

Jong Yang's homemade on top of stone steamers

Some of us brought starters to trade and smell

What else?   Probably more updates later and hopefully other attendees will chime in.

varda's picture
varda


Deli Rye is a favorite of mine, but it's hard to come by well made and authentic versions of it.    Fortunately it was one of the four breads we made at the King Arthur Rye class.   Today, I made this bread with one change - charnushka instead of caraway.   A simple change but wow, what a difference in flavor.   Frankly I was testing the theory that my husband's claim not to like rye was really a dislike of caraway.   He loved this bread, so I guess I'm right.    This is a very mild 20% rye bread with no sour flavor whatsoever.    It has a very nice texture, and the charnushka is just a lovely complement to the rye.  

I continue to use the new steaming method recommended by PeterS and I think it makes a big improvement to the crust.

Altogether this is a bread I will want to make again and again.    And so ends my series on the King Arthur Rye Class.   Someone else will have to post on the quark bread.  

Formula and method:

3/16/2013          
           
Rye sour   8:30 PM      Total
Seed 50        
Whole Rye 27 80     107
Water 23 65     88
          195
           
3/17/2013          
  Final Sour Total Percent  
Whole Rye 0 97 97 20%  
KAAP 384   384 80%  
Water 256 79 335 70%  
Salt 10   10 2.0%  
Yeast 2   2 0.4%  
Charnushka 6   6 1.2%  
Sour 176        
           
Rye Sour seed hydration 83%    
Rye Sour hydration   82%    
Starter factor   0.90    
Total Flour   481    
Total Whole Grain   20%    
Total Dough   828    
Percent prefermented flour 20%    
Hydration     70%    

Allow starter to ripen 16 hours after last build.   Mix all ingredients - consistency is somewhere in between a dough and a paste.   Bulk Ferment 1 hour.    Shape into stubby batard.   Coat with seeds.   Proof 50 minutes.   Slash crossways 5 times.   Bake 45 minutes at 450 with steam for 1st 5 minutes.  

Now from the sublime to the ridiculous.    I have been experimenting with baking with the discard from my daily starter mixes.   I tried crackers - needs work.   Bread - total disaster.  Then I moved on to hot pockets.    First a cheese pocket.   Then a few changes and salami and cheese.   These were promising.    Today, I put together a spiced meat pie.   It came out really nicely.   For some reason the discard starter just works really well on this.    The bread is very sour, but the meat stands up to it so it all seems just right. 


Bread:

Discard Starter (Rye and Wheat starters)    400g   (Rye is 83% hydration, wheat is 67% - together around 75%)

KAAP  300g

Water  200g

Salt   14g

(When I feed my starters twice per day, I put the discard into a lidded container in the refrigerator.   This starter is the product of the last week or so.)

Mix all ingredients until blended and fairly developed (just a few minutes)

Bulk Ferment on counter 3 hours.   

Brown 1 lb ground beef in pan and remove some of the fat.    Do not cook thoroughly.   Mix in chopped onions, italian plum tomatoes (canned around  6 of them without much of the juice) and spice with cumin, cardamon, coriander, ginger, black pepper, cayenne, cilantro, salt.)   Press out dough onto parchment paper on counter until fairly thin (1/4 inch.)  Proof covered around 45 minutes.    Place filling on one side of the dough, fold over and press the edges tight.   Refrigerate until 1 hour before dinner.   Pierce with knife all over.  Bake at 400F with steam for first 5 minutes for around 55 minutes.   Serve.  

Not bad.   Should have used more spices, and sauteed the onion with the meat.    Even though I tried to keep the liquid down, it still got pretty wet and some of it leaked out.   


varda's picture
varda

No not a publishing company, or a fancy new German housewares line - just a humble cobbler's loaf and miller's miche.  

Continuing on with trying to absorb the King Arthur rye class I took a few weeks ago, I decided to  make a Schuster Laib, or cobbler's loaf.   Mr. Hamelman explained that this upside down rye loaf was probably originally some apprentice baker's error and so the head baker called it a cobbler's loaf, because for some reason, calling someone a cobbler was a big insult.   Now of course, cobbler's loaves are made on purpose, and I've always gasped in admiration whenever I saw one.   (Breadsong's version comes to mind.)       At our class, while we were making the 80% rye loaves with rye soaker in Pullman pans, Mr. Hamelman quietly put one of these together.    So this time, I made an 80% rye loaf as a free standing upside down hearth loaf.  

At the class we had to sign (at least in our minds) an affidavit promising not to cut into the 80% loaves for 24 hours.    So I can't get a look inside just yet, as it's only been around 4.   

Update:   So I had a few people over this morning and served the bread (they were expecting maybe coffee cake?)   and they liked it, so I hacked it up to give them some to take home, almost forgetting that I owed a crumb shot.   Fortunately there was a little bit left.  

The flavor was very intense - that rye sour smell that I've been talking about transformed to taste.    As much flavor as you'll ever get from flour and water.     

So as not to have a day go by without bread, I decided to make a second loaf today.   My home-milled flour has been getting cranky, as I make one rye loaf after another, so I decided to pull it out of the closet and take it for a spin.    Loaf two is a miller's miche, so called because I used my home milled and sifted flour for the final dough, and sprinkled the whole loaf with the sifted and remilled bran. 

The dough was so sticky when I flipped it out of the basket using my hand to steady it onto the peel, that it stuck to my hand, and I had to scrape it off and pat the loaf back together, so I was expecting a disaster.   It recovered quite nicely in the oven, though, and is happily edible by humans. 

The rye loaf was made with my new twice daily fed rye sour, and the miller's loaf was made with twice daily fed white starter.    For today's bake, I finally got the smell that I remembered from the rye sour at King Arthur, although much less overpowering, as much smaller quantity.    My wheat starter seems happier and more active as well, so I'm happy with the new regimen.  

I used the exact formula from the class for the 80% rye, but modified process a bit to suit my baking conditions.    I will list what I did rather than Mr. Hamelmans precise instructions.

Formulas and methods:

Schuster's Laib

3/10/2013


1st feed

2nd feed

2nd feed

Total

Rye sour


12:30 PM

9:30 PM

9:30 PM


Seed

54


Whole Rye

28

100

-55

150

223

Water

26

82

-45

122

185


408

Soaker


Coarse Rye

109


boiling water

164


273


3/11/2013

Final

Sour

Soaker

Total

Percent

Whole Rye

137

192

109

438

80%

Sir Lancelot high gluten

109


109

20%

Water

153

158

164

475

87%

Salt

10


10

1.8%

Yeast

5


5

1.0%

Sour

350


Soaker

273


Rye Sour seed hydration


90%


Rye Sour hydration


83%


Starter factor


0.86


Total Flour


547


Total Whole Grain


80%


Total Dough


1037


Percent prefermented flour


35%


Hydration


87%


Build rye sour as listed.   Sprinkle top with rye flour after 2nd build


Make soaker at the same time as final sour build


After 12 hours when sour is ripe (smell, and islands of the sprinkled rye flour)

mix all ingredients.   Consistency is paste.


Bulk Ferment 30 minutes.    Shape sprinkling top with rye after folding in

each corner.    Place seam side down in lined basket.


Proof 1 hour 45 minutes.


Preheat oven to 550 for one hour (plus) with stone and large cast iron pan

Turn oven off, load loaf, and pour water into cast iron pan.   Close oven and

listen.   If hissing stops before 5 minutes is up, add water.   After five minutes,

turn oven to 470F for 15 minutes.   Then reduce heat to 440 for 40 minutes.

Remove and cool.


When cool wrap for overnight.  


Miller’s Miche

3/10/2013


1st feed

Total


9:30 PM


Seed

43


KAAP

25

118

143


Whole Rye

1

7

8


Water

17

84

101

67%


252


3/11/2013


Final

Starter

Sour

Total

Percent

KAAP


130


130

21%

Whole Rye


8

22

29

5%

Golden

450


450

74%

Water

350

92

18

461

76%

Salt

11


11

1.8%

Starter

230


Rye Sour

40


Starter seed hydration


67%


Starter hydration


67%


Starter factor


0.9


Total Flour


609


Total Whole Grain


79%


Total Dough


1081


Percent prefermented flour

26%


Hydration


76%


Autolyse flour and water 30 minutes


Add remaining ingredients and mix at speeds 1 and 2


to medium development


Rest 5 minutes.   Stretch and fold in bowl.


Bulk Ferment 2 hours.  


Shape into boule and place in lined basket.


Proof for 1.5 hours.  


Bake at 450 with steam (cast iron method - see above) for 5 minutes

without for 40. 


Remove and cool.


Note that Rye Sour is leftover from the Rye loaf.   


varda's picture
varda

Ever since returning from the King Arthur Rye class, I've been itching to make the four breads that we baked there, but first I wanted to get my rye starter into better shape.   I put both my rye and wheat starters on a twice a day feeding regimen, and gave them time to become happy and well fed.   Yesterday I decided it was time, and decided to start with the Flax Seed bread.   I followed along with Mr. Hamelman's formula and instructions, and didn't allow myself so much as a tweak.    Since I have been keeping a tiny amount of starter (around 50g) to make the twice daily feeding easier, and also to avoid unnecessary wastage, I built it up to quantity yesterday in three stages.   While I never got the in your face pungent smell of the KA rye sour, I did remember JH had asked us to taste a bit before baking.    So I tasted a bit this morning, and it was pretty tart stuff.  

I made two other changes to my routine.   First, I recently purchased a cordierite stone to replace the block of granite I've been using for the last few years.   That was mostly because the granite was both two small and too heavy, but I think the cordierite is better as well.    Second I changed my steaming routine.    I have been using towels for the last few years and thought I was getting good results, but when I saw the crust colors at KA, I thought I would see if I could do better.    So I ended up doing a combination of the two cast iron pan methods PeterS and Yerffej discuss in this post and this post respectively, not neccesarily intentionally and I'm glad no one was watching as I was flinging hot water around and trying not to get burned.    More refinement to come, but I was pretty happy with the crust.

Now on to tasting.   This bread has a really nice tang to it, nicely complemented by the flax seed flavor.    Despite my inclination against it, given my no tweaks rule, I used a bit of old bread in the soaker.     I have no idea what impact that has but it didn't ruin it.  

So I'll call myself moderately pleased, and on to formulas 2, 3, and 4. 

3/3/2013


1st feed

2nd feed

Total

Percent

Rye sour


4:30 PM

10:00 PM


Seed

49


Whole Rye

27

50

140

217


Water

22

42

115

179

83%


396


Soaker

10:00 PM


Flax Seed

50


Old Bread

40


Water

150


3/4/2013

Final

Sour

Soaker

Total

Percent

KAAP

300


300

60%

Whole Rye


199


199

40%

Water

86

164

150

400

80%

Salt

10


10

2.0%

Instant Yeast

3


3

0.6%

Flax Seed


50

50


Old Bread


40

40


Rye Sour

363


1002


Starter factor

91.7%


Night before mix make final starter build, and soaker.   When starter is ripe, mix all ingredients.   DDT 76F.  Proof 1 hour.   Preshape, rest and shape.   Place in banneton.   Proof around 1 hour.   Bake at 440F with steam at beginning.   JH’s notes say 38-40 minutes.   I think we did longer than that in class, and today I baked for around 45 minutes.  


varda's picture
varda

This weekend,  I and three other TFLers took a rye class at King Arthur with Jeffrey Hamelman.    Larry - aka Wally -  Faith in Virginia, and Otis - aka burntmyfingers - were there each driving from a different corner of the region.   It was fantastic to meet them for once, knowing them only from their bread and words up to now.  The class had 11 students (one didn't show up!)   ranging in age and experience, with the one from furthest away hailing from Malibu, CA.  

If I had any hopes in advance for the class, it would have been to gain a bit more skill in particular areas like mixing, shaping, slashing.   I can safely say that I did not make even an inch of progress in any of these areas.    That does not mean however, that I didn't learn anything.   Here are the lessons I learned in the order that I think of them. 

The most tangible lesson to come out of this class for me  is that my rye starter needs work.   The smell of the Hamelmanian rye starter is like nothing I've ever smelled before.   Since of course we were dealing with large enough quantities of starter to make 25 large loaves of bread for each of the 4 formulas we made over the weekend the mass was much larger than anything I'd ever worked with.    The smell was completely overpowering, and I had to move back a pace or two just to keep from keeling over.   My rye starter, even with my nose right up to it, just cannot compare.    This carried through all the way to the taste of the breads.

Chef Hamelman gave us a disquisition on the benefits of taking good care of our starters, explaining that extended refrigeration without feeding  (mea culpa) leads to an acid buildup that in turn begins killing off the yeast and beneficial bacteria.    While the King Arthur bakery feeds their wheat and rye starters twice a day, every day, he understood that might be tough for those of us who only bake once or twice a week, but he nevertheless suggested that we up our feeding schedule to at least a few meals per week.   While I have been skeptical of this in the past, I am not anymore.   In fact, if I could get the flavor in my breads that came out of the King Arthur classroom ovens yesterday, I would gladly feed twice a day no matter how much I had to throw out.    Consider me converted at least in theory.   We'll see what happens in practice.  

Home bakers are at a disadvantage when it comes to equipment.    Our loaves came out of the ovens with a sheen that I have never been able to achieve with my gas oven and various steaming techniques.    One press of a button and the deck ovens filled magically with steam which was then vented at just the right moment.     The spiral mixer just mixed the heck out of all the doughs while we all stood around with not much to do.   What can we do about this?   Be jealous.   That's it.

Chef Hamelman spent a lot of time testing us on when things were done.   Is the dough mixed enough?   Proofed enough?   Baked enough?   He kept a poker face throughout, there were always divergent opinions, and most of us were wrong as often as right.     What I did learn is that you can't just knock the bottom of a loaf to see if baking is done.   He recommended squeezing, looking, etc.   He did not pull out a probe thermometer and check.    Glad of that as I fried mine awhile ago and haven't replaced it.  

Peels with 8 or 9 loaves of bread on them are really heavy and getting them into the hot  oven was too scary for me.   I finally took a stab at removing a load, and that was bad enough.   Chef Hamelman's assistant was a quite thin and small young woman who was originally a baker in the KA bakery, so some are made of sterner stuff than I.    Other than that, the professional baking environment seemed much more manageable to me than I had imagined (see lesson about equipment above.)

Steam matters.   I already knew this, but we had a great accidental demonstration.   In addition to the 100 or so loaves that got made over the course of the two days, we also made a batch of salt sticks,  and a batch of deli rye rolls.   These were baked in the same oven as some 80% rye panned loaves - not a deck oven.    They came out looking very inedible, as it turned out the steam wasn't hooked up to that oven much to Chef Hamelman's surprise.   The loaves made of the same dough that were baked in the deck ovens were burnished and plump as could be.    The 80% rye did fine however, as it was very wet, and had the protection of the pans.  

Loaves made were a deli rye (best I've ever tasted) the 80% rye pan loaves, a flax seed rye, and a quark rye.    We each came home with two of everything but the pan loaves and I immediately wrapped most of it up and froze.   My husband who has always expressed an aversion to rye, has been chowing down on the flax seed loaf, and says it is the best loaf I've ever made.    Well I didn't really make it in any sense other than shaping it.    As my son put it,  I paid a lot of money to find out just how much I have yet to learn (and he didn't say it quite as nicely as that.)  

Final lesson:   if you are going to depend on your phone for picture taking, you have to remember to take the charger.   

Hope other participants will post themselves or add to this.

I sign off tired but happy.

-Varda

Update:   Rod, a student in the class, kindly sent in his excellent pictures and descriptions for posting:
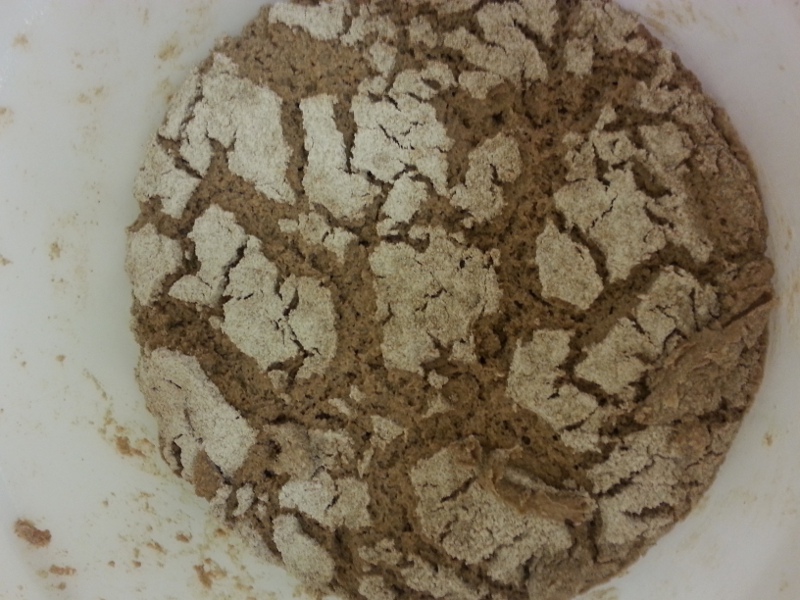
Jeffrey put whole rye flour on the top surface of the sourdough as much to pay homage to his German mentor and less for environmental control.  In pursuit of tradition.  This sourdough was developed after 16 hour at room temperature with a plastic wrap cover over the container.
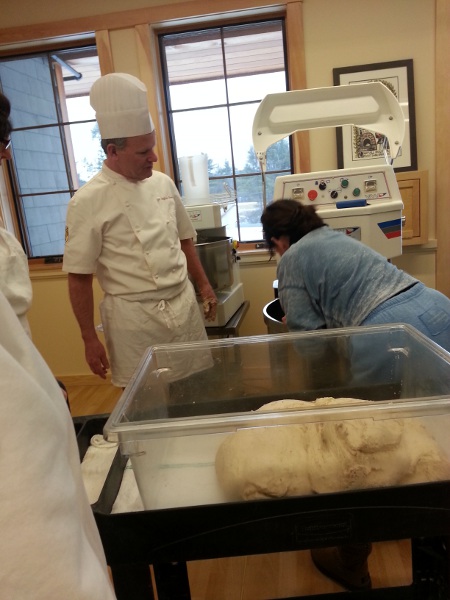
From the French word  gémir, to groan.  The backbreaking work of the third year apprentice.

So few caraway seeds in the deli rye dough but the flavor was pronounced.

Never far from the mixer.
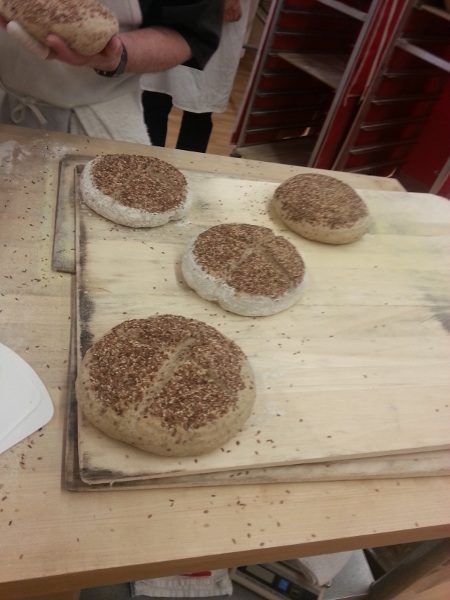
Applying flour to the outer edge for an artistic flare.   It was recommended to perform this task while the dough was still moist and consider using niger seed for a more dramatic effect.

Here is a shot of the quark loaves.   Remember how hot they were when we were attempting to determine if they were done.   It was easier to compare the color in the loaves in the oven.

Fruits of our labor.

varda's picture
varda

Last week, I had to go out during a bake, and didn't expect to get back in time for shaping.   Usually I would have placed the dough in the refrigerator to suspend operations during my absence, but in the spirit of experimentation, I decided to leave it on the counter in a 70degF kitchen.    When I got back the dough was very soft and bubbly, and I was afraid overfermented, so I shaped (not that easy given how full of gas it was) and proofed but cut the proof short (45 minutes) as I was worried about losing the whole bake.    Long story a little shorter, I underproofed it significantly and got an exploding loaf.    But an exploding loaf with a boatload of flavor.    Today I decided to retrace these steps, but with a normal proof.   I observed two differences between today's loaf and last week's.    One is today's loaf expanded normally in the oven, and two, the crumb isn't nearly as open.   Same rich flavor though.  

And now, the real reason I wanted to post:

I love this bowl.   It was a poor unwanted reject at the Kohl's housewares sale.   It has a crack in the bottom.    I never grabbed anything off the shelf so fast.    Perfect.   Just perfect.

But back to bread.

Formula and method:


1st feed

2nd feed

Mix


2/15/2013


4:15 PM

10:00 PM

9:30 AM


Seed

41


KAAP

23

75

96

194

95%

Whole Rye

1

5

4

10

5%

Water

17

55

68

140

68%


344

8.4

2/16/2013

Final

Starter

Total

Percent


KAAP

200

141

341

57%


Whole Rye


8

8

1%


Golden*

250


250

42%


Water

300

101

401

67%


Salt

12


12

2.0%


Starter

250


0.73


1012


Autolyse flour and water for 45 minutes


Add salt and starter and mix until smooth and supple

(Speed 1 around 10 minutes)


BF 45 minutes


S&F


BF 3 hours


Shape into boule and place in bowl


Proof until soft but still a bit springy


Bake at 450F with steam for 20 minutes


without for 22


 * See this post for description

varda's picture
varda

Today's bake is a miche made with home milled high extraction flour.   I have been working on this for awhile, but ran into some problems with overheating the flour while milling, which led to some notable failures.    Today, I was extra careful, and kept the flour cool throughout.   The dough was very tacky at 73%, and seemed to lose its shape every time I turned my back on it.   It held together enough to make bread though, so I declare it a success.   The crust had that mottled look that only wet tacky doughs seem to get.

And the crumb came out ok notwithstanding the mouse hole.

We always seem to photograph slices, but what about the morsels we actually eat?


I almost forgot to say something about the taste.   This is very hearty, almost like an unenriched whole wheat loaf, but without the bite back of the bran.   I sifted out around 1/3 of the bran, and used only the powdery flour and not the coarse farina.   Altogether a very pleasant flavorful loaf.  

Formula and Method:


1st feed

2nd feed

mix


1/30/2013


7:00 PM

10:00 PM

10:30 AM

Percent


Seed

23


KAAP

13

65

90

168

95%


Whole Rye

1


9

10

5%


Water

9

43

67

119

67%


297

12.9


1/31/2013

Final

Starter

Total

Percent


KAAP


136

136

25%


Whole Rye


8

8

1%


Golden*

401


401

74%


Water

302

96

398

73%


Salt

11


11

2.0%


Starter

240


26%


954


Starter Factor

0.8


Mix flour, water, starter until just blended.


Let sit for 1.5 hours


Add salt, and mix (by hand) until blended plus a little more.


Bulk ferment 2 hours stretching and folding every 20 minutes


the last two on the counter, the others in the bowl.


Shape into boule and place in banneton.


Proof for 1.5 hours until dough softens.


Bake at 450 F for 20 minutes with steam


and 22 without.


* Golden flour is the part of the milled wheat that can get through an extra fine sieve.   It is the part of the endosperm that mills to a fine powder (the inner core) plus tiny flecks of bran which gives it a  golden color.   With the technology I have available, I cannot separate out the bran from the powdery flour to get white flour as that requires use of controlled airflow which lifts out the lighter particles of bran from the heavier flour.   The golden flour does not include the coarse meal from the outer endosperm aka farina.   With multiple fine millings a lot of the farina can be crushed and so can pass through an extra fine sieve, but I didn't do that this time, and just took the flour that resulted from medium to coarse settings of my Komo.

Bonus photography lesson:

Winter posting can be frustrating as it can be so hard to get a good picture of the crumb.   By the time this loaf was ready to cut, daylight was gone.   Today, after giving up on getting a good photograph, I remembered that my husband has some very bright work lights.   So I fished one of them out of the basement,  and gave it a try.   I pointed the light at the wall, rather than at the slice, to avoid a bright light bouncing off the bread.   But just to demonstrate the difference between regular indoor light plus the camera flash versus a really, really bright light:

Yes, that's the same slice of bread as pictured above.

Here is the light in all its blinding glory:


Final question:   Why is it that when I preview the post, I can see the formula table with borders around the cells, but when I post, the borders disappear?   Any way to fix?  

varda's picture
varda


Lately I've been fascinated by the baking properties of the material that is left after milling wheat berries and screening out the fine flour and (some of) the bran.   One thing that has daunted me for awhile was what to call it.    At first I tried the term middlings, but that made me uncomfortable because of the squishiness of the term.    I have found in my readings at least 4 different uses for the word middlings, some similar to each other, and some not.   Bah.   I used this material several times as hot cereal, and it distinctly rang a bell from my childhood and beyond both because of flavor and texture - Cream of Wheat!   I loved cream of wheat when I was a child, and strangely, as an adult I was hooked on it if and only if I was pregnant.   Who can understand these mysteries.    So look up Cream of Wheat and what do you find - Farina.   Farina seems to be defined quite a bit more consistently than middlings, and  describes my mystery substance quite well.   So farina it is.  


I have baked several times with farina (plus other flours) and have been very happy with what it adds to the mix.  Now I find myself milling just so I can get the farina, and the heck with the high-ex flour - that's just a byproduct.   

The next thing I tried with it was using it as the flour in starter.  I had a "desem" starter that I had begun with a dab of rye starter, but had never been happy with the results.   But I had a bit of it tucked away in the refrigerator


So I built that up with farina, and got it ready for use.    I fermented it in an outer room which is colder than the rest of the house at between 62 and 65F.    The second morning it had grown and cracked and as I was planning to be out most of the day I put it into the refrigerator.   If there is one thing I've learned about whole grain starters, which I extrapolate to farina starters, it is that they can over-ripen when you turn your back on them, and then your bake is doomed no matter what you do. 

Here is what the starter looked like when I removed it from the refrigerator after around 7 hours and cut it in half.


At the same time, being piqued by A.P.'s suggestion of a long autolyse, I did an autolyse for that 7 hour period as well.   Finally I put all ingredients together, and mixed and fermented, and then retarded overnight only because time had run out for a bake yesterday.   This morning after proofing until the dough softened, I baked it and this is what I got after cooling:


Flavor is excellent - mild and creamy.   I somewhat dislike the squatter shape of overnight retarded loaves but that's a quibble.  

Skip this section if you are bored to death with milling and sifting.

I have developed a more streamlined milling and sifting process which I believe gives me as good results as the more elaborate one I was using previously.  First I got a sifter holder so I could sit down and sift instead of standing and hurting my back (ok, you younger folks might not need this.)   I wanted something where I could see what was coming out during sifting, so this is my set-up:


Yes, you're right, that's a plant stand.   It works great.   I place the sifter on top, sit down, and rub my hand through it and I can see the flour flowing down into the bowl. 

My milling and sifting log and notes:

1/13/2013


Berries

1000


Golden

665

67%


Farina

272

27%


Bran

40

4%


Loss

23

2%


Mill berries fine


Sift in 55


When streams get very light


sift leavings in 30


This separates off bran


Had to remill leavings at fine during this

process


Resift results in 55


This was as simple and effective

as other methods I've used


No appreciable difference between

this strategy and milling coarse first


I used plant stand with wooden bowl

and thick plastic on the floor


This was my lowest loss yet


Here is formula and method:


1/18/2013


10:00 AM

9:00 PM

2:00 PM


Starter


Seed

30


KAWW

1


1

1%


Farina

17

50

100

167

99%


Water

11

30

60

101

60%


270

9.1


Final

Starter

Total

Percent


KAWW


1

1

0%


Farina


142

142

24%


KABF

225


225

38%


KAAP

225


225

38%


Water

340

86

426

72%


Salt

12


12

2.0%


Starter

230


24%


1020


Starter Factor

0.85


Ferment starter at 62-65 degrees starting on 1/18


Refrigerate starter at 9 am on 1/19 as don't want to get overripe


Mix flour and water at 9:15 for autolyse


Mix all at 3:45 in mixer for 8  minutes to blend, and 4 more minutes

to strengthen.   Dough comes out very stiff and windowpanes


BF 30 minutes, S&F


BF 30 minutes, S&F


BF 50 minutes, S&F


BF 40 minutes


Cut and preshape


Rest 20 minutes


Shape


Place in couche on tray


Put whole tray into plastic trash bag and tie


Place in refrigerator around 8 pm


Remove at 8:45 am


Proof for 1.5 hours until proofed


Bake at 450F with steam for 20 minutes


and 20  minutes without


varda's picture
varda

Frequently when I ask my friends if they would like some bread, they say something like, oh I can't eat that - I'm off bread.   This makes me sad, so I decided to change my tack.   So lately I've been asking would you like some 100% whole wheat sandwich bread, and the responses have been much more positive.   Only one problem - I really don't know how to bake with 100% whole wheat.   So I finally took Janetcook's advice and got Whole Grain Breads by Peter Reinhart.  

Here is a shot at his master formula - enriched whole wheat loaf.    This tastes pretty darn good for 100% whole wheat.   Most of the flour is either in an overnight soaker or an overnight biga, so it comes out pretty soft.    The enrichment produces a smooth soft crumb.   And much more edible than my attempts at unenriched 100% whole wheats thus far.  

I used the approach of really knocking the dough around in the mixer to get adequate dough development.   Since I have a Bosch Compact and Franko warned me that despite the advertised 5 lb capacity, one is better off mixing under 1Kg or less than half that, I mixed up the 1.4Kg dough by hand, blended the ingredients for a few minutes in the compact, then cut the dough in half and did development half at a time for around 15 minutes each on speed 2.   I was able to get a semi-fragile window pane - in other words I could get it quite thin, but it was a hair away from breaking.   Based on the results I think I should probably have gone a bit longer.   

The resulting bread is great for the calorie conscious consumer (say that 5 times) as it can be cut quite thin.

I suspect a lot of people on TFL make this loaf, so would be interested in any insights, observations, and so forth. 

The best thing about it though was I pulled off one of the three pieces and handed it to a friend who was happy to have it.   We'll see how she feels after she and her family get to it.  


varda's picture
varda

One of my New Years resolutions was to make something following the beautiful creations of Terike.    While I didn't expect to match her artistry, one has to start somewhere, and why should she have all the fun.  I chose her incredibly beautiful and appetizing  Apple Plum Cake to start.     However, no plums this time of year, so I decided to substitute the nice Chilean sweet cherries that have been showing up in the supermarket.    This particular post had a good ingredient list, and some very nice pictures of the process, so I had enough to move forward.    However, since there were no instructions I had to make things up as I went along, and have no idea if I did anything like the right thing.   Here is what I did.

Ingredients

Milk  100g  -- used 1% - whole milk probably better

Sugar  23g

Salt    5g

Butter   25g  -- unsalted

Egg Yolk  1 at 18g

Yogurt  50g   -- used very thick, rich yogurt made at greek grocery.

Flour   300g  -- used Heckers unbleached AP

Instant Yeast  10g

Egg white for egg wash

Yogurt, sugar, half cherries, and half apple slices for filling.

Scald milk in microwave for 1 minute.   Remove and mix in butter to melt.   Let milk cool to warm.   Add all ingredients but egg white and filling.   Mix in mixer and by hand for a few minutes (dough is very dry)  until it comes together and is flexible.    Let rest in bowl for 30 minutes.   Cut off a chunk of dough and roll out with rolling pin until around double length to width and wide enough for filling (around 2.5 inches.)   Cut in half.   Place dab of yogurt in center of one of the halves.  Sprinkle with sugar.   Place a half apple slice and two cherry halves on top of the yogurt.   Take the other piece of dough and place over the top.   Press the edges of the top dough onto the edges of the bottom dough.   Then cut off the corners to make it sort of round.   Pick up the roll and press the edges together tightly all around.   Place in an oiled ceramic 9 inch pie pan.   Continue until 7 rolls are made.   There should be a fair amount of dough left over.   Roll strips of dough out and decorate away.   Try to make cool little doodahs to place on top of the rolls and here and there among the strips of dough.    Then cover and place in the refrigerator (as perhaps you forgot that you couldn't stay at home to see this through.)   A few hours later, remove from refrigerator, and preheat oven to 400F.   After the pie plate warms up (around 30 minutes) brush the top with egg white, and sprinkle liberally with sugar (including a bit of red sugar.)   Bake for 20 minutes, then reduce heat to 350.   Bake for 10 minutes then reduce heat to 300.   Bake for 10 minutes until all the rolls are browned (and hopefully none are burned.)   Remove, cool, cut and pass out to eagerly waiting family members.  

I feel quite certain that Terike's description of how she did this would be not even close to mine, even notwithstanding the Hungarian.  

Since I have not ever made something even remotely like this, I welcome any suggestions for how this could be done better. 


Pages

Subscribe to RSS - varda's blog