(2-results) Journey to perfect a 100% WW Sourdough Pullman Loaf

These are the results of my 2nd attempt. See the (2-recipe) blog post to see what the plan was.
Recap:
The wife has tasked me to come up with a sandwich bread recipe our family can bake at least once a weak to completely replace our regularly purchased box store sandwich bread.
This post is for the results of my second attempt to make the perfect loaf.
Requirements
- Soft and light
- 100% whole wheat
- Recipe must be easily repeatable and easy to execute.
- Recipe must be designed for a covered pullman loaf pan.
(https://shop.kingarthurbaking.com/items/pain-de-mie-pan-pullman-loaf-pan-13) - My 12 year old daughter must be able to bake the bread from start to finish
- Sourdough leavening only.
- From start to finish, the bread must be completable in 1 day.
- Process must exist to enable the baker to know with reasonable certainty that the loaf is perfectly proofed.
- Dough needs to contain a few softened chewy seeds, grain berries, etc. for texture and flavor.
Summary of Results
The Good:
- I solved multiple problems from the previous bake. The rise time was acceptable. The sourness was perfect (just a hint, subtle enough to enable a slice of the bread to be used on a PB&J).
- The 15 minute longer bake did indeed cook out more of the moisture and there were no slightly undercooked parts of the dough.
- The hydration level was perfect! At least when it comes to the feel of the dough. Very very nice dough. But, this is a big deal, because I think I am going to stick with this hydration level and these ingredient percentages for a while, which means I can focus more on the process, which means less variables and clearer results.
The Bad:
- The dough was still more moist than I want. BUT, the 15 minute increase in bake time made a big difference and I feel pretty confident that another 15 to 30 minutes of baking will get me to where I want to be.
- Due to the higher moisture of the bread, the crumb is too fragile for spreading jams and peanut butter, but I think a longer bake will fix this.
- I barely barely overproofed the loaf this time. How do I know... there was very little oven spring but there was zero collapse AND when I scored the dough it ripped right open. If I had waited any longer, I am pretty sure the loaf would have collapsed in the oven. The aliquot jar was between 250% and 300% (closer to 250%) when I finally loaded the loaf into the oven. I think for my next bake I will make sure to load the loaf into the oven at 200%.
- The crumb was slightly too open this time... I know why... it was because I shaped the dough earlier in the rise. In the first loaf, I shaped the dough late in the rise and the shaping process pushed down the air pockets in the dough. I am going to shoot for a 1 hour proof for the next bake, hopefully that will result in a more closed crumb.
- Dough was difficult to shape... not really because it was too wet, but because it is such a long loaf, that even though the dough was beautiful and fun to work with, it was hard to lift it with 2 hands and get it into the pan. My thought was... if it is hard for me, it will be impossible for my Daughter. DanAyo suggested loading the loaf into the pan right after kneading... I think I am going to try that. Probably not on the next bake, since I want to spend one or more bakes getting the bake time figured out, but soon.
The Final Recipe:
- 60g (12%) sourdough starter (50:50 hard red)
- 51g rolled outs
- 31g (6%) honey
- 12g (2%ish) non-iodized salt (Accidentally added to much salt)
- 30g (6%) virgin olive oil
- 475g (95% if you include rolled oats) well water
- 450g home milled hard white wheat (sifted to remove bran)
- sifted bran to be used as topping
The Bake:
- 9:00a: mixed 475g boiling water (all of the water), honey, oats, and salt until evenly combined. let it sit for 10 min to soften the oats.
- 9:10a: mixed in olive oil.
- 9:11a: added all flour, used ankersum to mix long enough to make shaggy mess.
- 9:21a: smeared 60g of starter over the top of the dough mixture, then used ankersum to knead using dough hook for 5 minutes.
- 9:26a: transferred as much dough as possible to clean bowl and covered. Took 20g of dough and put into aliquot.
- 10:30a, 11:30a: Stretch and fold.
- 4:20p: aliquot doubled. turned dough onto counter a preshaped. Prepped pullman pan, brushed butter on all sides of pan, sprinkled bran flakes on butter.
- 4:30p: Shaped loaf into log and put in pan and covered.
- 5:30p: Preheated oven to 375dF
- 6:00p: Aliquot was at 250% to 300%. Brushed top of loaf with melted butter, sprinkled bran flakes on top, and scored. Loaded loaf into oven and baked for 1 hour covered (note: I have misplaced my pullman loaf lid, I used an inverted cookie sheet to get by, the cookie sheet was in the warming oven, so it was already hot.)
- 7:00p: Put dough on a rack to cool. Took about 1.5 hours to cool.
- 8:30p: Sliced dough and enjoyed!

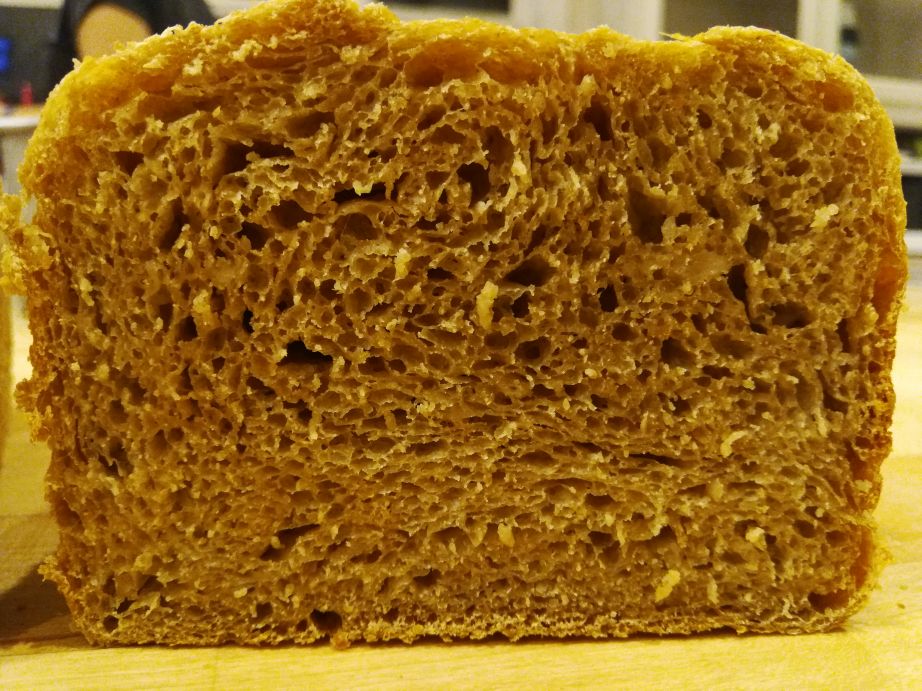
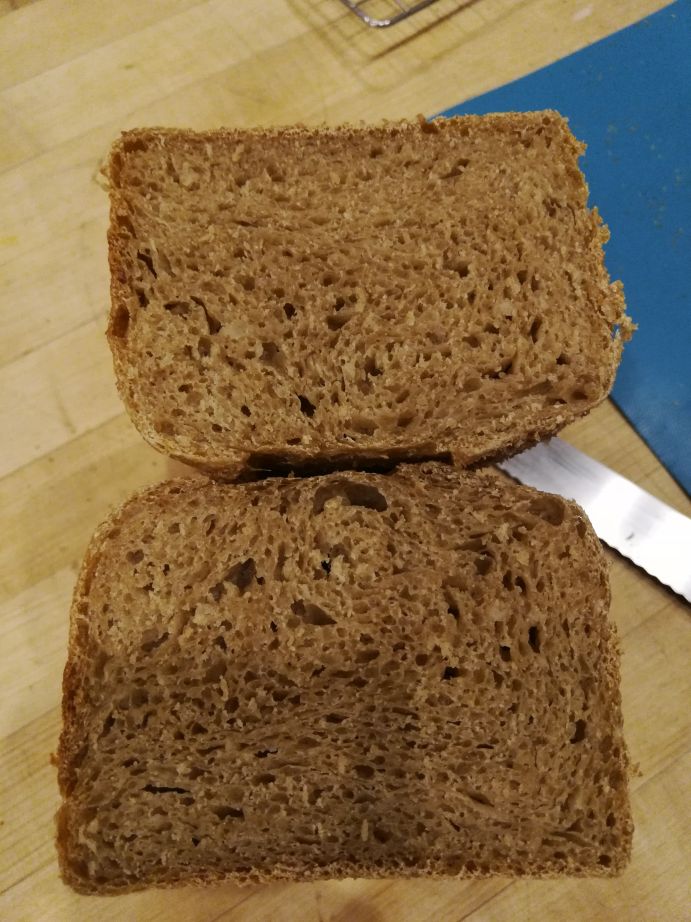
Much improved crumb, kind of lacy, but with a closed crumb.


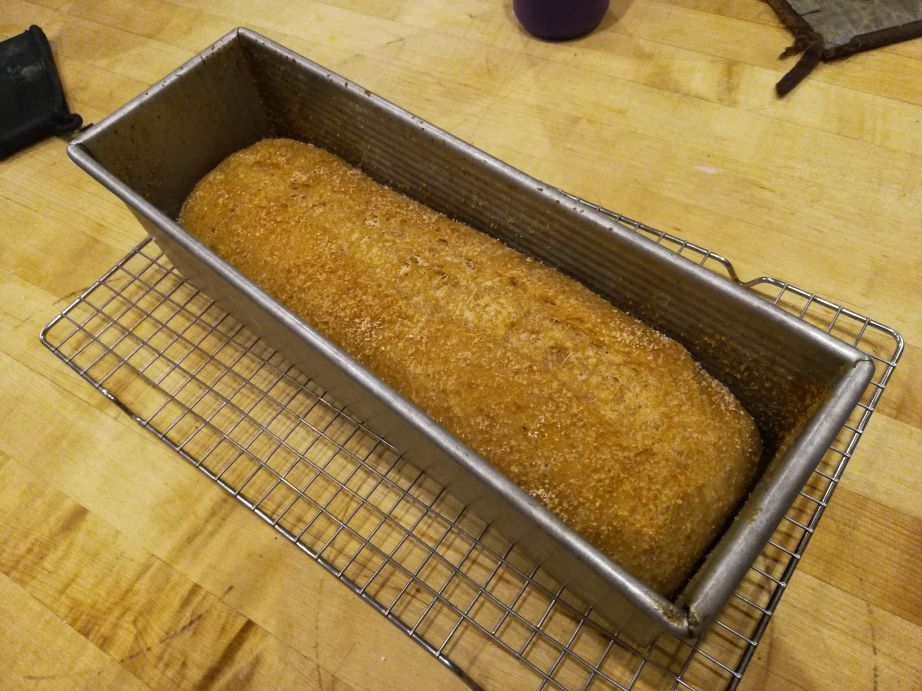
I don't know why I didn't take a picture of the loaf out of the pan. Here it is right after I pulled the loaf out of the oven.

This is right before I sprinkled bran on top, scored, and loaded into the oven.

This is the aliquot right before I loaded the loaf into the oven. The lower black line is where the dough was right after kneading. The upper black line is where the dough was right before preshaping.

The dough after shaping and placing in pan. I am not happy with how I non-uniform my shaping was, it was a real struggle getting that 14" loaf into the pan without stretching it the wrong way.

This is the preshaped dough. Ohhhh, it was luxurious! I don't think I have ever had 100% WW feel that way before. Lovely!


Comments
What is the weight of the bran? Does it seem like the right amount to sprinkle on top? Does it stay stuck to the top? Does it burn? Have you considered rolling the dough in the bran?
"What is the weight of the bran?"
I did not weigh the bran. I have 2 jars of bran that I accumulated from sifting my freshly milled wheat. It is very lightweight stuff. I melted about 1 tablespoon of butter and used a silicon brush to coat the insides of the pullman pan. Then I sprinkle some bran on all of the insides of the pan, enough bran to coat all of the surfaces. The bran and butter on the pan's main purpose is to keep the dough from sticking, some of the bran transfers to the dough, which is nice but not the main goal. I also brush the top of the loaf with butter and sprinkle bran on the top. The bran does stick due to the butter. If I had to guess, I used about 3 TBS of bran to coat the inside of the pan and 1.5 TBS of bran to sprinkle on top. Probably weighs 3 to 5 grams.
The detail of your post really helps. WW is really a different skill set from AP flour based bread and SD WW is another skillset again so you have some reading ahead of you.
SD WW with whole grains embedded that is soft is possible. It will not be as soft as a higher starch/bran ratio loaf like a 50% WW but it is doable-and also with slices that will not crumble when you take a bite of the sandwich. A few caveats MUST be paid attention to for a 100%WW SD loaf for all of it to come together.
First, let me correct an observation you made about why the slices are crumbly.
Your crumb is crumbly because the moisture has not had enough time to penetrate into the branny bits BEFORE the bake . As a result, the (relatively) dry branny bits will continue to absorb water from the crumb after the bake and dry the crumb at its thinnest components causing it to shatter and crumble with the pressure of a bite or grabbing the sandwich. However, there s a simple fix. A 100% WW dough needs adequate hydration and TIME for all the dough parts to absorb the moisture in order to have a soft,pliable crumb. This can be done in many ways-preferment, autolyse, sponge, cold retard,biga-but no matter which way you do it, it involves adding time. My preferred method was a preferment mixed in the morning, towards evening when the preferment was ready I then mixed a slightly sticky dough and by next morning (overnight in refrigerator) I had a beautiful,slightly tacky dough that I could then shape/proof/bake the next morning. This is still all in 1 day but shifted to overnight.
LINKS:
Txfarmer HERE was legendary. She is no longer on TFL but her pics were gorgeous! The 100%WW SD Hokkaido Milk loaf is the ultimate of soft, shreddable 100% WW SD bread.
HERE is another of her famous breads and it may be closer, in product, to what you want.
The next suggestion on achieving a soft,pliable 100% SD WW loaf involves working/kneading/mixing/S&F the dough to windowpane. Any soft,shreddable loaf has a dough that was worked to a good windowpane and 100% WW is no exception. I have found the statements about "the sharp bran cuts the gluten" to be nonsense. Because of the structure of WW flour, the dough needs added time to absorb the moisture and the baker has to work a little harder at developing the starchy gel (my phrase) in order to attain a nice windowpane. It takes adequate hydration,time for all the components to soften and absorb the hydration and a little extra elbow/machine grease to mix.
MORE LINKS:
HERE is a great recent pic of windowpane. It is an AP dough but a WW window is just speckled.
So, following, is some reading/scanning.
White bread loaf but she talks about the windowpane concept and troubleshooting it HERE
White bread in a pan de mie HERE
Useful spreadsheet for developing bread recipes HERE
You MUST read Dabrownman. Start with THIS but browse his links. He doesn't post much anymore but is available for emails or shout-outs.
THIS thread is long and specifically targetted at a dense,wholegrain bread but there are good concepts on WW baking included. Hanseata is a very talented baker.
If you want a book referral, Reinharts Whole grain book has a 100% WW made with Biga. Excellent but a dough that can be a bit difficult to get the biga incorporated.
LINK:
HERE is my early attempt at 100% WW/Grain soft bread.
Good Luck! Have delicious fun!
Your WW cereal loaf looks beautiful.
I have had a lot of success in the past baking WW loaves. And yes, WW and sourdough are very different than AP and bread flours.
My problem with 99% of WW bread pan recipes is that they are HEAVY. It is easy to bake a 100% WW bread loaf that is soft, flavorful, and strong enough to hold up to peanut butter. But, if you want that loaf to be be lightweight, i.e. low weight to volume ratio, things get much more difficult.
There are multiple ways to correct or change a trait in a bread. Every solution usually has side effects. For example, if I let my flours ferment longer, my dough will taste more sour and my bakes will take longer.
The windowpane is interesting. I used to worry about windowpane, but these days I don't, especially with long fermenting recipes, anything longer than 8ish hours. I still often check the windowpane of my dough, but mostly from habit. I learned from a few different sources and from my experiences with no-knead recipes, that gluten will develop to a window pane on its own given enough time. If you don't have enough time, you can negate the need for time with mechanical gluten development. IMO, window pane at the end of kneading is only necessary if you want to have short ferments. Windowpaning the dough is a useful tool for bakers wanting to know if they kneaded enough up front. Although, just like the poke test, it is a learned skill to know how much window pane is enough for the type of dough you are trying to make (flour content, hydration, etc).
Anyway, I have learned while experimenting with baking the same loaf over and over again, that underbaked dough produces a crumb that does not want to hold up to the spreading knife. And, I have also learned that cooking out the moisture in dough takes time and changes the crumb quite dramatically. So, my hunch, that simply baking the bread longer, is based on experience, and I will have to see where my hunch takes me (I have to see it through to the end for my own sanity). If my the crumb is still too fragile once I have explored this route, I will have to look elsewhere to achieve my desired results.
I don't think I will get to work on loaf #3 until tomorrow. But, maybe I will find the lids to my pullman pans today... I have a hunch where they are... I think they fell behind my oven... not an easy place to reach.
How about dividing it in half and placing them end to end in the pan? I think that would be easier for a 12-year old (and me).