The Fresh Loaf

A Community of Amateur Bakers and Artisan Bread Enthusiasts.

Most bookmarked

DanAyo's picture
DanAyo

Compilation of pH, pH Meter, and other such things

As a untrained baker concerning all things pH, I thought it good to provide this post for others that may be interested in learning along with me. The more I learn the more it becomes evident that pH and pH meter handling and maintenance is no simple thing. Although not rocket science a certain degree of knowledge is very beneficial. It is hoped that those with technical knowledge will join in and offer their expertise.

The following information may be intimating to some. I find myself in that category.
But it is, what it is...

Here is a short list of the pH meters that are commonly used among bread bakers

  • Hanna Halo Wireless- with ATC (Automatic Temperature Compensation) able to capture readings at interval over time -VIDEO-
  • Hanna Bread and Dough pH Meter - this looks like a very nice entry level model.
  • Milwaukee Pro pH and Temperature with ATC. Both a bulb type and also a spear tip probe are provided with this unit
  • others can be listed once they become known

pH strips and very inexpensive pH meters have not worked well for me. I know Benny has used an inexpensive unit, and I look forward to hearing from him about his experience.

As more information becomes available, it will be posted.

THIS VIDEO explains the basics of how pH meter determine the precise pH of a substance.

THIS VIDEO provides excellent tips for pH probe handling and maintenance.

Best practice to clean probe tips after they are used for starters, levains, or bread dough

We are cautioned to NOT WIPE the probe tip with a cloth or paper towel
I contacted Jason with Milwaukee Instruments. He tells me that this procedure will work.

  1. Use the sprayer on the kitchen sink to wash off ant debris from the probe tip
  2. Rinse the tip in distilled water
  3. Store the probe tip in dedicated Storage Solution - Storing in water will ruin the probe

pH Probes are delicate, extremely sensitive and require special care. They should NEVER be stored dry.
The perfect probe for dough and bread, but not the cheapest is the Spear Tip Probe. It will even measure the crumb via direct insertion with reasonable accuracy. 
Note - Milwaukee Instrument states that the probes do require replacement. They claim about a year, but I am hoping that they will last longer with occasional use.

bijection05's picture
bijection05

Loaf cracking outside of the score

Hi!


I'm fairly new to sourdough and just bought an oval banneton. 

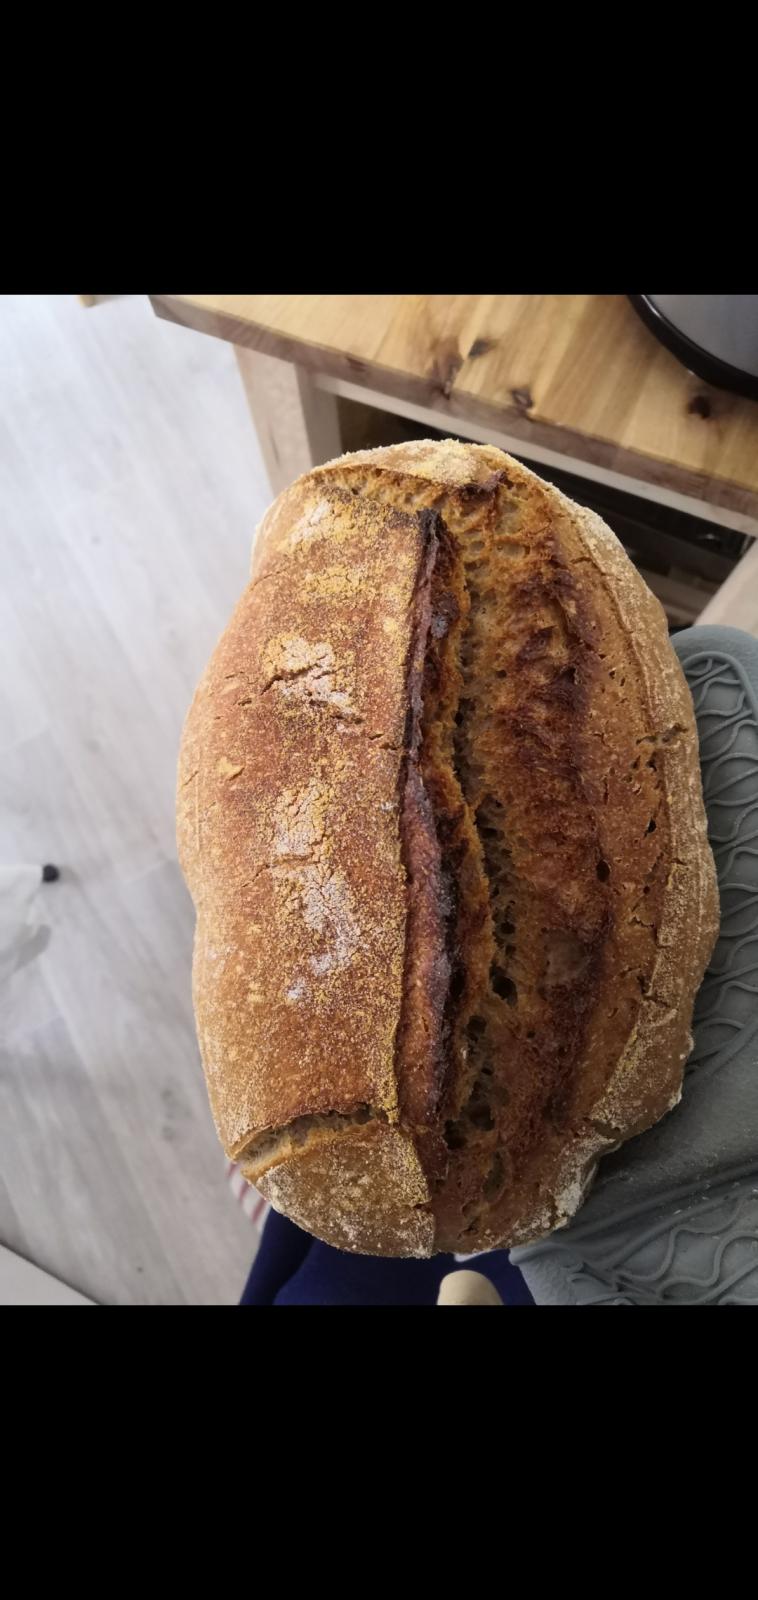
I've baked great loaves but it seems that most time they crack a bit outside of the score which I feel Ike is preventing a greater rise. Here's a picture of my last 50-50 while wheat sourdough following the perfect loaf recipe.

What do you think this is due to? 

Anonymous baker's picture
Anonymous baker (not verified)

What a lovely whole wheat sourdough recipe

https://youtu.be/jd_r69WauPk

Some good ideas with an excellent result. I highly doubt my starter at that percentage will take as long but as she says it depends on the temperature. Quite like the way she final proofs the dough. There's always something to learn. 

Enjoy! 

Jeffrey Hamelman's picture
Jeffrey Hamelman

Using thermometers to test for bread doneness

This post will be a little long; sorry, but I want to be thorough.

Several years ago, I was teaching baking classes at the Japan Institute of Baking (JIB) in Tokyo. A big part of the Institute is devoted to research on all manner of bread topics. An engineer there gave me a gift--a small probe that had a USB port on one end and a sheath to cover it. It is used to track the temperature changes within a loaf of bread. I asked him when bread reached its maximum internal temperature, and he said it was attained when the bread was approximate two-thirds through the bake. Hmmm. When I returned to Vermont, I put the probe into my desk at King Arthur and other activities took my attention--I didn't test it.

A year or so later, I was in Nantes, in France, visiting with dear friend Hubert Chiron, one of France's most important bakers, writers, and researchers. We were at INRA (Institut National de la Recherche Agrinomique), where he works. I asked--"Hubert, when does bread reach its maximum internal temperature?" "About two-thirds through the bake," he replied (I had not told him about the Japanese conversation). Hmmmm.

When I returned from that trip, I pulled out the probe and did the experiment for myself. Here's how it works: You take the sheaf off the end, plug the USB port into a computer and start the program. On the computer screen you see a grid that graphs temperature change on one axis and time on the other. Then you remove the probe, put the sheaf on, and wrap the whole thing in the center of a loaf of bread. It stays there throughout the final rise and the entire bake. Once the bread is baked, out comes the probe. On the computer you can see that there was no increase in temperature for a long while, since the bread was initially rising at room temperature. Eventually it curves upward after it has been loaded, and the temperature begins to increase. Sure enough, the temperature rises pretty quickly and then begins to taper off. Eventually--about two-thirds through the bake--it pretty much flatlines and temperature increase is minimal. 

Not too long after that, I was teaching a five-day class at King Arthur, and one of the students wanted to test doneness of a loaf using a thermometer. I told the class about my experiences in Tokyo and France, and my own recent experiment. Two things happened: one was that one of the students was a writer for Cooks Illustrated. His ears perked up, and a month or so later he sent me a one-page article he had written for Cooks; basically he had replicated the experiment I had done, with the same results. The second thing was that another student in the class just happened to have, in his glove compartment, a rather sophisticated temperature probe. He went and got it, and we inserted it into a loaf of ciabatta that was about to be loaded. Being a bunch of dweeby bakers, all of us just stood around, riveted to the display that showed the temperature rise. When the bread hit 210F internally, out it came. It was half done at most. I wouldn't go near it, but I offered a slice to anyone who wanted one. No takers. Believe me, if you were blindfolded and squeezed that loaf and a roll of Charmin, you wouldn't know which one was bread and which was toilet paper. 

I know that there are plenty of people who have their own opinions and practices that are different from mine, and that is totally fine. I started out working with French and German bakers, and squeezing and thumping were the ways that doneness was ascertained (along with the length of time the bread was in the oven and its color). It really is foolproof once the skill is acquired. One might also say it is more respectful to the bread, since there are no small holes in the bottom where a thermometer was plunged. And it sure feels good on the hands. 

Jeffrey

DanAyo's picture
DanAyo

Tip - Maurizio discusses Evaluating the Bulk Fermentation

This was posted as a reply in another post. It is so important it seems good to place it in a dedicated topic.

”I'm a bit late to this thread, but I thought I'd drop my two cents. Some incredibly insightful thoughts here on this topic -- a topic I consider to be one of the most challenging aspects to baking sourdough (and all bread, I'd assume): determining when to call bulk fermentation quits. Doc.Dough had a high point at the outset: how do we measure this quantitatively? There are so many conditions with each batch of dough it's hard to compare results baker-to-baker because we're all using a different flour, different starters, different mixing methods, vessels, and so much more. Because of this, when I talk to other bakers or do a post to The Perfect Loaf sharing a formula I'm working on, I don't specifically list a percentage rise to indicate when bulk fermentation is finished. Instead of using rise as an indicator, I like to judge when bulk completes through other signs:

  1. a significant rise in the dough from the beginning of bulk to the end
  2. a smoothing of the dough's appearance
  3. increased elasticity when tugging on the dough
  4. domed edges between the dough and the bulk container
  5. other signs of significant fermentation: bubbles on top and sides, and if you're using a clear container, bubbles on the bottom as well

So, many of the above are quite nebulous, but there's enough between all of those, plus experience with a particular dough, to give me a ballpark for when to end bulk fermentation.

Regarding #1: I say "significant" because I want to see some rise in the dough indicating fermentation and dough strength (a weak or overly wet mixture won't ruse much), but I don't measure the percentage rise explicitly. Why? In my experience, it can lead to false conclusions, especially if you're switching formulas frequently (which I am regularly doing). For example, a highly hydrated 100% whole wheat dough won't rise to the same height as a mostly-white formula. Therefore, saying 50% rise and trying to use that yardstick for both doughs is like comparing apples to oranges. One caveat here is if you are doing the same formula day after day, in this case, you can likely conclude percentage rise.

Numbers 2, 3, and 4 above all point to dough strength, which for me, is the number one indicator overall. As we know, a dough is strengthened not only through mixing/kneading/stretch and folds but also through fermentation as acids created as byproducts have a strengthening effect on gluten. It's easy to see this: observe your dough through the course of bulk fermentation: at the beginning, it's shaggy, sloppy, loose, and at the end, it's smoother, silky, and elastic.

Domed edges between the dough and bulk container sides further indicate strength as the gasses produced during fermentation push the dough upwards, and the center tends to dome slightly toward the outside. I also wanted to state that for me the final dough temperature (FDT) sets the stage for bulk timing. If I'm working on a mostly-white dough with typical levain percentages (10-20%), I can almost approximate when I stop bulk fermentation based merely on what the dough temp is after mixing. If I'm close to 80°F: I better start checking my dough around 3-3.5 hours; if I'm close to 75°F: it's likely going to push out to 4-5 hours. I'll use this as my coarse compass, and then from there, I use the numbered items above to further assess the dough in the moment to determine when to divide.

One thing to keep in mind here is the flour used in a formula and the hydration will drastically change bulk fermentation times and can throw a wrench into things. For instance, if I'm working on a 100% whole wheat dough at 105% hydration, the dough will have an almost flat surface in the bulk container all the way to divide time. Additionally, it may not rise all that much at all.

So to sum up, determining when to end bulk for me is much like what a (good?) doctor might do. I need to look at everything through a holistic lens to conclude: look at all the clues (the numbered items), any data collected (in our case formula and FDT), and experience to give my patient a diagnosis (when to end bulk).

Even with all this, there are plenty of times I still go to dump my dough container and find the bottom of the dough super, super active and kick myself for not tending to it 30 minutes earlier.

That's my approach to bulk fermentation. I know many bakers who use volume increase, and that's just fine, as is right with just about everything in baking: it's all about what you're used to and what works for you :)”

colinm's picture
colinm

Oven Spring, Bulk Fermentation, and an Experiment

The motive force for oven spring is often stated to be the expansion of gas cells in the dough, combined with a burst of activity by the dying yeast. However, this is only a part of the story. Gas expansion is unlikely to be sufficient by itself because the expansion of gas from a room temperature of 25° C to 80° C is only about 20%. And a burst of activity from the yeast is likely to be small because gas production declines at temperatures above 40° C. The other important drivers are given by scientific text books as the release of dissolved carbon dioxide as the temperature rises, combined with the boiling off of ethanol, which is also mixed with the water. For example, in “Baking Science and Technology”, Pyler quotes the following approximate contributions, which I have rounded to whole percents:
Ethanol boiling: 50%
Expansion of existing carbon dioxide gas: 29%
Carbon dioxide from solution: 19%
Yeast activity: 2%

That leads to the interesting question of how the carbon dioxide and ethanol come to be dissolved in the water. The answer presumably is that they are already in solution when they are created by the yeast, and remain that way until the loaf is baked. The likely time when this could happen is during the initial, apparently quiescent, part of bulk fermentation before the dough starts to rise. If this is true, the yeast is actively producing carbon dioxide early on, but the gas is not immediately visible because it remains in solution. Eventually, however, the solution becomes saturated and any further carbon dioxide has to be released as gas, causing the dough to start rising.

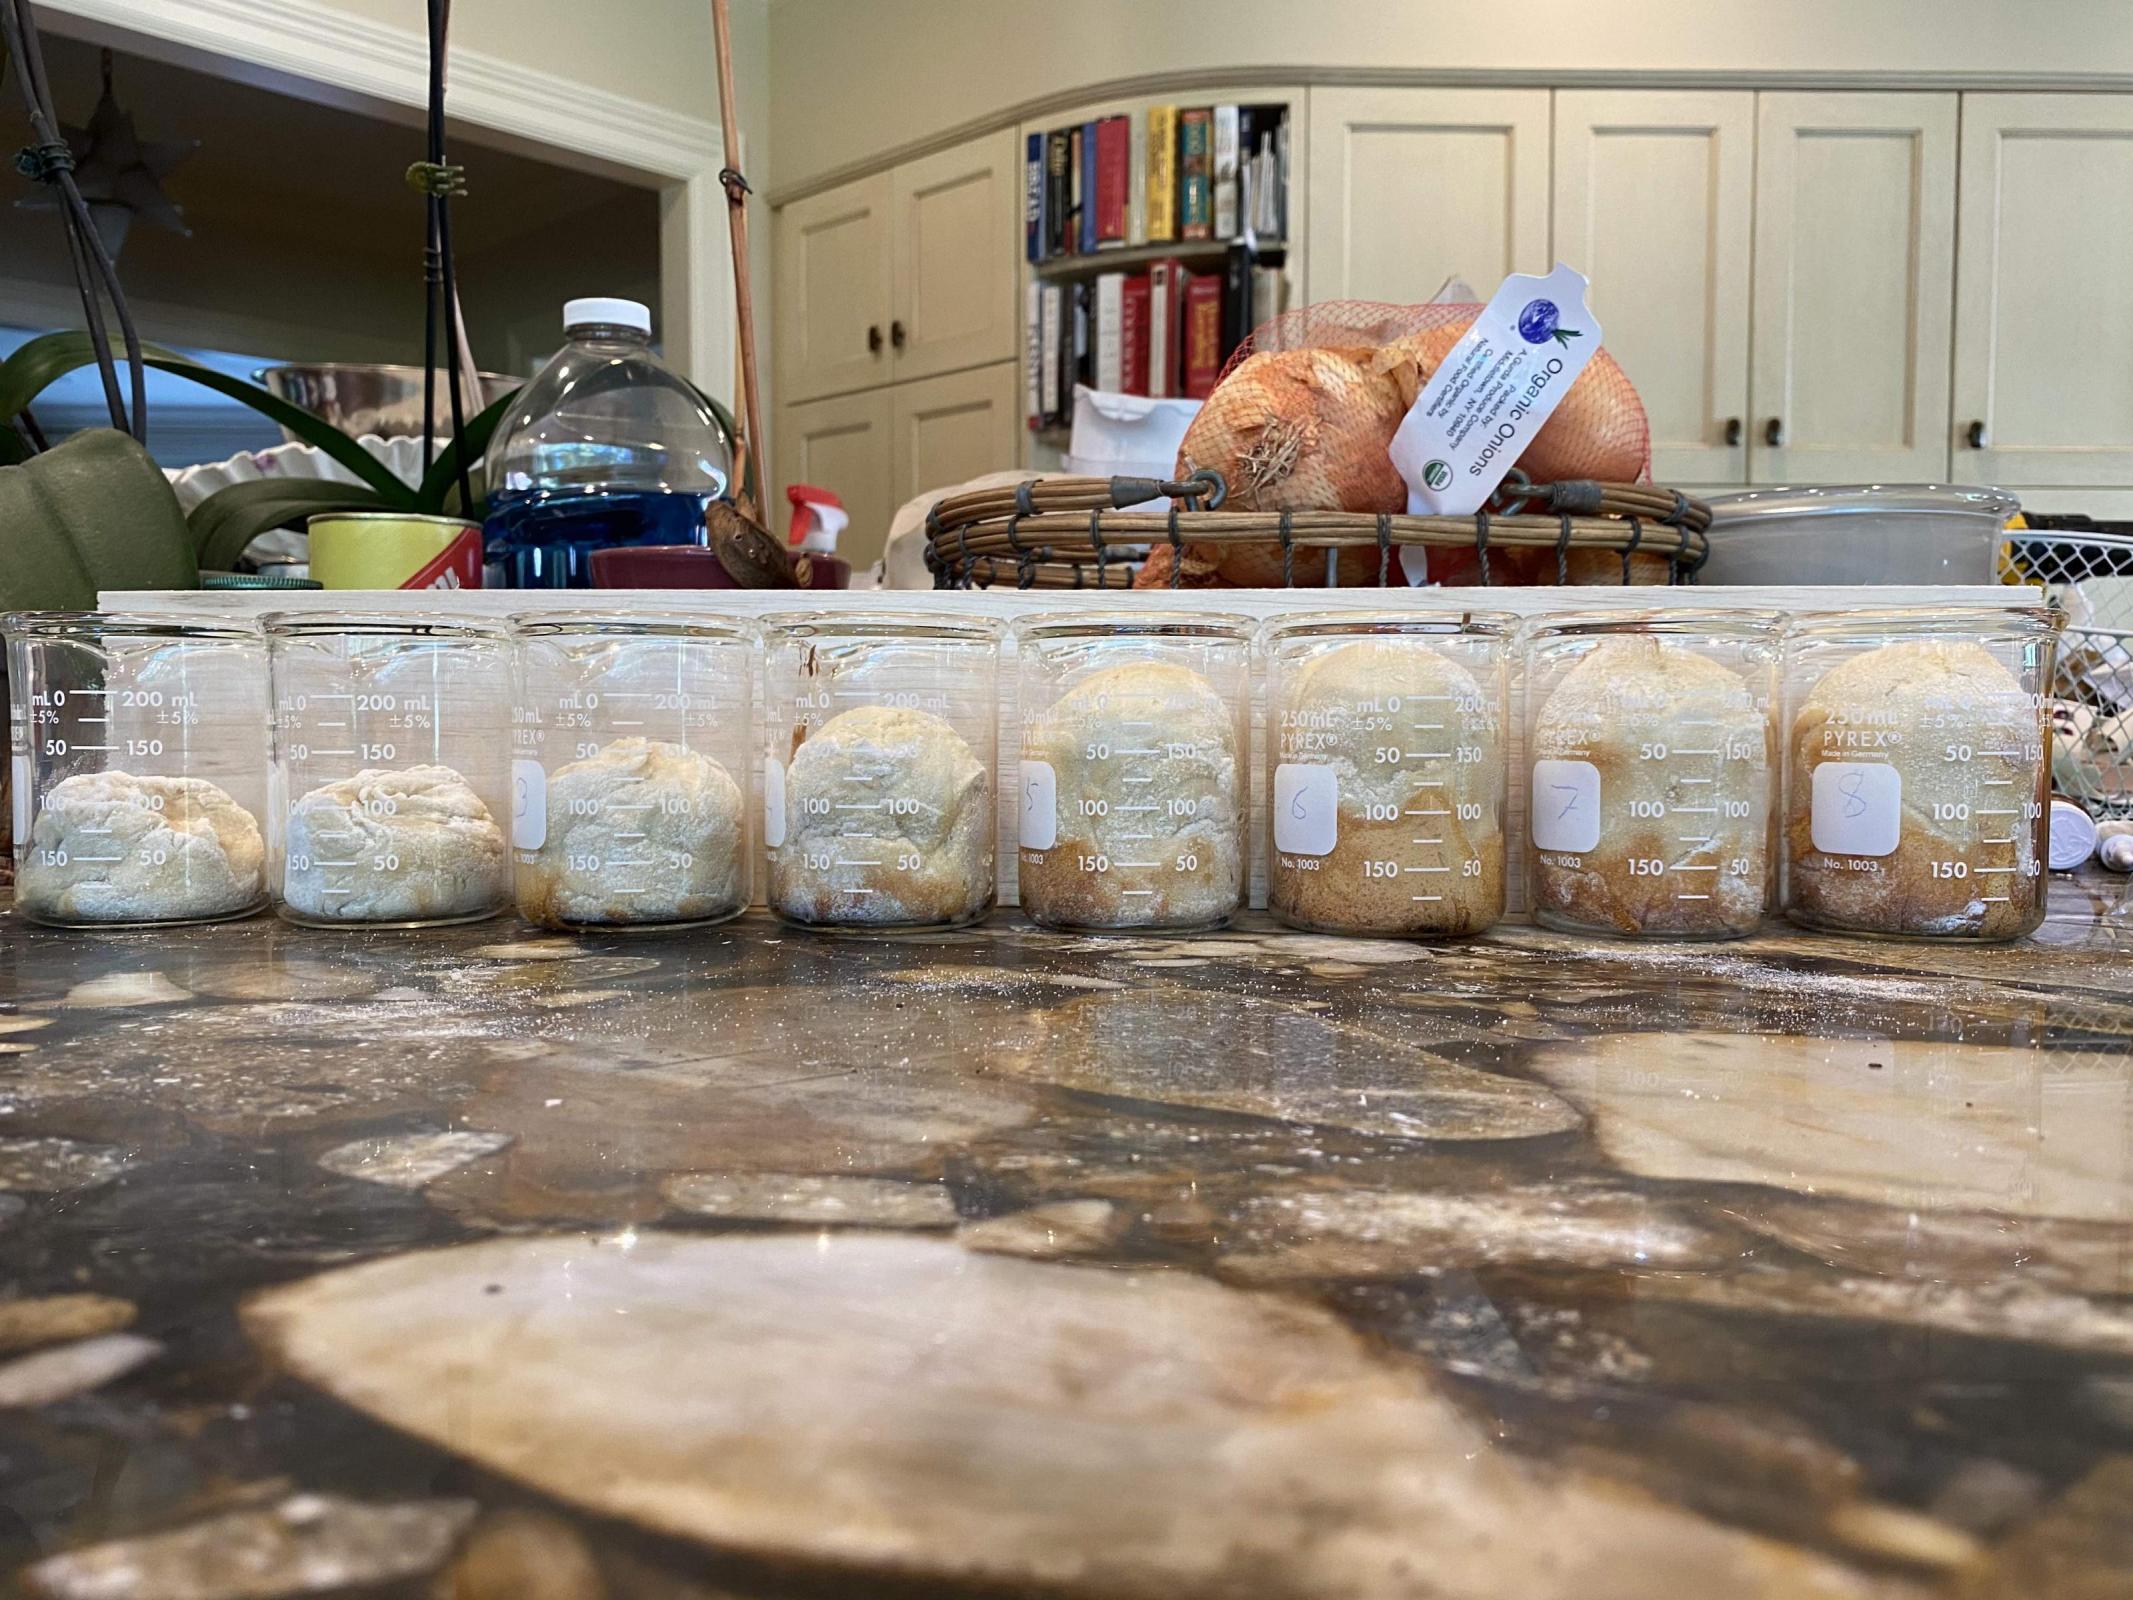
To explore this idea I conducted an experiment in which I divided a batch of dough into portions and baked them after different lengths of bulk fermentation. I started by mixing 500g of all-purpose flour, 350g of water, and 10g of salt in a food processor for 30 seconds. I removed 100g of the mixture as a control sample, coated it in rice flour to reduce sticking and placed it in a 250ml pyrex beaker. I then added 1.5g of active dried yeast dissolved in 5g of water to the food processor and mixed for 5 more seconds to incorporate the yeast. Then I cut 7 samples from the dough, each weighing 100g. I coated each sample with rice flour and put it in a 250ml pyrex beaker, covered loosely with foil. I immediately put the control sample and the first yeasted sample into a 450°  F oven to bake for 20 minutes. The remaining 6 samples were baked at half hour intervals over the next 3 hours.

The picture shows the beakers after baking, lined up in order of fermentation time, with the control sample on the left. The graph below shows the heights before and after baking. The baked height increases steadily for 2 hours, when it reaches a plateau at about twice the unbaked height.


The lower graph shows that the dough height before baking remains unchanged at first, only beginning to increase at 2.5 hours, even though the baked height increases steadily right from the start, consistent with the idea that carbon dioxide and ethanol are present but mostly remain in solution in the dough.

There is no sign of a step increase in baked height which would have been produced by a yeast burst. Indeed, extrapolating back from later samples, the rise in the sample baked immediately corresponds to only about 10 minutes of fermentation at room temperature.

The plateau in baked height after 2 hours most likely indicates a limit to the capacity of this dough for oven spring, since the rise in the unbaked dough after 2 hours indicates that fermentation continues. It would be interesting to run a similar experiment with different kinds of dough handling to see their effect on oven spring.

This experiment demonstrates that the yeast is active right from the beginning of bulk fermentation, even though there is little outward sign. It also shows that oven spring does not require that the dough has risen substantially. By the time that a noticeable rise indicates the end of bulk fermentation, the dough is already loaded with enough carbon dioxide and ethanol to drive a substantial oven spring.

Yippee's picture
Yippee

20200930 How I bake with CLAS


Please see here and here to learn more about concentrated lactic acid sourdough (CLAS). 


Because of COVID, we all minimize traveling. I haven't seen my friends for a long time, especially those who live afar. To reconnect with them, I made Rus's Ukrainian loaf and sent it to them with other homemade goodies. The bread was well received. My friends' wives all want to learn how to make it, but some are somewhat confused about the process. I summarized the steps to the bare minimum to help them start using CLAS ASAP to bake.


  1. Understand how concentrated lactic acid sourdough ("CLAS") works. Read the following blog post up to the point where video clips appear.  

     https://brotgost.blogspot.com/p/clas.html


2. Then, watch the following videos in which the baker demonstrates how to make CLAS. You may choose either one of the two methods to make it, depending on the available ingredients. 


a. Video 1 - the preferred method, watch up to 6:51

                 https://youtu.be/iPQV8qcwK1M


b. Video 2 - watch from 2:30 to 8:41

        https://youtu.be/niIcAuRRxWo  3. Recap


Temperature control in the required range is crucial for successfully producing a flavorful loaf. 

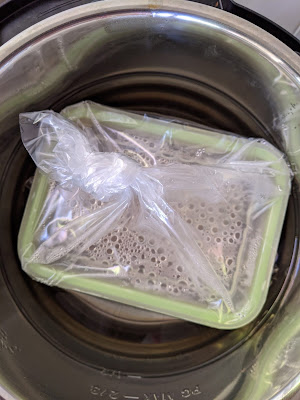
I set up a water bath in the Instant Pot, support the container with a trivet, and use the Instant Pot's yogurt feature to make CLAS:


then cover it with the lid. 

Unfortunately, I developed this water-bath method when I constantly deal with my annoying proofer's inability to maintain a target temperature. It drives me crazy. You don't need to do it this way when using an instant pot, but it ensures a stable temperature of the medium, and I don't have to monitor it with (multiple) thermometers. 


P.S. 20230722 🤔🤔🤔

💡💡💡 

I can also make CLAS in the Zo using its 'Rise 3' feature because it operates within the same temperature range as a yogurt maker. I can either take out the bread pan, place the container with CLAS in the bread machine, supporting it with a trivet, or ferment the CLAS directly in the bread pan.


To make CLAS with rye, you will need:

Rye or any other malt: 25g

 Whole-grain rye flour: 75g

 Water T. 45°C: 180 ml

 Vinegar (5%acidity): 10 ml

 Fermentation temperature: 40°C±2°C

 Fermentation time: 24-36h

 Hydration: 190%

 End pH: around 4


To refresh rye CLAS

1:10 (rye flour in CLAS : new rye flour), 190% hydration @ 40+-2C x 12 hours


To make CLAS with wheat, you will need:

wheat malt: 25g

 Whole grain wheat flour: 75g

 Water T. 45°C: 140 ml

 Vinegar (5% acidity): 10 ml

 Fermentation temperature: 38°C±2°C

 Fermentation time: 24-36h

 Hydration: 150%

 End pH: around 4


To refresh wheat CLAS

1:7 (wheat flour in CLAS: new wheat flour),150% hydration@38+-2 C x 12 hours

I usually make about 500g of CLAS at a time with 200g of grains. It stays in the fridge until I need it to bake, and I stir it thoroughly before use. I usually warm it up with one of Zo's fermentation features while I prepare the remaining ingredients. When I've used up most of the 500g of CLAS, I refresh it using the 1:7 ratio to make another 500g, give or take. 


 4. If you are new to bread making, read the "What do you need to purchase to get started?" section in the following blog post before proceeding further. 

https://brotgost.blogspot.com/2020/03/blog-post.html   


  Making Rus's Ukrainian Palyanitsa loaf 
  1. Watch the following video in which Rus shows how to make Ukrainian Palyanitsa with CLAS. 

         https://youtu.be/tpNqhC5s_Ck


2. Formula and procedure


CLAS 101.5 g (hydration 190%, 35g wholemeal rye, and 66.5g water)

(can be fresh or from fridge pre-warmed up to 30C/86F


Flour 665 g (high gluten flour German 812/or use bread flour)


Water 350 g (30-35C/86-95F)


Dry yeast 4.6 g 


Salt 10.5-14 g(table salt use10.5g, kosher salt use 14g) 


Total 1,144.5g


65% hydration = water weight / flour weight


(Dough temperature 30-33C/86-91.4F)


Bulk fermentation

90 minutes at 30-33C/86-91.4F 


Fold 

the dough according to the video


Rest 

30 minutes at 30C/86F


Shape


Final proof

25 minutes at 32 C/89.6F


Preheat the oven to 250C/482F

(It may take an hour+ to preheat the oven with the baking stones, so plan accordingly)


Score


Bake 

8-10 minutes 250C/482F with steam

then 40 minutes 190С/374F


gavinc's picture
gavinc

Solved my starter issue

Issue

My liquid white flour starter gets gradually weaker over time, although was created from rye flour. My regimen was to feed my culture a couple of times a week and refrigerate after the starter had ripened on the bench. The culture is 125% hydration and is fed with white bread flour.

The culture was initially strong with good rising power. After about three weeks it becomes weak and has a reduced ability to give a good rise and volume to the loaves. I have to occasionally freshen the starter with stone-ground rye to return its vitality and power.

The problem is that I did not notice the weakened state of my culture until I elaborated the starter to make the levain. The ensuing bake yielded a loaf with poor rise and volume.

Remedy

I stumbled across Jeffrey Hamelman’s ISO videos. In the Vermont sourdough episode, Hamelman revealed that the culture he maintains at home is a stiff rye sourdough. He gave the formula as 10-gram stiff rye sourdough, 20-gram rye flour and 17-gram water. I calculated the baker's percent to be 50% stiff rye sourdough, 100% rye flour and 85% water. He feeds it every morning and has been doing so for 40 years, without alteration.

I was immediately interested in trying out a stiff rye starter in the hope it would solve my issue.

Furthermore, in the Deli Rye Bread episode, Hamelman again used his stiff rye sourdough to make the Deli Rye Bread. He also included some liquid starter. He does not maintain two starters, only the stiff rye sourdough. When he needs a liquid white flour levain, he first converts some stiff sourdough to a liquid starter over two feeds.

I was convinced that this would provide me with a consistently lively starter that I could rely upon.

My experience

I fired up my Excel spreadsheet and made the calculation: Liquid stater to a stiff rye sourdough to match Hamelman's.

The process is in two stages:

1.       Convert the liquid starter to a stiff starter. This is only needed to be performed once. To 56 gram of my 125% hydration liquid starter, I added 68-gram of stone-ground rye flour. Cover and leave on the bench until next morning.

2.       Commence Hamelman's regimen. Mix 10-gram stiff rye culture with 17-gram water. Mix in 20-gram stone-ground rye flour.

I repeat the feeding once a day first thing every morning.

Using the stiff rye starter

Many of the sourdough formulae I bake with requires a liquid levain of 125% hydration.

Again with my spreadsheet, I calculated that I could easily create the liquid levain over two feedings. At the time of feeding the stiff starter in the morning, I use the leftover starter to make a small amount of 125% liquid starter: 37-gram stiff rye starter, 20-gram water and 9-gram bread flour. Then leave on the bench until about 5 pm that day. I then elaborate the starter to make the levain for the next day. The levain requirements for a Vermont sourdough is to pre-ferment 15% of the overall flour. Bread flour 100%, water 125% and mature liquid starter 10%. (I put the levain in a proofing box overnight at 24C). The levain is ripe when needed at 7 am the next morning.

Results

The elaborated levain was very bubbly and appeared lively, more so that I have ever seen.

Dough development

I noticed at the end of the bulk fermentation, that the dough had a nice feel of lightness, and had good structure.

It was easy to pre-shape and shape into an oblong. I placed the dough into a banneton to proof.  After 2 hours I checked the dough and determined it was ready for the oven, half an hour earlier than the usual proofing time.

The dough was easy to score after being inverted onto a wooden peel. It did not flatten out on the peel and held it's structure.

Baking

I baked the loaf on a stone in a pre-steamed oven, and steam for the first 10 minutes after loading. Finished in a drying oven.

The oven spring was much better than before. The ear and gringe opened up nicely.

This will now be my new sourdough starter regimen.


The Roadside Pie King's picture
The Roadside Pi...

Presenting, Pane di Matera: the ancient bread of Basilicata. (In the style of)

Hello, friends.

Lets say there was a micro bakers, that sells maybe 100-150 Baguettes a day, would it be unreasonable for the baker to ask is patrons for a crumb shot of the bread? (Asking for a friend) I already rehomed the baguette.

Here we have it. bread porn in it's finest! 


dmsnyder's picture
dmsnyder

Soft rolls with a "Medium Vienna Dough"

Medium Vienna Dough for Soft Rolls

This formula is from

 “Inside the Jewish Bakery,” by Stanley Ginsberg and Norman Berg

 As Interpreted by David M. Snyder

May, 2020

 For those who don’t know, Vienna Dough is an enriched dough that can be used for breads but is most often used for rolls - onion rolls, double knot rolls, pletzel, kaiser rolls and more. Besides differences in shaping, toppings and fillings, the various rolls differ in two respects: First, the dough can be more or less enriched with eggs, oil and sweeteners. Second, the shaped rolls can be more or less fully proofed. So, for example, rolls like onion pockets and knotted rolls are made with younger doughs (less proofed) and a sweeter dough. Kaiser rolls, where you want a less sweet dough, a crisper, thinner crust and less oven spring so the decorative shaping is maintained are proofed more fully.

 It should be noted that all of these products were made without dairy and are therefore kosher with either dairy or meat meals.

 This recipe is for a “medium vienna dough” that is ideal for knotted rolls and onion rolls. I use it for sandwich rolls. It makes a dozen 3 oz rolls. 

Ingredient

Volume

Grams

Bakers Percentage

Bread flour

4 1/2 cups

620

100

Water

1 1/4 cups

280

45

Veg. oil

2 Tbs

30

5

Egg

1 large + 1 for brushing

50

8

Sugar 

3 Tbs

40

6

Dry or liquid malt

1 Tbs

20

Instant yeast

5 tsp

20

3

Salt

1 1/2 tsp

10

2

Seeds for topping the rolls


 Note: I generally use all purpose flout with 11.7% protein. If you use a high gluten flour or if you substitute whole wheat flour for some of the bread flour, you will have to increase the water slightly to achieve the expected dough consistency which should be slightly tacky but not sticky. 

 If you use dry malt, treat it as a dry ingredient. If you use malt syrup, dissolve it in the water and then add the other wet ingredients.

 Procedures

1. Place the dry ingredients except the salt in the bowl of a stand mixer. Whisk them or use the paddle attachment to mix them together.

2. Mix the wet ingredients in a medium bowl.

3. Add the wet ingredients to the mixer bowl and mix with the paddle attachment at slow speed until all the flour is moistened. Add the salt and continue mixing for another minute.

4. Switch to the dough hook and mix at Speed 2 (on a KitchenAid Stand Mixer) until a medium gluten window is achieved (about 10 minutes).

5. Transfer the dough to the board and form a ball. Place the dough in a lightly oiled large bowl that can allow doubling of the dough volume. Cover the bowl.

6. Bulk ferment the dough in a warm place until it has doubled in volume. (45-60 minutes). 

7. Transfer the dough to a lightly floured board. Divide it into 12 equal pieces of about 3 oz. each.

8. Form the pieces into balls, cover them with a towel and let them rest for 15-20 minutes.

9. Shape the pieces as desired - flat disks for hamburger buns, long rolls for sausages, ropes to make knotted rolls, etc.

10. Places the formed rolls onto baking sheets and cover them. (I use quarter sheet pans which hold 6 rolls each and put these in plastic bakery bags for proofing.)

11. Pre-heat your oven to 350ºF.

12. Mix an egg with a tsp of water to glaze the rolls. Get out any seeds you want to put on them.

13. Let the rolls proof 3/4 of the way. (If you poke a finger in one, the hole should fill in very slowly.)

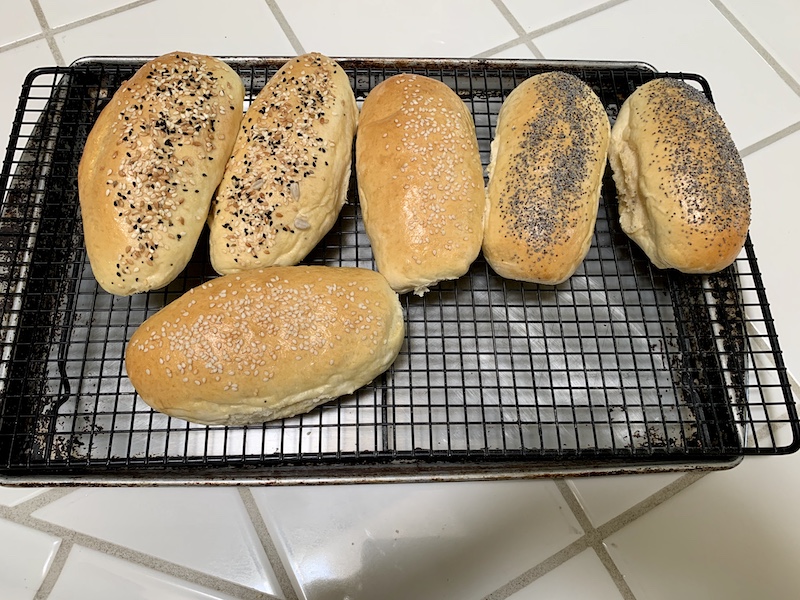
14. Brush the rolls with the egg wash. Sprinkle each roll with seeds (optional).

15. Bake until lightly browned and fully baked. (12-15 minutes or a bit longer, depending on your oven).

16. Cool on a rack completely before serving. 


 These rolls freeze well. I wrap each in cling wrap and place them in a plastic bakery bag with a tie. Thaw in a 375ºF oven for about 7 minutes.

 Enjoy

 David

Pages