The Fresh Loaf

A Community of Amateur Bakers and Artisan Bread Enthusiasts.

Most bookmarked

bwraith's picture
bwraith

Comparing Sourdough Fermentation Strategies

I thought it would be interesting to compare four different approaches to sourdough fermentation. I've baked four test loaves, each with 500 grams total flour (using a 50/50 blend of Heartland Mill Strong Bread Flour and Heartland Mill Golden Buffalo for a blended ash content around .85%), 72% overall hydration, and 2% salt. All loaves started with 18 grams 80% hydration white flour storage starter.

The difference in the loaves is in the fermentation method. In one loaf a direct inoculation of storage starter in the final dough (one-step method) was used. In the others a sourdough preferment was built and fermented for different amounts of time. The final loaf includes a spike of instant yeast.

Fermentation Methods Used

  1. Build final dough including 18 grams of starter, bulk ferment for 11.75 hours, final proof for 3 hours all at about 70F. (xls and html spreadsheets)
  2. Build a sourdough preferment constituting 35% of total flour and ferment until just doubled, about 8 hours at 70F. Soak remaining final dough ingredients overnight in the refrigerator. Mix preferment and soaker and bulk ferment for 3.75 hours at 70F then final proof for 4 hours at 70F. (xls and html spreadsheets)
  3. Build sourdough preferment same as in step 2 and ferment for 4 additional hours after it has doubled, about 12 hours at 70F. Proceed same as in step 2. (xls and html spreadsheets)
  4. Build sourdough preferment same as in step 3. Add 1/4 tsp yeast to soaker. Proceed same as in step 3. (xls and html spreadsheets)

The idea is to compare a long fermentation from an initial very small amount of starter to using a sourdough preferment that is immature (just doubled) or more mature (peaked). Finally, in the last one, the idea is to add in a spike of yeast to improve the rise in the case where a large, mature (35% of total flour and fermented until peaked) preferment is used.

In all cases, the final dough was shaped into a loaf when it had a little less than doubled during bulk fermentation.

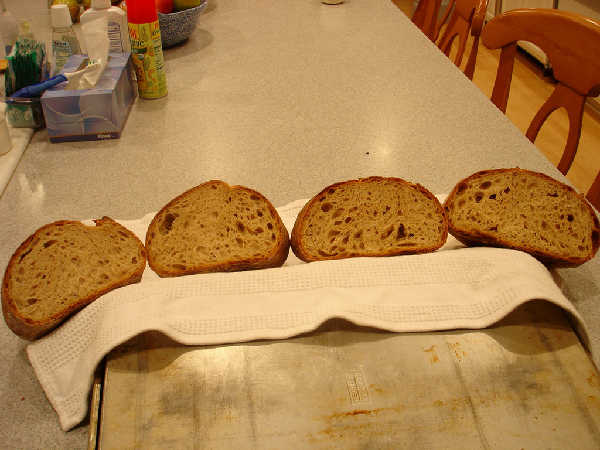
Photos of the crust and the crumb from left to right:
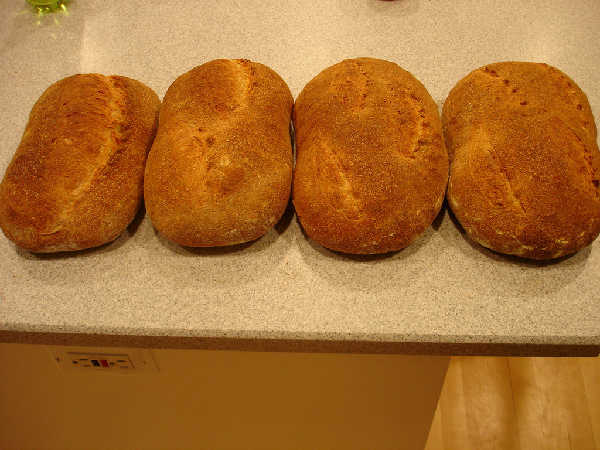
Test Fermentations 1-4 From Left to Right - Crust

Test Fermentations 1-4 From Left to Right - Crumb

Comparison

Crust

I couldn't tell any real difference in the crusts. It's possible the first one was a touch darker than #2 even though both were baked at the same time. Maybe there was a little more enzyme action in it since the entire dough was hydrated at room temperature for about 14 hours.

Crumb

Although they are more similar than different, the crumb was slightly lighter going from 1-4.

For loaf #1, this may again be a function of the enzyme action, which may have in some way hindered the gluten development. Another explanation might be that I needed to fold #1 one or two more times earlier to improve the gluten development over the longer fermentation, as it did seem a little too relaxed at shaping time, relative to the other loaves.

For loaves 2-4, the more mature preferments did not hurt the gluten in this case. I believe the very strong flours contributed to the better results with the more mature preferments. The more mature preferments probably had a larger organism count than the preferment for loaf #2, as they weren't at the collapsing stage yet. So, with higher organism counts, higher fermentation byproducts, but very sourdough tolerant flour, the more mature preferments ended up with slightly larger loaves in the end.

The oven spring went in opposite order to the loaf volume, not surprisingly, which explains why the result after baking is not as different, but the overall loaf volume before baking was significantly larger for loaf #3 than loaves #1 or #2. In the case of loaf #4, the yeast clearly had a big effect on gas production before shaping. I did deflate it a little during shaping, of course. It again was significantly larger pre-bake than loaf #4, but after baking it was only a little bit larger. In summary, the loaf volume before baking increased significantly from loaf 1-4, but the oven spring, which was greater in 1 and much less in 4, offset much of the difference. Nonetheless loaf #4 had a noticeably lighter feeling in the mouth.

Flavor

All of the loaves were fairly mild in flavor. However, without a doubt, loaves #3 and #4 were more sour than loaves #1 and #2. Everyone who I had test the loaves was able to discern the more sour flavors in #3 and #4. There was some debate about the order of #1 versus #2 and #3 versus #4. My youngest son, William, noted a sweetness he seemed to like in loaf #1. I believe he may be detecting, once again, some effect of the enzyme action that was probably greater in that loaf, which soaked for so long at room temperature, and may have resulted in more starch broken down into sugars. My oldest son thought #2 was more sour than #1, which may be correct, given that it had a slightly longer total fermentation time. My son's girlfriend felt the order was 1,2,3,4 from least to most sour, but others had no opinion on #3 versus #4.

Comments

I believe the following are true, all other things, particularly the temperature and amount of enzyme action in the process, being equal.

The difference between #1 and #2 is minimal. You can do a one-step or two-step process timed for convenient stopping points, and the results will be nearly alike, provided that the preferment is not allowed to get very ripe. A two-step process where the preferment is allowed to ripen significantly more will have a more sour flavor.

The least sour result comes from a one-step process run from a very small initial amount of starter.

At some point, I would like to test out effect of temperature in a side by side comparison. I believe if you adjust the fermentation times so that the relative ripeness of the preferments is similar to the loaves above, that the results may not be very different from above. I suspect the slight favoring of lactobacillus versus yeast at temperatures around 65F will have a smaller effect on flavor than overall relative ripeness of preferments and final dough, but I don't know if that test will get done at my house any time soon.

zolablue's picture
zolablue

Concord Grape Focaccia


Fall is in the air and beautiful blue-violet grapes are in the market and I could not resist the cartons of gorgeous, sweet scented concord grapes.  What better to do with them than to bake a grape focaccia.


The only other focaccia I’ve baked so far is Bill W’s wonderful sourdough raisin focaccia which I highly recommend.  I wanted to do a sourdough version of this one but being a bit inexperienced in this area I was unsure of how the sugar and oil may impact the sourdough so for this first grape focaccia I decided to use a small amount of starter and treat it more as an added ingredient for extra flavor.  (Me too chicken…?)  I also wanted to use some spelt flour and turbinado sugar so here is the recipe.


Concord Grape Focaccia


255g Concord grapes, seeded

310g water

76g liquid levain

300g bread flour
150g spelt flour
8g instant yeast
4g salt

1 tablespoon honey
2 – 3 tablespoons extra virgin olive oil
2 tablespoons turbinado sugar

1 tablespoon sanding sugar


Add sourdough starter to the water and dissolve.  In a mixing bowl, add the flour, instant yeast, honey, salt, and water (with starter mixed in).   Mix on medium speed for about 10 minutes.  Place in container and let rise until double.

Turn dough onto lightly floured counter and press into a round a little bigger than the oven form you will be using for baking.   I used a 9” x 2" round cake pan.  Pour 1 - 2 tablespoons of olive oil into the pan and swirl around to cover the sides.  Dump any excess oil onto the top of the dough in the center and spread to cover.  Pick up the dough quickly and place it over the baking pan allowing some of the dough to overflow the sides.  You will use this to flap over the grapes inside.

Place roughly 2/3 of the grapes into the form and press slightly into the dough.  Gather the edges of dough hanging over the pan and bring them together over the top of the grapes and slightly pinch together pressing down on the dough in the pan to make sure it is against all the sides.


Add the remaining grapes over the top slightly pressing them into the dough.  Drizzle about 2 tablespoons extra virgin olive oil over the top.  Then sprinkle 2 tablespoons of turbinado sugar followed by 1 tablespoon of sanding sugar over the top of that. 


Preheat the oven to 400°F while the dough begins to rise again – about a half hour.  The dough had reached the top of the cake pan. 


Bake for 20 – 25 minutes until golden brown on top. 


Remove from oven and take focaccia out of pan to cool on rack.  Cut into wedges and serve.


This was as if I’d filled it with grape jelly and it smelled amazing.  The dough was very soft and I suppose that was due to the sourdough starter I added.  I’m not sure if the spelt had anything to do with that as I’ve only baked with spelt a few times adding it to other sourdough loaves.  It was really gooey and delicious.


I am going to make this again later in the week but try and press the dough out flatter and bake on a stone so the bottom gets nice and browned as well.  I also think I’ll add more spelt and reduce the bread flour just to see how that tastes.  This was almost like a cake bread, very spongy and soft and moist.  Not too sweet either even with the sugars sprinkled on top. I think for the size and shape I baked the amount of grapes was perfect although I think if I flatten it into a larger shape I will increase the amount of grapes used just to make sure it covers the dough adequately.  Ugh, they’re so much fun to seed…not.  But it is well worth the effort. 


This was really fun and I don’t know how I can improve on the flavor of it but we’ll see. I think it will be a fun recipe to experiment with.  I’ll post more results here as I tweak and see what works best because the concord grapes won’t be here forever.


http://zolablue.smugmug.com/gallery/3648690#208178433

   
JerryMac's picture
JerryMac

NY Hard Rolls - HELP

Here is a real challenge,

Anyone know where I can find a recipe for a REAL NY hard roll ?

Anyone from the NY area knows what I mean about the texture and taste or real NY hard rolls.

I don't live in the NY area any more, NC , and you can't buy a real hard roll here to save your life. All they know here is "white" bread.

I've found many recipes for "hard rolls" on the net and in cook books but these are not "NY hard rolls"

HELP PLEASE - I'M desperate

Jerry

Kjknits's picture
Kjknits

Soft, white-ish sandwich bread

There was a request recently for soft sandwich bread, and I actually have been baking my own soft sandwich bread for several years now. It began as a recipe from my MIL, but I have made some changes to suit our family better. It's a white bread, but there is a pretty hefty amount of wheat bran in the dough, which gives it a pretty appearance and also boosts the fiber content.  Anyway, here it is. If you try it, I'd love to hear how it went for you.

Katie's Sandwich Bread

Makes two 1.5 pound loaves

2 C water
1/4 C butter
2 TBSP sugar
1 package active dry yeast, or 2-1/4 tsp active dry yeast, or 2 tsp instant yeast
1/2 C wheat bran
2 tsp kosher salt
about 6 C bread flour

Warm water and butter in a glass bowl or measuring cup in the microwave until just warmed.  The butter doesn't have to be completely melted--it will mix just fine into the dough later on. (My microwave warms the water and butter just enough in 1 minute and 10 seconds on high power. You can also do this in a pan on the stove, if you don't have a microwave.) Place yeast in bowl of stand mixer with 3 cups of flour, wheat bran, sugar, water/butter mixture, and the salt. (See note.) Combine thoroughly with the dough hook. Begin adding remaining flour in 1/2 C increments until a cohesive dough forms. Knead for 5-6 minutes with your stand mixer using the dough hook (mine kneads in this time at speed 2). The dough is fully kneaded when it passes the windowpane test.  Round dough out, then place in a lightly oiled bowl. Cover with oiled plastic wrap and let rise in a warm place until doubled, about 1 hour and 30 minutes.  I place my bowl in the oven with the light on.

When dough has doubled, punch down dough, divide in half, and form into loaves. I just flatten each piece of dough out to a rectangle, then roll it up, being sure to seal it tightly while rolling to increase the surface tension on the final loaf.  Pinch the seal, turn under the ends, and place loaves in greased pans (I use 9 x 5 heavy metal pans).  Cover (I use the same oiled plastic wrap from the first rise) to rise for another 35 minutes. Bake at 375 for about 27 minutes, or until browned and hollow-sounding when thumped.

Note:  when using active dry yeast, I put it in the mixing bowl with the water/butter and sugar and let it proof for a few minutes, till it gets foamy.  When using instant yeast, I just mix it in with the first addition of dry ingredients and then go on from there.

I have found that greasing my loaf pans with Crisco (I know, but what can I say, it works) provides the best release after baking.  Also, I use a Misto olive oil sprayer to oil the bowls and plastic wrap.

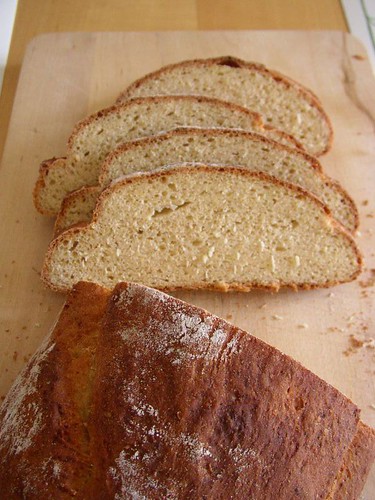
Here are the two batches of bread I baked today:

sandwich1

sandwich3


sand2

For some reason these loaves rose a little higher than usual.  The highest one was 5.5 inches!  I don't know what causes the "blowouts" on the sides of the loaves, but I don't mind them.  The bread is mildly-flavored, soft, and moist.  Only caveat is that it stales quickly, so I slice and freeze the loaves on the same day I bake them.  Then we just pull off slices as needed.

Enjoy, Katie in SC 

Anonymous baker's picture
Anonymous baker (not verified)

Chickpea bread

Recently I baked the following bread with chickpea flour. This recipe is my own creation. The chickpea flour gives the bread a light sweet taste.

chickpea bread

100 g chickpea flour
150 g white flour
5 g fresh yeast
~110 g water
1 TL honey
5 g salt
50 g refreshed sourdough

Dissolve yeast and honey in 20 g water. Mix the two flours and salt. Add sourdough, yeast and rest of water, mix and knead your dough (by hand or mixer) until smooth and elastic. Shape into a ball and leave covered for 1 hour or until double in size. 
Shape and leave to prove for another 30 minutes. Preheat oven to 230C. Mist inside with a spray. After 10 minutes reduce heat to 190 C and bake for another 20 minutes. Remove and cool.

Recipe in German: http://kochtopf.twoday.net/stories/2841127/

I haven't had a chance to document this much. Play with it. You'll figure it out.
Better documentation to come soon.

Recipe Convertor

dstroy's picture
dstroy

Strombolini

Recipe adapted from Brother Juniper's Bread Book.
My husband worked at the Br. Juniper's bakery in HS so we've eaten a lot of these things.

The basic idea is that taking a good filling and a good dough and bake them together, how can you go wrong? Think savory cinnamon roll, but use your imagination: you could use any dough and any number of fillings.

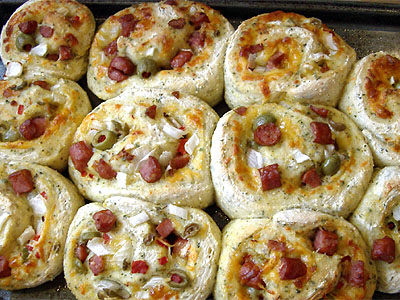
The bakery used to make a veggie version on a roasted pepper bread and a meat version on an herb bread. Here I've adapted the meat version to use up what we happened to have in the fridge (some extra Kabanosa, which I've seen called a "Polish Slim-Jim"). I think the bakery used to use some kind of salami. Sausage would be good too.

Anyway, on to the actual recipe:

Oreganato Bread

4 C flour
3/8 C polenta (course ground corn meal.. if you don't have it just use regular corn meal)
2 t granulated garlic or 2 T crushed fresh garlic (I used el cheapo garlic powder)
3 t dried parsley
2 t dried oregano
1 t black pepper (if you have a pepper mill, use it... it is way better when you get little nuggets of pepper every now and then)
1 T instant yeast
1 T salt
1 1/4 - 1 3/4 C water

Mix all the dry, add water and mix until you've got something you can knead, then knead it for approx. 10 minutes. Let it rise for 1 1/2 hours.

Roll it out flat and top with whatever you have. This time I used:

Chopped onion
Green olives
Cheese (chedder and mozarella, today. Swiss and jack previously)
Sausage bits

Other recommended toppings:
Roasted red peppers
Good sprouts (they used to use these big mung bean sprouts that were *so* good... nothing like those little alfalfa sprouts that are like getting pubes in your teeth)
Garlic (as long as you don't mind stinking)
Artichoke hearts

Roll it up and slice it into 1 inch thick slices. It'll spill, but no sweat: just dump anything that pours out on top. Let rise for 1 1/2 hours then bake for 1/2 an hour at 350.

You also don't need to slice it before baking it. For parties at the bakery they would roll one up and bake it whole, then just slice it off as people wanted some. It was quite impressive. I find that the little ones are much easier to deal w/ though.

Enjoy. Let me know if you try any other fillings.

These are great for throwing in the freezer and then you can take them to work with you for lunch! They thaw out by lunch, and then 30 seconds in the microwave and it's mmmm..mmmm goodness.

Abe's picture
Abe

Community Bake: Naturally Fermented Buckwheat Bread

I'm confident you'll all enjoy this bake. A bit different from previous community bakes and there's room for your own interpretations. This is a naturally fermented fermented buckwheat bread which has no yeast nor starter. It is a fascinating process with lovely results. Here is a very good version of this recipe but there are many out there all a variation on the same theme. I've been baking this type of bread for quite a while and have settled on my own method which suits me best. Don't really measure for this bread as it's a very good recipe for going by feel, once you have the hang of it. I'll post what I think is a good video to learn from and then i'll explain my own tweaks. 

https://youtu.be/8IQuDDOLoyI

Now for my method: 

  1. I wash the raw organic groats (this can either be done in a sieve or in a bowl and carefully pouring out the water). This is because i've noticed that while soaking unwashed groats it attains this purple colour which is harmless but aesthetically more pleasing when washed. Sometimes i'll soak the groats for about an hour and then pour off the excess liquid and rinse a few times. 
  2. Then i'll pour in water but just enough to cover the groats. After about an hour or two i'll check them and add in more water as they will soak it up. Just enough to cover them once again. 
  3. Soak for 12-24 hours. When they've softened, maybe just started to sprout and the water is now like a gel then you can move on. 
  4. Then i'll blend the groats into a paste but won't add anymore water. Prefer a thicker batter. After which i'll add about 2tsp salt (I like it with more salt) and stir it in thoroughly. 
  5. Cover and leave in warm place for another 12-24 until the mixture has risen, is very bubbly and will have a fermented aroma. Sometimes it'll have a bit of a funky smell but don't worry. 
  6. Once it's risen and bubbly (usually for me it takes around 12 hours but it will vary - i've never had any issues) then i'll gently stir in a seed mix - pumpkin, flaxseed, sunflower and sesame. No measuring. 
  7. Pour it out into a prepared loaf pan. I suggest a 1.5 litre or 1.5 lbs pan. 
  8. While many recipes bake it straight away i'll leave it for about an hour before baking. 
  9. Bake. 350F for about 80 minutes. 

This is a delicious bread which is healthy, light on the stomach, delicious and fantastic toasted. 

P.s. There are many videos and webpages with similar techniques for this bread. Some do all buckwheat and others mix up the grains a bit and might add in quinoa too. I suggest you watch a few to get some ideas. A hand held blender is really useful as it can all be done in one bowl. I bought one specifically for this type of bread. Found a food processor to be too finicky and messy. I look forward to seeing what you all come up with. Also, see here and here for Mariana's and Mini's excellent advice on how to score a batter bread. I always get an excellent rise from this bread but it leaves a flying crust. I didn't think a batter bread could be scored but Mariana explained how it could be done. Perhaps mine rises more than the bread in the video because I do make a more thick batter. Many videos show a more modest rise but they often have a much thinner batter. Again, it's all up to you - I just happen to like the results, crumb and texture wise, doing it with my own tweaks. 

Mariana found a very good video and posted it in a comment below. However I thought it'd be good to also post it here. Thank you Mariana.

https://youtu.be/IEzQqTlsyOw

As you can see, a slightly different method with very good results. 

mwilson's picture
mwilson

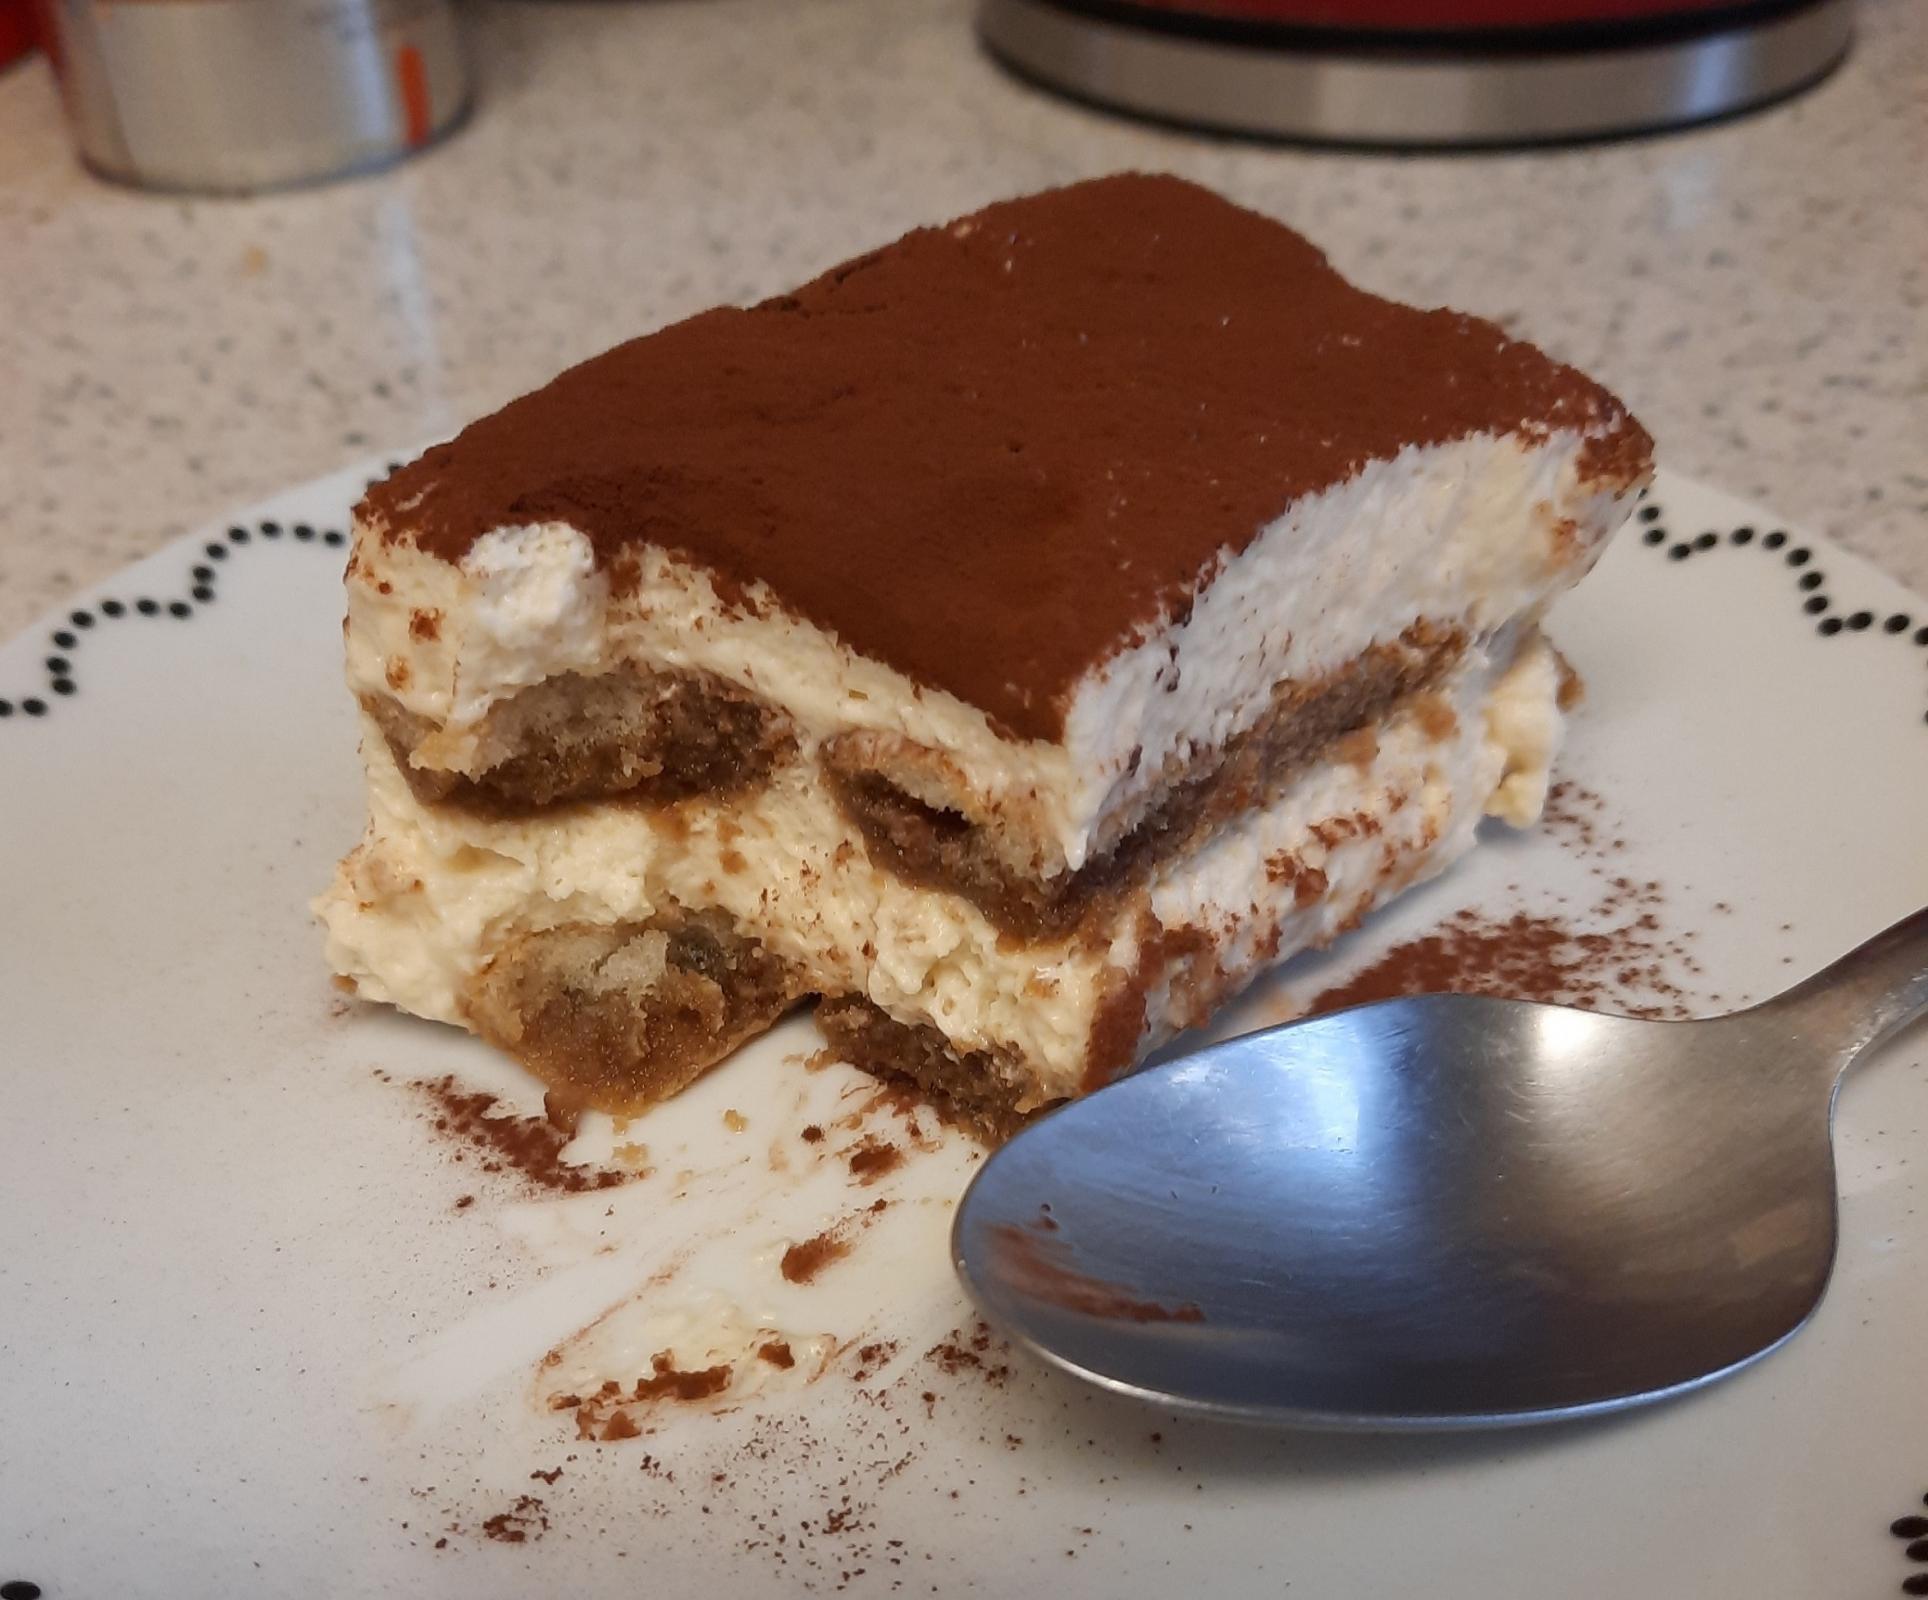
Tiramisu

I take much pleasure in making various desserts even though I don't really have a sweet-tooth. IMO there are several technical aspects that one should pay attention to when making a good tiramisu. However, I would normally approach this with a chef’s instinct, rather than being a stickler for precise quantities of ingredients. That being the case I have arrived at a definitive record of how I make tiramisu.

The important principles of tiramisu:

  • It should use only mascarpone. Some recipes use whipped cream to bulk it out, but this mutes the flavour of the mascarpone.
  • It should use raw eggs. I understand some may be uncomfortable with this but they are essential in providing the right texture.
  • It should use cocoa powder for the topping, and this is best applied before serving.

Ingredients:

Crema di mascarpone:

  • 500g mascarpone
  • 100-120g sugar (to taste)
  • 4 large eggs (UK large eggs)
  • 3 tablespoons Marsala wine

Sponge layer:

  • approx. 40 Savoiardi (Ladyfinger) biscuits
  • 6-8 strong espresso shots
  • sugar and Kahlúa to taste

Prepare the espresso in advance, add Kahlúa and a little sugar and enough water to make approx. 400ml 320ml*. Set aside. Next make the crema di mascarpone which will require an electric mixer many bowls and at least one spatula. First carefully separate the eggs into yolks in one bowl and whites in another. At this stage add a small pinch of salt to the whites.

Next make a cold zabaglione (sabayon) - Mix egg yolks, sugar and Marsala wine and use an electric mixer with a whisk attachment to beat on a medium to high speed until very thick. This will take at least ten minutes - stop at intervals to scrape down the sides of the bowl to ensure a homogenous mix. The prolonged mixing time will ensure the sugar has dissolved and wine is fully emulsified. Transfer the mixture into another bowl and set to one side.

Next remove mascarpone from the fridge, empty into a large bowl (this will occupy the final mixture) and work it a little just to loosen it. Separately, using an electric mixer and the whisk attachment whip the egg-whites until "stiff peaks". This is another crucial stage; while the whites at "soft peaks" still look foamy at the "stiff peak" stage the whites will look smoother. A good sign is the whisk will leave a trailing mark in whites and the top sides will taper in. Don't over mix as the water within the egg whites will leech out. It is equally important that they are not under worked either as we need a strong structure that stiff-peak egg whites will provide.

Lastly for the crema di mascarpone; the sabayon, whipped egg whites and mascarpone are carefully folded together. There are varying ways to do this but generally it is easiest to mix-down, i.e., start with the stiffest mixture and loosen it. To do this add part of the sabayon to the mascarpone and mix until homogenous. Then add the remaining sabayon in stages folding carefully to retain as much air as possible. It should feel loose and aerated. Next add the whites, again in stages being careful to fold them in gently to avoid knocking out any air but ensuring there are no unmixed parts. This gets easier with practice.

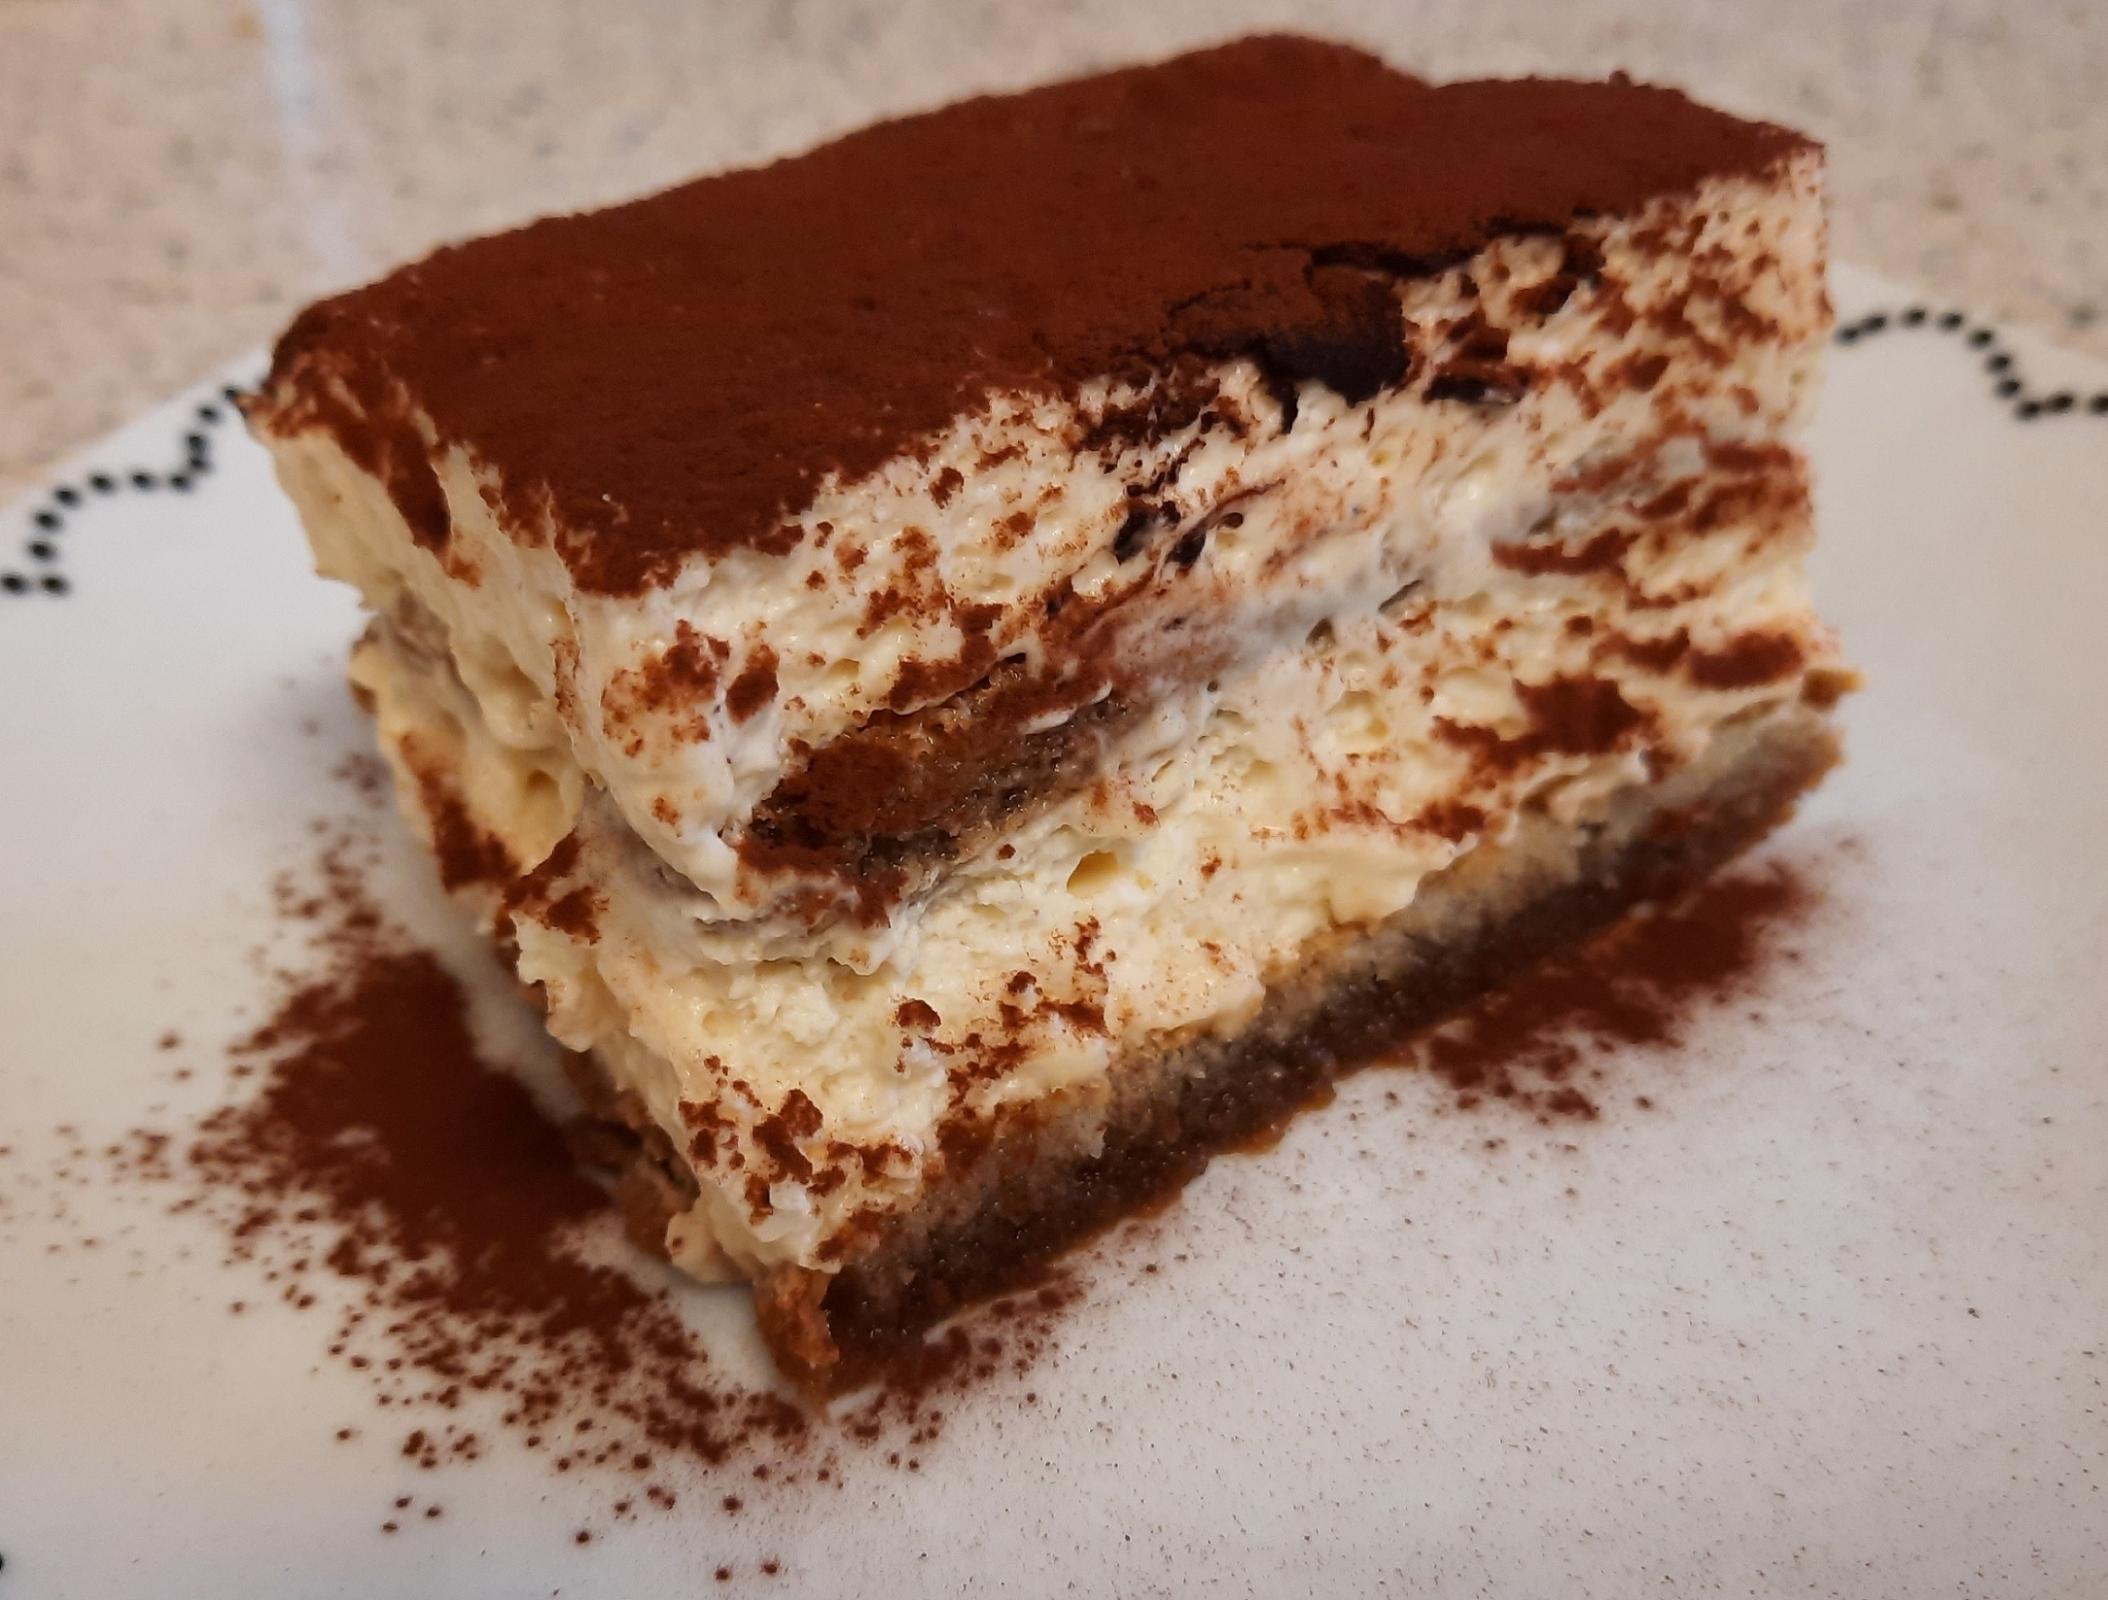
Finally construct the tiramisu - Briefly submerge the ladyfinger biscuits in the cooled coffee mixture and layer them. Alternate with the crema di mascarpone and smooth the top with a palate knife or spoon. Cover with plastic film or foil and leave to set overnight in the fridge - at least 8 hours.

Cut pieces and dust with cocoa powder to serve.

Done!

*Updated based on feedback.

Benito's picture
Benito

Eric’s Poppyseed NY Deli Rye Bread

This is my first bake of rye at this percentage, prior to this I have only used 5-10% in my sourdough breads.  I’ve followed Eric’s original recipe but followed Dan’s procedure building the gluten before adding the levain, salt and holdout water.


The crust is soft after it cools and will slice better the next day. If you need bread that will stand a few days, this mix is good for mailing across the country. Sealed in a plastic bag after cooling, this rye will be great 4-5 days later and freezes very well.


For one loaf


Rye Sour

50g Active Rye starter

137.5 g Rye (Whole or White Rye)

137.5 g water

Mix and set at room temp overnight. (If this stage will longer than 8 hours I suggest refrigerating after 3 hours and warming to room temp before proceeding)


Final Dough:

All Rye Sour 163 g of rye total so 29% rye

242g water (consider holding back some water say 22 g or so) hydration 73%

394g bread flour

½  Tablespoon sugar

½  teaspoon instant yeast

11g Sea Salt


(Total flour 557 g)


Build the rye sour overnight.


Mix bread flour, water (minus holdout water), yeast and sugar using a mixer.  Once incorporated let rest for 15 mins.  This is a stiff dough.  Then mix on low speed to build gluten.

Once gluten well developed add levain mixing again until well incorporated and gluten well developed.  Then add the salt and holdout water gradually and again mix until well developed.

Transfer the dough to a well oiled bowl and continue bulk fermentation 80ºF for about 1 hour or until the dough has at least doubled.

Once bulk is complete and the dough has at least doubled pre-heat the oven to 500ºF with the dutch oven inside.

Dust the surface of the dough and the countertop with flour and release the dough onto the countertop.  Degas the dough by patting it down with the heel of your hand.  Shape into a batard.

Transfer the batard to your final proofing device.  I used a cookie tray with bottles of wine on either side, then my couche and then a sheet of parchment paper.  I placed the dough seem side down onto the parchment supporting the sides of the dough.  I brushed the surface with water and put poppyseeds on the outside of the dough.  

The dough was left to final proof at room temperature.

After about 45 mins when the oven was ready the dough was lifted off the couche using the parchment as a sling, placed on the countertop and scored with a bread knife.  The dough was then transferred to the dutch oven and the lid placed on top for steam.

The oven temperature was dropped to 470ºF and the dough was then baked for 15 mins lid on.  Then the lid was removed and the dough was baked for a further 20 mins at 420ºF.  After 20 mins the temperature was dropped to 350ºF and the bread was done after about another 10 mins and removed to a wire rack.

A glaze of cornstarch and water was brushed on the crust.

The bread will be left until the next day to slice.


Pages