The Fresh Loaf

A Community of Amateur Bakers and Artisan Bread Enthusiasts.

Most bookmarked

Anonymous baker's picture
Anonymous baker (not verified)

Hamelman, Hand Kneading

I'm new here and have enjoyed all the great information.  Thanks to everyone.

I've been a bread baker for years, starting with Amy's Bread (anyone still bake from that book?  I loved many of the recipes).  

I recently got Hamelman's book out of the library and almost didn't try any recipes because everything is about mixing on speed 1 or speed 2 and I'm trying to get away from using a mixer at all.  But reading around here I seems that some people use Hamelman's formulas and mix and knead by hand.  So any advice about how to convert the mixer speeds to hand kneading would be greatly appreciated.

Cheers,

--Dave

Edthebread's picture
Edthebread

DLX users question

Hi Everyone

I have a question for all you seasoned DLX users out there.  I recently bought one and I'm getting the hang of it for kneeding bread, but I had a question about the mechanism.  I kneed about 10 cups of flour with the roller, setting it about one inch from the side of the bowl, and when it has been kneeding for a while and the dough is nice and stiff, the arm moves out quite a way towards the center of the bowl when the dough comes round.  Is this the way is should be to kneed the bread efficiently, or should I place the roller farther from the edge so it does not need to move out so much when the dough comes around?

Thanks


Ed

Anonymous baker's picture
Anonymous baker (not verified)

What kind of insect is this in my wheat grinder - left dormant for 8 years ?

I got out my 30 year old Magic Mill wood stone wheat grinder, after not being used for at least 8 years.  It was stored in the laundry room, and I had stupidly left about a half teaspoon of hard red winter wheat flour in the collector (& stone grinding area).  I was surprised to find about 8-10 of these dark brown/black appearing larvae still alive and moving around after all this time.  They are about 1/2" long, and I took these photos with a digital microscope, so they look larger than life.

Larvae image #1

Larvae Image #2


I have not seen any of the more typical brown flour beetles that chomp through boxes and bags (about the size of a small sesame seed), nor any moths.  There was also tons of carmel colored smaller, dried out poppy seed size particles & some webs all over every aspect of the grinder.  I scraped some and took another shot that is more detailed under microscope.  I'm assuming these must be dried out eggs?

Larvae Eggs ???

Anyway, I'm totally freaked out about using this old Mill, as it is very hard to get it all apart enough to clean thoroughly...and am thinking about just getting a new Nutramill to replace it.


Any idea what these critters are...and how they could still be alive after at least 8 years?


I wasn't sure where to post this, but I had linked photos, so if moderator needs to move it, please do.

foolishpoolish's picture
foolishpoolish

Pandoro (a lievito naturale)

FP

md_massimino's picture
md_massimino

First sourdough onion bread

Thought I'd share this one, because it was simple and came out really good.  I'm sure it can be improved on but I can normally tell by how fast the fam digs in to the warm loaves which outcomes are keepers.

I have a sourdough starter that was made from organic grapes (http://www.exploratorium.edu/cooking/bread/recipe-grapeyeast.html) I did this in two phases, to kind of work around my schedule so maybe it will work the same way for you.

Stage 1 (night before):

  • 1/2 cup active sourdough starter
  • 255 g warm water
  • 310 g all purpose flour

Stir the water into the starter, then stir in the flour.  I covered with a dish towel and left it on the counter overnight because the kitchen has a corner that stays around 58 degrees at night in the winter.  I didn't want a super slow ferment from the fridge so I figured this would be fine.  The dough spent about 8 hours in this stage.

Stage 2 (morning of baking):

  • 125 g warm water
  • 250 g flour
  • 1 1/2 tsp salt
  • 1/2 sauted onion

Stir the water into the starter, then stir in the flour.  It was really hard to incorporate the water into the existing intermediate starter, might add less flour during that stage in the future.  This is a wet dough so the stretch and fold is in effect.  Fold in the onions, then stretch and fold once every 20 minutes for an hour.  The onions were left over from another dish, so they were already sauted and cold from the fridge.  Let rise until double.  I let it go for about 8 hours.

After 8 hours I tried forming batards, but gave up and just left them a little like ciabatta.  Surface tension and dough consistency are my main problems these days, still working on my technique.   Cooked in a hot, steamed oven for about 25 minutes.

I don't think the shape mattered much because these loaves came out awesome.  This recipe made two decent sized loaves.  I took one to the neighbor's house that I wish I had back.  They should have gotten a loaf of the pain de campagne I made earlier in the day ;)

In the future I'm going to add a little more flour, perhaps whole wheat or rye.  Comments on anything are appreciated as I'm new to the bread world, though I'm trying to catch up quickly.


Debra Wink's picture
Debra Wink

Greetings from Missouri

Hello to all. Guess it's time to introduce myself, since I've already jumped in and started posting. (Just couldn't help myself :-) This site was almost overwhelming at first, but I'm gradually figuring things out. If you have any helpful tips for me on site navigation and notification settings, I'm grateful for advice.

Like everyone here, I love to bake. I'm an equal-opportunity baker---cookies, cakes and pies may be my favorites. But one can't live on sweets, and so I look to bread and whole grain baked goods to satisfy my need to bake, whithout breaking the calorie bank.

I am also a scientist at heart, and I enjoy researching and experimenting with methods, troubleshooting and tweaking recipes and formulas, and just talking science. Two of my loves---microbiology and baking---add up to bread. Especially sourdough. I have done a lot of work with starters, so you may see me throw my two cents into those discussions.

FlydM, you have a very nice place here. Thank you for having me :-)

Anonymous baker's picture
Anonymous baker (not verified)

Slow Rising Bread

Hello


I am a complete beginner in the sourdough world. I am a low budget mamma and can't really buy a established starter; moreover, The Netherlands is a rather difficult place to get nice flours (can you imagine they don't sell WWFlour in the supermarket?!?!?!). Therefore, i started my own, with the instructions of Mike Avery in his site sourdough home, 2 weeks ago. Started feeding it every 8 hours, on a basis of Rye and WW, and from the beginning it always smelt so good. So far it has been bubbly and happy, and after the first week I switched to feeds every 12 hours with rye and AP Flour. It started to double its volume by then. With all these signals of health I decided to jump in the pond. I took a recipe of Pain de Mie I found in the Sourdough Companion site, because it seemed easy. It prompted to make a sponge with 1 T of starter (I used 3, though, just to "give more power") and 100gr flour and 100gr water. I left it overnight, and this morning it had bulked considerably. I proceeded to mix the dough ingredients, amongst which there is milk and butter, I kneaded 3 times with intervals of 5 min, 5 min each kneading, then fermented for 3 hours with a fold each hour, until it seemed to have doubled even though I had my doubts. Here things started to seem slow, since in the recipe it said that it would take 2 hrs the first rise. I punched down and shaped in a tin the half and the other in a "log". It's been 3 1/2 hrs and my loaves seem to be so slow...! They haven't doubled so far, and I am wondering if this is normal. Is there anything I might be doing wrong?? I am patient, but I wonder about the average rates of rising for sourdough. I hope anyone can help me with some answers.


Grateful in advance,

P

Anonymous baker's picture
Anonymous baker (not verified)

Real Italian ciabatta vs. American artisan ciabatta

Okay, someone please tell me how to get true, authentic Italian ciabatta? I lived in Naples Italy for a year and I fell in love with the breads of the region. I make a very respectable using Peter Reinhart's "The Bread Bakers Apprentice" recipe. The crust and color are picture perfect. The crumb is full of holes just like the picture but..........the texture is really lacking to what I remember. In Italy, we would buy day old bread because it seemed to have much more flavor and the texture would soak up all the great ragu's my mother in law would make. Here is the rub, mine(and other's from artisan and professional bakers here) do not come close to what I remember. My texture turns to crumbs(crumbly) after about a day despite trying everything(from more or less oil, to changing my flour(even artisan flour from "King Arthur's), to times for proofing and temps for baking). What is the secret? I'm driving myself NUTS! Somebody help!

Yumarama's picture
Yumarama

Sourdough Starter made with commercial yeast?

Ok, this is THRICE in one day I've read here about people starting "sourdough" starter with commercial yeast. 

Can anyone explain the process and how this is seen as "sourdough"? Does commercial yeast get along with lactobacilli's acid development? I'd imagine that needing to feed the commercial yeast a lot sooner, since it's a faster yeast than wild yeast, would mean that the lacto wouldn't have enough time to establish itself before it's numbers get diminished rapidly.

Someone walk me through this please...

Saw it mentioned in a link to PreparedPantry.com, then again here and Norm mentions it here.

Stephmo's picture
Stephmo

Cinnamon Swirl Bread - KAF Baking Companion

In getting started down the path of baking, I'd been having problems with dough failing to rise in the oven or the second time - so the enthusiasm of this bread comes in having the faith to cut my rise times in half sine I was using Fleishman's instant yeast.  Once I did this, I was able to get the bread I finally wanted without the disappointment of a heavy, dense loaf that seemed like it should work.

After reading up on the policy of repriting recipes, it seems I'm okay to share how I got to this point.  If it's a problem, I do hope someone will let me know.  :)

Anyway, husband is a tremendous fan of all things cinnamon and sugar-based, so he was wanting a cinnamon sugar bread since the baking experiment began.  When I'd gotten the King Arthur Flour Baking Companion, he zeroed in on the recipe for Cinnamon Swirl Bread on page 206-207.  It can seem a bit daunting with the Dough, Filling and Topping ingredients, but let's break it down, shall we?

All of the ingredients pictured (some things premixed):
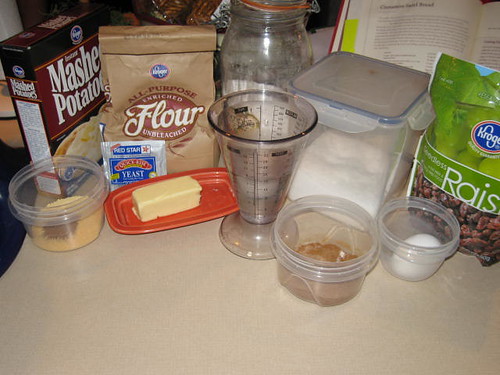
But let's start logically with the DOUGH:

3 cups (12 3/4 oz) unbleached all-purpose flour

1/4 cup (1 1/2 oz) potato flour or 1/3 cup (3/4 oz) potato flakes)

1/4 cup (1 1/4 oz) nonfat dry milk

1 1/4 tsp salt

1/2 tsp cinnamon

3 Tbs (1 1/4 oz) sugar

2 1/2 tsp instant yeast

4 Tbs (1/2 stick, 2 oz) butter

1 cup (8 oz) water

For reference, I opted for the potato flakes and used unsalted butter. All ingredients were at least room temperature.
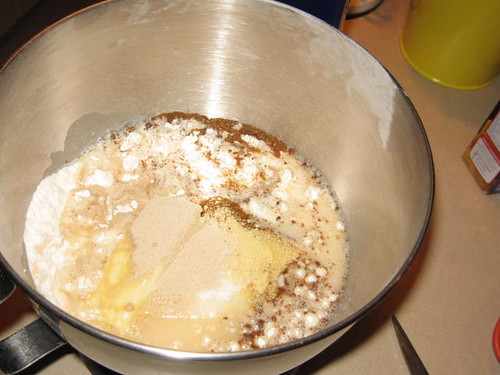
From KAFBC:

In a large mixingbowl, combine all the dough ingredients, mxing until dough begins to come away from the sides of the bowl.  Knead (about 10 minutes by hand, 5 to 7 minutes by machine) until the dough is smooth and satiny.  Transfer the dough to a lightly oiled bowl, cover the bowl ith plastic wrap and set it aside to rise for 1 to 1 1/2 hours; it will be puffy, if not doubled in bulk.

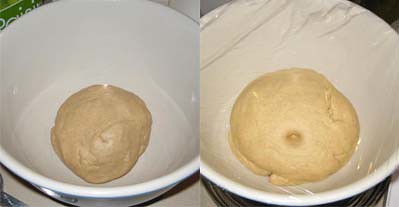
Once I'm convinced everything's going well enough, I acutally let the mixer do ALL the work on this sucker.  I was doing this after work so I took time to go upstairs and change and came back to see that the dough hook had done its job rather nicely (my mixer and I are good friends now):

I check my rise after 45 minutes and do the "poke" test - where I see if my poke sticks.  As you can see, I do have a doubled dough and a poke that's more than sticking.  So rather than risk tiring out the yeast, I decide to move onto next steps:
Next steps for Cinnamon Swirl Bread involve the FILLING Ingredients:

1/4 cup (1 3/4 oz) sugar

1 1/2 tsp cinnamon

1/4 cup (1 1/2 oz) raisins or currants

2 tsp unbleached all-purpose flour

Egg wash, made from 1 large egg beaten with 1 Tbs water

For my bread, I used raisins.  Husband thinks we could have doubled the swirl ingredients.  From the book:

Pulse the filling igredients except the egg wash in a food processor.

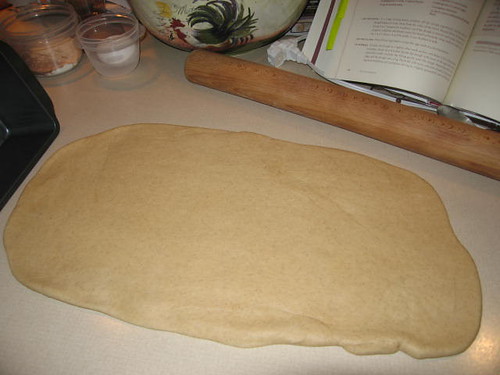
TO ASSEMBLE:  Transfer the dough to a lightly oiled work surface and shape it into a long, narrow rectangle, about 16 x 8 inches.  Brush the dough with some of the egg wash (set the remainder aside) and pat the filling gently onto the dough. Beginning with a short edge, roll the dough into a log.  Pinch the side seam and ends closed (to keep the filling from bubblng out) and palce te log int a lightly greased 8 1/2 x 4 1/2-inch loaf pan.  Cover the pan with lightly greased plastic wrap or a proof cover and let the bread rise for a bout 1 hour at room temperature, or until it's crowned about 1 inch over the rim of the pan.

I actually made this a little bit simpler than it sounds - I laid my loaf pan at one end of the counter and rolled my rectangle towards it as a guide, keeping the width slightly narrower than the pan.  The dough was very silky, so I really just sprayed some Pam on my kitchen island for the "lighly oiled" portion of the instructions.

Here's the dough rolled out - you can see my loaf pan "guide" on the far left.  I don't know if it's just me, but the cinnamon in the dough really seems to come through for me:
The filling was VERY clumpy (raisins!), so it didn't spready as easily as I would have liked.  This is also where the discussion of doubling the filling for future batches came in:
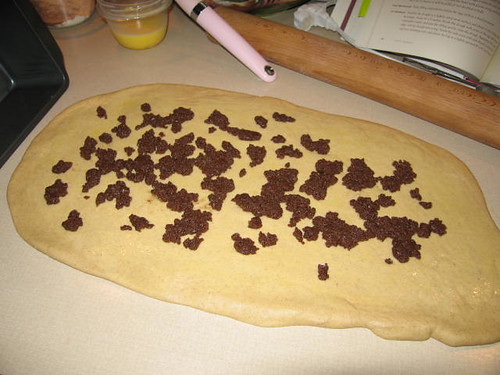
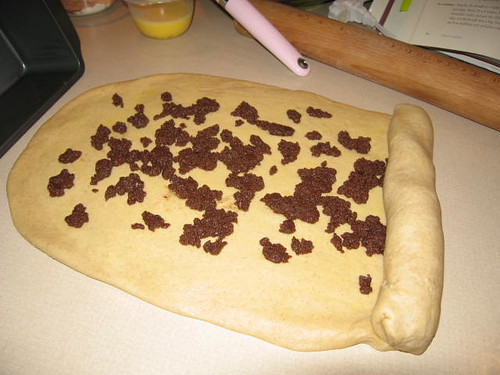
The rolling was actually a snap.  I did the side tucking as I went along and went towards my loaf pan:
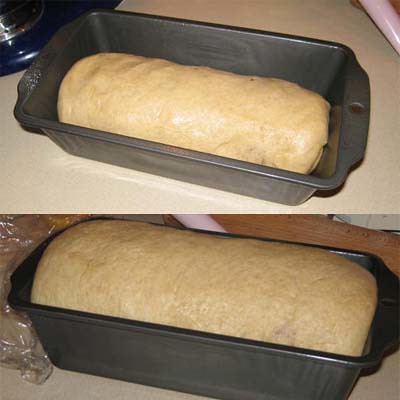
Again, with the rising, I checked out the loaf in only HALF the time - and good thing!  Doesn't it look like I'm an inch above the pan?
Now for the good suff - the TOPPING:

2 TBS (1 oz) butter

2 Tbs (7/8 oz) sugar

1/4 tsp cinnamon

1/4 cup (1 oz) unbleached all-purpose flour

I will say that this made MORE than enough of the topping.  From the book:

In a small bowl or mini processor, combine the butter, sugar, cinnamon and flour until the mixture is crumbly,  If you're using a mini processor, watch carefully; topping will go from crumbly to a cohesive mass in just a second or so.

Brush the top of the loaf with some (or all) of the reserved egg wash and gently press on the topping.

Preheat the oven to 350 degrees.  Bake the bread for about 45 minutes, tenting it lightly with aluminum foil or the final 15 minutes or so if it appears to be browning to quickly.  Remove the loaf from the oven, and after about 5 minutes, quicky remove it from the pan.  some of the streusel will fall off, but you can alleviate this by first loosening all around the edges of the loaf with a knife, then turning the pan on its side and gently pulling it away from the loaf.  Topping will continue to fall off as you maneuver the bread -- we've never figured out how htey make that stuff adere so nicely on the store-bought loaves -- but you'll still be left with a lot of the sweet topping.

I did actually score the top of the loaf lightly before baking it - you can't really tell, but I did:
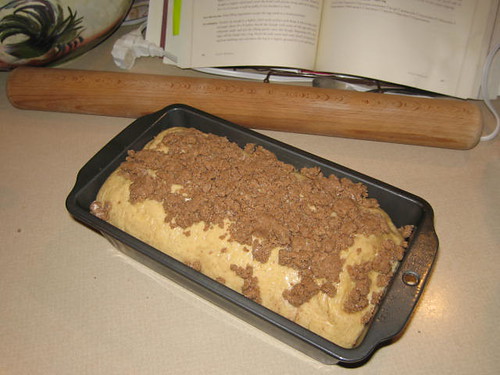
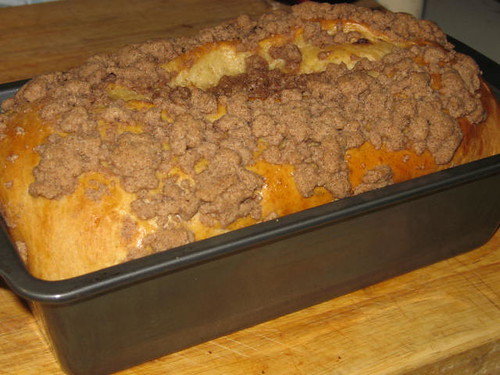
The oven browning was FANTASTIC - we did tent it for a bit to save on some of the browning and you can see that the split did come through (as did a bit of the filling, but that's okay):
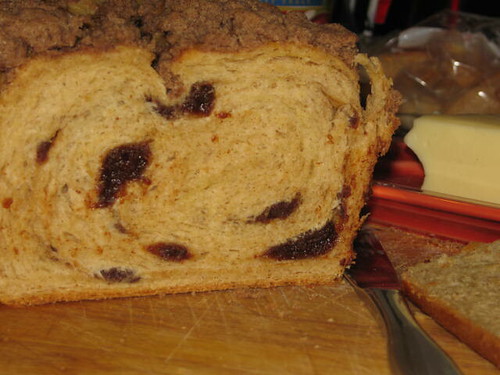
Slicing into the bread was amazing - it smelled fantastic and made GREAT toast and snacks.  It was great with cream cheese and peanut butter as well:
Pages