The Fresh Loaf

A Community of Amateur Bakers and Artisan Bread Enthusiasts.

Blogs

Jo's picture
Jo

thought I would blog my progress. I have recently converted my garage into a bakery, i learnt to bake in france, spent 4 months with an artisan baker and then returned to bake here. Artisan bread is virtually unknown in these parts, in some cases when I take my baguettes into places to sell them people say "'what's that"' in most cases they don't even recognise it as a loaf of bread. Will endeavour(if anyone is interested to keep you updated on my progress) I will give you more info on output etc and post some pictures soon. Oh I live in Fish hoek Cape Town South Africa

pumpkinpapa's picture
pumpkinpapa

I created a delicious spelt starter at the beginning of February and made some great loaves from it recently.


The one on the left was a 50/50 organic AP with organic light spelt flour (I can only afford 2.5 kg bags of spelt and ran out) while the one on the right is a 100% light spelt loaf. Both were excellent! The kids liked the 50/50 while I found the 100% to be exactly like pumpernickel in texture, great spread with peanut butter or pb/banana/honey!

I used Sourdolady's recipe for starter but reduced all liquids by 25%, otherwise too much liquid and the starter never matures. After a week the starter was active, not as much as white or rye, and definitely not as volatile as whole wheat, but it was bubbly and produced a pleasant aroma. You can use either whole or light spelt with no loss of nutrients as they are contained in the germ not in the bran as in wheat.

I used the basic sourdough recipe as given in Peter Reinharts BBA but with 25% less water again:

Starter:

4 ounces spelt starter, 4.5 ounces spelt flour, 0.75 to 1.5 ounces water

Final dough:

20.25 ounces spelt flour, 0.5 ounce Celtic sea salt, 9 to 10.5 ounces lukewarm water 

Kneading took about 20 minutes, but my house is cool these days which affects proofs immensely as well. However unlike all my sourdough experiences (save for yeats spiked variations), this spelt sourdough had far faster and greater second proofing results than wheat or rye starter.

This is going to be my main bread, and if the kids continue to enjoy it then I should experiment with spelt cinnamon buns soon too. 

Marcelo's picture
Marcelo

Hi I'd like to share with you all my Bread with Olives recipe. I'm new to thefreshloaf.com, just discovered it with the links from here that the recipe got on my blog.

Bread with Olives

Bread with Olives

This is a recipe for a bread famous with my family and friends. It comes with a small story: 10 years ago when I moved to work in Buenos Aires we celebrated a year going out with my girlfriend Carolina (now my wife), and had a fancy dinner in a great Hotel (Alvear Palace) with diamond ring... and all,... Well, the restaurant (Le Bourguiñone) has this wonderful bread with olives... but they wouldn't share the recipe...
It took me about 6 trials to get it really close, I believe the current version of the recipe yields a bread that's as good as the original or better. As I'm not in the restaurant business I'm ready to share the recipe of this tasty bread with the world...

Here is the whole recipe.

Hope you enjoy it. I will be posting a couple more (garlic, bacon and onion) in the next few days.

Marcelo.

Srishti's picture
Srishti

Thank you Jane, JMonkey and Tom,

I finally had sucess getting decent (not as big as Jane's) Holes in my whole wheat Sourdough!!! The taste was definitely much superior to my previous attempts :)

ab

I also made a hazelnul & a seeded bread with same dough. They looked gorgeous but did't have any impressive holes:

cde

bwraith's picture
bwraith

My staple bread for the past couple of years has been a miche. I started doing the BBA recipe with half bread flour and half KA whole wheat flour. Lately I've been experimenting with different blends of organic and sifted flours. I haven't yet settled on one recipe and change things every time I do it lately, but I thought I'd describe this basic recipe.
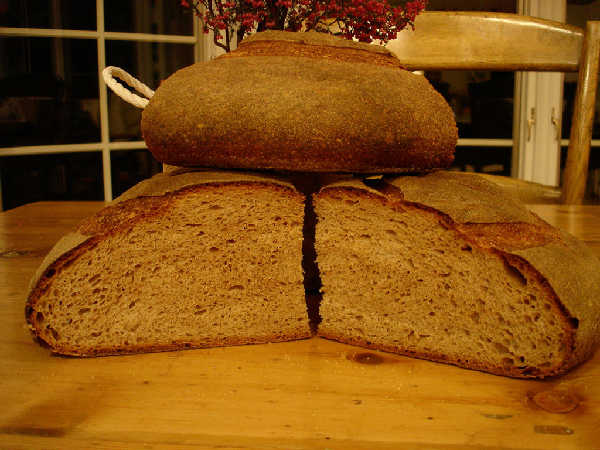
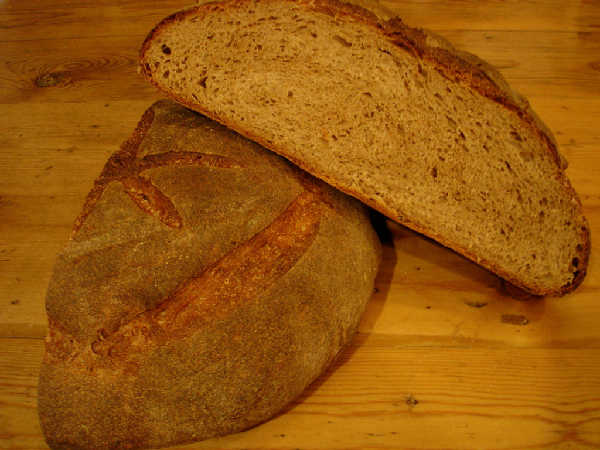
 Loosely based on BBA Miche and Hamelman Mixed-Flour Miche.

 Loosely based on BBA Miche and Hamelman Mixed-Flour Miche.

Mixed-Flour Miche: Loosely based on BBA Miche and Hamelman Mixed-Flour Miche.

I have some photos of my process.

Many, many thanks to JMonkey, SourdoLady, Zolablue, Mountaindog, Floydm, and numerous others. My results on this and other recipes are much better because of the great ideas I've found in the various blogs, postings, and lessons here.

Mixed-Flour Miche: Loosely based on BBA Miche and Hamelman Mixed-Flour Miche.

There is a "firm starter" that is built from white poolish-like starter as in the BBA "barm" version (50/50 by weight using breadflour and water), which is retarded overnight and included in the dough which is baked the same day.

The recipe I've been doing lately has evolved from the BBA miche recipe to be more like the "Mixed-Flour Miche" in Bread by Hamelman. My objective has basically been to have a high whole wheat content, but use sifted flours to get a less coarse crumb. I have also mixed red wheat and white wheat flours as well as tried some spelt trying to come up with a flavor that is not too "grassy" or "nutty". I find the taste of 100% white wheat bread to be a little too bland, whereas using too much red wheat seems bitter in a way I don't like.

As a result, I've ended up mixing various flours in an attempt to get something that is mostly whole wheat with some of the coarser bran sifted out and partly red wheat, partly white wheat for flavor.

The recipe showing in the photos is as follows, and is loosely based on both the BBA Miche and the Hamelman "Mixed-Flour Miche" in Bread.

For the firm starter:

  • 7oz "BBA style barm" (100% hydration bread flour starter)
  • 6oz Golden Buffalo flour (sifted red wheat flour from Heartland Mills)
  • 3 oz KA Organic Whole Wheat
  • 4oz water

Mix/knead ingredients for about 3 minutes to get a fairly firm not very sticky dough. Place in container and let rise to about 1.5x in volume - about 3 hours. Punch it down and allow to rise again to double - another 2.5 hours, roughly. Place in refrigerator overnight. I was trying to get this one to be a little more sour, and I think I went too far, as the bread was just a touch too sour for my tastes, but I don't like my bread very sour. Some might like the more sour flavor I got. My plan is to reduce the rise time of the firm starter and use less Golden Buffalo and maybe use whole spelt flour in higher proportion next time.

For the dough:

  • 6 oz KA whole spelt flour
  • 8 oz Golden Buffalo sifted red wheat flour (Heartland Mills)
  • 3 oz KA Organic Whole Wheat
  • 6 oz sifted white wheat flour (Homestead Grist Mill)
  • 6 oz Sir Lancelot High Gluten flour
  • 3 oz KA Rye Blend
  • 29 oz water
  • 3/4 tsp diastatic malted barley flour
  • 26 grams salt (about .9 oz)
  • Firm starter from day before.

Cut up firm starter and cover with towel to allow the pieces to lose their chill.

Autolyse: Mix all but salt and starter in bowl until the ingredients form a uniform shaggy mass. Allow to rest for 60 minutes.

Mix and knead dough: Push the pieces of starter into the dough and sprinkle with salt. Mix/knead for 5 minutes to form a supple, fairly soft dough. The total hydration of the entire overall dough is 82%, so it is relatively soft at the beginning. Place in a container to rise.

Fold the dough hourly: The total bulk fermentation time was 4.5 hours. I think I probably went too long, though. Anyway, I was folding it using the technique in Hamelman's Bread, i.e. (very roughly) turn the dough out on a bed of flour top down and gently spread it out/push out some of the gas. Then pull out and stretch one side of the dough and fold it toward the center. Do the same for the other three sides. Put the dough back in the container with the top up and the seams down. I may have "overfolded", as the dough seemed a little "too tough" possibly, and I didn't get as much oven spring as I was hoping for.

Shape into boule: Form a boule not too differently from the folding technique above, except it is more of a gathering in of the edges of the dough and pinching them together to stretch the "top" of the dough (which is face down on the counter as with the folds). Flour a couche with rice flour and place in 8 quart steel mixing bowl, and then place the dough in the couche seams up.

Final Proof: Allow to rise for about 2.5 hours - again I let it go until 3 hours, and I think it was probably too long to wait.

Place on parchment: Place parchment on an upside down baking sheet or a peel and flour with coarse corn meal. Invert the bowl with the dough onto the parchment and pull away the bowl. Gently pull away the couche, which works great with the rice flour on the couche. Slash as photos show. I very lightly spray water on with spray mister.

Bake: Preheat oven to 500F well before this point, like an hour before. Use various steaming techniques as described many places for home ovens. Drop temperature to 450F after about 5 minutes. Bake at 450 for 10 minutes, then rotate loaf and drop temperature to 400F for another 20 minutes. Then rotate and drop temperature to 375F. Continue to bake until internal temperature is about 208F.

I would enjoy hearing any comments about how to manipulate flavor, the amount of rise, crumb texture, and so on. This bread did not rise quite as much as some others I've done in similar fashion. There are a few reasons I can think of, such as too much fermentation and proofing time, starter slightly too ripe and sour, possibly folding too much, maybe kneading too much in the very beginning, and so on. I also think the sour flavor is too much for my tastes, and other versions I've done were less sour. I think this is due mainly to overly long fermentation and proof, and to allowing the starter to become too ripe. Also, I used a higher proportion of red wheat flour in this starter than previously.

Flourgirl's picture
Flourgirl

Well, I am not losing my mind, at least not over some carda-whatever.  I have a picture of a label in my camera-phone that I will have to upload if I can figure out how.  The label on the containers of carda-whatever are actually spelled wrong!  HA, no wonder I was confused.

Anyhooo, enough on my spelling angst.  I am only working every other weekend at the bakery for the winter and finishing my apprenticeship at a coffeehouse.  It's a lot slower paced there, with a very limited menu of baked items.  Muffins, brownies and cookies are all I have to make.  Usually, the owner makes the muffins as I can't come in early in the morning anymore because of my winter schedule.  It's the break I need as I have two really intense classes for the winter, accounting and small business management.  SBM is basically all about making a "real" business plan.  The final exam is presenting your plan to the class and teacher like they are bankers and you are trying to get a loan.  So, I am doing a lot or research into pricing of items like supplies, equipment and even drywall for the remodeling of my "shop."  I also have to come up with a name, menu and pricing, along with a zillion other things I can't think of right now as my head is swimming with ideas.  Any suggestions would be appreciated!

See where I am spending my apprenticeship:

http://www.8thstreetcoffeehouse.com/index.html

dstroy's picture
dstroy


My son is a huge Legend of Zelda fan. He has been for years actually.

When he was 3, he wanted to dress as the hero "Link" (Green Boy, as he called him) for Halloween.

Here was his costume:


So when he asked for a Zelda cake for his birthday, I had to think about how I was going to do this. I'm not exactly a professional cake decorator!

I finally took some classic imagery from the game - the sword in the stone, the hero, and the Tri-force symbol that appears throughout the game, as my inspiration for the cake.


I started with cookies, which I cut and painted with food coloring ink.

I made a couple of Link cookies to choose from, and a partial sword cookie too.

Then I made a chocolate cake, which I froze and cut and rearranged:


And finally some cream cheese chocolate frosting, purple sparkle sugar sprinkled (his favorite color) and some strategically placed non-chocolate frosting with yellow sugar sprinkles and voila!

zelda cake with candles


Felix with his cake

He liked his cake!

pmccool's picture
pmccool

This weekend I got to try a couple of flours that I haven't used previously.  

The first was an unbleached AP type (brand name Eagle Mills) that I purchased at a Sam's Club.  With a protein content of 4 grams in a 30 gram sample, it's as high in protein as a lot of bread flours that I have used.  Whether I was brave or foolish is open to debate, but I decided to try in in the BBA pain a la ancienne even though I've never made that bread before.  The flour worked very well in this application.  I'm still of the opinion that the water content in Reinhart's formulas don't begin to produce the types of doughs that he describes in the text, because I had to add more water to get the kind of softness that he indicates.  Once I got the dough sufficiently hydrated, it was very supple and extensible without being excessively sticky.  In fact, I'll cut way down on the amount of bench flour next time (because there will be a next time with bread that tastes this good) so that I don't have as much on the finished bread.  The crust was crisp and the crumb was tender, though not as open as I had hoped.  My shaping left a lot to be desired.  And let's just state up front that it is better to remember to slash the loaves before they go into the oven, rather than a couple minutes after closing the door.  However, ugly or not, this bread has a wonderful flavor.  It was a great accompaniment to the jambalaya that my wife made for lunch Saturday.

The other flour I tried was Wheat Montana's Prairie Gold.  A local grocery has a display set up featuring both the Bronze Chief (a red variety) and the Prairie Gold variety grains.  Each bin of grain feeds into an individual grinder, which I think are impact types.  Just push a button and it drops freshly milled flour into a plastic bag.  It's a bit pricey at 79 cents per pound (which is quite a bit higher than the already-ground and bagged flour of the same brand sitting on the shelf).  Still, I got a couple of pounds of each, partly to play with freshly ground flour and partly to see how the gold variety tastes in comparison to the red varieties with which I'm already familiar.  I used a honey whole wheat recipe that I have used for many years so that I could gauge the behavior of the Prairie Gold against past experience.  The dough mixed easily, but seemed somewhat wetter (because the fresh flour wasn't as dry as the prepackaged stuff, maybe?).  The dough also handled well, becoming very smooth after 8 to 10 minutes of kneading.  It was much tackier than I usually see with this recipe, although it wasn't at all gloopy.  The bulk fermentation easily doubled but although the last rise in the pans was quite a bit slower and seemed to run out of gas before redoubling.  There was very little change in volume while baking.  The crust of the finished loaves is perhaps a little lighter in color than loaves made with red wheat but the crumb is markedly lighter.  It isn't as white as a white loaf, but it isn't dark either; more of a sand color.  Since the flour grind was relatively fine, the crumb is free of any grittiness and fairly close-textured.  The flavor is, well, like whole wheat, but less so.  There is no bitterness or "grassy" flavor that some find objectionable in whole wheat breads.  Some writers have described the flavor as insipid, but I don't think that is accurate.  I think it is more that people are gauging the gold or white varieties' flavor against the flavor profile of the red wheats, which have more tannins.  That's not unlike comparing a white wine to a red wine and complaining that the flavor isn't as robust.  I'm certainly willing to use it in my bread, particularly if I know that the people eating it aren't fond of the flavor of the red wheat.  For myself, I'm happy to continue using the red wheat flours since I like that flavor.

PMcCool

Susanmarie's picture
Susanmarie

gf

Here are the NKB and the hearth breads I mentioned earlier:

NKB crumb

Hrth

Any feedback would be greatly appreciated!  The NKB is the original recipe except for the pan, and the Hearth has 4 c. flour and 2 c. water, as opposed to the 5:2 I usually use.  I'm not sure if the holes are about what I can expect using this and AP flour or not...  I guess the holes on the Hearth are a little bigger than with the 5 cups...I said earlier they are not much different. 

Pages

Subscribe to RSS - blogs