The Fresh Loaf

A Community of Amateur Bakers and Artisan Bread Enthusiasts.

Blogs

bwraith's picture
bwraith

Home Milled and Sifted Wheat Montana Sourdough

Home Milled and Sifted  Wheat Montana Sourdough

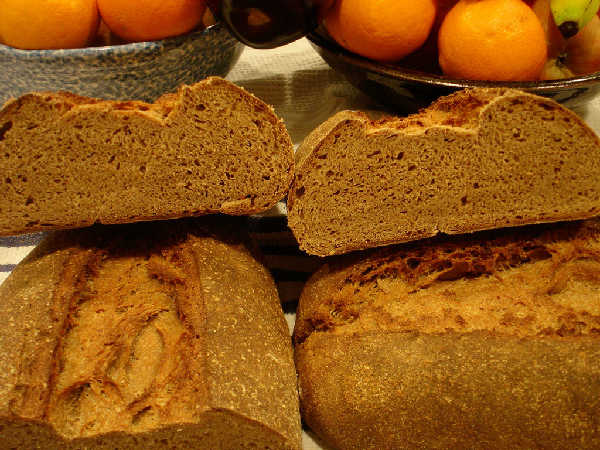
My adventures in home milling and sifting continue. Most recently, I did fairly extensive additional test milling and sifting of Wheat Montana Bronze Chief hard red spring berries. In the past, I regularly used flour from two main sources: Heartland Mill, and Wheat Montana. Heartland Mill is a good source of hard red and hard white winter wheat flour and berries. Wheat Montana is a good source of hard red and hard white spring wheat flour and berries. After sending test flours from the milling and sifting session with Wheat Montana Bronze chief hard red spring wheat berries, I wanted to follow that with a "production run" and some test baking. I've already posted a fairly unusual "Reconstituted Mash Bread" made from Wheat Montana hard white and red spring wheat berries. The following is a more ordinary sourdough made from high extraction flour from the same milling session.

A spreadsheet in xls and html format is posted with the recipe and the sourdough timing. Additional photos are posted.

The formula is again much the same as previous test bakes. It consists of a levain contributing 15% fermented flour to total recipe flour made with equal quantities of sifted rye, sifted spelt, and freshly milled and sifted  "cream flour" from my milling session, combined with an overnight soaker of the remaining dough ingredients, which is the remaining "cream flour", 2% salt, about 76.5% water, and 1% malt syrup. The estimated ash content of my "cream flour" is about 1.1%, so it is similar once again to previous high extraction flours that I model after Heartland Mill Golden Buffalo flour.

The bread had some large and small holes, as the dough at 76.5% hydration was a little softer than I expected. As before, it takes some experience to learn the amount of water that my home milled and sifted flours will absorb. I slightly overestimated the amount of water in this case and ended up with a bread more reflective of a fairly soft and wet dough. The crumb was light and flavorful, which was expected, since I've had excellent results from Wheat Montana Prairie Gold and Bronze Chief flours in the past.

bwraith's picture
bwraith

Reconstituted Whole Grain Mash Bread

This is a recipe idea I've wanted to try since I started milling and sifting my own flour. My milling and sifting process results in a few grades of flour and bran, but in total they represent the entire contents of the whole grain. My idea was to process the different grades of flour in different ways, hopefully resulting in a better whole grain bread. In particular, I very much enjoyed the flavor and texture of the mash bread recipe from WGB by Peter Reinhart, which I blogged a while ago. This recipe is derived from the mash bread recipe and some other ideas in WGB, but it takes advantage of the fact that I have available various separate components of the whole grain flour. The resulting bread, made as described below, is very good, maybe my favorite whole grain bread so far.

I've posted a spreadsheet in xls and html format showing the recipe and sourdough timing. I'm not providing a whole recipe in the blog in this case. Since the ingredients will vary so much, and I used particular output from my milling and sifting process, it's more of an idea than a recipe. Anyone who tries it will have to carefully read WGB's mash bread recipe, look at my spreadsheet, and then make up a recipe to fit available ingredients and/or sifting equipment. I've also posted some additional photos.

To make this bread, I first simmered the bran and very dark coarse granular flour from my milling and sifting process for a few minutes. The idea is to soften the high fiber components of the whole grain flour. Then, when the simmer cooled to about 165F, I added "golden flour", which is higher ash content flour from the first and last siftings. I maintained the temperature at around 150-155 for a couple of hours to get a dark, sweet mash. The mash was refrigerated. Meanwhile, I fermented a levain of whole rye, whole spelt, and some of the whiter flour from my sifting process. In the morning I combined the mash, the levain, and all the remaining whiter flour from my sifting process along with some salt and malt syrup to make the final dough, which rose and was baked later in the day.

Admittedly, this is difficult to duplicate at home unless you have a couple of fine sieves and access to a coarse stoneground whole grain flour. However, a similar recipe should be possible by separating out the bran and larger particles with a fine sieve, simmering that, then adding some of the remaining flour to make the mash, then using all the remaining flour in the final dough.

Using store bought ingredients, another similar version could be to use store bought bran for simmering, a high extraction artisan flour (like Heartland Mill Golden Buffalo) for the mash, and white flour for the remainder. Yet another version might be to use store bought bran for the simmer, store bought wheat germ and white flour for the mash, and white flour for the remaining flour. Or, it would probably work to use store bought bran for the simmer, whole wheat flour for the mash, and white flour and store bought wheat germ for the remainder. All of the above are the same in spirit, which is to reconstitute the components of whole wheat flour in total, while simmering separately the coarser bran, mashing darker flour, and then adding lighter flour to the final dough.

Very roughly, the bran should constitute some 10-15% of the recipe, the dark flour added into the mash should be about 25% of the total flour, and the rest should be lighter flour. Wheat germ, if used, should total about 3% of the weight of flour. Evaporation and some mash left in the pan means you have to estimate the remaining water and flour in the mash, in order to then have the right amounts of flour and water in the remainder of the recipe. Another interesting flour to try in the mash, if you are going with a store bought duplication, is first clear flour. The character of the "darker" flour I added to my mash is somewhat like first clear flour.

Also, as in all the WGB recipes, you could easily make this a yeasted recipe by replacing my levain with a yeasted biga and adding some yogurt or other fermented milk product to bring up the levels of fermentation acids in the final dough.

The resulting bread has a soft, dense crumb, which is normal for mash bread. However, the unique flavor from the mash and the soft, spongey texture more than make up for the somewhat more dense crumb. The lighter color results from the fact I milled and sifted a 50/50 combination of Wheat Montana Prairie Gold and Wheat Montana Bronze Chief. The Prairie Gold berries are hard white spring wheat berries, which have a much lighter color of bran, resulting in a lighter color. I also prefer a mixture of white and red wheats, which results in a milder but not bland flavor that I prefer to either 100% red wheat or 100% white wheat. The more dense and soft crumb makes it an excellent bread for sandwiches or to use with tahini, peanut butter, honey, and so on. I had some this morning for breakfast, and it is one of my favorite whole grain breads, if not the all time favorite.

holds99's picture
holds99

I was thinking about one of the main objectives of TFL (encourage, support and assist new bakers) and with that in mind I decided to attempt a "tried and true" recipe that would perhaps be appealing to bakers just getting into artisan baking. I set out to make a bread that would be easy and as fail-safe as possible for entry-level bakers to produce. I chose the Rustic Country Bread recipe from King Arthur flour. The recipe is available on line at their website. I thought it would be a good recipe to introduce bakers who haven’t used or had experience with using a pre-ferment method (poolish) when making an “artisan” bread and because of its simplicity it’s a good one for new bakers to try. I used a Dutch oven for baking the bread, which pretty much eliminates the problems of moving the fermented loaf onto a stone and running the risk of having it sink or losing it completely. Anyway, here are the steps I followed. I made the dough per K.A. recipe using stretch and fold technique. Instead of dividing the dough into 2 boules, I kept it in 1 piece and made a large boule. After shaping the boule I placed it in large skillet, lined with parchment paper (make your parchment paper long enough so you will be able to have enough overhang on each side to enable you to pick up the boule and lift it up out of the skillet and place it into the Dutch oven without dropping it). I placed the skillet containing the boule in a plastic bag (you can alternatively cover it with film, stainless steel pot...whatever), closed the bag to let it rise until nearly doubled. An hour before baking I put the Dutch oven (empty) with the lid on into the oven and preheated the oven to 500 deg. F. After the boule had doubled in volume my wife helped me lift it out of the skillet (holding the ends of the parchment paper) and place it into the preheated Dutch oven. I scored/slashed the top of the boule with 3 long slashes, put the lid on the Dutch oven, placed it in the oven (be extremely careful here, you’re dealing with a 500 deg. cast iron pot) and closed the oven door.  I immediately turned the oven temp. down to 450 deg. F and let it bake for 30 minutes, then took the top off the Dutch oven for the final 10-15 minutes of baking. Don't forget to remove the lid, so your loaf will brown nicely.  Because this is a double size boule, you’ll have to bake this one about 10 minutes longer than the smaller boule. Using a thermometer inserted into the boule check for an internal temp. of 210 deg. F. If the top is getting too brown and it still hasn’t reach 210 deg. F. internal temp. put the lid back on and let it go for a while longer. Remove boule from Dutch oven, picking up the parchment paper edges, and place it on a wire rack to cool for a couple of hours.  DO NOT cut until completly cool.  So, here are the results.

 Rustic Country Boule baked in Dutch Oven

Rustic Country Bread - No 1: Rustic Country Boule baked in Dutch Oven

 Rustic Country Bread baked in Dutch oven.

Rustic Country Bread - No 2: Rustic Country Bread baked in Dutch oven.

 Rustic Country Bread - Interior/Crumb.

Rustic Country Bread - No 3: Rustic Country Bread - Baked in Dutch oven - Interior/Crumb.

dstroy's picture
dstroy

This year, the boy requested a Shaolin Monk on his birthday cake (he's obsessed with all things Chinese).

And a robot saying "beep".


Shaolin Monk vs Robot cake


chatzkorner's picture
chatzkorner

 Phantom Hourglass cake Phantom Hourglass cake    My son is a fan of Nintendo games...he just had his 11th birthday and here are some of the pictures of his cake... Phantom Hourglass cake

Susan's picture
Susan

One-DayOne-day, 100g starter

Sponge-basedSponge-based, 50g starter

There were a couple of differences:
The One-day dough subbed 40g WWW, and added 1/8-cup sesame seeds
The Sponge-based dough added 1T oil.

Amazing difference, huh?

Floydm's picture
Floydm

Tonight's sourdough loaves.

sourdough

Quite good, though not as sour I as like. It was sunny today, so I had it rise quicker than usual on the table in the sunlight. I honestly think it made a difference in the flavor. I need to take advantage of the cool nights while the remain to do a few more loaves with long, slow overnight fermentation.

Floydm's picture
Floydm

I was walking across the Portland State University campus last week and I noticed this:

brick oven

During the summer, the farmers market happens here. I gather someone must bake during the market. Neat.

ohc5e's picture
ohc5e

On Thursday of last week, I made pizza dough using my 100% hydration sourdough starter. I let it ferment at room temperature for a few hours before putting it in the fridge for 3 days to ferment.  After the long wait, I am happy to say the pizza turned out great.  I found a great site on the web for pizza dough run by a serious home pizza-maker.  Its got a lot of great information about Neapolitan style pizza, not all of which I followed. (i.e. I ignored the advice to cut off the door lock of my oven so that I could use the self-clean function to bake my pizzas at 700 degrees--I guess I just don't have enough commitment to the home-pizza making cause!).  I heated my pizza stone for an hour at 550 and used my broiler on high to cook the pizzas, which were cooked in roughly three and half minutes.  The crust was chewy and soft in the middle with a crispy, lightly charred outer crust.  The sauce was made from imported San Marzano tomatoes that I pureed with an immersion blender, two gloves of smashed, raw garlic, and a handful of torn fresh basil.  I used mozzarella that I bought today at a great Italian specialty store in Brooklyn (Caputo Fine Foods) that makes the mozzarella fresh every morning and salts it in a brine right in front of you--amazing.  I'm sure the pizza would have been almost the same using some good, fresh mozzarella from the grocery store but this was especially good .  I added a couple of tablespoons of fresh grated parmigiano cheese and when the pies came out, a healthy dose of olive oil.  I'm stuffed and can definitely say the pizza was worth the wait.  The link to Jeff Varasano's pizza site is http://slice.seriouseats.com/jvpizza/  He gives very detailed instructions on kneading, etc that makes for an interesting read...

The dough was really wet compared to most pizza doughs I've made before which resulted in a failed first effort at stretching the dough.  But I did much better on my next try and by the third and fourth, I had the process down.  I just had to turn the dough much faster than I'm used to. I used a mixture of KA bread flour and imported Molino Caputo Tipo 00 pizza flour from Italy.  I used roughly three-quarters "00" and one-quarter KA bread flour, if I remember correctly.  The finely milled flour has a gluten percentage of about 11.5%.  I'm interested to try it in a ciabatta recipe.  You can buy it from www.fornobravo.com.  Shipping was pretty reasonable considering.  I bought 5, 2.2lb bags for about $30, including shipping.  

Hot PizzaShot of the CrumbShot of the Crumb

Underside of the PizzaUnderside of the Pizza 

caryn's picture
caryn

Since I have shared some successes on this site, I thought I would share a not so good outcome.  Today I was baking sourdough loaves for out-of-town visitors to take back to their home in Madison Wisconsin tomorrow.  I decided to make them two loaves of BBA sourdough with pecans and some whole wheat and rye flours.  So I scaled up my recipe to make 3 loaves, so I could taste the result before I gave the loaves to them.  I baked the first two, since I don't have room to bake three at once, thinking that if the third one was a bit over-risen because of the extra wait for the oven, I would not care, since my husband and I would keep that one.

Well, what happened is I was taking that first batch of two out of the oven  and....the first loaf went flying off of the rack onto the floor!!!!!  Naturally it was the better looking of the two!  (I am usually pleased with the flavor of the breads that I make, but the shaping could use some improvement.)

Thank goodness the loaf that I baked by itself came out without mishap.  So I will send our friends off with the loaves that made it out of the oven properly, and my husband and I will abide by the "5 second rule."  I am sure it will be fine for us to eat, but not to give away.  It looked only a bit worse for wear, having some cracks in the crust from the mishap!

BBA Sourdough With Pecans- 5 Second Rule!BBA Sourdough With Pecans- 5 Second Rule!

The other loaves that I am giving awayThe other loaves that I am giving away

Pages

Subscribe to RSS - blogs