The Fresh Loaf

A Community of Amateur Bakers and Artisan Bread Enthusiasts.

varda's blog

varda's picture
varda

The other day I stopped into a Whole Foods store in the hope that I could find some white rye.   I couldn't, in fact the person I spoke to had no idea what white rye was.  But there on the shelf were bags of King Arthur Italian Flour.   Wow!   No shipping.   But what to make?   I decided on Ciabatta.   Specifically Hamelman's Ciabatta with Poolish (p. 107 of Bread).   Only after I had mixed everything up did I remember that the Italian Flour bag had a note recommending less water for this flour than others - and I had even accidentally put in around an extra ounce of water.   So it was wet.   I just decided to go with it instead of adding more flour.   It was too wet to take out of the bowl to stretch and fold, so I used the in the bowl method.   Then I decided it was too wet to move it around too much so after the first rise, I poured it (yes poured) into a dutch oven and let it do the second rise there.   Then  baked with the top on for 30 minutes, and the top off for 25.   What did I get?    Well it looks a bit like a three pound muffin.  

with an extremely blistery top:

and the lightest feathery texture I've ever managed to produce.

Yum!  

varda's picture
varda


Some time ago, I started trying to recreate a Tzitzel (caraway) Jewish Rye that was sold in a neighborhood bakery where I grew up.   But first I had to get more skilled at baking bread period.   This site was a font of information, and at one point, David Snyder gave me a pointer to a comment hidden deep in one of his two year old blog posts from nbicomputers http://www.thefreshloaf.com/node/6103/craving-crackly-crust-sour-rye-bread#comment-31138.   After putting my Tzitzel dreams on hold for awhile, I decided to try again.   This time I went directly to Norm's comment and made a few modifications.  I did the following:

1 lb King Arthur Bread Flour (instead of First Clear flour which I can't get easily)

1 lb thick rye sour (built up from an existing rye starter with rye flour and water over the course of around 24 hours)

10 oz water

1 Tbsp vital wheat gluten (since I think First Clear is higher protein than even KABF)

.6oz kosher salt

.5oz instant yeast

caraway seeds

I mixed everything up in my kitchen aid for around 10 minutes - so long because the rye sour is very tough to blend with the rest of the ingredients.    Then I took a wooden bowl and rinsed it in water, and shook out the excess water without drying it.   This was to recreate the wooden box environment as described by Norm (see above comment).   I shaped the dough by patting it gently into a ball.   I know from having tried to make this bread before that trying to shape it after it rises is a lost cause, so I decided to shape it right after the mix.  Then I brushed water over the top with a pastry brush and then put a piece of damp linen over the the top of the bowl.   I let the dough double in size (this took around 1.5 hours).   Then I sprinkled thickly with corn meal.  Then with very wet hands, I transfered the dough to a peel covered with corn meal and then a hot stone and baked for 1.5 hours at 450 deg F.   Then waited overnight to cut.  It came out with very thick crackly crust and a fine rye flavor.   And I guess I'm starting to think that I will never recreate the bread I remember, but maybe this is even better.


varda's picture
varda

A few weeks ago, I made an accidental very sour rye bread, which had an addictive quality to it, but unfortunately failed in every other regard.   So armed with advice from some very helpful people on the forum, I have been trying to make a successful loaf with that same tart and delicious taste.   This I have not yet succeeded in doing.   Yesterday I decided to try to follow the Hamelman pain au levain approach with some notable deviations to see where that would get me.   So I started with the basic pain au levain formula, but upped the ratio of rye to bread flour to almost 1, and even higher on the starter.   Then for the second ferment, I placed the shaped loaves in linen lined bread pans for support, and refrigerated for 20 hours.   Then baked for over an hour in my WFO.   I thought that the long ferment and the higher percentage of rye flour would get me to sour (without turning the entire dough into starter which is why the original bread was such a failure) but it didn't.   But I did get a delicious rye bread with a much higher percentage of rye flour than I have ever dared to try.   So I'm not yet daring to make 100% rye (for which I'll follow Mini Oven when I do) and I still haven't managed to get back the sour without the flopping, but nevertheless I'll pause for a minute to enjoy this very tiny milestone. 

Yes, I scored two different ways - just to see - and got some extra scores besides.   Could have proofed even longer?

varda's picture
varda

It seems to me that if you are trying to gain proficiency in baking bread that it helps to pick a formula and make it over and over again until it starts to seem natural and easy.   I'm not there yet with Hamelman's pain au levain but it ain't for lack of trying.  My biggest difficulty with it so far has been something that should be simple - following the instructions.   When I first started making it I viewed the rise times as something like suggestions.   2 hours seemed like a ridiculously long time to do the final rise, and I would do 1 hour and then wonder why the bottom split.   Last week I did an experiment.   I split the dough into three 1 lb loaves and tried doing a final ferment of 1.5 hours, 2 hours, and 2.5 hours respectively.   The 2.5 hour rise won the looks test, but the 2 hour tasted the best.   And surprise, surprise, the 1.5 hour loaf was a mess.   Today, I followed all of Hamelman's times with 2 hours for the final ferment (the book says 2 to 2.5 hours.)   I still can't get as pretty a loaf as my model in all this (and the post that set me off on this particular quest)   http://www.thefreshloaf.com/node/17236/agony-defeat-and-thrill-victory.   But that doesn't mean I can't keep trying.   And the great thing about practicing on a bread like this is you get to eat it. 

varda's picture
varda

Yesterday I tried my hand at a miche after reading so much about these loaves on this site.   I must admit that I had to restrain myself from dividing it into three loaves as I was wondering what a three person household was going to do with an almost four pound loaf.  I tried Hamelman's Pointe-a-Calliere (page 164 of Bread.)   I had to make a few modifications.   I was planning to do 85% whole wheat flour, 15% AP, but ended up with around 60-40 because I was lower on whole wheat flour than I had thought.    Since I was baking in my clay oven which has a fairly narrow door, I found that the dough had grown so large that I had to make an oval rather than round loaf, and again because of the oven, I took it out after 45 minutes instead of the full hour since it was already quite cooked and would have turned into a cinder after any longer.  But I did follow the instructions to wait a full 12 hours before slicing despite my usual impatience in these matters.   And after all that?   Wow.   That is a delicious bread.   It is very hearty.   A slice with a bit of peanut butter makes a substantial meal.  But will we eat the whole thing?   I guess it depends how long it remains fresh, which I've yet to see. 


varda's picture
varda

I continue to bake in my mud oven - in fact I haven't baked any bread at all in my "indoor" oven so far this summer.   It is a steep learning curve.   Since I last posted, I have added a thermometer and a door (essential) a peel (helpful) and have started to use parchment paper to keep things cleaner.   I continue to make my slow progress through Hamelman's Bread.   Today I tried Semolina with a levain.  (page 171)   I split it into three small loaves which are a bit more manageable.    Here they are. 

and the crumb

When I finished baking, I put tonight's dinner (chicken and vegetables) in a dutch oven into the oven and let it cook with the "leftover" heat for several hours.   And served with bread of course.

varda's picture
varda

I just finished making my first edible bread in my cob oven.   In May I had no kitchen so wasn't able to bake at all.   Then in June, I got my kitchen back, but I started the process of building an outdoor oven.   Since I am not a handy person this was very challenging.  I read Kiko Denzer's book from cover to cover, did soil testing on the dirt around my house, bought some materials, scrounged some materials and made some materials, and got some great advice on the forum here.   I heard a lot of things about how you could make this sort of thing in an afternoon.   Maybe if you have a team of oxen or a lot of friends who want to help.   Suffice it to say it took me a lot longer than that.   I have tried for the last few days to bake in it.   The first day it wasn't quite dried out - I left some wood in it - so half of the bread got smoked and the other half didn't cook.   It all got dirty.   The second day, I cleaned it out properly before baking, but I didn't quite get just how long or how hot the fire had to burn.   So the loaf was as mushy as it went in an hour later.   Today, I stoked the fire for three hours to make sure it was hot enough, did a thorough cleaning, and then cooked away.  40 minutes later I had this:

and this

and finally the oven ad hoc and unlovely as it may be


varda's picture
varda

Today I made Hamelman's poolish baguettes.   Which retaught me a lesson I've already learned which is that making baguettes is hard.   A month or two ago, I tried the Bouabsa formula several times, without having any idea that it wasn't reasonable to start one's baguette making career with that, so I backed off to Hamelman which I think is quite delicious in its own right.   But it is still hard for the novice bread baker.  

From this side it doesn't look so bad -

From this side, not so much ...

All I can say is thank god for bagels which are tasty and rewarding -

varda's picture
varda

Sometimes baking bread seems to be about the challenge and developing the skills and trying new things and so forth.   And sometimes it is all about making what you want to eat.   When I started bread-making in earnest in January, I suddenly lost my taste for the supermarket bagels I'd been eating happily for several years.   Since there is no good bagel place in my immediate area, I simply stopped eating bagels.  But then many of you just kept posting and posting and posting your various bagel bakes, and I couldn't stand it anymore.   So I decided to try Hamelman's approach, and I was pleasantly surprised to find that not only was it relatively simple, but geez, it tastes like the bagels that I used to eat way back in the day, when a New York baker moved to St. Louis, got in a taxi cab and told the driver to take him to the Jewish section of town.   This was back in the sixties, and such a thing had not been seen in St. Louis before.   My father used to come home with dozens and dozens of bagels, and somehow we managed to eat them all.   Usually when I make something, it doesn't come out just how I like it, and I fiddle and fiddle or switch approaches a half dozen or so times, and possibly make something better over time, and possibly not.   But unless someone has a compelling argument that their bagel formula is better than Hamelman's I'm just going to stick with it, and focus on learning how to shape better.   Thanks for all the inspiration to you bagel bakers out there.   Now I have what I want to eat.   -Varda

And all ready for creamcheese.

varda's picture
varda

Recently I have been experimenting with making sourdough multigrain breads.   My first attempt had 50% bread flour, 25% spelt, and 25% rye.   Suffice it to say, I hope our friendly neighborhood coyote didn't break a tooth on it.   Yesterday, I went down to 6% spelt, 6% rye.   This wasn't bad.   Today, I went down even further and made baguettes with 3% rye, 3% spelt.   This was downright tasty.   Here they are with a flag in honor of Patriot's Day.
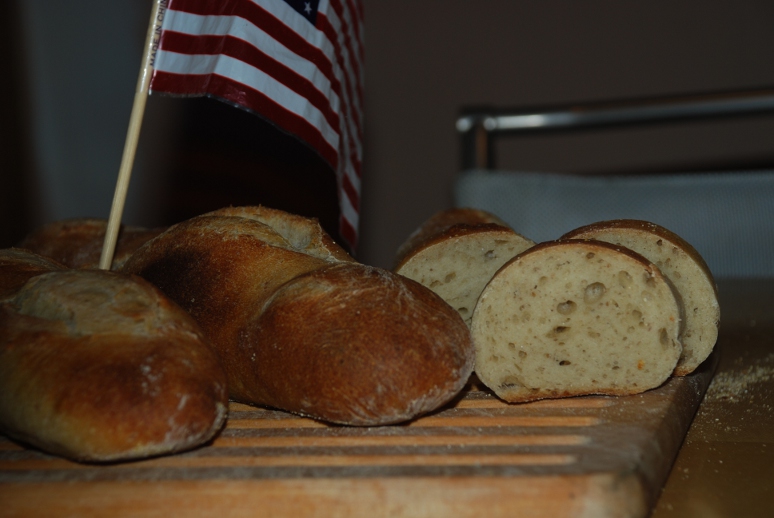
and with the remnants of the 12%er. 

470 g Bread Flour, 17 g Rye, 15 g Spelt, 250 g white starter around 75% hydration,  312 g water, 1 T salt. 

Start feeding active white wild yeast starter afternoon before, with at least two feedings, maintaining 75% hydration.   Leave on counter overnight.   Mix all ingredients but salt and autolyse for 30 minutes.  Mix in salt.   During bulk ferment, stretch and fold every 45 minutes  twice.   Leave for 45 more minutes.  Cut in three pieces (could have done two, these were short) preshape and let rest for 15 minutes.   Shape.   Final ferment until done (I really don't know the right amount but I did 40 minutes.)   Bake at 475 for 23 minutes.


Pages

Subscribe to RSS - varda's blog