The Fresh Loaf

A Community of Amateur Bakers and Artisan Bread Enthusiasts.

rossnroller's blog

rossnroller's picture
rossnroller

You know those drying butt-ends of sourdough bread from the previous bake that you leave sitting in a bag, in danger of being forgotten until it's too late? I hate wasting bread, so am always on the lookout for ways to use those leftover bits.

Cubed leftover bread makes great croutons, and of course you can keep yourself in good supply of bread crumbs using a food processor. I keep a bag of frozen bread crumbs in the freezer door, which I often top up.

One of my favourite uses for leftover sourdough, though, is in panzanella, a refreshing traditional Italian salad that is good all year round, but especially in summer. There are lots of variations, so don't hesitate to throw in any compatible ingredients you have on hand. The version that follows is one that has evolved over time in my kitchen. I think it's pretty close to qualifying as 'traditional'.

Ingredients:
leftover sourdough or other bread (traditionally, ciabatta is used)
4 medium tomatoes
2 trimmed celery stalks, cut in diagonals
1 Lebanese cucumber
1 medium red onion
60ml red wine vinegar
1/2 teaspoon sugar
125ml extra virgin olive oil
1 clove garlic, crushed
1/4 cup or more fresh-picked basil leaves, shredded or torn

Method:
Thin-slice onion and let soak in vinegar in salad bowl while you prepare rest of ingredients
Cut tomatoes into coarse wedges or cubes, add to bowl, sprinkle over sugar, grind over pepper, salt to taste
Cut bread into approx 2cm cubes
Cut celery into strips lengthways, then slice obliquely across in diagonals
Add bread and celery to bowl
Combine remaining ingredients in screw-top jar, shake well, pour over salad, and toss gently.

That's it! So quick and simple, and just delicious. Using top quality organic tomatoes, homegrown if possible, makes a big difference to the end result.

Cheers all
Ross


rossnroller's picture
rossnroller

I mostly prefer straight breads, but had some ricotta that was left over and in danger of souring, so decided on a whim to add it to a bread dough I've been baking a lot lately, along with some fried onion. The result knocked my socks off!

The onion is as good as you might imagine (especially the slightly charred bits on the outside of the crust). The ricotta, while not itself evident as a distinct flavour presence, seems to enhance the texture of the crumb (soft, yet firmly structured with just the right amount of chew), as well as coaxing the sweetness out of the wheat - and this in a bread that already sings with sweet wheaten harmonies counterbalanced with rye.

The bread I'm referring to is a variation of David's lovely 'San Joaquin Sourdough'.

I like to make up a starter comprising 30% wholewheat + 70% baker's flour and have lowered the salt content, but otherwise stick to David's original formula. Hard to beat, I've found. My process is different, though. I dispense with the 21 hour retardation, instead completing the bulk proof then retarding the shaped loaf for 8 hours and baking straight out of the fridge. Works extremely well for me with my flours, current ambient temps and schedule.

I would think this would work equally well whether you use my version or David's original, but since I have only tried my version with the onion and ricotta additions, this is the one that appears here.

Formula:
100gm ripe starter @ 75% hydration (30% ww, 70% AP flour)
450gm AP flour (mine is 10-11.5% protein)
50gm whole rye flour
365gm filtered water
8gm salt
50gm ricotta
half a medium brown onion, chopped and fried until caramelised golden (would have used red onion if I'd had some)


Method (ambient temp 26C/80F):

  1. Hand-mix all ingredients except onion until it just comes together, rest 30 mins.
  2. Stretch and fold several times, strewing the dough lightly and evenly between folds with fried onion until it is incorporated in the dough. Cover with oiled plastic food-grade bag.
  3. Do one set of S&Fs every 30 minutes for 1.5 hours. Then allow bulk proof to complete (total BP was 1.5 hours in my warm conditions).
  4. Preshape, rest 10 minutes, and shape.
  5. Retard in fridge at 4C/40F for 8 hours. 
  6. Slash dough down middle (to maximise grigne where bits of onion can char - utterly delicious!), and bake straight out of fridge, as follows:


Baking

  • 12 minutes with steam, starting with maxed out pre-heated oven and turned down to 225C/435F a couple of minutes after loading.
  • Remove steam source, then bake 13 mins @ 215C/420F
  • Turn down to 200C/390F, bake another 15 mins.
  • Turn oven off and rest bread with door ajar for 5-8 minutes.

Here's some pics:


Yes, a little lavish with the butter, but the flavour of this bread was too good to clutter up with any but the simplest of toppings - and is there anything better on good bread than butter?

As with any enriched savoury bread, it was not particularly versatile, but with the right accompaniments - oh my my! eg: Thin-sliced cheese and hot English mustard just popped with the onion backdrop, sliced cold roast beef with horseradish also very yum. Two days down the track, it was superb toasted lightly, rubbed with garlic and drizzled with EVOO, and topped with sliced fresh-picked backyard tomato.

Cheers all!
Ross


rossnroller's picture
rossnroller

There's a bumper crop of Swiss chard in the backyard. Love spanakopita, saag etc, and a lot of the harvest has gone on those dishes, but a couple of weeks ago 'calzone' began to beat an insistent rhythm in my head. I began to imagine a filling of Swiss chard, ricotta, feta, mushroom, ham maybe...

I bake SD pizzas weekly, so thought I should be able to wing it with calzone (haven't made it before). I adjusted the dough to be a little firmer, concocted that filling I had envisaged, and voila:

There's a couple of lessons in this pic.

Lesson #1: The steam-release slashes in the top of the calzones closed up because the dough was still not firm enough, despite adjusting the flour content up. Note to self - make the dough firmer for calzones than pizzas (my usual pizzas are thin-crust SD and high hydration).

Lesson #2: The calzone at the top of the pic is misshapen. This is because I foolishly shaped and filled it on the benchtop and had to try to shift it on to baking paper to get it on to the peel and into the oven - duh! If you make a firm dough, not such a problem (you could maybe just load directly on to a semolina-sprinkled peel), but I was lucky to salvage it at all.

Here's a cross-sectional shot:

Ideally, I suppose there shouldn't be that caving under the crust, but I've had calzones from good pizzerias that also have that, so I wasn't too concerned. Most importantly, the filling worked extremely well and the calzones were just delicious. All the oohs and ahhs suggested that this was the beginning of a special relationship (not sure that sentence came out quite as intended).


A week later, calzone night again! This time I firmed up the dough more and added some ham to the filling. SO much easier with a firmer dough, and the slashes on top stayed open. The resulting calzones were again ridiculously good - better than any I have had out. And second time around, my shaping had improved (though not my photography - to avoid the green hues our CFL kitchen lights impart, I had to use flash):
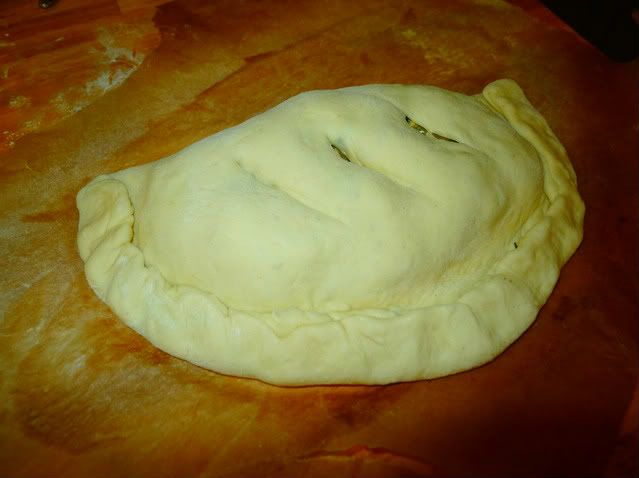
Pre-bake... Start with a circle of dough stretched out like pizza, but not as thin. Spoon the filling in a pile on the half of the dough circle closest to you, leaving a margin of 3 cm or more for the seal. Bring the dough forward over the filling, lining up the edges. Fold the edge back over once, then press down all the way along with the tines of a fork, as with an apple pie. Fold over again and seal with your thumbs or a finger (this is the final stage, after which the pic was taken). A little milk brushed on first can help the dough seal to stick.
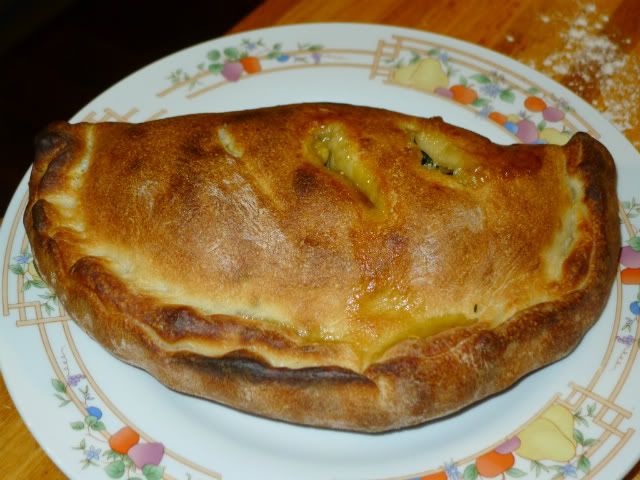
 

The top was brushed with milk so it didn't burn during the bake.
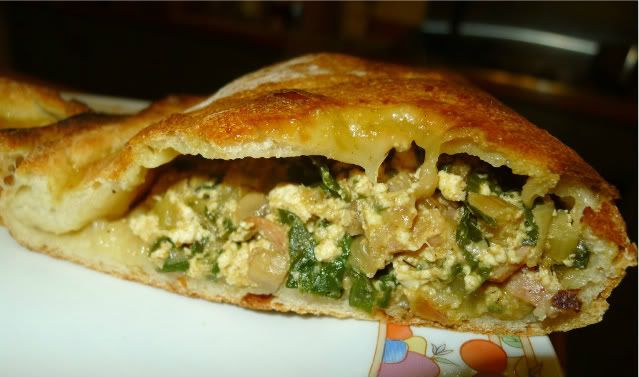
 

Wonky angle, but you get the idea.


Out of time, but will return and post my recipe directly.

OK, took a while longer to get back than anticipated, but here's the recipe:
------------------------------------------------------------------------------------------------------------------------------------

Sourdough Calzone

Dough (makes 3 calzones or pizzas):
20g SD starter @ 100% hydration
3 small pinches dry yeast
300g water
500g baker's flour (AP would probably be fine, also)
6g salt

  • Stir up starter and water, then add other ingredients and mix (I do it by hand).
  • Let stand 30 mins
  • Tip out on to lightly floured bench and knead 5 mins, or until gluten starts to develop and dough loses most of its stickiness. If dough is very sticky and unworkable, add a bit more flour as you knead  - but only a bit.
  • Divide dough into three portions of same weight, and form into tight balls. Roll around in oiled plastic containers (I use one per ball) so balls are covered in oil, put lid on containers and store in fridge 1-3 days.
  • If you want to bake same day, allow 5 hours to proof outside fridge prior to shaping and baking. For retarded dough, remove from fridge about 3 hours before shaping and baking. (I'm assuming a moderate ambient temp, say 21-24C/70-75F...if higher or lower, you'll need to adjust proof times out of fridge accordingly).


Filling:
200g Swiss chard leaf, chopped
50 stems, fine-chopped
150g mushroom, chopped
1 onion, chopped
1 clove garlic, chopped
1 chilli, chopped
2 slices leg ham, chopped (optional)
200g ricotta
50g feta, crumbled
35g provolone (or any tasty melting cheese), grated
35g fresh-grated mozzarella, grated
25g milk (approx)
pepper, dried oregano, paprika to taste
NB: Salt not necessary - the feta provides sufficient salt

  • Fry onion and Swiss chard stems on moderate heat a few minutes, then add mushroom and cook until done.
  • Add garlic and chilli and fry another couple of minutes. Don't let garlic colour.
  • Combine cheeses and add enough milk to achieve nice consistency. Combine all ingredients and mix gently.

Shaping:

  • Flatten dough ball slightly with palm on sheet of baking paper, then spread gently and gradually from centre with fingers to form circle. I find it best not to use rolling pin, as this adversely affects aeration - you want the air left in the dough.
  • See above (under pre-baked picture) for rest of shaping directions.
  • Prior to loading into oven, cut 3 slashes on top of calzone, then brush with milk.

Baking:

  • Pre-heat oven to 250C/480F with pizza stone. Transfer 2 calzones on baking paper to pizza stone (they should just about cover the stone).
  • After 10 mins, lower temp to 225c/435F. Bake another 7-10 mins. Check to make sure crust is not burning, and lower temp a little further if necessary (I didn't need to, but of course, ovens vary).

---------------------------------------------------------------------------------------------------------------------------------

Highly recommend you give these babies a try. Fantastic change from pizza, and if you have a backyard crop of Swiss chard or similar, this is one of the best ways I've come across to devour it! Serve one per person with a nice shiraz or other red of your choice and fresh salad, and line up the DVD. You won't be in any shape to do anything more strenuous!

Cheers!
Ross


rossnroller's picture
rossnroller

I don't know why I've neglected to try Hamelman's whole wheat levain all this time - probably because I find it hard to leave rye out of a bread. Recently, a friend put in a request for a wholewheat loaf, so thought it was a good time to give Hamelman a run with this one.

Glad I did. This was a lovely bread. I've made it a few times since, including with 20g of toasted wheatgerm (one of my fave flavour enhancing tricks - courtesy of one of David's terrif SFBI feedback posts). Love it with or without this enhancement.

I've found this bread is particularly delicious toasted (3 days after baking seems optimal)...and it makes a great Croque Monsieur. For anyone with Hamelman's 'Bread' who has not gotten around to trying the WW levain, recommend you do so post haste!

Cheers all!
Ross

(Pics coming - can't see any image uploading function at the moment)

rossnroller's picture
rossnroller

My partner is great at preserves and has recently turned her hand to olives, which were sourced from our small potted olive tree and branches overhanging fences around the neighbourhood. We see scrumping as a form of urban harvesting - the olives we took would have fallen to the street and rotted.

Last week was the big reveal. We'd waited months for the moment of tasting, so decided to make an occasion of it with a big farmhouse platter for dinner featuring the olives, an assortment of cheeses, some crudites and prosciuotto - and of course, a nice red.

I decided to make a bread to accompany the meal, and came up with this white sourdough with rosemary and toasted wheatgerm. Usually, I'd add olives to the mix, but decided not to on this occasion, preferring the focus to be solely on our platter olives.

The bread was probably slightly underproofed, going by the explosive rise. I didn't mind, because it gave the finished bread a rustic look in keeping with the theme of the dinner. I was delighted with the blistering on the crust and the soft, creamy crumb.

As it happened, we didn't wait for dinner to sample the bread. We sliced some up and had it with avocado for lunch. Very nice. Later that night it proved to be at its very best with wine and cheese.

This is not a versatile bread. It doesn't go particularly well with sweet toppings, but as an accompaniment for savouries - oh, yes.

Recipe to follow, but for now here are some pics:


OK, back. Here's the recipe.

Ingredients
150gm starter (white, 80% hydration)
335gm water
490gm bakers' flour
10gm toasted wheatgerm (will double this next time)
3 sprigs fresh rosemary, stripped and chopped
8gm salt


Method

  • Hand mix and autolyse 45 mins.
  • Cut in salt, stretch and fold, then bulk proof 4 hours 15 mins. Do two more S&Fs hourly in first 2 hours.
  • Pre-shape and rest 20 minutes. Shape.
  • Final proof 2 hours 15 mins, then retard in fridge overnight.

Note: My ambient temperature was quite low - 18C/64F - so adjust proof times according to your conditions.

Bake straight out of fridge next day, as follows:

  • Heat oven to max, with pizza stone inside. Score bread and load. Immediately turn down oven to 225C.
  • 12 minutes @ 225C/440F with steam.
  • 12 minutes @ 215C/420F (steam source removed)
  • 15 minutes @ 200C/390F
  • Turn oven off and rest loaf with door ajar for 5 minutes.

Cool on cookie rack or similar for minimum 2 hours before slicing.

And the olives? Just unbelievably good. If you have access to some fresh fruit, I highly recommend you have a go at preserving your own. Not difficult - the hardest thing is having the patience to wait for the curing to be complete.

Cheers all
Ross


rossnroller's picture
rossnroller

Not bread, but still baked and yummo!

This is a derivation of the Greek classic, spanakopita. The filling is the same, but instead of using filo pastry I make a basic flour/water/olive oil dough and roll it out in long rectangles to fashion these spirals (just lay the spinach/feta filling along the strip of dough, and roll up like sushi, then roll the dough tube of filling side-on to form the spirals). Simple, and one of my favourites, especially with a green mixed salad picked straight from the garden and dressed up with EVO, seeded mustard, balsamic vinegar, fresh squeeze of lemon, a little sugar, marjoram, seasoning, and a bit of feta crumbled in. We are lucky enough to have an unseasonal tomato crop in the backyard at the moment, so I chopped one of those precious treats in as well.

Cheers all!
Ross

PS: Forgot the main point of the post! This meal was about as locavore as it gets for an urban dweller. The filling included some bread crumbs from a home-baked sourdough loaf, and a large proportion of the ingredients came from our garden: the spinach (actually rainbow silver beet), lemon, marjoram, mixed lettuce leaves and tomatoes. As anyone who grows their own veges and herbs knows, it's immensely satisfying to compile a meal using so much of your own produce. Pathetic, I guess, but I'm really proud of our backyard organic garden. It's even more of a buzz than raising the illicit backyard plant or two way back when...and this time, good for you!


rossnroller's picture
rossnroller

I've been going through a wing-it phase, experimenting with creating sourdough cakes, brownies and other goodies I'd previously only made using more conventional recipes. I wasn't intending to make chocolate sourdough bread at all, but did so on an impulse when one of my wing-it episodes landed me with a bit too much chocolate and walnut cake mixture.

I just chucked in AP flour, a bit more starter, a bit of salt and enough water to give me a dough of the consistency I like. Random enough beginnings, but the happy accident I referred to in the post title came later. I forgot about the bread after the final proof, and left it sitting on the kitchen bench overnight, rather than retarding fermentation in the fridge (which is my usual modus operandi, partly because I like the flavour imparted by the extended fermentation, and partly to suit my baking schedule). 

This long overnight final proof at room temp can work well if the ambient temps are cool, but this was one of the warmer winter nights - around 21C in the kitchen from memory, maybe warmer. Actually, definitely warmer until we went to bed - we had a fire on.

Anyway, when I got up next morning and opened the fridge to find the dough missing, I realised what had happened. On uncovering the dough, I was annoyed to find it puffed up and bloated to an enormous size. It was literally bursting at the seams! When I slashed it prior to loading, it parted extravagantly. Not the worst sign, I noted with faint hope. I was expecting it to deflate like a pierced football bladder.  Sure it was grossly overproofed nevertheless, I decided to go ahead and bake it anyway on the off-chance that it would somehow turn out edible.

Well, bugger me - what a shock! It was the lightest, softest crumbed sourdough bread I have ever baked!! The pics don't show how big and light this baby was per dough weight (considerably less than my usual bake of around 800-1000g), but do give some indication of the airy crumb. There was no sign of overproofing in the finished product!

And the flavour? Mild chocolate with a hint of sour. Would be nice with maraschino cherry jam, I imagine, but we only tried it with strawberry jam (not bad) and marmalade (better - combined well with the orange tang). All in all, though, it was at its best simply spread with butter.

I'm not into novelty breads so won't be repeating this one in a hurry, but would go down well at a kid's birthday party, I suspect - spread with nutella with hundreds-and-thousands? (erk!)

Cheers all
Ross


rossnroller's picture
rossnroller

My assessment ritual with new loaves (I only do SD) is as follows:

1. When the 2 hour cooling period is up, I slice an end off, spread it with a little unsalted butter, and share it with my partner.  Exchange oohs and aahs (when appropriate).

2. Cut the first slice proper, assess the 'nose', have a prolonged gawp at the crumb and give it a prod, take a pic or 10 if it's nice and open, smear slice with butter - and put it to the taste test. I know purists like to taste bread unadulterated, but for me, the ultimate sample is of a generous slice thinly buttered. I also love to spread a slice from a freshly baked bread with butter and honey, but not until later.

3. Next comes an open sandwich. And here's where I'm particularly interested in toppings others like. My favourites:

  • Good quality shaved ham off the bone on thickish slice of bread spread with butter, mayo (home-made obviously best, but much of the time I settle for the convenience of a decent commercial brand like S&W), aioli or a good mustard (Dijon or hot English). I usually add some rocket (aragula) from the garden or lettuce of some type.
  • Chicken - preferably the grey parts - sliced off the remains of last night's roast and mixed with mayo, ground white pepper and a sprinkle of quality paprika, with thinly spread butter and rocket or lettuce. Sometimes, also, I like to have chicken with cranberry sauce on buttered bread.
  • Egg mixed with mayo, fresh ground white pepper and a hint of paprika, and sometimes with a little pickled gerkin chopped in, spread on buttered bread - again with rocket or lettuce.
  • Egg mixed as above + asparagus on buttered bread.
  • I did try a variation of bánh mì, using the usual Vietnamese toppings but on a thick slice of SD bread, rather than enclosed in a white Vietnamese baguette - nice, but not a keeper. The traditional way is better.
  • For bread more than a day old, my absolute favourite is open toasties with butter, mayo, ham, cheese and sliced red onion, with fresh ground black pepper + sprinkles of paprika and cayenne pepper. Basically, a variation on a croque monsieur.
  • Love bruschetta, but only when good tomatoes are available (much of the time the supermarket tomatoes are tasteless in this part of the world)
  • Sardines on buttered toast with a bit of tomato sauce smeared over + fresh ground pepper is always yum.
  • Of course, I like all the usual spreads on toast - marmalade, peanut butter, Vegemite (yeah, I know, I know - it's a downunder thang), jam...but that goes without saying.

I'm getting a bit jaded with my usual lunch toppings, especially the ham. So, looking for inspiration from others - would love to hear from you re your favourite toppings!

Best of baking!
Ross

rossnroller's picture
rossnroller

I was intending to give today's bread to someone, but the dough was too long for the peel and the end stuck to the handle as I was loading it into the oven, pulling a bit of dough away. I think I'd better keep this one for my partner and I...

Gives new meaning to the term 'bread porn'!

OTOH, it's marvellous how the perspective changes when viewed from a different angle. But I still don't feel it's appropriate to gift a bread that looks like a...

...sunfish!

Best of baking all!
Ross

rossnroller's picture
rossnroller

One of my experiments went awry a couple of days ago. I had some leftover buttermilk and decided to sub that for milk in my usual SD pancake mix. I've used buttermilk in traditional pancakes and it was good, but I found it wasn't prepared to socialise properly with the SD leaven. No matter how much buttermilk I added, the batter refused to thin to the consistency I like. Added milk in the end, and that made things runny, but alas - the batter refused to behave in the fry pan. While browning to a nice golden finish, it was like custard inside. No amount of extra heating would remedy this.

Moving right on, I decided against pancakes. Crepes were the go! So, swirled the batter quickly around the pan to keep it thin...fail.

Time to quit, so I sulkily dumped the bowl of batter on the kitchen shelf and left it there for the rest of the day. It could get as sour and nasty as it liked. Only one place that mess was bound - the compost.

Towards evening, I returned to the scene of the crime and made off out the back to dispose of the evidence. Then a thought struck me - wasn't this fermenting mess a sort of starter, or sponge, or whatever...? And if so, why couldn't I add flour and attempt to bring off a disaster rescue? I hate throwing out anything edible, especially starter, so promptly rationalised my way back inside with my bowl of trouble and set to work.

I left my premium bread flours alone, not wanting to waste them on something that was likely to be mediocre at best, and grabbed some plain (AP) supermarket flour. Threw in enough to get a good consistency.  Thought better of ignoring my good flours, and tipped in a bit of organic wholemeal. And some milk powder - why not?

Since there was sugar in the batter, I figured sweet(ish) and spicy was the way to go. Chucked in some cinnamon, and lesser quantities of mixed spice, ginger, plus a bit of dry-roasted coriander/caraway mix left over from a cooking venture some days earlier. The dough was a bit sticky.  A sprinkle more flour... Nice.

Recalling Sylvia's tantalising recent pics of her walnut and raisin bread, I chopped up some walnuts, then raisins (not golden ones - the large flat relatives) and a bit of candied spice. Folded them into the dough. Didn't worry about pre-soaking.

And so it went. No weighing, no recipe, working only by the light of instinct and experience - and it dawned on me that I was enjoying the freedom of it all! In fact, it was exhilarating!

Bulk proofed 3 hours with 3 S&Fs, rolled the dough in on itself lengthwise, bunged it into a bread pan, and retarded in the fridge overnight.  Baked straight out of fridge next morning: 40 mins @ 185C (365F), no steam. I didn't even bother with a glaze.

The result was thrilling! A rustic-looking loaf that rose well and when sliced for a sampling 2 hours later had my partner and I raising our eyebrows. The crumb was even and soft, but well-structured and elastic. The only thing I might have done differently with the benefit of hindsight was brush a bit of milk on the top before loading the dough to slow down the browning of the crust. Got away with not pre-soaking the fruit - it wasn't at all hard or too chewy, possibly because I cut the raisins into smaller pieces. And the taste test? An A-grade pass!


So, what began as a failed experiment ended as an unlikely triumph. I'm a bit regretful I won't be able to duplicate this bread exactly, but letting go of recipes and weighing was a liberating experience. I do firmly believe in exercising some precision in bread baking as a general procedural principle and will continue to tweak and take notes, but winging it every so often is a buzz. I do that all the time in cooking, but for some reason have not felt safe removing the safety net with bread baking until now. Will be living a little more dangerously in future!

Best of baking!
Ross


Pages

Subscribe to RSS - rossnroller's blog