The Fresh Loaf

A Community of Amateur Bakers and Artisan Bread Enthusiasts.

pmccool's blog

pmccool's picture
pmccool

Believe it or not, Floyd's Sweet Potato Rolls can be made even better.  And I wouldn't even have known that but for a bit of Thanksgiving serendipity.

My youngest daughter and family had been in town for a visit the weekend prior to Thanksgiving.  For one of our meals, she made Elizabeth Karmel's Sweet Potato Bourbon Mash.  Sweet potatoes are one of my favorite things and they play very nicely with a bit of bourbon.  Needless to say, the dish was delicious!

A few days later, I was planning to take some rolls to our older daughter's home for Thanksgiving dinner and decided that the sweet potato rolls would be in keeping with the day.  As luck would have it, there was about 3/4 of a cup of the sweet potato bourbon mash left over; just the perfect amount for the rolls.

The dough came together nicely and the rolls baked up prettily, filling the house with their fragrance.  They tasted even better than they smelled!  As our daughter put it after taking a bite, "It's like Thanksgiving in your mouth!"  

So, if you feel the need for a bit of self-indulgence, I'd highly recommend this.   In effect, you get a two-for-one deal, since the sweet potato mash is worth doing in its own right.

Paul

pmccool's picture
pmccool

OldWoodenSpoon has been chronicling his adventures and misadventures of baking the Vienna bread from the Inside the Jewish Bakery book.  Partly out of sympathy and partly out of curiosity, I decided to bake the same bread this weekend to see what would happen.

In a word (or three), not very much.

Things to note:

- I'm using a no-name AP flour

- The yeast was Fleischmann's IDY from a new package.

- Since I had no malt on hand, honey was subbed for the malt in equal amount.

- Ambient temps in the kitchen Saturday started out in the mid-60's and got all the way up to about 71 or 72F, so fermentation times were perhaps 50% longer than those noted in the book.

- The bread was baked in the specified 8.5 x 4.5 pans (in this instance, some cheap steel pans with a bright tinned finish, very lightweight).

- No egg wash was applied.

- As directed, the bread was baked in the center level of a 350F oven after the fermenting dough had just crested above the brim of the pans.  There were no stones, steam pans or other appurtenances in the oven.

The resulting bread was...ordinary.  So ordinary, in fact, that I haven't bothered to take a picture.  The slash bloomed nicely with the modest oven spring, the crust color is a light golden (I'd prefer it to be darker), the crumb structure is very even, maybe 3/4 of the mass is below the rim of the pan and the other 1/4 is above the rim, there are no gummy/compressed/underbaked zones in the loaves, and they stand upright without external support.  In other words, about what one would expect to see in a typical loaf of white bread.

From what I read in OWS' accounts and from what I see in my bake, I would opine that the biggest differences are in the use or non-use of malt and in the oven setup.  Which is the biggest factor, I can't guess, but I am confident that the two are combining to make OWS' experience so thoroughly frustrating.  It would have been nice if I had had some non-diastatic malt on hand just to see if the bread had responded differently.  However, since I used no malt of any kind in this bake, it suggests that the at-least-partially-diastatic malt used by OWS may have had a negative effect on dough structure by converting an excessive amount of starch to sugar and may have led to hyperactive yeast growth for exactly the same reason.  I'm less clear about how the presence of both upper and lower baking stones in OWS' oven might have influenced the outcome, especially since I have previously plunked bread tins down on a baking stone with no noticeable ill effects.  Based on OWS' experience, it appears that the presence or absence of the stones does have an effect, as does the location of the pans in the oven.

For what it is worth, that's my report from the field.  I hope it provides some useful information for OldWoodenSpoon and others who are working with this bread.

Paul

pmccool's picture
pmccool

This was going to be a blow-by-blow account of reviving a starter that had been dried for travel.  Yeah, my eyes are starting to glaze already, too.  So this will get more of a Readers Digest treatment.  And I'll try to stay awake until the end.  What you do is up to you.

Here's the back story: Man lives in Pretoria, South Africa.  Man has sourdough starter.  Man will repatriate to his home in Kansas City.  Man does not wish to lose his starter or begin a new one after his return.

Still with me?  Good.

Having read two different methods right here on TFL for preparing a starter for travel, I chose to do (drumroll, please) both!  And knowing that some or all of my luggage would be subjected to the tender mercies of either the TSA or U.S. Customs, I wanted to make sure that I had enough with me that at least one packet got through.  Or so I hoped.

Technique #1 involves adding enough flour (if your starter is runny) or enough water (if your starter is more like a dough) to some of said starter to achieve a thick batter consistency that is still smearable.  I don't know if smearable is a word but it is the key.  The traveler (your faithful reporter in this instance) needs to smear a thin layer of the suitably hydrated starter on a sheet of parchment paper and wait a day or two for the smear to dry to until it is roughly as crisp as potato chips.  Or potato crisps, for those of you who are still in South Africa.  The dried smears / chips / crisps can be broken into smaller pieces and placed in plastic bags for eventual placement in your baggage or on your person.  Note that thinner smears = shorter drying times.

Technique #2 involves adding flour to your starter until it is so dry that it is reduced to crumbs.  Some mechanical intervention will be necessary; perhaps the edge of a spoon or maybe a pastry blender or even a food processor.  I can say that a mezzalune is effective.  The more flour you try to force into the dough, the less cooperative it becomes; hence the need for mechanical assistance to cut it into ever smaller bits while force-feeding it yet more flour.  As with the flakes, the crumbs can be bagged for travel.

I strongly recommend that you clearly label each bag so that there is no leeway for interpretation by the various uniformed officials who may have their hands in your luggage at some point.  We all know what happens when we assume, right?

Thus prepared, your faithful reporter placed a baggie of dried starter in every piece of luggage.  And, for reasons yet unclear, every bag and every baggie made it all the way to the proper destination.  On the same day.  

Being somewhat surprised to find myself the proud possessor of a surfeit of dried starter, I did what any American male worth his salt would do: I set up a competition.  Keeping one baggie in reserve as insurance, I combined 10g of flaked starter and 25g of water in one container and 10g of crumbed starter and 25g of water in another container.  Here's how they looked at the start of the competition, flakes to the left and granules to the right:
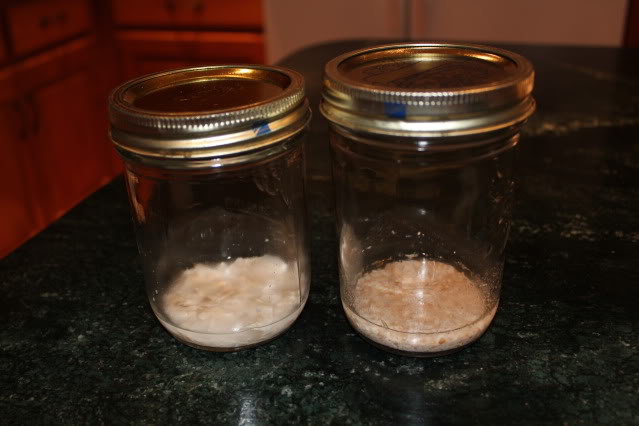
Pretty exciting, huh?  Other than some fogging of the inside of each jar, they looked about the same 24 hours later so I added 15g of flour of each.  At the end of the second 24-hour period, they were still pretty flat.  There was a whiff of...something...from the granules jar but the flakes jar smelled mostly of wet flour.  By the end of Day 3, there was evidence of bubbles in the granules jar and a hint of expansion.  The flakes jar was still pretty quiet; just a stray bubble or two.

Yep, that's right, the excitement continues to build!

At the end of Day 3, I discarded half of each sample and added water and flour in a 1:2:3 ratio.  I also moved them to some smaller plastic containers.  Here's how they looked after dinner and settling into their new digs:
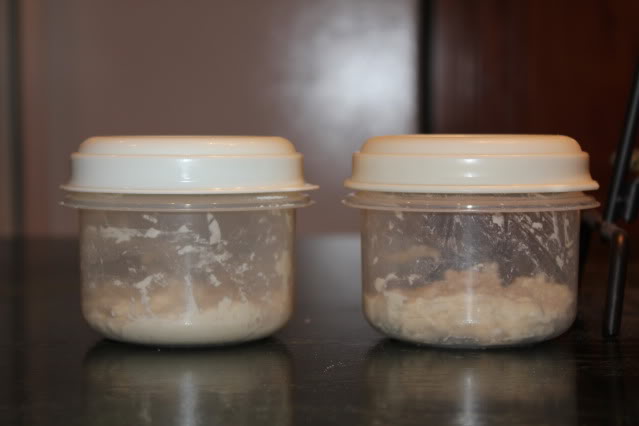
Just to keep you on your toes, I've switched the granules container to the left and the flakes container to the right.

Some 12 hours later, there was some genuine growth going on:
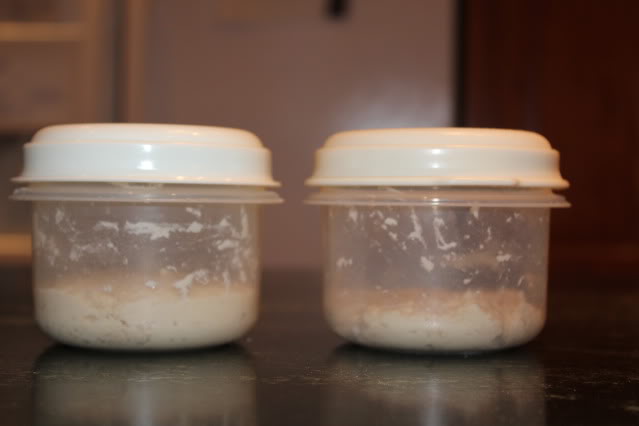
And from a different perspective:

The crumbs sample has expanded noticeably and is riddled with bubbles.  The flakes sample has expanded just slightly and has fewer bubbles.

And that's pretty much how it went for the next few days.  The crumbs sample consistently out-performed the flakes sample.  Even on a 12-hour feeding schedule, the crumbs sample smelled consistently of acetone which suggests that it was burning through its food between feedings.  The flakes sample never developed a notable yeasty / fruity / sour odor in the week's time that I ran the comparison, although it did get past the wet flour odor.

If your eyes are still open at this point, you can hang on for the wrap-up.

For short-term storage, such as for travel, I would choose the granules approach to drying starter over the flaked approach.  I've done the flakes technique twice now and it required a full week to get back to a sluggish level of activity in both cases.  For longer storage, I'd use the flakes.  Why?  Because it seems to be a more stable form that is less susceptible environmental upsets.

I have some notions about the difference in behavior of the two.  First, the granules weren't as dry as the flakes.  That seems to have allowed the yeasts and bacteria of the starter to get back to work faster, possibly because they were less stressed and did not shut down entirely.  Second, although the organisms were tightly bound in a relatively dry environment, they were also surrounded by food even if they could not exploit it easily.  The down side for the granules is that their higher moisture content would make them more susceptible to attack by molds and other organisms, which militates against using them as a long-term storage option.

The good news is that there are options for the traveler, as well as for disaster recovery.  The easiest way to travel with a starter, of course, is to tuck a small blob in a plastic bag or other container.  That's probably the easiest way to lose it to a zealous inspector, too.

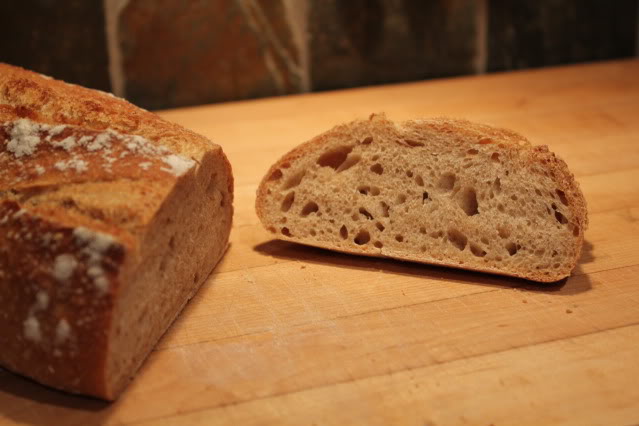
And the reward for any of you who have stayed awake through this entire dissertation?  Pictures of the pain au levain baked with the reconstituted starter, which now smells the way a healthy and happy starter should.  Note that the bread was made at about Day 7 or Day 8; not because of the starter's readiness but because of the baker's schedule.  The starter could probably have been used on Day 4 or Day 5.  First, the loaf:

And then the crumb:
Happy travels!

Paul

pmccool's picture
pmccool

After about 22-23 hours in transit from Johannesburg, which includes a 4-hour layover in Atlanta, I arrived in Kansas City just after noon on Friday.  It's a wonderful thing.  And kinda weird at the same time.

No baking this weekend.  That will probably wait until next weekend.  Meanwhile, I've been keeping busy with things like buying a pickup, getting a new cell phone, catching up with friends and neighbors, revisiting some favorite restaurants, yard work, sleeping, etc.

I'll post about the starter rehydration once I get that kicked off.  I'll probably do more lurking than anything else for the next few days.  There's a lot of catching up to do around the homestead.

Paul

pmccool's picture
pmccool

As part of my preparation to move from South Africa back to the United States, I dried my sourdough starter using two different techniques.  The first was to simply smear a thin layer of batter-consistency starter across some parchment paper and allow it to dry at room temperature.  The second was to mix flour into some starter until it was reduced to crumbs.  I found that a mezzalune was very helpful in the latter stages of incorporating the flour by allowing me to chop the progressively stiffening starter into smaller and smaller pieces while blending in more flour.

The finished product, two bags of crumbed starter and three bags of flaked starter:

That gives me one packet per suitcase.  Each will be appropriately labeled.  Hopefully, at least one and maybe all will arrive home with me. 

I'm interested to start rehydrating a bit of each to see which one comes back to fighting trim more quickly.  I'll post follow-ups when I can.

Paul

pmccool's picture
pmccool

Because of some scheduled maintenance on my car, I had to work from home one day a week or two ago.  That afforded me an opportunity to accomplish a couple of additional objectives: first, clear out some of the pantry contents in preparation for my pending move and second, make some bread.  As it turned out, that also became my last bake in South Africa.

In terms of the pantry, there was just enough rye flour to make a small rye sour, a couple of kilos of crushed rye, sunflower seeds, flax seeds, sesame seeds, whole wheat flour and bread flour.  While I couldn’t use up everything in a single bake, I was able to put together a formula that utilized all of those ingredients to some extent.  I thought that I would aim for something around 70% hydration, on the assumption that the resulting dough would be somewhat slack but still have enough body to carry the load of the crushed rye and seeds.  After some measuring and calculating, the draft formula looked like this:

Rye Sour

42g white starter (mine was roughly 60% hydration and there’s nothing magical about using exactly 42g)

140g whole rye flour

140g water

Soaker

200g crushed rye (cracked rye or rye chops would work just as well)

50g sunflower seeds

50g flax seeds

50g sesame seeds

350g boiling water

Final Dough

All of the rye sour

All of the soaker

450g water

150g whole wheat flour

850g bread flour

13g yeast

20g salt

The rye sour ingredients were thoroughly mixed the evening before baking day and covered while fermenting at room temperature (in the upper 60’s F).    The next morning, the sour was noticeably puffy, though nowhere near doubled.  When I poured in the water for the final dough, the sour detached from the bottom of the bowl and floated to the top.

The soaker ingredients were mixed the morning of baking day, covered, and allowed to cool until they were just warm to the touch.

The final dough was assembled and baked as follows:

  1. The rye sour, the soaker, and the water were combined and thoroughly mixed.
  2. The remaining flours, yeast and salt were added to the sour/soaker/water mixture and mixed until thoroughly combined.  The dough was sludgy and stiff, more like a rye dough than a wheaten dough.
  3. The resulting dough was quite a bit stiffer than I wanted, so I began adding water and mixing and kneading to incorporate the water.  Some 25 minutes and probably another 50g of water later, I called it good enough.  My initial thought had been to arrive at a dough that was slack enough to handle with stretch and folds.  That may not be a realistic goal, given the quantity of crushed rye and seeds.  This dough required a lot of muscle to perform the usual push/turn/fold method of kneading.
  4. The dough was placed in a greased bowl, covered, and allowed to ferment until doubled in volume. 
  5. After gently degassing the dough, I shaped it into two batards.  Boules would probably have worked just as well but my gear, including bannetons, was somewhere between Johannesburg and Kansas City.  Since I had to improvise, I placed the shaped loaves on a parchment lined baking sheet and covered them, allowing them to ferment until they were nearly doubled in size.  It was about that time that the dealership let me know that the car was ready.  Plan B, then, accompanied by much muttering.  I placed the loaves in the refrigerator and hoped that they wouldn’t over-proof before I got back.
  6. A little more than an hour had elapsed by the time I got back to the house.  The loaves looked a bit wobbly.  More muttering.  I preheated the oven (and steam pan) to 230C/450F which proceeded as it usually did, which is to say sl-o-o-o-o-wly.  Taking the loaves out of the refrigerator, I tried to slash them with the sharpest of the dull knives that were available to me, which caused a visible settling of the loaves and not much of a cut.  Quickly dumping some boiling water into the steam plan, I then manuevered the sheet pan with the loaves into the oven as gently as possible and left them to themselves for about 45 minutes.  During that time they regained about half of the volume they lost when slashed.
  7. When the loaves were done to the eye and the ear (the instant read thermometer was in the same crate as the bannetons and knives, remember), they were removed from the oven and allowed to cool on a wire rack, covered with a towel.

Dough at beginning of bulk ferment:

Dough at end of bulk ferment:

Finished loaves:

On the plus side, this is a very good bread, particularly with regard to flavour.  Lots of earthy notes from the rye while the sunflower seeds provide a more mellow richness.  The flax and sesame seeds each contribute to the crunch factor.  Surprisingly, this is not a tough bread.  Neither is it dry.  It is, however, very substantial, requiring real chewing.  Given the lengthy kneading, the crumb is very even, composed of small cells.  In spite of the high percentage of bread flour, it reminds me more of a vollkornbrot.  It definitely feels like a vollkornbrot in the stomach; thin slices are just fine, thank you.  I can report that it plays very nicely with ham and cheese but tends to overwhelm smoked chicken breast.

There are a number of things to address if I am able to try this again once I’m back in the States.  The first is to bump up the hydration.  Pushing it to 85% may not be too much.  That might loosen the dough enough to permit use of the stretch and fold technique and gain a more open crumb.  Then again, it may be too soft to carry the soaker successfully.  Maybe, just maybe, a bit of sweetener would bring some of the grainy flavours forward; perhaps a drizzle of honey or molasses, or a combination of the two.  Not tolerating any interruptions between final fermentation and baking will be important, too.  If the ambient temperatures are in the 70’s F or higher, going entirely sourdough with no commercial yeast is also an option.  Depending on moisture content, some alterations to the baking profile may also be required.  For instance, a wetter dough with some sweetener in it might want the high initial temperature for the first 15 minutes or so to drive oven spring, which would then have to be dialled back to prevent the crust from burning before the interior is thoroughly baked.  Hmm, I’m going to have to reacquaint myself with U.S. flours.  That may push things in unexpected directions, too.

Considering that the whole thing was jerry-rigged from start to finish, I’m reasonably happy with the outcome.  Probably the biggest frustration is that it over-proofed during the final fermentation.  Even with that happening, the bread is not crumbly at the top and dense at the bottom.  If I can source the ingredients (I’ve not had much luck locating rye chops or crushed/cracked rye in stores back home), I’ll definitely take another run or three at this to see whether I can come up with something that I can produce reliably.  If any of you want to try some variations on the theme, let me know how things go, please.

pmccool's picture
pmccool

Today was a fun day, featuring a thoroughly informal and just as thoroughly entertaining class on how to make bread.  Eight friends and acquaintances received a lesson on making a honey whole-wheat bread.  Two of them thought that they would just observe but we had them up to their elbows in flour along with the rest of the group in no time flat. 

It was raucous and messy and fast-paced.  Lots of questions (good ones!) and lots of interest.  At the end, we helped Joan clean up her kitchen and get things put back to rights.  Afterward, everyone took their shaped and panned dough home for the final rise and baking.  I've already seen a couple of FB posts.

The format was simple.  Everyone brought their own utensils and I supplied the ingredients since I need to clean out the pantry anyway.  I had a sheet with the recipe and instructions printed up for each student, along with another tip sheet that, among other things, referenced TFL.  I had everyone weighing and measuring after a minimal intro, then used the autolyze time to go into a bit more detail and field questions.  There was one bobble, mine, while assembling the final dough, in that I forgot to have them put the butter in the dough.  So much for practicing mise en place!  Anyway, it was a good opportunity to demonstrate that just about any mistake is recoverable and that adjustments are inevitable even without mistakes.

We used the time for the bulk ferment to munch on a loaf of Sweet Vanilla Challah that I had brought along for that purpose, along with the demo loaf of the honey whole-wheat that I had prepared in advance.  Bonus discovery of the day: challah smeared with Nutella and coconut butter is way more than just good.  Next time you're in Florida, pick up a jar of the coconut butter.  Just sayin'.

Some pictures:

I'm pretty sure that at least one or two will use this as a launch pad for further baking on their own.  Even if it doesn't become something that they choose to do consistently, they at least have the knowledge that they can make bread on their own.  And that it can be a lot of fun.  That's a good thing to have.

Paul

pmccool's picture
pmccool

A few weeks ago, I blogged about a bake that was destined for dinner with friends.  I had asked what they would like us to bring and the response was "Something that would go well with snoek pate."  Since I didn't have a clue about what Marthinus put into his snoek pate, other than that snoek is a fish, that left me with (in positive terms) a lot of freedom of choice.  I wound up choosing two breads: a sourdough in the pain de compagne vein and Reinhart's pain a l'ancienne.

Before I go further, I should provide some context.  Marthinus had an 18-year run as chef/owner of one of Pretoria's top restaurants.  Although he has changed businesses, he remains passionate about food and cooking.  He is still very selective about the ingredients he uses and very creative with how he puts them together for the finished dish.  When presented with something, he wants to know what went into it and what process or processes were used.  And he is not bashful about sharing his opinions.  For Marthinus, flavor matters.  A lot.

With that in mind, I was both relieved and pleased to see Marthinus enjoy both breads.  He was especially taken with the flavor of the pain a l'ancienne.  So much so, in fact, that this chef and self-avowed non-baker has begun experimenting with pain a l'ancienne at home.  He's already made it twice, with neither effort quite reaching the goal that he wanted to achieve.  One was, from his description, over-fermented.  The other was probably under-hydrated. 

In spite of not hitting a home run with the first two attempts, Marthinus is soldiering on because the flavor of those breads was still captivating.  As he put it, "There isn't a bakery around here where you can get bread that tastes like this!"  Knowing Marthinus, he will have bread whose crust and crumb is as satisfying as its flavor in the not-too-distant future.  It might even be the final motivation to press ahead with a WFO that he had already been contemplating.

Seeing his interest in the bread's flavor has caused me to give some more thought to the importance of flavor.

We all bake for a variety of reasons.  Sometimes it is as fundamental as putting food on the table for our families.  Sometimes we bake because it satisfies an inner longing to master a craft and produce something that appeals to the senses.  Sometimes we bake because it is better to knead a batch of dough than it is to punch someone or something.  Sometimes we bake because it lets us take an active role in making foods that are wholesome and unadulterated.  Sometimes we bake to be reminded of a special place, or time, or person.  Sometimes we bake because we can produce something better than we can get at the store for less cost.

Whether our reasons for baking are utilitarian or esthetic, we all bake for flavor.  If bread tasted or smelled like cow flop, we wouldn't eat it. 

As you read through the posts here on TFL, you will see frequent mention of the flavor and fragrance of the breads that are being produced.  People get downright lyrical as they try to describe the flavor of the breads they make.  It isn't surprising.  Every bread sooner or later goes into our mouth.  And as we chew it, the initial visual impression that we had of it is supplanted by the flavors and aromas that permeate our mouth and our nose.  At that point, our attention has shifted away from whether it had a open crumb or a tight crumb, a dark crust or a light crust.  What we want is flavor; the kind of flavor that tells us "Yes!  This is the way that bread should taste!" 

Flavor is so important to us that we aren't content to simply savor the notes that come from the grain, the yeasts, the bacteria, or the enzymes that have all contributed to a specific bread's flavor.  Bread's flavor calls for other flavors, sweet and savory.  Depending on the bread, we may want the simple luxury of butter or a drizzle of olive oil or a scattering of salt.  Or maybe a PB&J is in order.  Or we might marry some good ham, Havarti cheese, and a grainy mustard with an earthy rye.  The possibilities are as infinitely variable as the people making the decisions and the ingredients they have to work with  Every one of those choices is driven by the desire for flavor.

Although I have used Marthinus, with his training and experience as a chef, as an example of someone who cares about flavor, each of us in our own fashion is also concerned about flavor.  Whether or not we consciously acknowledge it, every loaf of bread we bake is another step in the pursuit of flavor.  Some of us are adventuresome, others are cautious.  Some of us crave the new, others want familiar comforts.  Some want in-your-face flavors, others prefer to thoughtfully consider the more subtle flavors.  We each, though, want our bread to taste good

The next time you chew a piece of bread, think about what you are tasting.  And enjoy!

Paul

pmccool's picture
pmccool

It was a busy baking weekend here in Pretoria.  My lease for the house is up at the end of September, which means I'll be in temporary quarters for the last two weeks of my stay here.  Since I don't know what I might have for kitchen facilities during that time, I'm trying to fit in the baking that I need/want to do while I can.

On Friday evening, I mixed the liquid levain that the Vermont Sourdough formula calls for, plus enough extra for sourdough pancakes on Saturday morning.  Never one to leave well enough alone, I also set up a soaker consisting of cracked rye at 10% on flour, with an equal amount of water, to include in the bread.  I need to use up what I can, right?  And I haven't been wrong yet about choosing which breads to grace with some cracked rye.

On Saturday morning, I assembled the final dough for the Vermont Sourdough and put it through its stretch and fold regimen.  A formula for this bread, posted by zolablue can be found here, with corrected metric weights here.  The day was a bit cool, with temperatures only getting up into the mid-60s, so both the bulk and final ferments were leisurely affairs.  It's a lovely dough to work with.  Initially, it's a bit sticky (probably accentuated by my use of the cracked rye soaker), but it transforms with each S&F into a dough that that is elastic and self-supporting.  The final proof after shaping was done on parchment on a baking sheet.  Scoring was a bit ugly (I miss my knives!) but one loaf still developed a respectable ear during baking.  The other loaf exhibited a small blow-out along the bottom edge, which would probably have been prevented if the scores had opened properly.  No pictures, I'm afraid, as the bread is already in the freezer.

After getting the sourdough to the bulk proof stage, I started a batch of Sweet Vanilla Challah.  I've blogged about it previously, so won't repeat myself here except to say that I really like this bread.  Much of my baking involves lean whole grain breads, so working with an enriched white bread is like driving a luxury sedan after driving a pickup.  Everything is so much smoother.  Again, no pictures since both loaves are in the freezer.  One will be gifted later this week and the other will be consumed at a bread class I'm conducting at a friend's house next Saturday.

After getting home from church this morning, I started a batch of the honey whole wheat bread that the class will be making next Saturday.  I wanted to give the formula a shake-down to ensure that everything worked the way I expected.  Good thing, too.  The flour was much thirstier than I expected, so hydration needs to go up.  I also wanted to show the class the effects of a couple of techniques.  Because of time constraints, we'll only use a 15-minute autolyze in class.  For this batch, I extended the autolyze to 60 minutes.  I also extended the kneading time to about 25 minutes.  All things considered, this bread should be more tender and less apt to crumble than the batch that I made a couple of weeks ago.  As the picture below shows, matching pan size to dough quantities properly results in a prettier loaf.

In considering what to do with some apples that might not be used otherwise, it occurred to me that someone had posted an apple variation to the Blueberry Cream Cheese Braid that Floyd initially posted, so I went looking.  For once, my memory concided with reality.  The apple filling formula is about two pages down from the end of Floyd's post.  So, I set the sponge, peeled the apples and cooked the filling, made up the final dough and set it to proof, then went to the stoep to read the Sunday paper.  Well, part of it anyway.  When I came back in to check the dough, I found that the dough had doubled so I mixed both the egg glaze and the cream cheese filling, then rolled out and assembled the two braids.  I am not a natural-born braider but I'm really pleased with these two attempts in spite of the obvious flaws.  Dunno yet how they'll taste but they make the eye happy.  Here they are:

And a closer view:

Odd.  I'm not seeing the images that I've linked to.  Ordinarily they pop into view immediately.  Maybe it's just my slow connection here.  Hopefully they will show up once the post is submitted.

 All in all, a very satisfying baking weekend.

Paul

pmccool's picture
pmccool

Saturday, August 20, was a busy day in the kitchen.  And a bit more daunting than normal.  Friends had invited us to dinner that evening and asked if I would bring some bread.  When I asked what they would like, the answer was “something that would go well with snoek paté.”  Did I mention that Marthinius had previously been executive chef and partner in an up-scale restaurant?  And did I also mention that I’ve never had my baking critiqued by a chef whose training is in classic French cuisine?  Hence the daunting.

Well.  A challenge.  Bread to go with snoek paté.  Whatever that might turn out to be. 

I wound up choosing two breads: Reinhardt’s pain a l’ancienne and a pain de compagne.  Both French in origin or influence.  Neither one required complex techniques but each offered layers of flavour from levains or long ferments; one somewhat more ethereal and one more hearty.  (Hedging, don’t you know.)  And each being something that was started the previous evening with the final dough preparation (the pain de compagne) or shaping and baking (the pain a l’ancienne) on Saturday.  Because each was at different stages of readiness Saturday morning, it also gave me better opportunity to manage oven timing without a train wreck between two different breads that had to be baked at the exact same time.

And, since we were also invited to a braai (barbecue) on Sunday afternoon, I followed those with Portugese Sweet Bread using Mark Sinclair’s formula.

The breads, happily, proceeded without a hitch.  Just as happily, temperatures were starting to moderate; enough that the house temperature was in the low to mid-60s instead of the 50s.  I still spiked the final pain de compagne dough with about a half-teaspoon of yeast as insurance and used a make-shift proofer for the bulk ferment.

Handling the pain a l’ancienne dough is, except for temperature, not unlike handling taffy or melted mozzarella cheese.  It is so wet that it has very little internal support and wants to stick to everything.  Nevertheless, I was able to get it divided and “shaped” as per instructions.  One or two were rather raggedy in appearance, so they didn’t make the trip to dinner that evening.  Which is not to say that they weren’t eaten.  In spite of knowing how difficult it is to slash such wet dough, I made the attempt.  The slashes were not a thing of beauty but they did serve a purpose.  You can see in the photo that the greatest expansion occurred at the slash locations.  Rather than repeatedly opening the oven for steaming by spritzing, I relied on pouring boiling water into a preheated pan in the oven to generate steam.  The oven in this house only heats up to 230C, which is a bit less than I needed, so I relied on the convection setting to boost the, um, “effective” temperature.  While I would have liked to have a prettier bread, this gave me a baguette-like bread with great flavour but without the technical demands of producing a classic baguette.  I’ve tried but my present setup just doesn’t permit me to hit that target even if my technique is bang on, which it frequently is not.

The pain de compagne is more familiar to me and went very smoothly.  The only glitch was my being a bit impatient about getting it into the oven.  I could have waited another 20-30 minutes at those temperatures and avoided a couple of small blowouts.  Other than that, some very tasty bread.

The Portugese Sweet Bread is lovely stuff.  The dough is easy to handle and absolutely silky compared to the whole-grain lean breads that I usually make.  I have no complaints with the process or the finished bread.

Eventually it was time for dinner, the moment of truth.  Marthinius made the snoek paté with snoek that he had smoked at home.  I don’t know entirely what was in it (mayonnaise? minced celery? other?) but my wife, who is ordinarily not a lover of things involving fish, thought it was absolutely wonderful.  I concurred.  After asking me to describe each of the breads and then sampling each, Marthinius decided that he liked both (whew!) but preferred the pain a l’ancienne with the paté.  I think the complex play of flavours appealed to him.

There were two main courses.  One was a deboned haunch of springbok, larded with garlic cloves, lightly smoked, then wrapped with bacon and finished in a slow oven.  The other was chicken breasts stuffed with feta cheese and spinach.  Both were excellent.  They were accompanied by baby corn, roasted sweet potatoes, and a pilaf.  Dessert was a vinegar pudding, as it is called by the Afrikaners.  Those from a British background would probably call it a nutmeg pudding.  It was a thoroughly enjoyable meal and evening.

The weather on Sunday was absolutely gorgeous.  There was plenty of warm sun and a cool breeze.  With chicken, steak and boerwors on the braai, delicious side dishes, and lots of conversation, it made for a marvellous afternoon. 

We are definitely happy about moving back to the States soon but we will miss times like these with friends like these. 

Pages

Subscribe to RSS - pmccool's blog