The Fresh Loaf

A Community of Amateur Bakers and Artisan Bread Enthusiasts.

OldWoodenSpoon's blog

OldWoodenSpoon's picture
OldWoodenSpoon

I have not been very active here in many years, posting only occasionally in reply to member questions, and even more rarely to my own blog.  Perhaps so much so that I may even appear to only talk the talk.  I decided today that I should, if not change that, at least speak into the silence a little bit.  So, I will tell you of  my latest bake.

This is a very straight forward 68% white sourdough.  The last year or two I have adopted/adapted the 3-stage approach of Danni3113, for which you can find the basics here.  The principal adaptation I use is to refrigerate the completed starter after the last feed, then on dough making day I pull it out early, give it a stir, and wait till it gets "jiggly" to start my dough.  This adapts better to my schedule.

I also bake in dutch ovens because my oven uses so much top heat that crusts turn black long before the loaves are finished.  I bake covered for 15-18 minutes, then finish uncovered for 10-12 minutes, to center temp of +/-205F.  Here are today's results (crumb shot when available).

and

Edit:  Added Crumb Shot

Just saying...  (Am I boasting?  Of course!  Don't we all?)

Still baking happy!
OldWoodenSpoon

OldWoodenSpoon's picture
OldWoodenSpoon

I love Jeffrey Hamelman's book Bread!  It offers many recipes that could qualify as my favorite, so I just don't bother to choose. Often, what I bake is driven by how much time I have, and for Homemade Bread Day I did not have a lot of time.  Because of that, I chose Country Bread.  It uses a biga that provides 50% pre-fermented flour for flavor, but also includes only a short prep cycle that fit my schedule.

I used even less yeast in the biga than the original formula calls for so it could ferment for a long time, enabling me to set up the biga late at night and not have it mature until late on the next afternoon, when I would have time to bake.The strategy worked out well, and the loaves came out of the oven late that night, just in time for bed.  Don't you just love slipping into bed with the aroma of fresh baked bread filling the house!?

These loaves are destined for gifting so I won't be able to get a picture of the crumb.

Happy Homemade Bread Day!
OldWoodenSpoon

OldWoodenSpoon's picture
OldWoodenSpoon

The book "Sourdough" by Sara Owens was a surprise gift in more ways than one earlier this year.  First, I was not expecting it, had not asked for it, and in fact, did not know about it.  Second, it has proven to be a wonderful, inspiring and tasty addition to my library!  Others have already posted my favorite bread from the book, the Honey Oatmeal Spelt recipe, so I decided, finally, after what must be two years of lurking, baking, and silence since my last blog entry, to post something for once.

The book title of this recipe is Wild Rice, Herb and Almond Levain, but in the formula she notes that the herbs are "optional".  I am not a great fan of herbs in bread unless the bake is for a specific meal or use, and I know the herbs chosen are appropriate for that setting.  For general baking and unpredicted use I consider the herbs too limiting in what the bread can be used for and served with.  So no "optional" herbs in my bake. 

No formula posted here either since I baked it straight out of the book with only very minor deviations.  There may or may not be legalities to posting the formula, but regardless, I do not do it unless I have made what I consider a material modification that makes it mine, not the author's.  That's just me.  Others feel different.  That's up to them.  I will note, however, that fully a quarter of the flour in this loaf is my home milled white whole wheat flour, plus 5% Wingold Dark Rye flour.  The recipe calls for medium rye but I don't have any of that and I have "tons" of dark rye.   The rest of the flour is Guisto's Artisan Select Malted.  The loaf also contains nearly 20% (Baker's %) cooked and cooled wild rice and 10% toasted, blanched, slivered almonds.  If my Breadstorm numbers are correct (not guaranteed!) then the hydration is almost 77%.

This was a fun bake, and quite challenging.  The dough made up as a very wet dough:
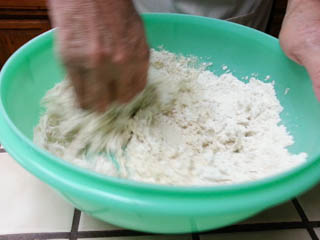
but it settled down quickly after an hour autolyse, and once the wild rice and toasted, slivered almonds were incorporated.
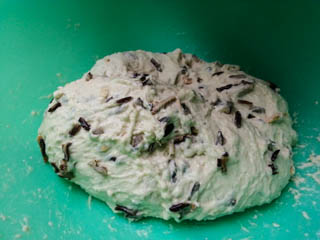
The process for this dough after the main mix and autolyse used a four hour bulk fermentation with stretch and folds, (I use two letter folds at each turn) every 30 minutes for 3 hours, and then an undisturbed fourth hour.  The dough was then divided and preshaped, as a single boule in my bake.  After 30 minutes of bench rest it was final shaped and placed in a linen lined baneton in a plastic bag, and retarded ovenight in the refrigerator.  I use a small wine refrigerator for retarding so I have temperature control, and this bread was kept at 42F for 16 hours.

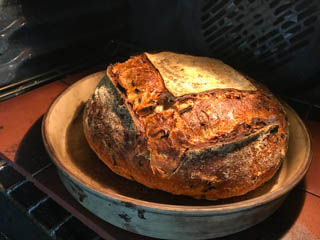
I baked the loaf en cloche directly out of the refrigerator.  The oven was preheated to 505F (as high as my GE will go without locking the door!) with the cloche baker inside.  I slid the dough into the hot baker with a Super Peel and baked under the dome at 505 for 7 minutes.  At the 7 minute mark I turned down the temperature to 485F and baked under the dome for another 8 minutes, then the dome lid was removed and the bake continued for another 25 minutes at 485F.  Finally, the oven was turned off and the door propped open a bit, leaving the bread inside for 10 more minutes.  I took this final step because I knew the dough was very wet, and with the wild rice it would tend to stay that way.  The extra 10 minutes in the "falling oven" helped let some of that moisture migrate out of the dough and evaporate off without spoiling the crust.

The baking strategy worked well, producing very nice bloom and spring, a boldly baked crust and an attractive appearance that I was quite pleased with:
The inside of the loaf is as pleasing as the outside:
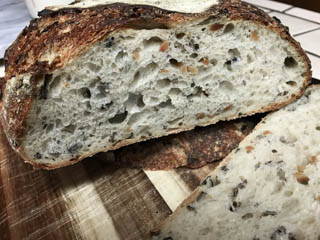
There is a good distribution of large and small holes as a result of the good spring this bread attained, with plenty of wild rice and almonds in evidence.  The crumb has a cool, creamy texture, and the wild rice lends it a moistness that does not chew up "gummy".  The almonds retained their crunchyness, and that wonderful flavor that toasted almonds exhibit.  All combined this has been a wonderful bread to look at, and to eat.  The flavor is not strong in any direction, with a mild sour that we prefer over strong tang, and with a crisp crust that I value highly in sourdough breads I bake. 

This formula is a keeper, and I would encourage everyone to check out Sara Owens' "Sourdough" for the many interesting recipes she presents.  Note, however, that the book is about Sourdough as a topic, not about sourdough bread as a topic.  There are many, many non-bread recipes in the book, from pies and cakes to tarts and empanadas, and they all use sourdough starter in one way or another, and again, not always specifically as a leavening agent.  All of the many I have tried taste great though.

Thanks for stopping by, and do visit again.  Perhaps I will post something again sooner, rather than later, this time.
OldWoodenSpoon

OldWoodenSpoon's picture
OldWoodenSpoon

Well, it's been a while (about two years I think) since I last posted to my blog.  Lots of irrelevant reasons for that, but last night's bake from the first edition of Jeffrey Hamelman's book BREAD inspired me to return.  Time will tell if I can keep it up.

I baked this one "by the book" with only a longer final proof than prescribed because I undershot the desired dough temp by 5-6 degrees, and in my cool house the dough just never caught up.  The end result was, nonetheless, delicious.  We love this bread, and prefer it to the base Vermont Sourdough because of the extra flavor that the added whole wheat flour produces.  I used Guisto's Unbleached Artisan flour alongside my home-milled whole hard white wheat flour.  In this case the wheat was only milled a couple of days before the bake.

The crust shot is at the top, and here is the crumb.

Vermont SD w/ added Whole Wheat

The crumb is not as open as I like, but that is due to my less than excellent dough handling skills.  Thanks in part to the excellent qualities of the Guisto's flour this dough was a joy to handle, albeit poorly on my part, and the flavor was excellent.  The crust came out crackling crisp, and the crumb cool and creamy, wheaty sweet with a perfect (which for us means pretty mild) sour tang.  It wrapped the meatloaf sandwiches perfectly at lunch today.

Thanks for stopping by
OldWoodenSpoon

OldWoodenSpoon's picture
OldWoodenSpoon

This is Take II because I actually baked this formula twice this week.  The first time I used dark rye instead of white rye flour by mistake.   The second time I got the flour right, but I may have done something else wrong.  Both bakes are very tasty.  Almost addictive to a giant sweet tooth like myself.  Even though I baked it for what seemed like forever though, it still came out not quite done.  Or, it came out something else I don't recognize.  Here is the picture that explains it.

There is that dark and heavy, almost gummy edge that runs all the way around the loaf, thicker on top, and hardly present on the bottom.  I baked two of these together on the same shelf, about 8 inches apart, and both came out the same.  They were baked at 225F for 2 hours 45 minutes.  A skewer in the middle came out a bit wet and with gummy crumbs on it at 2 hours 20 minutes, so I gave them more time.  At the next check the skewer came out clean.  The book does not specify how to tell if these are done, so I followed my limited knowledge of "the basics"...  I asked my wife.

There was one other difference between the book instructions and my kitchen that I also do not know the impact of.  That is:  No KitchenAide mixer or any other "paddle attachment" mixer.  I made these in the old Hamilton Beach Mixmaster.  It is one of those double-beater mixers.  I used slow and not-quite-so-slow speeds to mix, and used the prescribed times as a guide, roughly.  When the batter achieved that "loose, stringy and very, very sticky" point I quit.  It seemed like the batter might be more highly aerated than a paddle mixer might have made it, but I've never worked with a paddle so I don't know.  If that were the case though, and the batter was a little "foamy" as a result, could that account for this appearance?  Or is it just under baked as I surmise?  Or, is it just fine, and I'm being too picky again?

I ask if I'm being too picky because back in November of 2008 nbicomputers (Norman Berg) posted his own bake of this formula, and in that post he says it was baked for 2 hours at 225F.  His photo shows slight evidence of  the same, so I don't think my results are too far off.  I imagine he used a Kitchenaide, or something like it, so I'm curious about the impact that might have.

Aside from that, this is a wonderful cake.  The aroma while it bakes is intoxicating, and the taste is addictive.  I have to stop baking it, and give some away, or I fear my "stock" will be going up undesirably.  I will probably bake this again at some point, and I think I will probably go back to the dark rye flour when I do.  The crumb and texture with the dark rye flour were more coarse than with the white rye, and the sweetness seemed a bit less sharp to us than with the white rye, but we like it very much.  We both thought that was a very good tasting mistake, and worth repeating.

Thanks for stopping by.
OldWoodenSpoon

OldWoodenSpoon's picture
OldWoodenSpoon

I have been reading with interest the postings by Andy (ananda) about his work with double levain breads.  Until now I had not experimented with them, but I had a fully refreshed rye sour at hand. I have already baked a solid brick of a Russian Black bread with that sour, and whilst licking my wounds I have been looking for something a little less difficult to exercise my sours with.  I'm not sure if double levain falls in that category or not, but at least it is not a 100% rye bread.

I read and reread Andy's posts, and finally decided to just plunge in and give it a try.  After all, that's half the fun of baking, for me anyway.  I composed a formula based on my existing rye (80% hydration based on the formula from Inside the Jewish Bakery) and wheat (66% hydration) sours, targeting a total of 30% prefermented flour in the batch, and dividing the preferment as 1/3 rye and 2/3 wheat sours.  Both sours are being actively fed twice daily. I also wanted to include a good portion of whole wheat flour from my home mill, but I was not willing to go 100%, so I ended up with some Portland Mills Morebread (All Purpose) flour in the mix as well.

 The overall formula for two 750 gm boulles broke down like this:

Grams
Wheat Levain:                       287
Rye Sour                                 162
PMI AP Flour                        266
BRM Dark Rye Flour              86
Fresh Whole Wheat flour     265
Salt (1.5%)                                13
Water (70% Hydration)       430

 I hand mixed the batch enirely, beginning with the sours and water in a large bowl, then adding the remaining flours and mixing to a shaggy mass.   I rested the dough for 30 minutes, then added the salt and mixed it in thoroughly, along with another 15-20 grams of water because the dough was too dry.  My home-milled wheat flour is very thirsty and always requires a little extra water.

 I bulk fermented the dough in a clear bucket for what ended up being 3 ½ hours, doing stretch and folds on the counter at 1,2, and 2 ½ hours.  It ended up stretching out to 3 ½ hours in bulk because dinner was ready just at the time when I should have been dividing.  We ate, I did the dishes, then I divided and shaped the dough into two rounds, and placed them in floured cane bannetons to proof.   Because I planned to bake them consecutively in my La Cloche clay baker, I moved one loaf to a cool place after about 45 minutes of proofing.  The other remained where it was warmer. The difference was not enough, and the second loaf mildly over proofed.

As planned, I baked these consecutively in my La Cloche.  The La Cloche (top and bottom both) was preheated to 535F on preheated tiles on the lower rack of the oven.  The bread was loaded, and after 10 minutes the temperature was turned down to 485F.   At 15 minutes into the bake I removed the La Cloche lid from the oven and completed the bake at 485F in 15 to18 minutes for each loaf.  Between loaves I returned the La Cloche top to the oven while the preheat temperature of 535F recovered.

Here are the two boulles.


The crumb:

And closer:

Overall I am pleased with this bake.  It was a successful experiment.  The loaves baked up very nicely, with a nice bold crust, which I prefer. The crumb is, for a 50% whole grain and rye bread, pretty good, and perhaps even very good.  It is certainly not a brick like a certain Russian Black Bread of recent experience.  The thing which surprised me is the flavor.  The flavor is not excellent, but I would call it very good.  The rye flavor is fairly strong, but the whole wheat is somewhat muted, and certainly overshadowed by the sour tang.

I would rate the flavor higher but that it came out too sour for our taste, and I must read more to determine why that happened.  I was unprepared for this outcome because I did not retard the dough in any way, but rather took it directly from the main build through bulk fermentation, shaping, proofing and into the oven.  The bulk fermentation time was a little longer than planned but not exageratedly so.  Still, the sour flavor is as strong as if I had retarded the dough overnight in a cool spot.  I conclude on a preliminary basis then that the extra sour flavor comes from the acidity of the rye sour, or perhaps the bulk fermentation time should have been much shorter than 3 hours because of the whole grain hyperactivity.  After more reading I will try this again and try to tone down the sour a notch or two.  I'd like to be able to taste the bread itself more than this bake allows.  It will be fun learning to manage and bake with double levains.

Thank you Andy (ananda) for the inspiration, and especially for your great descriptions of your double levain bakes to guide me.

Thanks for stopping by
OldWoodenSpoon

OldWoodenSpoon's picture
OldWoodenSpoon

It seems that all that was required was to step back, breath deep, and allow time to create a little distance.  As I started to bake this again my wife asked "So, what are you baking?".  After I answered she asked "So, what are you going to do different?".  I said "I'm going to bake this like I never saw it before and see what happens."  She just smiled and left me to it.

I approached this bake as if there were nothing different about it, and (almost) as if I had never made it before.  The only intentional deviation I made from the recipe as printed was to reduce the yeast by 1/3, as I always do these days when a recipe calls for IDY.  Some day I must do a test bake with bottled water because something around here makes IDY go crazy!

The dough developed fully in only 11 minutes in my old Bosch.

Shaped, panned and proofed.  I was as careful as I could be with the shaping on these, and got a pretty good result for each.  The pan on the left is a shiny one, and the one on the right is a non-stick dark one.  I brushed both with my usual home-made pan release.


I kept the top tiles out of the oven for this bake (and he nods at the commitment to forget previous bakes) and I kept the middle rack where these loaves baked just above the level of the lower tiles (and he nods again).  After baking it was clear that I should have proofed them a few minutes longer.  Both ruptured along one top edge, and there was no seam there on either loaf.  Both the bottoms are nice and brown, and there is a slightly darker tone on the nearer/dark-pan loaf in the following shot.


The crumb is more open than that described in the book, but it is nice and tender, and there is no evidence of doughy crushed layers on the side verticals.  There is also no pronounced hourglass shape evident.

There was another, unintentional, deviation from the published recipe.  I forgot to turn the oven down from the preheat of 375F to 350F when I loaded the loaves, so these baked a little hotter for a while, until I finally remembered it.  I'll find out one day if that contributed to the openness of the crumb.

It is finished.  It is not perfect.  It tastes wonderful, and I'm thinking, maybe, french toast for breakfast.  And on to other things. 

Thanks for stopping by.
OldWoodenSpoon

OldWoodenSpoon's picture
OldWoodenSpoon

I have learned a lot about my oven this fall.  One of the most important things I learned, though, I just confirmed this weekend with this bake.  I have feared since I finished the insulation layer that my oven was too thin-walled to hold enough heat for multiple bakes.  I also suspected that perhaps I just was not "charging the heat battery" fully enough to make it last.  This weekend was a test of this theory.

This weekend I extended the high-fire burn from 1 3/4 hours to 2 1/2 hours.  I did not burn it any harder than I have before, but I burned it that hard for longer.  The finished temperature of the oven was not that much different from previous bakes.  I could tell by other external observations, like steam coming from the insulation layer, that I had the heat deeper into the oven than before.  The temperature drop during my soaking and equalization period was also quite a bit less.  I figured that was a good thing.   It did throw off my proofing schedule though!  Just one of the joys of learning a WFO.

The plan was to again try to bake two loads in the oven, back to back.  I've tried it before and ended up with undercooked second batches both times.  For this test I prepared a first load of 30% Whole Wheat sourdough boulles (6 loaves @ 770 grams each) that I knew with confidence I could bake off.  The second load was a lighter test of two loaves of "Old School" Deli Rye from the Inside the Jewish Bakery book.  At only two loaves I could bake them in the kitchen if the wfo proved not up to it.  In the end, the wfo proved up to the task.

It was a challenge trying to bring all the timings together, and I only pulled it off, sort of.  I underestimated the soaking and equalization time I needed after the longer high-fire burn.    While waiting for the oven to cool I over-proofed the sourdough, and ended up forcing the oven floor temperature down with repeated damp scuffling.  It worked out though, and the sourdough baked off beautifully.  Next time I will try loading just a few degrees hotter.  Here they are, just ready to come out of the oven.

These finished at 208F after 28 minutes.  The bottom crust was not as pronounced as I feared.  I must have gotten the floor cool enough after all.  As soon as I got these loaves out I loaded the rye loaves, even though the oven temperature was a bit higher than the recipe specified.  Nonetheless, they baked off in roughly 30 minutes as well.  Here is the whole bunch on the rack cooling.

I was very pleased with the crusts on these loaves. They all have that great thin, crisp crust that I think is characteristic of the WFO finish.  Following are the crumb shots.  The sourdough first:

Though quite acceptable and very tasty, there is obviously some tightness in the crumb from over proofing.  As I learn to manage the oven timing better that will improve.

Here is the rye bread:

I was very pleased with this result.  I have a short list of improvements to shoot for next time, but the patti-melt sandwiches yesterday were great!  I also gave one of the sourdough loaves, still warm from the oven, to my neighbor and assistant oven builder.  As it happened his newlywed daughter and her husband were visiting, so they enjoyed the loaf for dinner.  Next day my friend said "Don't send that bread over when the kids are here!  Now they're looking for a house in the neighborhood!".  Too much fun!

What did I learn about my oven?  It can bake two loads back to back with no trouble.  I just have to charge it up accordingly.  I need to allow more time in my timeline for oven soaking and equalization though.  I have a big note in my oven management log to "Make the oven wait for the bread, not the reverse!  Start the fire early!" 

I also know that I must finish my oven door.  I have been getting by with just a piece of 3/8" plywood held in place by a brick for an oven door, and it does not fit all that well.  I know, therefore, where my heat is going!  I have a 3" thick solid oak door in progress, but I still need to get the stainless steel heat shield made for it, and get my thermometer.  I also have a little millwork to do to finish the woodwork up before I can do those things.  With that door, though, my heat retention will improve a lot.  As it was, the oven was at 545F (roughly) when I loaded the sourdough, and roughly 435F when I loaded the rye.  It was still over 400 when the rye finished.  I assume the temperature drop was less for the rye bake because it was only two loaves.  Next time I'll prepare more loaves for the second load!

Thanks for stopping by!
OldWoodenSpoon

OldWoodenSpoon's picture
OldWoodenSpoon

I said I was going to take a break and bake other things, and I am determined to follow through.  We made our annual pilgrimage to Apple Hill in the Placerville area of California, USA this past Saturday.  We go every year to buy fresh apples, eat too much apple pie, and enjoy the Fall season, mountain air, and fresh apples.  With a half bushel of Stayman Winesap apples we brought home sitting in a corner in the kitchen, I had to bake Aunt Lillian's Apple Cake from Inside the Jewish Bakery.  We are very glad I did, because this is really, really good!

The book says this is great with a cup of coffee for breakfast.  In the interest of thoroughness in testing, I had to try it.

The book is, of course, right!  This makes a great replacement for toast, and even for everything else, at breakfast.  It is light, sweet but not cloyingly so, and tastes like apple, not like cake with a bit of apple in it.  It does go great with coffee.

Thanks for stopping by
OldWoodenSpoon

OldWoodenSpoon's picture
OldWoodenSpoon

My schedule cleared up enough that I could sneak in another test bake of this recipe last night.  Based on yesterday's exchanges with Eric Hanner and MiniOven I made only a couple of adjustments from the previous bake, and in particular changed the rack and tile setup in my oven at Eric's suggestion.  Here is a brief summary of this bake:

1.  Continue with KAF All Purpose flour (11.7% protein)
2.  Continue to exclude malt (don't have the proper malt required)
3.  Continue dough development to just short of full gluten development
4.  Add about 8-10 grams of additional water to bring "apparent" hydration to more acceptable level.
5.  Continue two rises with thorough degassing between for bulk fermentation
6.  Attempt to more carefully and evenly shape the dough
6.  Remove upper tier of tiles from the oven and raise baking rack up (1 slot) to middle of oven
7.  Continue to preheat to 375F then back down to bake at 350F after loading

Part of my original plan was to also implement MiniOven's suggestion for dark baking pans, but alas, I did not find them locally and had to order them.

In summary, there is both good news and less than good news in this bake.  Eric's suggestion to remove the top tiles did pay off well, and the oven spring was much more even and controlled in this bake, where my shaping held up.  That is the good news.  The additional water in the mix returned this dough to a manageable hydration level that was much easier to work with.  I turned out one good loaf and one where the "bottom" seam gave way and the loaf blew up.  That part is my fault.  The basic problem I have been trying to resolve, though, persists.  Despite the changes and improvements in this bake I still have sides caving in.  That is the less than good news.  It is not quite as dramatic this time, but it is clearly still an issue.  Here is a short pictorial review:


The loaf on the left is the one where I got sloppy in the shaping.  I failed to pay attention to where the seam ended up, and so it ended up around to the right side in this picture.  Because of a taper I allowed in that edge I could not readily rotate that seam to the bottom without ending up with a double crease in the top.  I decided to let it be and take the consequences.  I knew this seam would not hold, but it actually came out a little better than I imagined.  I probably should have rested it and re-rolled it, but I did not.  I did a better job shaping the other loaf, and I did center the loaves better in the pans prior to proofing.

Here the loaves are fully proofed, ready for the egg wash, slash and loading.

Here you can see how well the proofed dough fills the pans.  That side seam in the left loaf never did proof out to touch the pan, but the oven spring filled that gap quickly.  Nonetheless it remained the weak spot that failed.

It took 36 minutes to get the internal temperature up to 206F.  You can see above that the loaf on the left has suffered a shaping failure and burst up on the inner edge where that side seam failed to hold.  The above shot also shows the setup for this bake.  No top rack or tiles, and the baking rack is up one level from before, leaving about 1 1/2" more space between the pans and the bottom tiles than in previous bakes.  If that proximity to the bottom tiles was a deciding factor in the problem of the loaf bottoms caving in this should have resolved it, but in the end it made no difference.

The crosscut above shows the quite open crumb, the clear hourglass figure, and the doughy patches against the side walls of the loaf where internal pressures have compressed dough layers up against the side walls.  Again.  Note that this shot is of the better shaped of the two loaves.  Also note that the oven spring is more orderly and the slash stayed reasonably well centered, indicating the spring in this loaf was pretty much straight up rather than distorting off to one side or the other as has been the norm in all my previous bakes.  This was the main thrust of this particular test bake, and it was a success for certain.  It is pretty conclusive that if I can properly shape the loaves, removing the top tiles will allow them to spring normally.  Thank you Eric!

Since I was not able to bake one of these loaves in a dark pan I still don't have much new insight into the cave-in problem.  I feel like the answer is right in front of me, but because I tend to suffer from tunnel vision when problem solving I am missing it.  I plan to leave this and go on to other baking until my dark loaf pans come in and I have some non-diastatic malt on hand.  At that point I will hopefully have achieved some distance from this issue so I can open the book and try this again from a standing start, by the book, doing my best to approach it as my very first encounter with this bread.   That's todays thought anyway.

Thanks for stopping by
OldWoodenSpoon

Pages

Subscribe to RSS - OldWoodenSpoon's blog