The Fresh Loaf

A Community of Amateur Bakers and Artisan Bread Enthusiasts.

Lazy Loafer's blog

Lazy Loafer's picture
Lazy Loafer

This has got to be the absolutely best way to caramelize a bunch of onions (in this case, about 8 largish ones). Last night I sliced them all with the mandoline (still made me cry), filled up my crock pot and tossed them by hand with a few tablespoons of olive oil and a bit of salt.

They cooked overnight (about 10 hours) on low, then a couple more hours with the lid partly off to cook down the liquid. I'll now freeze them in 100 gram batches for use in all kinds of things!

So, other than pizza (already planned), what are your favourite bready things to make with caramelized onions?

Lazy Loafer's picture
Lazy Loafer

I had a full load of 8 cast iron pots in the oven this morning. I had four of my Heart Bread loaves to bake for a customer, and I've been waiting for an opportunity to bake some of Ian's cream cheese breads, and I also added a couple of Tartine Porridge loaves to top up the load - this one made with Kamut flake porridge, walnuts and walnut oil (bought some the other day). They all turned out very pretty, and the Kamut Durum Potato Cream Cheese sourdough is soooo yummy! Good baking morning... :)

Lazy Loafer's picture
Lazy Loafer

One of our Christmas traditions is to have strawberry crepes and bacon for breakfast Christmas morning. Which always results in a whole lot of bacon fat in a tin in the fridge. I've been meaning for some time to try this in bread, and didn't have any baking for customers this week, so this was my chance.

The basic recipe is a fairly simple sourdough:

  • 85% bread flour
  • 15% whole wheat flour
  • 68% water
  • 2% salt
  • 25% levain (100% hydration)

Just for a twist, I used whole durum atta flour in place of the whole wheat flour.

I mixed the flours, water and levain and let them sit for about 45 minutes, then added salt, some dehydrated minced onion, crumbled Asiago cheese and a good dollop of bacon fat. I didn't weigh any of these so can't really provide the formula, but I'm sure you could use whatever amount you felt was appropriate. The mixing happened in the Ankarsrum with the dough hook, for only 3 or 4 minutes. The dough was quite nice already, and I plopped it into a flat container to ferment. I folded it three times over the next hour and a half, folding in some diced smoked honey ham (couldn't use the bacon, as we ate that for breakfast :) ).  It was very strong, but soft and silky dough - lovely!

It fermented for several hours at room temperature (not sure how long; wasn't timing it but rather just keeping an eye on it). At the end of the bulk ferment the dough was absolutely gorgeous - smooth, silky, soft and pillowy. I divided it into two loaves and did two letter folds on each piece of dough, then let it rest for about 15 minutes. There were some large bubbles which I chased to the edges and popped. I gently rolled it into 'chubbs' and let them rise in the bamboo risers while the oven heated up (about 45 minutes with the granite stones).

If you haven't made bread with these ingredients, you're missing an experience. Just the smell of the baking bread is so mouth-watering it's hard to wait for it! There wasn't a lot of oven spring because I think the final proof was close to 100%. It didn't collapse, and still felt lively, but was very pouffy. It was the usual bake - 5 minutes at 475F with steam, then 30 minutes at 425F.

This bread is one of the best I've made. The aroma and flavour are exceptional. The crust is tender and the crumb perfect - soft, moist and open just right. I won't be making this for the customers as I don't usually have that much bacon fat on hand, but it's definitely on my list for baking for us!

Lazy Loafer's picture
Lazy Loafer

This is one of those bakes that sort of comes together by accident. I had soaked some rye grains a while back, planning on using them in a pumpernickel, but it turned out I had soaked too much grain, so I drained the remainder and let them sit for a day. They sprouted (as they do), and I stuck the bowl in the fridge, planning on 'doing something' with them later. By the time I remembered to pull the bowl out a couple of days later they had mostly malted (i.e. they had a tangle of little rootlets along with the tiny sprouts). I could have toasted them and made some red rye malt, but instead I decided to try something I'd been thinking of for a while - fermenting them. I soaked them in about half kombucha and half water, then covered (to keep out the pesky fruit flies) and let them sit at room temperature again for a day or two, then cooked them for around 20 minutes. They ended up tender and very, very fragrant!

The other thing I wanted to try was to make a formula for a poolish bread that could be made in one day. That meant pre-fermenting a fairly high percentage of the flour in a poolish for a shorter period of time. I used a blend of bread flour, whole wheat and whole rye flour, and threw in some raisins (and a bit of spices) just because I felt like it.

The dough was really beautiful, coming together quickly and developing very nice gluten and structure.

After about three stretch & folds on a wet counter, I put it into an oiled container to ferment.

It only took about an hour to nearly double, with a lovely dome. It was pillowy and soft.

After a pre-shape and short rest, I popped it into the bannetons. It proofed quite quickly, taking me by surprise, and the oven wasn't quite ready so I think it over-proofed just a touch.

There wasn't a lot of oven spring but it was still decent, holding its shape well and expanding somewhat.

And the crumb is very nice! Creamy and moist, and very tasty for a fairly quick bread. The grains almost disappeared into the dough which isn't too surprising considering all the soaking, sprouting, fermenting and cooking they went through! I'm glad I put the raisins in; they're a nice touch. :)

I don't think I'll make quite this same bread again, what with all that work for the grains, but I will probably make it again with a different cooked (and possibly fermented) grain porridge.

Lazy Loafer's picture
Lazy Loafer

I decided to take (Canadian) Thanksgiving weekend 'off', meaning I won't be baking for either retail outlet for Saturday nor am I doing a regular bake for the subscribers on Sunday. Of course, I'm baking ten dozen Sweet Potato buns for them tomorrow, including half a dozen gluten free ones, and four loaves of Heart Bread for my special customer as well, but you know, relatively 'off'. Which means, of course, that we didn't have any bread for ourselves either (no leftovers to nick from the bread shop on Saturday).

So I whipped up an all-purpose kind of batch of dough yesterday and baked it this morning. I started with the 1-2-3 formula and changed it up a bit - the '1' was a poolish made with stout and stone-ground whole wheat, the '3' was bread flour, stone-ground Red Fife and whole rye, and so the '2' was more like '2.25'. Specifically:

Poolish

  • 50 grams stone-ground whole wheat
  • 50 grams home-made stout
  • 1/8 tsp ADY

Dough

  • 100 grams of poolish
  • 225 (ish) grams of water
  • 200 grams unbleached bread flour
  • 75 grams stone-ground Red Fife
  • 25 grams stone-ground rye (coarse)
  • 25 grams sunflower seeds (just raw; too lazy to toast them)
  • 6 grams salt
  • 1/8 tsp ADY

All dough ingredients were mixed in the Ankarsrum (just because). It was interesting to observe the different action using the roller and scraper with dough for only one loaf instead of the usual four to six. Once the dough was relatively smooth (and I added a bit more water, hence the 225 (ish) grams), I put it into a flat container - easier to stretch and fold. I did three S&Fs about half an hour apart, then after about three hours on the counter I put the dough in the fridge for the night.

This morning I took it out and pre-shaped, rested, then shaped into a ball and put it into a floured basket to proof for about two hours overall (including the bench rest). I popped it into a cast iron pot pre-heated to 475F and turned the oven down to 450F, then baked for 25 minutes with the lid on. I took off the lid, turned the pot and reduced the temp further to 425F for another 20 minutes. The interior was 205F so it was done!

Oven spring was great...

The crust is lovely and shattery, and the crumb is moist and springy.

I'm happy with this bread, and even more happy that my bread-making skills have progressed to the point where I can whip up a bread like this with no recipe and no angst. Makes me feel like a real baker! :)


Lazy Loafer's picture
Lazy Loafer

Some of my customers asked if I was making buns for Thanksgiving dinner, so I said I'd give it a go. Sweet Potato buns seem to be just the thing. I did a sweep of this site and the internet in general to look at recipes; none quite filled the bill (the recipe needs to be easily scalable to several dozen buns and the ingredients can't be too expensive or difficult to handle, or time-consuming to prepare). So I tested and tweaked, and came up with the following.

The sweet potatoes were roasted then put through the food mill, so the resulting mash is not too wet. If you are using boiled sweet potatoes or something like pumpkin or squash, you'll have to adjust the liquid in the recipe accordingly to make a soft dough.

I mixed the wet ingredients, then the dry ingredients and then mixed them all together. I used the Ankarsrum and let it run for probably six to eight minutes, or until a soft, sticky dough was achieved. Note that with the sweet potato this will indeed be a sticky dough! One thing to note - rather than using two eggs, I used one egg and the equivalent to another egg using ground flax seed mixed with water 1:2. That makes it much easier to scale (e.g. if you need 75 grams of this, then you can use one large egg plus about 8 grams of flax seed mixed with 17 grams of water). It's also cheaper and the flax seeds are a nice addition to the buns. The durum atta flour also adds good flavour.

I left the dough to rise for about two hours, folding gently once during that time. When it was risen and puffy, I scaled the buns to 85 grams, shaped them into rounds and put them in a greased pan, not quite touching. They then went into the fridge overnight (covered with greased plastic wrap). In the morning I baked them in a 350F oven, straight out of the fridge, for about 20 minutes, turning the pan once.

I'm really happy with these. The aroma of the dough and the finished buns is excellent, and they taste really good. The crumb has that nice 'shred' you look for in an enriched bun, and is nice and moist. A keeper!

Note that some of the buns don't have smooth tops. This is because I put half of them 'pinched' side up to see how they would look. It didn't add anything, so I'll bake them all smooth side up in the future. :)

Lazy Loafer's picture
Lazy Loafer

One of my friends / customers recently had a heart attack and bypass surgery. He loves my bread, but his wife is understandably concerned about his diet, so I created a new bread for them based on some research into diet and cardiovascular health. There is evidence that whole grains, particularly oats, are related to reduced cardiovascular risk. Good fats can be found in olive oil and flax seeds, and sprouted flour and long, slow fermented sourdoughs may also have benefits (at least for digestibility if not heart health). Here's what I came up with:

I'm finding the addition of a little yeast water (apple, in this case) makes for a softer dough. This small amount probably won't add to the taste much, especially as the sourdough sort of takes over. And I added the bit of vital wheat gluten to strengthen the dough because of the relatively weak sprouted spelt flour and oats / oat bran.

The dough was a bit sticky but strong and fairly easy to shape. I mixed it in the big mixer (made a batch of six) for about 4 minutes, then did three or four stretch and folds over the first two hours. It ended up sitting in the coolish basement for about five hours, then I put it in the fridge overnight to bulk ferment.

This morning I scaled it and shaped it, putting it into floured baskets to prove.

About an hour and a half later I popped them into pre-heated cast iron pots to bake. They're still in the oven at the moment, but the test loaf (same formula, slightly smaller than the production loaves) is at the top of this post.

The crumb is lovely and moist, with a complex slightly sour flavour. Something my customer (and I) can feel good about eating! Oh, and he loves it. From the heart. :)

Lazy Loafer's picture
Lazy Loafer

Having managed to create two yeast waters, from plums and apples in my own garden, it was time to try them out to make some bread.

I built each of them into a starter with two builds, adding roughly 50 grams of yeast water and 50 grams of bread flour in each build. The apple yeast water was amazing (the one on the left in the photo at the top of the post); the plum yeast water not so much but still doubled within about 6 or 7 hours. Both smelled simply wonderful - clean, fruity and yeasty with a touch of alcohol.

First I made some small sandwich / burger buns with the apple yeast water. I used about 25% Red Fife flour and added some rehydrated minced onion but didn't want to add too much of anything so I could experience the flavour of the bread with the yeast water. I was a bit surprised at the dough, given the activity in the starter; it didn't seem to rise very quickly or much. I ended up popping it in the fridge overnight because it hadn't shown much activity after several hours at room temperature. In the morning it was still sort of clay-like so I left it on the counter for a few more hours, then shaped it. It was nice, soft and elastic but not very light or puffy. I shaped it into buns, flattened them and pressed sesame seeds into the top.

Once baked, the thing that struck me was the pale colour. Very unlike most of my bakes, though they were certainly done inside. Decent oven spring but not huge.

Crumb was a bit dense but decent. The DH says "good bun!" so I guess they pass, but not one of my best bakes.

Yesterday I used the plum yeast water to make some currant buns. I used the recipe from this page for Dutch Currant buns, with a couple of changes. I used the yeast water starter to replace part of the milk and flour, and left out the dry yeast. I also used an egg substitute (ground flax seeds mixed with water) as I wanted to try this out anyway.

Once again, the dough didn't rise much and felt very dense, even after 5 or 6 hours. I shaped the buns last night and put them in the fridge. Not much change this morning, so after letting them sit out for a couple of hours I popped them in the oven.

Once again, little oven spring and a very pale colour. The crumb is dense, but the buns do taste good!

So, I'll continue to test this out. I like the idea of having a source of wild yeast that doesn't have the sour taste of sourdough starter. Perhaps it needs different timing, or a tiny bit of dry yeast for a booster.


Lazy Loafer's picture
Lazy Loafer

Well, you know me - I can't resist a challenge! And thanks so much to @Mini Oven for issuing this one. I had more fun with this than I've had in a long time. :)

Here in Victoria (BC, Canada) we're not quite on the path of totality for the eclipse but will have the best view in Canada (about 90% totality). That's assuming clear skies, of course.

I started out thinking, as others have, of making two doughs, one dark and one light. So I went back to my flour test sourdough recipe, where I tested a variety of flours by using each as 25% of the total flour weight. This was the basis. The 'sun' dough is 25% corn flour, with added sunflower (well, duh!) and sesame seeds. The 'moon' dough is 25% teff flour. I wanted it a little darker so added a little bit of very dark toasted malt flour and a touch of Ghirardelli cocoa. Then just for fun I added currants and poppy seeds.

Oh, and just because I'm a total idiot, I decided to make not one, but nine loaves, in the same timeframe as prepping and baking all the bread for tomorrow's shop and market. And to advertise it for sale without ever having tested a loaf first. At least there are nine, so I can cut one (later when they cool) and make sure it's at least edible first). :)

I wanted to show the 90% eclipse, so placed the 'moon' on top of the 'sun'. That worked fairly well...

... except that they are both fairly soft doughs and the shape very quickly spread, placed as it was on parchment on a baking sheet. So, new solution (I'm making this up as I go along, right?) - put the whole construct in a parchment-lined basket. I didn't want to turn it out of the basket once risen, so I figured I could lift the whole thing out with the parchment once it was ready to bake.

And taa-daa! It worked! Here are eight of them loaded into pre-heated cast iron pots.

Just right! I did try to score the 'sun', but the dough was too soft.

I was a bit nervous for the first 30 minutes until I could take off the lids and see what had happened. Hmmmm, looks okay so far! Finish baking with the lid off, then turn them all out.

I'm glad the colours stayed nicely contrasting. Sometimes the bake darkens things to the point where the colour is lost. The loaves look a little bit like a snail devouring a rock, or maybe a bunch of baseball caps, but you get my drift, right? I'll cut one later and post the results (crumb and taste).

And there you have it - Eclipse 2017 Bread! Oh, and here are a couple of the other breads I baked today for sale tomorrow - Oat, Walnut and Seed Levain and an Orange Coriander 100% rye sourdough.

Edited - here's the crumb shot! Texture is a nice moist, chewy sourdough, and the taste is good. Slight salted chocolate taste on the 'dark side'. :)
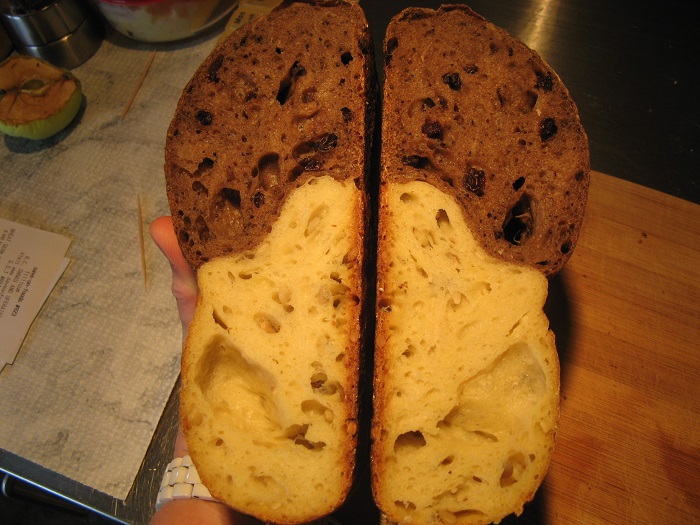
Nice sun spots and moon craters!

Lazy Loafer's picture
Lazy Loafer

So, after baking 75 loaves of bread in the one week since we've been back from holiday, what do I do for a break? Bake bread, of course! :) I was making "What do I do with all these green beans from the garden" minestrone for dinner, and needed some bread to go with it. All I had on hand was multigrain sandwich bread which didn't seem quite right with minestrone, so I figured it was high time I finally tried the most-bookmarked bread on this site - Jason's Quick Cocodrillo Ciabatta.

I happen to have a large bag of Durum Atta flour (this is Canadian 100% whole durum flour, finer than semolina but not as fine as remilled durum flour) so I used 150 grams of this along with 350 grams of bread flour, 475 grams of water, 15 grams of salt and two teaspoons of yeast. I mixed it in the Ankarsrum with the dough hook, and let it run at medium high speed for about 30 minutes until it was climbing up the hook (as directed). Then I poured it into an oiled container. The recipe said to let it triple which happened fairly quickly in the warm summer heat. Good thing too, as the soup was going to be ready for six o'clock and I didn't want to be waiting until eight for dinner!

I poured the gloop out onto a floured counter (on reflection an oiled counter would have been much better, and used my plasterer's scraper to sort of letter fold the puddle, then cut it into three pieces and put them (with great difficulty and laughter) onto a floured piece of parchment on a baking sheet. Shaping consisted of scrunching the sides in a bit so they didn't run into each other or off the sides of the baking sheet.

I sort of poked them a bit to re-distribute the bubbles, as I wasn't even going to attempt to turn them over at this point. And I could have let them proof a bit longer but was getting impatient for dinner, so into a 500F oven they went. Ten minutes, turn and ten more (and by that time the atta flour on the parchment was burning so the smoke alarm went off when I opened the oven to turn the pan. Sigh...)

I only let this cool for about 15 minutes, then sliced up one loaf for dinner. The crumb is moist and glossy with a little bit of olive oil here and there from the oil that was in the container during the ferment. Crust is thin and delicate and the loaf is very squishy. Gorgeous yellow colour from the atta flour too.

This is so good, I ate about half a loaf with my soup. :)

And I've still got two more loaves. Not bad for 500 grams of flour. How can anyone pay money for rubbish supermarket bread when making bread is this cheap and easy!


Pages

Subscribe to RSS - Lazy Loafer's blog