The Fresh Loaf

A Community of Amateur Bakers and Artisan Bread Enthusiasts.

JonJ's blog

January 3, 2025: The Fresh Loaf is moving! Content posted after 5pm Pacific time today will not be migrated. Learn more...

JonJ's picture
JonJ

Should have made this one sooner. Benny has hit on something really lovely here with 100% WW Hokkaido milk breads, and the recipe is simply superb.

This bake was done by following his 2.0 version of the recipe as his later versions seemed to show that a small amount vital wheat gluten was a good thing.

As always there are some deviations. Obviously my flour was different. I used a 'sprouted' hard-white wholemeal flour for this bread. Normally that flour is a little bland and doesn't make much of a crust, but it actually was perfect for this recipe and is actually the locally grown flour with the highest protein that I can find.

Another thing is that my usual sourdough starter seems to be a little bit of a delayed bloomer sometimes on sugary doughs. When I looked at the sweet stiff levain there was growth after 12 or 13 hours, but nothing like Benny showed in his pics:


So, I got a little nervous that this one would just take forever and did substitute 10g of the full-cream milk with some yeast water to act as insurance (taken from the sediment at the bottom of the jar, which I believe to be more potent). I did also keep back 20g of the milk as per the recommendation. I do think that culturing a sweet stiff levain for a few days before the next bake might be prudent for getting a starter that is already acclimatized to enriched doughs.

The other thing is that most of the common loaf pans in my part of the world are broad and flat rather than the classical "Pullman" shape. I do have a Zenker pan which is a little like the Pullman, but that is one huge pan! So, I opted for one of my medium sized pans that is a little broader and fatter - 24cm X 7cm X 13cm, just a touch smaller in volume than Benny's recipe, but I didn't scale down the recipe and kept it the same.

The new video from Benny with the shaping is what finally planted the idea in my mind that I need to make the bread. Shaping was fun, although I did struggle to make 4 identical rolls, as usual could get 3 the same, but the 4th, well, there is always one. And maybe with some experience I'll eventually be able to roll them up so that the centres of the rolls don't stick out on the ends. But the rolls were super tight and strong and could feel that they were ready to give good oven spring when they went into the pan.

When it came to the final proof, I did find that the bread was looking quite ready for baking at about 4 hours after shaping, judging by the aliquot jar:


I could have gone an extra hour (to 5 hours), as the aliquot jar after baking looked like this after baking, but was worried about overflowing the pan spectacularly and still got great oven spring:

There's a chance that the YW gave this a speedier ferment, also, I think using a sprouted flour might have given some boost.


The amazing thing about this bread is I couldn't believe it was 100% whole grain, it is super soft and doesn't have that astringent whole wheat taste that you can sometimes get. Using a hard white flour was a good choice, it turned out, although I probably will throw in some red wheat next time, or try another wholewheat altogether just to see the difference. The smell after baking was particularly intoxicating and the kids and I just hovered near the kitchen waiting long enough for it to cool down to taste. Super bread and super recipe, highly recommended.

-Jon

JonJ's picture
JonJ

Dan's recent questions, and all of the recent discussions about yeast water have made me think of ways of making it more reliable.

With a double build preferment, as was done in the Swiss Farmhouse community bake, yeast water breads can be reliable. We end up waiting to see if the first build of preferments starts to increase in size and show all the signs of active yeast fermentation and then use that to start another preferment which is used for the final bread. It works reliably once we know the first preferment works and because of the high amount of preferment in the final dough the bread bulks and proofs rapidly. The trouble is that it involves advanced planning!

A single build preferment, while not as reliable does work too (however, occasionally it fails to grow, and it is hard to gauge visually if the fizzy yeast water in the fridge has enough active yeast).

But what if we could drop the preferments altogether and just work with the liquid yeast water directly in the final dough? Other bakers, like Caroline seem to be able to get this to work. Maybe they just use a large amount of yeast water; or there is confidence that it is fresh and was fed recently. When I've tried it, it has been haphazard with the occasional 20 hour plus fermentation time, so not reliable for me yet.

The recent experiments with the sediment at the bottom of the yeast water jars for me indicated that it might be possible to use that as a form of 'concentrated' yeast water. It worked well at a high bakers percentage in that basic test - 20g of sediment/slurry had strong raising power.

How would it work as the sole leavening source for a bread? What I like about malt yeast water is that it propagates rapidly and there is no requirement to strain fruit pieces.

For this bread then, I cultured 56g of existing malt yeast water with 71g of malt extract syrup and 710g of water (so a ratio of 1:10 malt extract to water). After 24 hours, even with the jar kept exclusively at fridge temperatures, which I prefer to do, there already seemed to be a large build up of sediment. Wasn't ready to bake then so used it a day later when it was 45 hours from the initial feeding. After siphoning off the top I could get 41g of the concentrated sediment that was settled at the bottom of the jar. It was surprising that it was only 41g - thought it looked like more and maybe I should have left it in the fridge for more that 45 hours to get more sediment.

After siphoning carefully


This 41g was used to make a bread with 400g of flour (so the concentrate was at a baker's percentage of 10.25%). It performed a bit like a slow sourdough, and took 6 hours at 26°C(79°F) before the dough was at about 55% volume increase when it could be shaped and cold retarded overnight. A lot slower than the initial basic test, but the amount used was much lower.

Here's the bread after baking the next day:

(What makes the bottom lift like this on the baking steel? Baked at 230C for the initial part of the bake when it lifted like this; it almost looks like it is hovering on the breadboard!)


The lazy part of me is questioning if this method is worth doing when it is very easy to go and buy a sachet of instant yeast which would have a similar effect. I guess the bread itself, because this is yeast water might be more acidic than with commercial yeast, but don't yet have a pH meter to confirm that! It was certainly nice enough to eat, see the pic for yourself.

I think this approach might be more successful with faster fermentation, and for that would probably need a larger amount of the concentrate and to try it at a baker's percentage of say 20% or higher (but would also have to make sure that the non-diastatic malt added in wouldn't get too high!).

-Jon

JonJ's picture
JonJ

Weet-bix (in South Africa and Australia, or Weetabix in the UK, apparently available in the US too...) is a breakfast cereal of 'biscuits' of wholegrain wheat biscuits. The usual way we eat it in my family is with a sprinkle of sugar on top and then allow it to soak up the milk. It can really soak up the milk. It's quite a comfort food, and would be a great way to increase dietary fibre and be fairly healthy too (if it wasn't for the aforementioned sugar).

Because of the comfort food thing, thought it might be great in bread. I know it is used in biscuit and rusk recipes here. I found this recipe from Australia for a bread made with self-raising flour which gave me some ideas how to create a sourdough bread recipe.

That recipe allowed the weet-bix to soak up the milk overnight and then used that in the dough the next day, so I followed along with the idea making an overnight soaker with some sugar and the raisins too. The soaker had already soaked up all the milk even before it went into the fridge. If I was to rework the recipe I'd use the dry biscuits in the initial dough mix instead. The problem with adding an ingredient that soaks up moisture is similar to the oat porridge recipes, you end up crafting a recipe with a high nominal hydration, or the final dough is of such a low hydration to compensate for the wet soaker that will be eventually added that it is pretty stiff and it is difficult to combine the components together.

This is what happened here, my final dough was pretty stiff, even after it was mixed with the levain. The Weet-bix soaker was added to that and my poor mixer struggled to combine with the stiff dough. I had made a yeast water preferment to act as insurance in case I needed it, so that was also included to try and loosen up the dough mixture.The raisins, walnuts and cinnamon were added at the end to the mixer.  Mixed for a total of 20 minutes.

The resultant dough had a horrid texture, unlike anything I've ever worked with before. From the mixer it went into a Pyrex dish in the proofer, but trying to coil fold it was a nightmare. There was lots of gluten visible, sheeting of the dough, but trying to lift and stretch it didn't work - it was more like working with a rye dough that fails to 'stretch' or show cohesiveness. Someone who was visiting called it a primordial gloop bread.
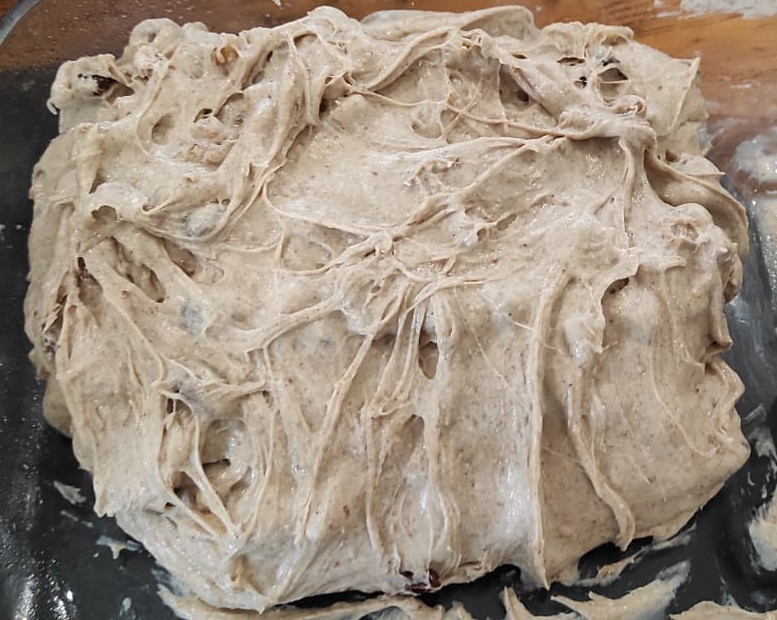

In a moment of temporary insanity of struggling with the gloop I threw it into the large loaf pan (a 30cm Zenker) which was a mistake as the pan was too large, so I ended up with a flat bread. It was baked for 60 minutes in the pan at 200°C(392°F), covered for the first 20 minutes with foil.
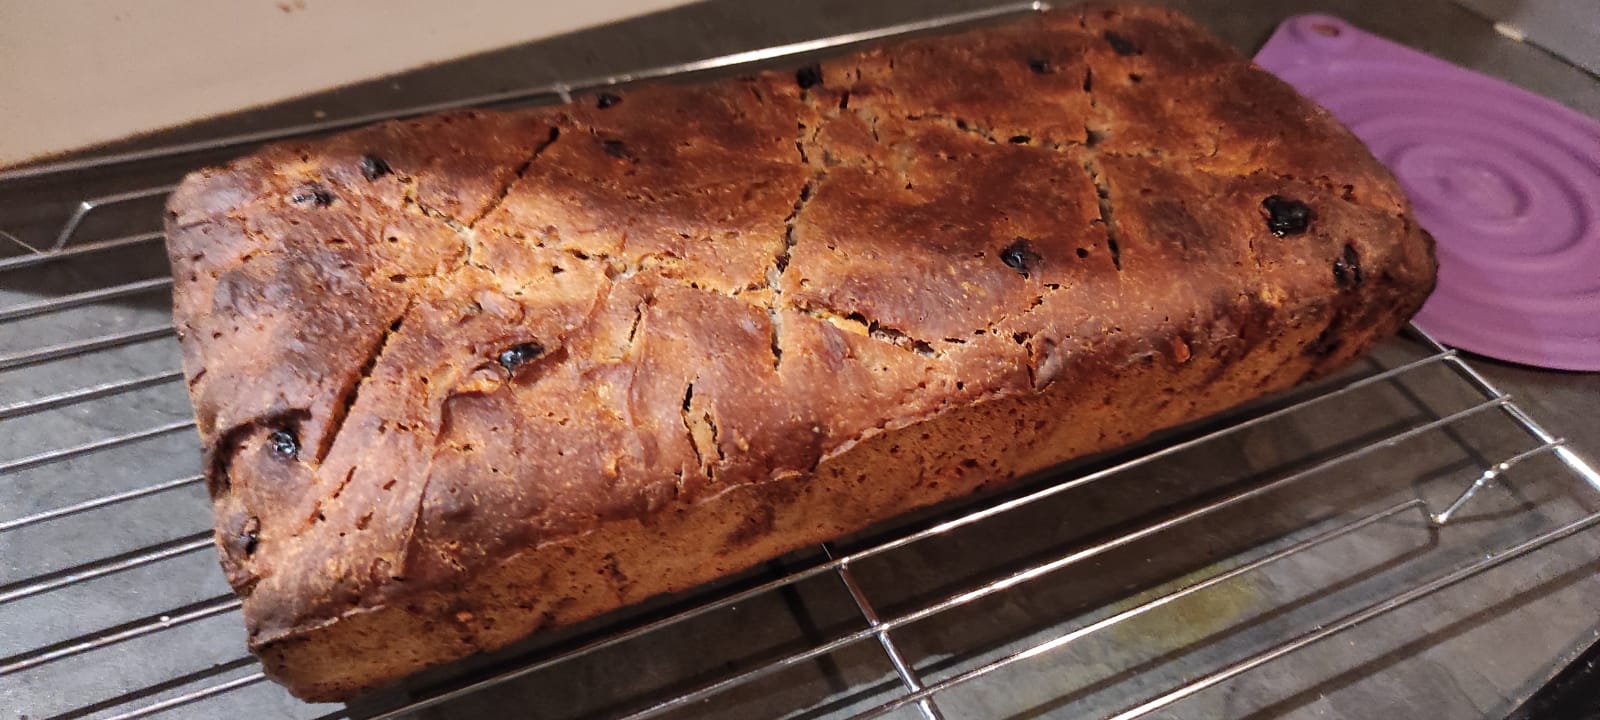
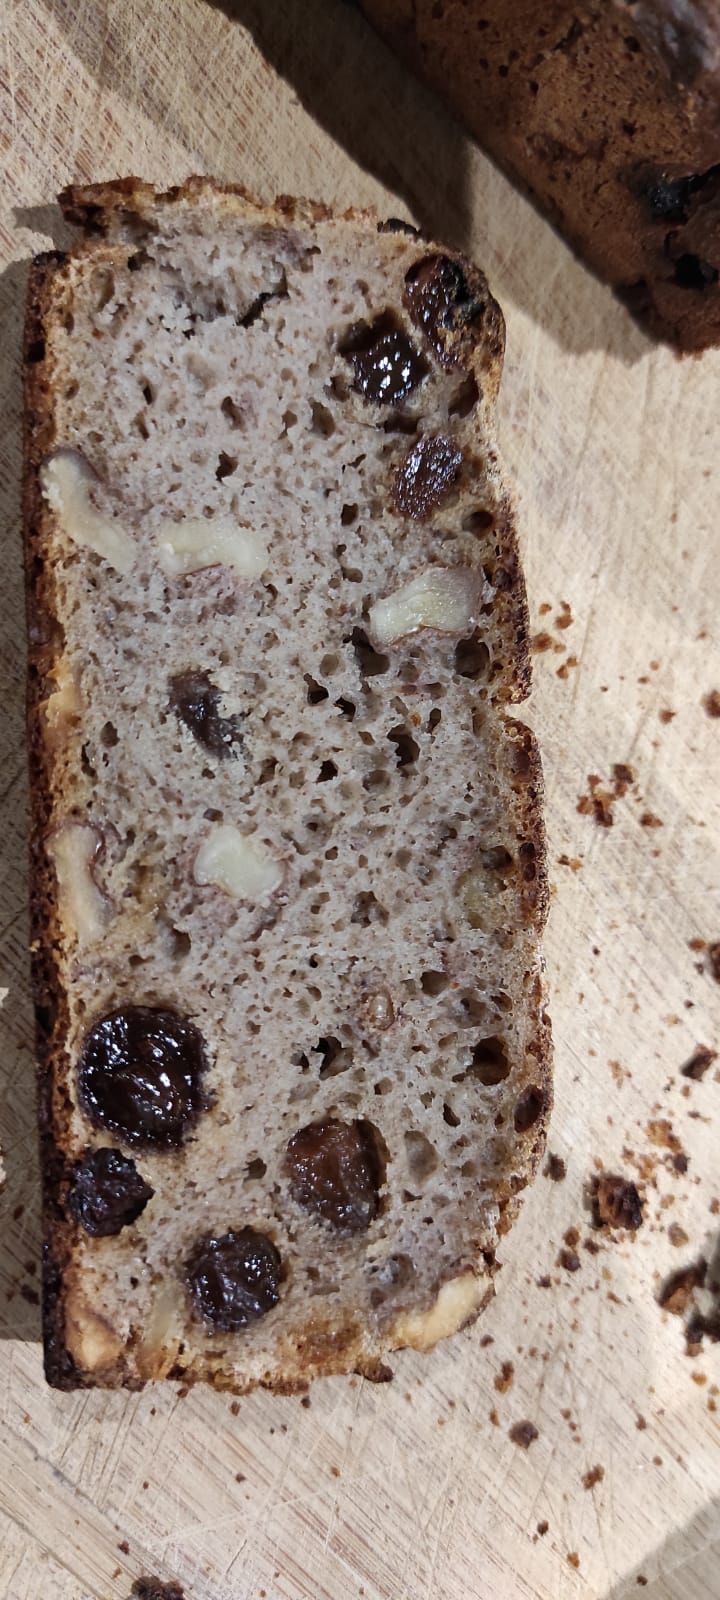
The bread itself is really interesting. In some ways it is like a giant Weet-bix. The crust crackles when you bite it, and the texture of the interior is a little like a creamy weet-bix biscuit that has been allowed to soak up all the milk. Being flat isn't such a bad thing, as it has given me more crust per slice. I do like eating the bread, but on the other hand a whole loaf of it may be a bit much so most of the loaf has now been sliced and frozen. I'll have toast made with it when I need a comfort food snack.
-Jon

JonJ's picture
JonJ

I had all of the best intentions of sticking to the recipe on this one but diverged. Caroline's "39% WW triple levain w/ Holy Trinity add ins Pullman Loaf" intrigued me and I had every intention to make one exactly the same, but then I thought.... well I've got some spelt sprouts growing, why don't I use those instead of the wholewheat? And when it came time to adding the ingredients I realized we'd run out of honey! And my homemade buttermilk, while lovely didn't have a sour taste, it was more like a yoghurt.

Spelt sprouts

2 day old spelt sprouts


Home made buttermilk

The home made buttermilk curds used had the texture and taste of yoghurt rather than the sour buttermilk taste.

So technique: the starter used was my desem starter, revived from being semi-desiccated. I used that to make two levains - white bread flour and rye. Only had 125g of spelt sprout pulp which was added to the initial mix together with 200g of bread flour (instead of the 335g Rouge de Bordeaux fresh milled). And when it came to adding bread flour later 415g of bread flour was used (instead of the 335g of T65). I've got confidence now that sprouted wheat works well in bread, but still am working on how to translate a mass of pulped sprouts into an equivalent mass of wholewheat flour when it comes to calculations. Since we were just out of honey I used 20g of golden syrup to make up for the lack of simple sugars that the 42g of honey would have given. Played it safe though as didn't know if this was a good idea, so only 20g. With hindsight, I should probably have used treacle. The dough went straight from the mixer to the loaf pan, it didn't go into a bowl first, all of the bulking happened in the pan.

Bake time was 55 minutes at 190°C (374°F) followed by an additional 5 minutes out of pan. I did cover it with foil towards the end so that the top wouldn't get too dark.


This was a very nice bread. It was lovely fresh and really nice warm with spreads. Got a bit more sour tasting after a few days. It didn't have much of a wholewheat or spelt taste. I did notice the semolina crunch when I toasted slices of it. All in all, a very easy way to make lots of tasty bread especially if you're the kind who freezes slices. The recipe did remind me a little bit of Maurizio's sandwich bread with tangzhong which has olive oil and honey in it.

-Jon

JonJ's picture
JonJ

David Snyder has previously posted a magnificent recipe for a Buttermilk-Spelt sourdough bread (originally by Cecilia Agni Hadiyanto). This is a tweak of David's recipe to accommodate a large preferment, mostly because I've lately been wanting shorter bulk and proof times on my breads. Since my sourdough starter hadn't been fed for a week in the fridge when I did this one, I also added in a yeast water preferment as an insurance that the bread would rise.


Both preferments were used when they were 8.5 hours old. The formula adjustments that I needed to make to the recipe meant that I used less buttermilk than David did (in order to feed the sourdough preferment with water rather than buttermilk).

Unusually, the sourdough levain had great bubble development and was already 'pourable' after 8.5 hours old whereas the apple yeast water build looked fairly young with poorer bubble development. Probably this was because the apple yeast water from the fridge wasn't as active as the visual fizz seemed to suggest.

I've had a few problems in the past with spelt overextending and spreading, even turning into a dough 'soup', so was a little extra cautious, I added in 10g of VWG to be increase the chance of success, and actually ended up using 30g less of the buttermilk than I intended because I had held some back.

Even so, there were a few minutes when I was watching the mixer worrying that it wouldn't come together, but after 8 minutes on the dough hook it started to look like it would clean the bowl and the salt was added only at that point which tightened the gluten noticeably. I gave it 9.5 minutes on the dough hook in total and tried to do good gluten development upfront because of the speedy ferment.

This bread had 2 hours of bulk ferment at 27°C/80°F (with a single fairly tight fold about halfway through), and a further 40 minutes for final proof (on the wine-bottle couche) before immediately baking. The aliquot jar showed around 55% volume increase at the time of shaping and 105% when it went into the oven, where I baked on a baking steel.

The bread came out quite dark, even though I only baked it for 38 minutes. There was nice oven spring and an even crumb.


David is right, this bread makes for exceptional eating and I can see myself making it again and again. The buttermilk made it a bit sour and the ~40% wholemeal spelt (a bit lower in this version) gave it a bit of nuttiness. In fact, it tasted a lot like a rye. My personal jury is out if I prefer it over Caroline's holy trio of Olive-oil/buttermilk/honey which tastes just a wee bit similar, although sweeter, so I guess I'll have to repeat this exercise again but with some olive oil and honey!

JonJ's picture
JonJ


Cherry breads make me think of cherry cake. I do love a good Madeira cake. They're super sweet and very much a cake. And yet, we had a box of cherries in the fridge, probably too much for us to eat. Which made them just too tempting to use as a regular inclusion in a bread, not a cake.

It was surprising to me, but this worked quite well. I really enjoyed eating this bread, and although the cherries lost some of their flavour they were still great to eat in a bread, especially when they were used together with a pecan inclusion.


This is also the first bread with both yeast water and sourdough that worked for me (previously I'd tried yeast water as the liquid for feeding the sourdough which wasn't all that different to using just plain water). This time I made both a yeast water build and a sourdough levain at the same time and used them both 9 hours later in the final dough.

RYW build

Sourdough levain

These two photographs taken through the bottom of the glass containers illustrate the different degrees of development of these two preferments after this period of time (photos are actually from a later bread, but looked very similar for this loaf). Clearly the yeast water build (top pic) is much more advanced than the sourdough levain (bottom pic), which still looks relatively 'young' even after 9 hours. I'm assuming the levain was young because of the high ratio feed (1:8:12, starter:water:flour) and also that it was a stiff starter.

Using the two preferments together seems to have been a success. Fermentation was fast and the total time from adding the preferments to baking was 3 hours (2 hours bulk plus 1 hour final proof). The aliquot showed 30% at end of bulk and 80% at time of baking.

This was a lovely quick bread to make. There was good oven spring and a crispy crust with an interesting pattern from allowing the seams to open.

JonJ's picture
JonJ

It seems to be a fashion here, but it was my turn to try out Benny's version of Eric's rye.

The taste was very mild, even though I used wholemeal rye flour. I think that perhaps my rye sour wasn't sour enough - started with a very sour 50g of rye starter so thought that 4 hours of 27 deg C would be enough to get a rye sour, it sure smelt sour but obviously needed more time to develop a stronger sour taste.

Texture was lovely, very soft and just like I'd expect for a deli loaf.


Next time I'll try adding Caroline's "trio" of EVOO/buttermilk/honey to it, and will be sure to use the raisin YW too. Might even consider some malt then. I'm not used to instant yeast, forgot to degas the dough prior to shaping!

The separate gluten development process is a winner. Had my doubts at first when the mixer got stuck into it, but old lady Kenwood eventually managed to produce a beautiful supple dough.

Oven spring surprised me! Think I should have scored horizontally across the loaves instead of at an angle.

I'm a beginner when it comes to corn starch glaze. I painted it on 10 minutes before the end of the bake, at least I thought it was 10 minutes before but the bake needed to go longer and so repeated again. It seems Benny paints it on after the loaf comes out the oven though?

I like the winebottle couche idea, even though it is a little dangerous in that there was a bottle or two of unopened wine left out there on the counter just begging to be opened.

Winebottle couch, ready for drinking


-Jon

JonJ's picture
JonJ

Just wanted to drop a note about how much I enjoyed both making and eating this bread.

This is a quality recipe. Great posts from David and Hans and lots of techniques and tricks in the comments to their posts meant this was like following a well charted path.

This bread surprised me by it's mildness. Was a pleasure to eat. Even the kids got stuck into it!

Technique wise I was fairly faithful to the recipe although I did not initially have enough rye sour, so did a two step build with the second step fed 1:1:1 and then given a further 3.5 hours. Even after that was still around 30g short of rye sour when compared to the recipe, but all was fine. Used my "desem" starter for this bread rather than my regular starter. A  60:40 blend of rye wholemeal:sifted rye was made in order to make a 'medium' rye flour, next time I might adjust that ratio to 70:30 as there was a little bit of guesswork for the extraction rate of the sifted rye flour.

In some ways this bread was a healing experience for me. In my youth I had a bit of a love/hate relationship with rye, loved it as this was a bread my family loved but also some of that caraway seeded rye was just a little too overwhelming. As I grew older rye became this superb bread to take with on hikes as it lasted so well. And now, as I get more into bread making I want to explore rye further, especially some of the interesting Nordic, Baltic and Russian ryes that seem to be so beloved by the people for whom they're their first bread and are tied to family and homeland.

JonJ's picture
JonJ

Formula

We all seem to not have enough time in our lives lately. And it is worse when it comes to finding time to fit natural fermentation into our days! One thing I've been loving about the yeast water bakes is how quickly fermentation takes place. A lot of that speed is due to the sheer amount of levain that is added into the final dough with a large part of the flour coming from the preferment.

So, I've also been experimenting lately with high inoculations to see if I can also make sourdough bread in a way that is more convenient for me. I know that there are some bakers (like Peter Reinhart) who have many recipes with a large amount of pre-fermented flour. This bread was made with 48% pre-fermented flour (153% inoculation).

To get this high inoculation I needed a lot of levain. So, I took the approach of emulating what I do with the yeast water - build up the levain in two steps at a hydration of about 63%. When I looked at my starter in the morning it looked like it had gone past its peak, so I added an extra third preferment step at 100% hydration just to commence with a starter at peak. All of this levain building does kind of defeat the purpose of making the bread in a convenient way, but hey this one was another experiment! Preferment #1 had 2 hours in the proofer, then was all used to feed #2 which had 2.5 hours, and the final preferment also had 2.5 hours, so they were all fairly young when they were used. I took care to feed with warmer water - at 36°C (97°F) - and the proofer was set to 27°C (80°F).

The bulk ferment time was a little like the yeast water - 2.5 hours of bulk proofing, followed by 1.5 hours final proof and then immediately baked. The aliquot was at 38% volume increase at the time of shaping and 105% at the end of final proof.

The rustic look was quite lovely (thanks to seam side down in banneton).

This was quite a flavourful bread - the parmesan, olives and especially the origanum (sweet marjoram) bring a lot of flavour, and I might halve the origanum next time. It is also quite difficult to tell if the bread was lacking a sourdough tang because of the strong herb taste.

I'm not completely convinced any more that a 20% innoculation, as is the default in so many recipes, is actually my ideal anymore. Although, my baking notes do testify that high innoculations, like this one, do involve  some work in feeding the preferments.

-Jon

3 slices

Olives in slices

JonJ's picture
JonJ

As Dan said, "bad babka" is a misnomer, and I also happen to think a "bad blueberry" bread is a misnomer. But I'm biased in liking fruit in my breads, and this particular combination of fresh blueberries and lemon zest in the bread is lovely.

As usual, this is a yeast water bread, this time made with apple yeast water. And, like last time, I only did a single build of the yeast water 'levain' before including it in the bake as I could tell that the fridge jar of apple yeast water was suitably fizzy and a double build didn't seem to be necessary. To 137g of apple yeast water I added two different kinds of wholemeal flour: 49g of a hard white wheat wholemeal and 50g of atta flour. To this was also added 129g of a strong bread flour, and it was combined with a danish whisk and finished off by hand kneading and then left for about 11.5 hours to overnight in the proofer at 27°C (80°F) before using in the final dough.

Once again the main recipe is the Hamelman recipe from the community bake. Other than using the single build described above the other main deviation was that I didn't use the same inclusions as in the community bake but instead used 80g of fresh unprocessed (but washed) blueberries, as well as the fresh zest of one lemon, about 3 tsp worth.

I got something right this time when preparing the final dough - did a short 20 minute autolyse of the flour and water before adding in the levain build and this made all the difference. It only needed about 3 minutes in the stand mixer before the bowl was clean, although I left it running for a total of 8 minutes before stopping the mixer; the salt was added about half way through by pouring it slowly into the running mixer.

Fermentation times were similar or faster than the fast times I've seen before with yeast water: 1h30 bulk followed by 1h10 final proof, all done in the proofer at 27°C (80°F). The aliquot was estimated at 50% at the time of shaping and reached up to 225% at the end.

Once again seam side DOWN in the banneton. Struggled to add the seed topping to it because of that. But this time around was so much better! It puffed up into a ball in the banneton during the final proofing. Loading it into the dutch oven was difficult. Even the 'heave ho' to lift in the parchment seemed to change the shape it was so jiggly. I was so worried that I'd get another ugly flat bread that 6 minutes into the bake I removed the hot dutch oven, opened it and did a small cross score just to ensure that there was some lift, and yes there was lift! I've actually already made another bread after this one, and for that I was bold enough to not do any 'panic' scoring and that one seemed to have achieved a nice lift so I'm beginning to trust the seam side down method more now.

Blueberry and lemon is amazing, never tried the combination before. Also think I've got a particularly good bag of lemons at the moment as they were also great in the parmesan bread. I should probably have extracted the juice and just used the blueberry skins, there might have been less cavitation. On the other hand the juice brought extra flavour to the loaf.

-Jon

Small 'cross score' added during the bake

Pages

Subscribe to RSS - JonJ's blog