The Fresh Loaf

A Community of Amateur Bakers and Artisan Bread Enthusiasts.

davidjm's blog

davidjm's picture
davidjm


Secrets to successful Clay Oven Usage

I'm still relatively new to this, but I haven't seen the information below in other places.  I welcome your comments and suggestions from your experiences as well.  They will benefit the whole community!

First, go ahead and buy the book by Kiko Denzer "Build your own earth ovens" (amazon.com $15)

Insulated Hearth Subfloor:

In Kiko's book, he recommends using plain sand as a subfloor for the hearth.  That is the cheapest way to do it, but for $50 more, you can have an insulated subfloor that will hold heat much better than sand.  Build a form the size of the top of you base at least 2" thick.  Buy a bag of Portland cement and 2 big bags of vermiculite from a plant nursery.  Mix the two at a 5:1 ratio (vermiculite:Portland) dry.  Then add water and mix until you get an oatmeal consistency.  Pour into the form.  Smooth out the top.  Make sure it's level!  Let dry for at least a week.  Then you will set your fire brick directly on top without mortar.  The clay walls will hold it in.  Ideally, you would have 4-5" thick subfloor.  I found that I loose heat out the floor faster than the walls with 2" thick subfloor.

Oven Dome:

Kiko, in one of his blogs, actually says the ideal height of the dome, no matter the size of the floor, is 16".  He plans to add it to the next edition of his book. In the present edition, he gives a percentage formula. 

Firing the oven:

After a couple miserable failures, and combing the web for advice, I finally figured out how to successfully fire a clay oven.  Here's what I learned.

You really need good seasoned oak to make it get hot enough. 

Buy an Infra-red thermometer (amazon.com $80).  It is worth it.  You'll need to chart out the heating behavior of your oven at least one time.  Then you can use it to give you a frame of reference during a heating. 

And, plan to spend at least 3 -5 hrs heating it up, depending on the size of your oven.  My oven floor is 28" wide by 31" deep, and 20" high ceiling inside.  It is a relatively large oven.  I found that I have to fire the oven for 4+ hrs to get the temp high enough. 

Think in terms of heat saturation of the clay walls and floor.  Noah Elbers at Orchard Hill Breadworks (orchardhillbreadworks.com) says he fired his clay oven 6 hrs before he attained proper heat saturation. 

The outside walls are a good guide as to heat saturation.  In my oven, I need the outside walls to gain 100 degrees in temp before I am near having proper saturation; even more if I want to bake a larger quantity.  (This is where an IR thermometer comes in handy!)

I think firing time depends on how much you are baking too.  If you are only doing a couple pizzas and no breads, then you don't need as much heating time.  But if you're going to maximize your baking potential, you'll want a long hot heating.

I took hundreds of data points of my oven during a firing, and I put my findings into a graph.
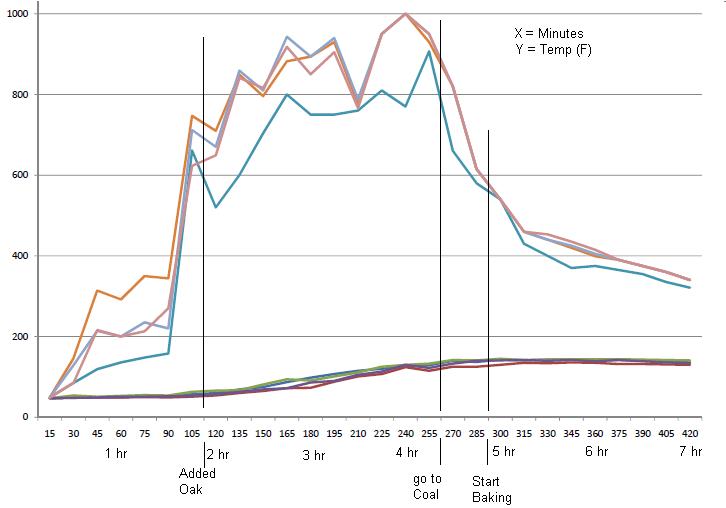
(The upper lines are inside temps.  The lower lines are outside temps.)

Couple observations from the graph:

  1. You see a big jump in internal temp at 75 minutes when I put in a few pieces of nice seasoned oak.  After which time, the internal temp continues to grow.
  2. Inside temp reached 1000+ degrees F at its peak.
  3. The rate of heating of the outside increased after the good oak was added and steadily gained in temp until the fire went down to coals.  (I rake the coals across the floor and let sit for 30 min to heat the floor uniformly.)
  4. After that time, the outside temp remained relatively constant.
  5. You can see clearly how after the fire is taken down to coal at 255 minutes (or 4:15 into firing), we immediately start losing inside temp at a steep rate.  Coals stayed down for 30 minutes and then raked out. 
  6. Once the oven inside temp reaches around 450, we see a leveling off of the rate of cooling.  I think that if I had fired the oven another hour, the inside temp would have leveled off at a higher temperature.  That would have given me addition time in the pizza and bread baking range.  As it was, I got about 90 minutes worth of baking time on that firing.  My max capacity in that firing was: 14 pizzas, seven 30" baguettes, and 6 whole grain loaves.

I hope this is helpful.

Let's hear some of your secrets!

David


davidjm's picture
davidjm

I was up for a challenge recently, so I decided to try the Poilane-Style Miche from Peter Reinhart's "Bread Baker's Apprentice."  It's a 10 cup wheat, 100% wild yeast loaf.  It is also the cover picture of the book.  What a loaf of bread!

I ended up doing a variation on the recipe.  After 6 days of working on it, the final loaf turned out much better than I could have hoped.

As you can see, it rose much more than I expected.  I had made a deep cut in a pound-sign pattern, and the crust still broke at the edges from rising.  I have taken to using the "hearth-baking" steam technique outlined in Reinhart's book.  So the crust was thick and had two discernable layers on the pallate:  The outside was crispy, while the inside part of the crust was chewey (also a feature of sour-dough, as I understand it).

The crumb was somewhat irregular, but didn't have the big holes.  I don't think I could have expected it though given the style of loaf.  It was chewy, cake-like, and moist. 

The taste was really tangy, because I purposefully increased the percentage of starter.  I was concerned about it rising enough.  Although, next time, I think instead of doubling it, I'll only do 1.5 x's as much starter because it was a bit too tangy.  Here is my short version of the variation I followed:

Seed culture:

  1. One cup of rye to make seed culture
  2. next day (or when ready) add another cup of rye (1/2 cup water)
  3. Remove one cup of 2 cup mix and add another cup of rye
  4. Repeat step 3 on the fourth day

Barm:

  1. Take 2 cups of rye starter and add: 2.5 cups white and 2 cups water.
  2. Refrigerate overnight.  Ready next day.

Firm Starter:

  1. One-half of Barm (which amounts to 2 cups or more) + 2 cups wheat + 1/2 cup water
  2. Set it out and let rise.  Then refrigerate overnight.

Dough:

  1. Add all of starter + 6 or more cups of wheat + 3 and 1/4 tsp salt + 2 and 3/4 cups - 3 cups of water.  (My final loaf was an 8 cup total mix.  I followed the recipe, but it wasn't enough water for 10 cups.  So I've adjusted this variation to have more water and thus more flour.)
  2. I proofed it in a large mixing bowl with a towel lining.  It worked great.
  3. Two rises at 70 degrees F (it's about winter here) until it doubles.
  4. Punch back very gently.  I just lifted the dough out of the bowl and flipped it upside down to punch back.  Reinhart seems to think with these style loaves, it is best not to completely de-gas it.  It worked for me.

So there you go.  A great tasting loaf with nothing but flour, salt, and water.  Praise God!  Enjoy with a cup of Irish Breakfast tea and a steaming bowl of oatmeal.

davidjm's picture
davidjm

Since most break-baking professionals tend to emulate French bakers, I thought it might be instructive to post this picture and present some questions I am unable to answer at this time. 

We recently spend three weeks in France (in Northern Brittany and Paris), which really raised the bar of my bread baking aspirations.  Take the following sour-dough rye loaf I purchased in the "inter-marche" (normal grocery store) in Brittany, France.  Notice the shape of the loaf.  It is triangular.  In France, each bakery has characteristic shapes, sizes, and slashing patterns.  This was the only time I ever saw a shape like this.  The crumb was light and hole-y, but still had the "cake-like" texture characteristic of good rye loaves.  There are a few things I would like to know:

1. How did the baker retain the shape of this loaf while still maintaining hydration?

2. There were no slashes, but the crust was also not broken.  How?  Is that a feature of hydration and extensibility?

3. In France, to be considered rye, they have to have a certain percentage of rye flour to white.  This bread had a crumb that I cannot replicate with the 50:50 rye:white mix I use in my siegle au levain.  How did they make a nice dark rye loaf and keep an airy crumb?


Siegle au Levain


Subscribe to RSS - davidjm's blog